2012 NISSAN XTERRA tires
[x] Cancel search: tiresPage 316 of 341
Steps for determining correct load
limit
1. Locate the statement “The combinedweight of occupants and cargo
should never exceed XXX kg or XXX
lbs” on your vehicle’s placard.
2. Determine the combined weight of the driver and passengers that will be
riding in your vehicle.
3. Subtract the combined weight of the driver and passengers from XXX kg
or XXX lbs.
4. The resulting figure equals the avail- able amount of cargo and luggage
load capacity. For example, if the
XXX amount equals 1,400 lbs. and
there will be five 150 lb. passengers
in your vehicle, the amount of avail-
able cargo and luggage load capac-
ity is 650 lbs. (1,400-750 (5 X 150)
= 650 lbs) or (640-340 (5 X 70) =
300 kg.) 5. Determine the combined weight of
luggage and cargo being loaded on
the vehicle. That weight may not
safely exceed the available cargo and
luggage load capacity calculated in
Step 4.
6. If your vehicle will be towing a trailer, load from your trailer will be trans-
ferred to your vehicle. Consult this
manual to determine how this re-
duces the available cargo and lug-
gage load capacity of your vehicle.
Before driving a loaded vehicle, confirm
that you do not exceed the Gross Vehicle
Weight Rating (GVWR) or the Gross Axle
Weight Rating (GAWR) for your vehicle.
See “Measurement of weights” later in
this section.
Also check tires for proper inflation pres-
sures. See the Tire and Loading Informa-
tion label.
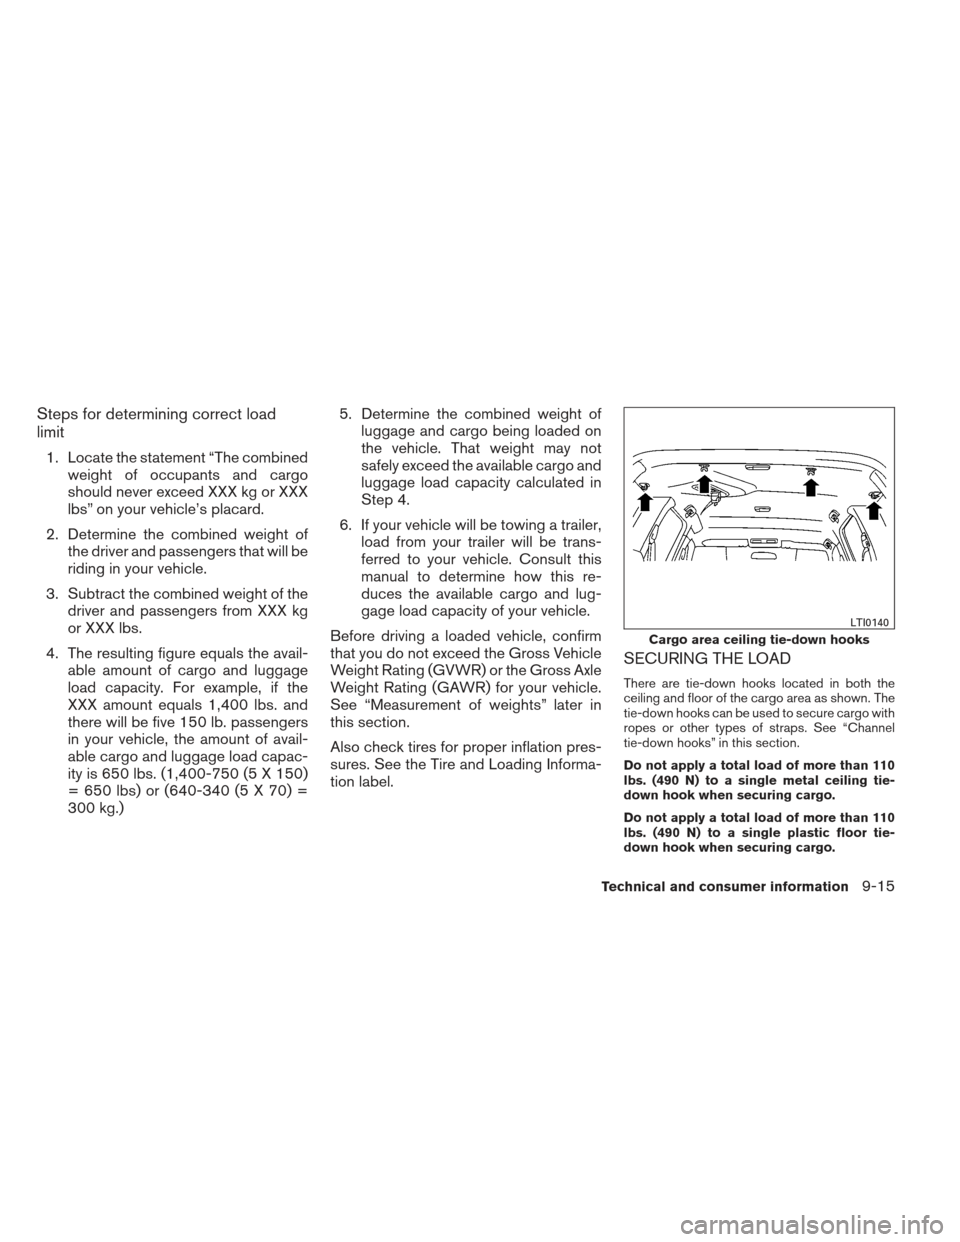
SECURING THE LOAD
There are tie-down hooks located in both the
ceiling and floor of the cargo area as shown. The
tie-down hooks can be used to secure cargo with
ropes or other types of straps. See “Channel
tie-down hooks” in this section.
Do not apply a total load of more than 110
lbs. (490 N) to a single metal ceiling tie-
down hook when securing cargo.
Do not apply a total load of more than 110
lbs. (490 N) to a single plastic floor tie-
down hook when securing cargo.
Cargo area ceiling tie-down hooks
LTI0140
Technical and consumer information9-15
Page 326 of 341
●Do not modify the vehicle exhaust sys-
tem, brake system, etc. to install a
trailer hitch.
● To reduce the possibility of additional
damage if your vehicle is struck from
the rear, where practical, remove the
receiver when not in use.
● After the hitch is removed, seal the bolt
holes to prevent exhaust fumes, water
or dust from entering the passenger
compartment.
● Regularly check that all trailer hitch
mounting bolts are securely mounted.
Tire pressures
● When towing a trailer, inflate the ve-
hicle tires to the recommended cold
tire pressure indicated on the Tire
and Loading Information label.
● Trailer tire condition, size, load rating
and proper inflation pressure should
be in accordance with the trailer and
tire manufacturer’s specifications.
Safety chains
Always use suitable safety chains between your
vehicle and the trailer. The safety chains should
be crossed and should be attached to the hitch,
not to the vehicle bumper or axle. Be sure to leave
enough slack in the chains to permit turning
corners.
Trailer lights
CAUTION
When splicing into the vehicle electrical
system, a commercially available power-
type module/converter must be used to
provide power for all trailer lighting. This
unit uses the vehicle battery as a direct
power source for all trailer lights while
using the vehicle tail light, stoplight and
turn signal circuits as a signal source. The
module/converter must draw no more
that 15 milliamps from the stop and tail
lamp circuits. Using a module/converter
that exceeds these power requirements
may damage the vehicle’s electrical sys-
tem. See a reputable trailer dealer to ob-
tain the proper equipment and to have it
installed. Trailer lights should comply with federal and/or
local regulations. For assistance in hooking up
trailer lights, contact a NISSAN dealer or repu-
table trailer dealer. Vehicles equipped with the
optional trailer tow package are equipped with a
7-pin trailer harness connector. A NISSAN 7–pin
tow harness kit is available from your dealer. If
your trailer is equipped with a flat 4-pin connec-
tor, an adapter will be needed to connect the
trailer lights to the vehicle. Adapters are available
at auto parts stores and hitch retailers.Trailer brakes
When towing a trailer load of 3,500 lbs.
(1,587 kg) or more, trailers with a brake
system MUST be used.
However, most states
require a separate braking system on trailers with
a loaded weight above a specific amount. Make
sure the trailer meets the local regulations and
the regulations where you plan to tow.
Several types of braking systems are available.
Surge Brakes - The surge brake actuator is
mounted on the trailer tongue with a hydraulic line
running to each trailer wheel. Surge brakes are
activated by the trailer pushing against the hitch
ball when the tow vehicle is braking. Hydraulic
surge brakes are common on rental trailers and
some boat trailers. In this type of system, there is
no hydraulic or electric connection for brake op-
eration between the tow vehicle and the trailer.
Technical and consumer information9-25
Page 330 of 341
Manual Transmission (if so equipped)
●Always tow with the manual transmission in
Neutral.
● On 4-wheel drive vehicles, place the transfer
case in the 2H range. Failure to do so will
cause the powertrain to bind up.
● After towing 500 miles (805 km) , start and
idle the engine with the transmission in Neu-
tral for two minutes. Failure to idle the engine
after every 500 miles (805 km) of towing
may cause damage to internal transmission
parts.
Automatic Transmission (if so
equipped)
To tow a vehicle equipped with an automatic
transmission, an appropriate vehicle dolly MUST
be placed under the towed vehicle’s drive
wheels. Always follow the dolly manufacturer’s
recommendations when using their product. DOT (Department of Transportation) Quality
Grades: All passenger car tires must conform to
federal safety requirements in addition to these
grades.
Quality grades can be found where applicable on
the tire sidewall between tread shoulder and
maximum section width. For example:
Treadwear 200 Traction AA Temperature A
Treadwear
The treadwear grade is a comparative rating
based on the wear rate of the tire when tested
under controlled conditions on a specified gov-
ernment test course. For example, a tire graded
150 would wear one and one-half (1 1/2) times
as well on the government course as a tire graded
100. The relative performance of tires depends
upon the actual conditions of their use, however,
and may depart significantly from the norm due to
variations in driving habits, service practices and
differences in road characteristics and climate.
Traction AA, A, B and C
The traction grades, from highest to lowest, are
AA, A, B, and C. Those grades represent the
tire’s ability to stop on wet pavement as mea-
sured under controlled conditions on specified
government test surfaces of asphalt and con-
crete. A tire marked C may have poor traction
performance.
WARNING
The traction grade assigned to this tire is
based on straight-ahead braking traction
tests, and does not include acceleration,
cornering, hydroplaning, or peak traction
characteristics.
Temperature A, B and C
The temperature grades are A (the highest) , B, and
C, representing the tire’s resistance to the genera-
tion of heat, and its ability to dissipate heat when
tested under controlled conditions on a specified
indoor laboratory test wheel. Sustained high tem-
perature can cause the material of the tire to de-
generate and reduce tire life, and excessive tem-
perature can lead to sudden tire failure. The grade
C corresponds to a level of performance which all
passenger car tires must meet under the Federal
Motor Safety Standard No. 109. Grades B and A
represent higher levels of performance on the labo-
ratory test wheel than the minimum required by law.
WARNING
The temperature grade for this tire is estab-
lished for a tire that is properly inflated and
not overloaded. Excessive speed, under-
inflation, or excessive loading, either sepa-
rately or in combination, can cause heat
build-up and possible tire failure.
UNIFORM TIRE QUALITY GRADING
Technical and consumer information9-29
Page 339 of 341
Temperature gaugeEngine coolant temperature gauge .....2-6
Theft (NISSAN vehicle immobilizer system) ,
engine start .............2-24,3-2,5-11
Three-way catalyst ................5-2
Tilting steering wheel ..............3-12
Tire Flat tire .....................6-2
Spare tire ...................6-4
Tire and Loading Information label .....9-12
Tire chains ..................8-39
Tireplacard..................9-12
Tirepressure.................8-32
Tire rotation..................8-39
Tires of 4-wheel drive ............8-41
Types of tires .................8-38
Uniform tire quality grading .........9-29
Wheels and tires ...............8-32
Wheel/tire size .................9-9
Tire pressure Low tire pressure warning light .......2-16
Tire Pressure Monitoring System (TPMS) ....5-3
Top tether strap child restraint .........1-30
Towing 2-wheel drive models ............6-13
4-wheel drive models ............6-14
Flattowing..................9-28
Towingload/specification..........9-22
Towtrucktowing...............6-12
Trailertowing.................9-19
Transmission Driving with automatic transmission ....5-13
Driving with manual transmission ......5-18
Travel (See registering your vehicle in another
country) ......................9-10
Trip computer ...................2-9 Trip odometer
...................2-4
Turn signal switch ................2-29
U
Uniform tire quality grading ...........9-29
V
Vanity mirror ...................3-13
Variable voltage control system .........8-16
Vehicle dimensions and weights .........9-9
Vehicle dynamic control (VDC) off switch . . .2-32
Vehicle dynamic control (VDC) system .....5-35
Vehicle identification ...............9-10
Vehicle identification number (VIN)
(Chassis number) ................9-10
Vehicle identification number (VIN) plate ....9-10
Vehicle loading information ...........9-13
Vehicle recovery .................6-14
Vehicle security system .............2-23
Vehicle security system (NISSAN vehicle immobi-
lizer system) , engine start ......2-24,3-2,5-11
Ventilators .....................4-2
Visors.......................3-12
Voltmeter......................2-8
W
Warning 4WDwarninglight..............2-16
Air bag warning light .........1-59,2-18
Anti-lock brake warning light ........2-14Battery charge warning light
........2-15
Brake warning light .............2-15
Door open warning light ...........2-15
Engine oil pressure warning light ......2-16
Hazard warning flasher switch .......2-31
Low
fuel warning light ............2-16
Low tire pressure warning light .......2-16
Low windshield-washer fluid warning
light......................2-18
Passenger air bag and status light .....1-53
Seatbeltwarninglight............2-18
Vehicle security system ...........2-23
Warning/indicator lights and audible
reminders...................2-13
Warning labels (for SRS) ..........1-58
Warninglights..................2-13
Washer switch Rear window wiper and washer
switches...................2-26
Windshield wiper and washer switch . . .2-25
Weights (See dimensions and weights) .....9-9
Wheels and tires .................8-32
Wheel/tire size ...................9-9
When traveling or registering your vehicle in
anothercountry .................9-10
Windows Locking passengers’ windows .......2-47
Power rear windows .............2-47
Power windows ...............2-46
Rear power windows ............2-47
Windshield-washer fluid .............8-13
Windshield wiper and washer switch .....2-25
Wiper Rear window wiper and washer switches .2-26
Windshield wiper and washer switch . . .2-25
Wiperblades.................8-19
10-6
Page 340 of 341
RECOMMENDED FUEL:
Use unleaded regular gasoline with an octane
rating of at least 87 AKI (Anti-Knock Index) num-
ber (Research octane number 91) .
CAUTION
●Using a fuel other than that specified
could adversely affect the emission
control system, and may also affect the
warranty coverage.
● Under no circumstances should a
leaded gasoline be used, because this
will damage the three-way catalyst.
● Do not use E-85 fuel in your vehicle.
Your vehicle is not designed to run on
E-85 fuel. Using E-85 fuel can damage
the fuel system components and is not
covered by the NISSAN new vehicle lim-
ited warranty.
For additional information, see “Capacities and
recommended fuel/lubricants” in the “Technical
and consumer information” section.
RECOMMENDED ENGINE OIL:
● Engine oil with API Certification Mark
● Viscosity SAE 5W-30
See “Engine oil and oil filter recommendation” in
the “Technical and consumer information” sec-
tion of this manual.
COLD TIRE PRESSURE:
See Tire and Loading Information label.
The label is typically located on the driver side
center pillar or on the driver’s door. For additional
information, see “Wheels and tires” in the “Main-
tenance and do-it-yourself” section of this
manual.
RECOMMENDED NEW VEHICLE
BREAK-IN PROCEDURE:
During the first 1,200 miles (2,000 km) of vehicle
use, follow the recommendations outlined in the
“Break-in schedule” information found in the
“Starting and driving” section of this manual. Fol-
low these recommendations for the future reli-
ability and economy of your new vehicle. Failure
to follow these recommendations may result in
vehicle damage or shortened engine life.
GAS STATION INFORMATION