2012 NISSAN QASHQAI Reverse
[x] Cancel search: ReversePage 72 of 297
Downloaded from www.Manualslib.com manuals search engine REAR WINDOW
WARNING
In freezing temperatures the washer solution
may freeze on the rear window and obscure your
vision. Warm the rear window with the rear win-
dow defogger before you wash the rear window.
CAUTION
Do not operate the washer continuously for
more than 15 seconds.
Do not operate the washer if the reservoir
tank is empty or frozen.
The rear window wiper and washer can be oper-
ated when the ignition switch is in the ON position.
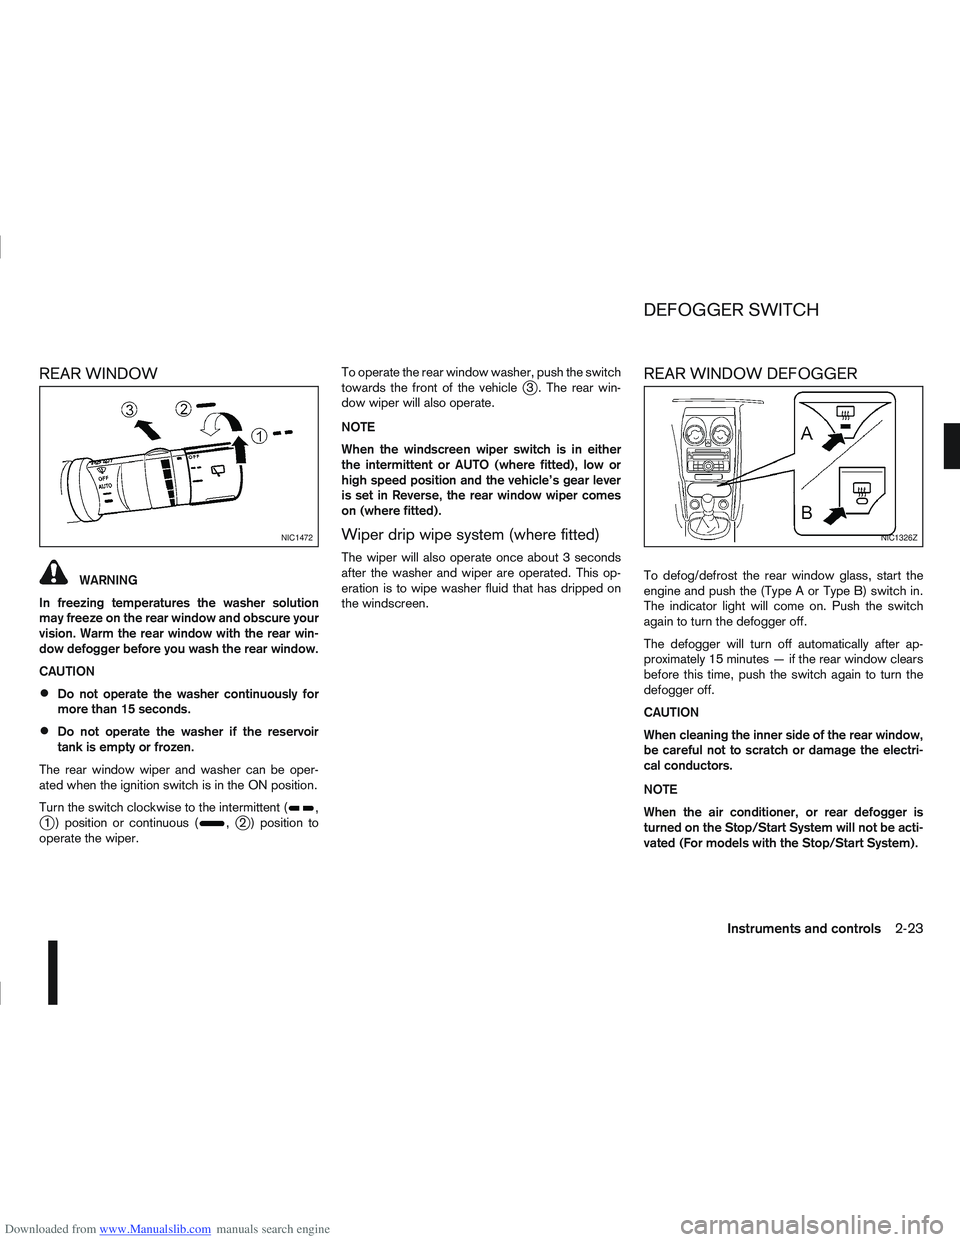
Turn the switch clockwise to the intermittent (
,j1 ) position or continuous (,j2 ) position to
operate the wiper. To operate the rear window washer, push the switch
towards the front of the vehicle
j3 . The rear win-
dow wiper will also operate.
NOTE
When the windscreen wiper switch is in either
the intermittent or AUTO (where fitted), low or
high speed position and the vehicle’s gear lever
is set in Reverse, the rear window wiper comes
on (where fitted).
Wiper drip wipe system (where fitted)
The wiper will also operate once about 3 seconds
after the washer and wiper are operated. This op-
eration is to wipe washer fluid that has dripped on
the windscreen.
REAR WINDOW DEFOGGER
To defog/defrost the rear window glass, start the
engine and push the (Type A or Type B) switch in.
The indicator light will come on. Push the switch
again to turn the defogger off.
The defogger will turn off automatically after ap-
proximately 15 minutes — if the rear window clears
before this time, push the switch again to turn the
defogger off.
CAUTION
When cleaning the inner side of the rear window,
be careful not to scratch or damage the electri-
cal conductors.
NOTE
When the air conditioner, or rear defogger is
turned on the Stop/Start System will not be acti-
vated (For models with the Stop/Start System).
NIC1472NIC1326Z
DEFOGGER SWITCH
Instruments and controls2-23
Page 84 of 297
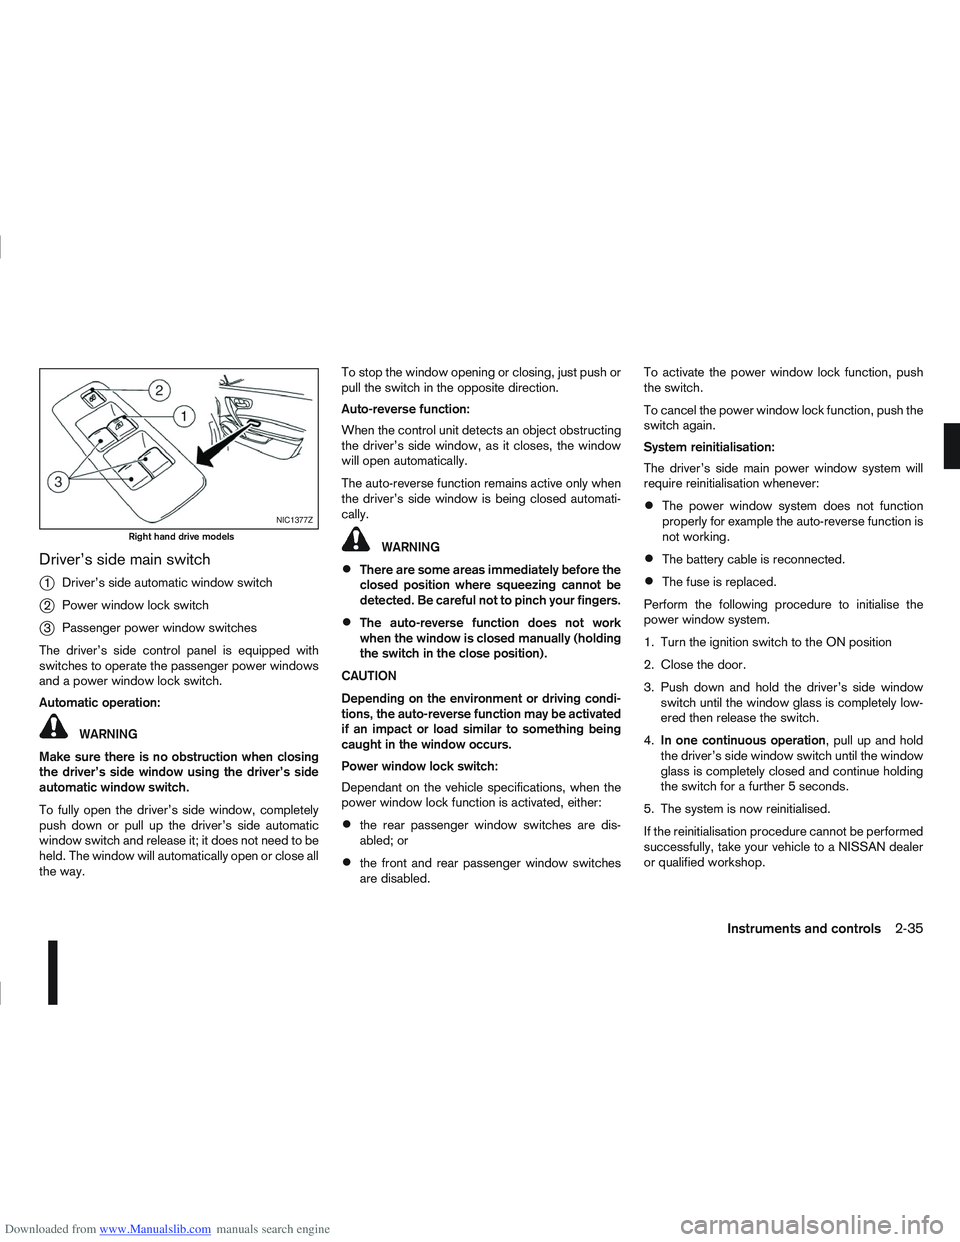
Downloaded from www.Manualslib.com manuals search engine Driver’s side main switch
j
1Driver’s side automatic window switch
j2Power window lock switch
j3Passenger power window switches
The driver’s side control panel is equipped with
switches to operate the passenger power windows
and a power window lock switch.
Automatic operation:
WARNING
Make sure there is no obstruction when closing
the driver’s side window using the driver’s side
automatic window switch.
To fully open the driver’s side window, completely
push down or pull up the driver’s side automatic
window switch and release it; it does not need to be
held. The window will automatically open or close all
the way. To stop the window opening or closing, just push or
pull the switch in the opposite direction.
Auto-reverse function:
When the control unit detects an object obstructing
the driver’s side window, as it closes, the window
will open automatically.
The auto-reverse function remains active only when
the driver’s side window is being closed automati-
cally.
WARNING
There are some areas immediately before the
closed position where squeezing cannot be
detected. Be careful not to pinch your fingers.
The auto-reverse function does not work
when the window is closed manually (holding
the switch in the close position).
CAUTION
Depending on the environment or driving condi-
tions, the auto-reverse function may be activated
if an impact or load similar to something being
caught in the window occurs.
Power window lock switch:
Dependant on the vehicle specifications, when the
power window lock function is activated, either:
the rear passenger window switches are dis-
abled; or
the front and rear passenger window switches
are disabled. To activate the power window lock function, push
the switch.
To cancel the power window lock function, push the
switch again.
System reinitialisation:
The driver’s side main power window system will
require reinitialisation whenever:
The power window system does not function
properly for example the auto-reverse function is
not working.
The battery cable is reconnected.
The fuse is replaced.
Perform the following procedure to initialise the
power window system.
1. Turn the ignition switch to the ON position
2. Close the door.
3. Push down and hold the driver’s side window switch until the window glass is completely low-
ered then release the switch.
4. In one continuous operation , pull up and hold
the driver’s side window switch until the window
glass is completely closed and continue holding
the switch for a further 5 seconds.
5. The system is now reinitialised.
If the reinitialisation procedure cannot be performed
successfully, take your vehicle to a NISSAN dealer
or qualified workshop.
NIC1377Z
Right hand drive models
Instruments and controls2-35
Page 85 of 297
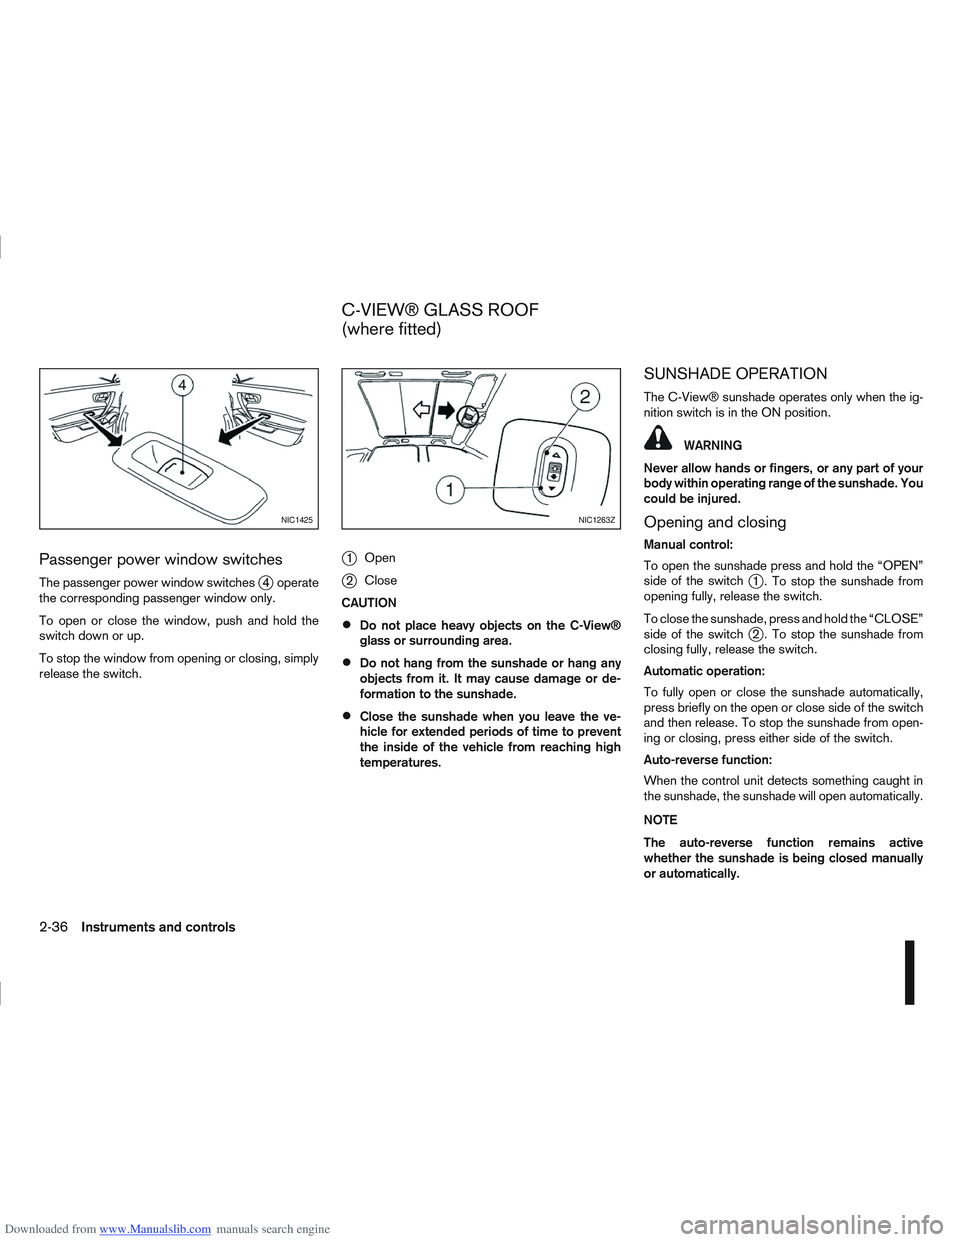
Downloaded from www.Manualslib.com manuals search engine Passenger power window switches
The passenger power window switchesj4 operate
the corresponding passenger window only.
To open or close the window, push and hold the
switch down or up.
To stop the window from opening or closing, simply
release the switch.
j1 Open
j2Close
CAUTION
Do not place heavy objects on the C-View®
glass or surrounding area.
Do not hang from the sunshade or hang any
objects from it. It may cause damage or de-
formation to the sunshade.
Close the sunshade when you leave the ve-
hicle for extended periods of time to prevent
the inside of the vehicle from reaching high
temperatures.
SUNSHADE OPERATION
The C-View® sunshade operates only when the ig-
nition switch is in the ON position.
WARNING
Never allow hands or fingers, or any part of your
body within operating range of the sunshade. You
could be injured.
Opening and closing
Manual control:
To open the sunshade press and hold the “OPEN”
side of the switch
j1 . To stop the sunshade from
opening fully, release the switch.
To close the sunshade, press and hold the “CLOSE”
side of the switch
j2 . To stop the sunshade from
closing fully, release the switch.
Automatic operation:
To fully open or close the sunshade automatically,
press briefly on the open or close side of the switch
and then release. To stop the sunshade from open-
ing or closing, press either side of the switch.
Auto-reverse function:
When the control unit detects something caught in
the sunshade, the sunshade will open automatically.
NOTE
The auto-reverse function remains active
whether the sunshade is being closed manually
or automatically.
NIC1425NIC1263Z
C-VIEW® GLASS ROOF
(where fitted)
2-36Instruments and controls
Page 109 of 297

Downloaded from www.Manualslib.com manuals search engine jACamera
When the gear or selector lever (AT or CVT) is
moved into the R (Reverse) position, the monitor
(NISSAN Connect display) shows the view from the
rear of the vehicle.
The system is designed as an aid to the driver in
detecting large stationary objects. It is intended to
help avoid damaging the vehicle when reversing.
However, the system will not detect small objects
below the bumper and may not detect objects close
to the bumper or on the ground.
WARNING
The rear-view camera is a convenience but it
is not a substitute for proper reversing. Al-
ways turn your head and visually check that
the manoeuvre is safe to do so before revers-
ing. Always reverse slowly.
The distance from the objects viewed in the
rear-view monitor differs from actual distance because of the use of wide-angle lens. Ob-
jects in the rear-view monitor will appear visu-
ally reversed compared to those viewed in the
inside and outside mirrors.
Make sure that the back door is securely
closed when reversing.
The area below the bumper and corner areas
of the bumper cannot be viewed on the rear-
view monitor because of its monitoring range
limitation.
Do not put anything on the rear-view camera.
The rear-view camera is installed above the
number plate.
When washing the vehicle with high pressure
water, be sure not to spray it around the cam-
era. Otherwise, water may enter the camera
unit causing possibly water condensation on
the lens, a malfunction, a fire or an electric
shock.
Do not strike the camera. It is a precision in-
strument. Otherwise, it may malfunction or
cause damage resulting in a fire or an electric
shock.
CAUTION
There is a transparent cover over the camera
lens. Do not scratch the cover when cleaning dirt
or snow from it.
HOW TO READ THE DISPLAYED
LINES
WARNING
Use the displayed lines as a reference. The
lines are highly affected by the number of oc-
cupants, fuel level, vehicle position, road con-
dition and road grade. Always check with your
eyes directly around the vehicle while revers-
ing.
The distance guide line and the vehicle width
line should be used as a reference only when
the vehicle is on a level paved surface. The
distance viewed on the monitor is for refer-
ence only and may be different than the ac-
tual distance between the vehicle and dis-
played objects.
When reversing the vehicle up a hill, objects
viewed in the monitor are further than they
appear. When reversing the vehicle down a
hill, objects viewed in the monitor are closer
NAA1120
Models with NISSAN Connect
SAA0889Z
REAR-VIEW MONITOR
(where fitted)
4-2Display screen, heater and air conditioner, and audio system
Page 110 of 297

Downloaded from www.Manualslib.com manuals search engine than they appear. Use the inside mirror or
glance over your shoulder to properly judge
distances to other objects.
The lines which are displayed on the monitor, indi-
cate the vehicle’s clearance and distance between
the obstacle and the bumper
jA.
Displayed lines indicate the distances between the
obstacle and the bumper as follows:
j1 0.5m(1.5ft)–red
j2 1m(3ft)–yellow
j3 2m(7ft)–green
j4 3m(10ft)–green
NOTE
The vehicle clearance lines are wider than the
actual clearance.
The lines are indicated as reference distances
to the obstacle.
REAR-VIEW MONITOR SETTING
For details, see the separately provided NISSAN
Connect Owner’s Manual.
OPERATING TIPS
When the gear (MT) or selector (AT or CVT)
lever is shifted to R (Reverse), the NISSAN Con-
nect display automatically changes to the rear-
view monitor mode.
When the gear (MT) or selector (AT or CVT)
lever is returned to a position other than R (Re- verse), it may take some time until the screen
changes. Objects on the screen may be dis-
torted until they are completely displayed.
When the temperature is extremely high or low,
the screen may not clearly display objects. This
is not a malfunction.
When strong light directly enters the camera
lens, objects may not be displayed clearly. This
is not a malfunction.
Vertical lines may be seen in objects on the
screen. This is due to strong reflected light from
the bumper. This is not a malfunction.
The screen may flicker under fluorescent light.
This is not a malfunction.
The colours of objects on the rear-view monitor
may differ somewhat from those of the actual
object.
Objects on the monitor may not be clear in a
dark place or at night.
If dirt, rain or snow attaches to the transparent
camera cover, the rear-view monitor may not
clearly display objects. Clean the transparent
camera cover.
Do not use alcohol, benzine or thinner to clean
the transparent camera cover. This will cause
discoloration. To clean the transparent camera
cover, wipe with a cloth dampened with diluted
mild cleaning agent and then wipe with a dry
cloth.
Do not damage the transparent camera cover as
the NISSAN Connect display may be adversely
affected.
Do not use body wax on the transparent camera
cover. Wipe off any wax with a clean cloth damp-
ened with mild detergent diluted with water.
Display screen, heater and air conditioner, and audio system4-3
Page 111 of 297
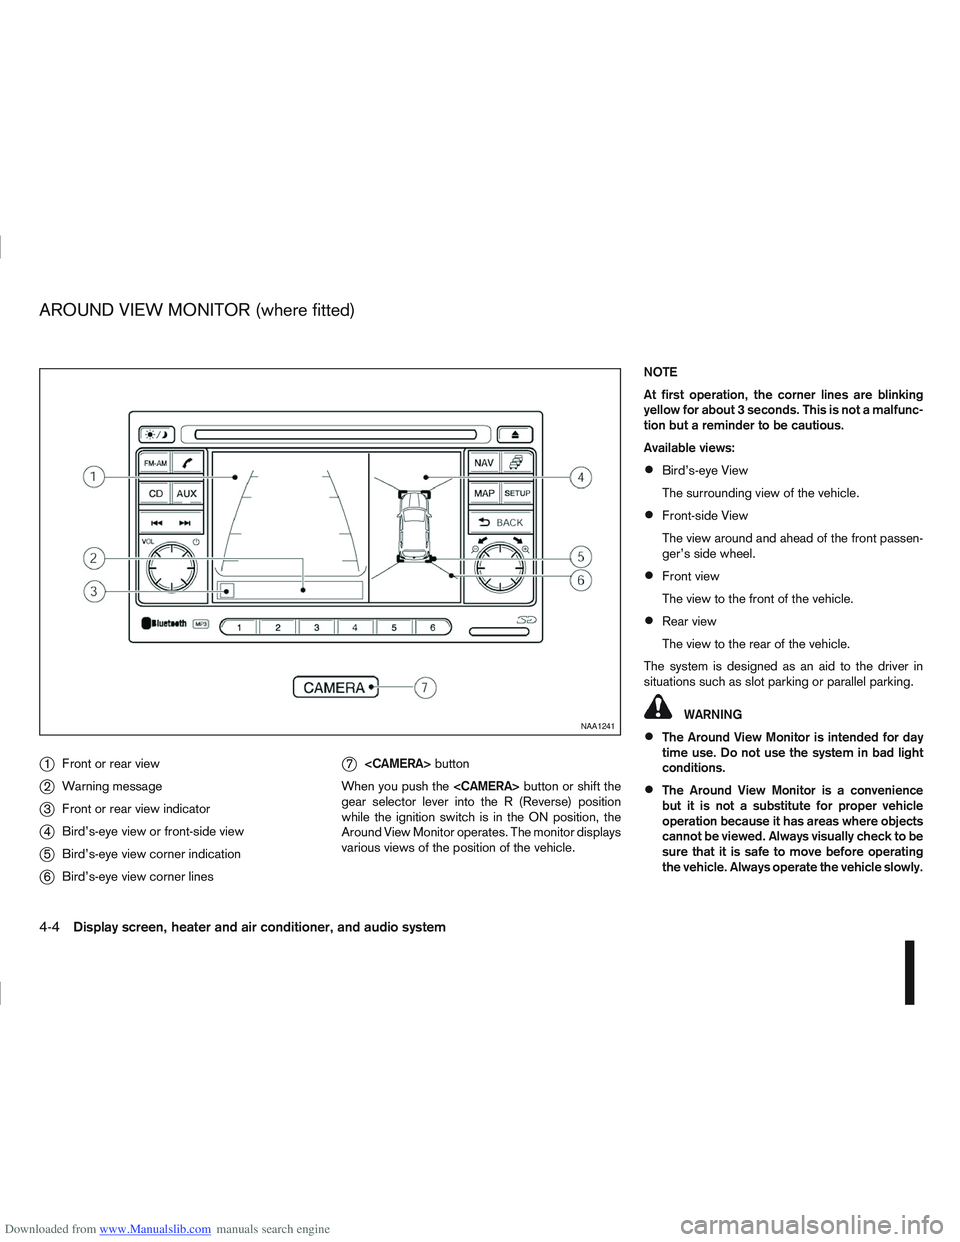
Downloaded from www.Manualslib.com manuals search engine j1Front or rear view
j2Warning message
j3Front or rear view indicator
j4Bird’s-eye view or front-side view
j5Bird’s-eye view corner indication
j6Bird’s-eye view corner lines
j7
button
When you push the
gear selector lever into the R (Reverse) position
while the ignition switch is in the ON position, the
Around View Monitor operates. The monitor displays
various views of the position of the vehicle. NOTE
At first operation, the corner lines are blinking
yellow for about 3 seconds. This is not a malfunc-
tion but a reminder to be cautious.
Available views:
Bird’s-eye View
The surrounding view of the vehicle.
Front-side View
The view around and ahead of the front passen-
ger’s side wheel.
Front view
The view to the front of the vehicle.
Rear view
The view to the rear of the vehicle.
The system is designed as an aid to the driver in
situations such as slot parking or parallel parking.
WARNING
The Around View Monitor is intended for day
time use. Do not use the system in bad light
conditions.
The Around View Monitor is a convenience
but it is not a substitute for proper vehicle
operation because it has areas where objects
cannot be viewed. Always visually check to be
sure that it is safe to move before operating
the vehicle. Always operate the vehicle slowly.
NAA1241
AROUND VIEW MONITOR (where fitted)
4-4Display screen, heater and air conditioner, and audio system
Page 113 of 297
Downloaded from www.Manualslib.com manuals search engine OPERATION
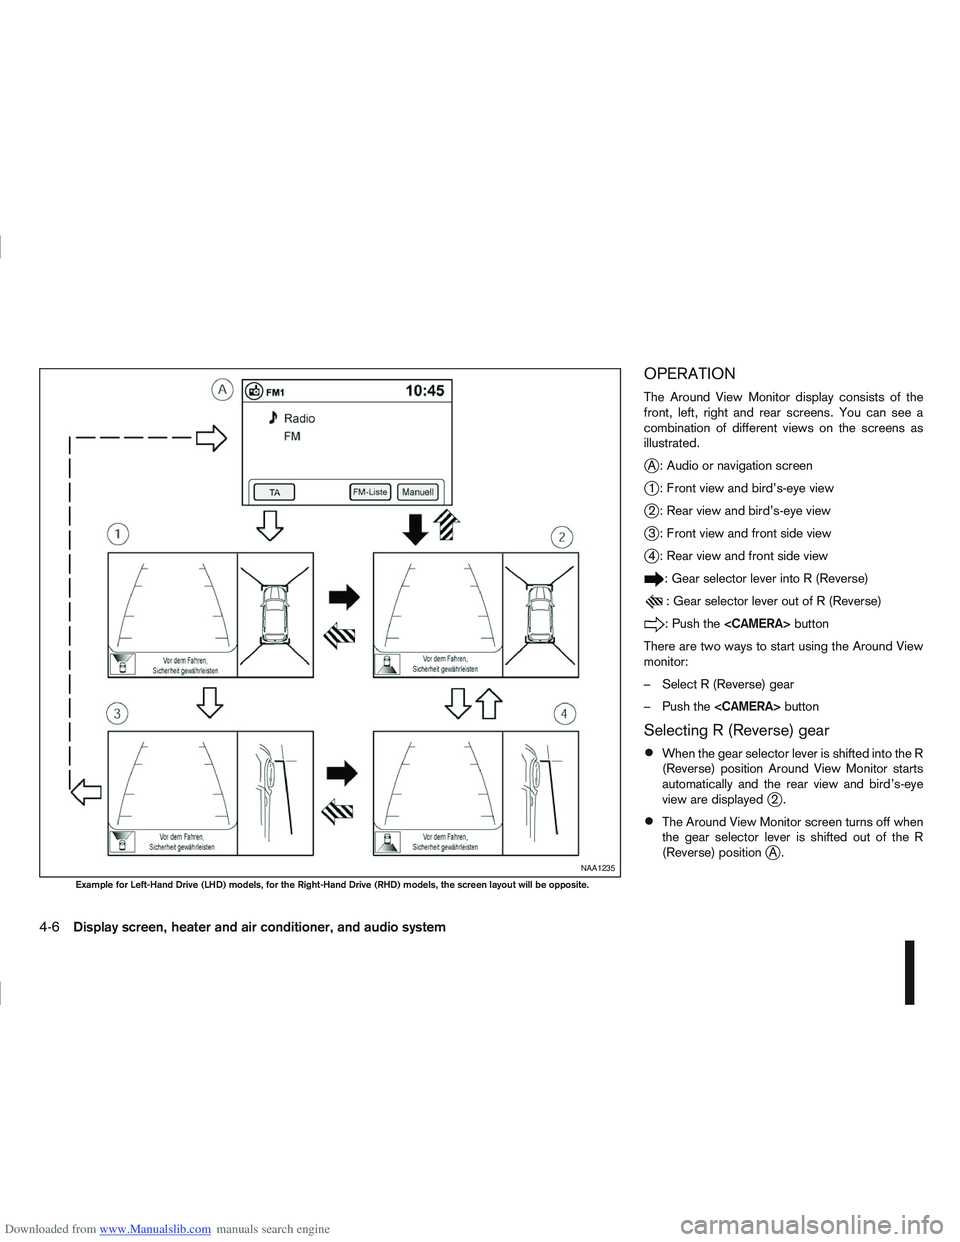
The Around View Monitor display consists of the
front, left, right and rear screens. You can see a
combination of different views on the screens as
illustrated.
jA : Audio or navigation screen
j1 : Front view and bird’s-eye view
j2 : Rear view and bird’s-eye view
j3 : Front view and front side view
j4 : Rear view and front side view
: Gear selector lever into R (Reverse)
: Gear selector lever out of R (Reverse)
:Pushthe
There are two ways to start using the Around View
monitor:
– Select R (Reverse) gear
– Push the
Selecting R (Reverse) gear
When the gear selector lever is shifted into the R
(Reverse) position Around View Monitor starts
automatically and the rear view and bird’s-eye
view are displayed
j2.
The Around View Monitor screen turns off when
the gear selector lever is shifted out of the R
(Reverse) position
jA.NAA1235
Example for Left-Hand Drive (LHD) models, for the Right-Hand Drive (RHD) models, the screen layout will be opposite.
4-6Display screen, heater and air conditioner, and audio system
Page 114 of 297

Downloaded from www.Manualslib.com manuals search engine In R (Reverse) gear rear view and bird’s-eye viewj2 are shown. The view on the screen on the
passenger’s side switches to the front side view
j4 when the
Push the
back to rear view and bird’s-eye view
j2.
Pushing the CAMERA button
When the
View Monitor operates and the front view and
bird’s-eye view are displayed
j1.
The front view and bird’s-eye view are displayedj1 . The view on the screen on the passenger’s
side switches to the front-side view when the
j3 . Pushing the
Monitor off.
To switch the driver’s side screen between front
view and rear view use the gear selector lever.
GUIDE LINES
WARNING
The distance guide line and the vehicle width
line should be used as a reference only when
the vehicle is on a paved, level surface. The
distance viewed on the monitor is for refer-
ence only and may be different than the ac-
tual distance between the vehicle and dis-
played objects.
Use the displayed lines and the bird’s-eye
view as a reference. The lines and the bird’s- eye view are greatly affected by the number
of occupants, fuel level, vehicle position, road
condition and road grade.
If the tyres are replaced with different sized
tyres, the predictive course line and the bird’s-
eye view may be displayed incorrectly.
When driving the vehicle up a hill, objects
viewed in the monitor are further than they
appear. When driving the vehicle down a hill,
objects viewed in the monitor are closer than
they appear. Use the mirrors or actually look
to properly judge distances to other objects.
The vehicle width and predictive course lines
are wider than the actual width and course.
Front and rear view
Guiding lines, which indicate the vehicle width and
distances to objects with reference to the vehicle
body line
jA , are displayed on the monitor.
Distance guide lines:
Indicate distances from the vehicle body.
Red linej1 : approx. 0.5 m (1.5 ft)
SAA1840Z
Front view
SAA1896Z
Rear view
Display screen, heater and air conditioner, and audio system4-7