2012 NISSAN QASHQAI Reverse
[x] Cancel search: ReversePage 118 of 297

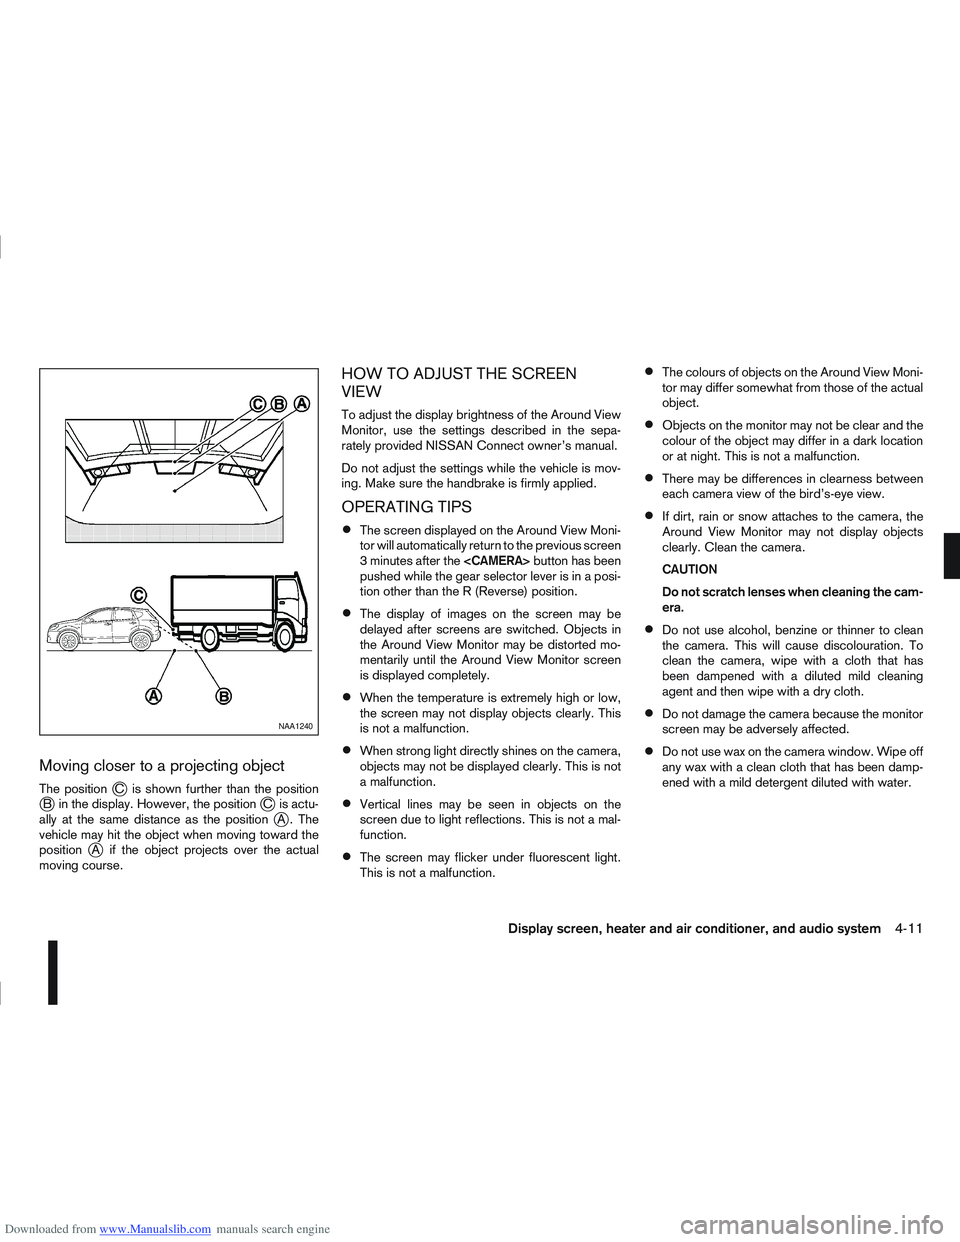
Downloaded from www.Manualslib.com manuals search engine Moving closer to a projecting object
The positionjC is shown further than the positionjB in the display. However, the positionjC is actu-
ally at the same distance as the positionjA . The
vehicle may hit the object when moving toward the
position
jA if the object projects over the actual
moving course.
HOW TO ADJUST THE SCREEN
VIEW
To adjust the display brightness of the Around View
Monitor, use the settings described in the sepa-
rately provided NISSAN Connect owner’s manual.
Do not adjust the settings while the vehicle is mov-
ing. Make sure the handbrake is firmly applied.
OPERATING TIPS
The screen displayed on the Around View Moni-
tor will automatically return to the previous screen
3 minutes after the
pushed while the gear selector lever is in a posi-
tion other than the R (Reverse) position.
The display of images on the screen may be
delayed after screens are switched. Objects in
the Around View Monitor may be distorted mo-
mentarily until the Around View Monitor screen
is displayed completely.
When the temperature is extremely high or low,
the screen may not display objects clearly. This
is not a malfunction.
When strong light directly shines on the camera,
objects may not be displayed clearly. This is not
a malfunction.
Vertical lines may be seen in objects on the
screen due to light reflections. This is not a mal-
function.
The screen may flicker under fluorescent light.
This is not a malfunction.
The colours of objects on the Around View Moni-
tor may differ somewhat from those of the actual
object.
Objects on the monitor may not be clear and the
colour of the object may differ in a dark location
or at night. This is not a malfunction.
There may be differences in clearness between
each camera view of the bird’s-eye view.
If dirt, rain or snow attaches to the camera, the
Around View Monitor may not display objects
clearly. Clean the camera.
CAUTION
Do not scratch lenses when cleaning the cam-
era.
Do not use alcohol, benzine or thinner to clean
the camera. This will cause discolouration. To
clean the camera, wipe with a cloth that has
been dampened with a diluted mild cleaning
agent and then wipe with a dry cloth.
Do not damage the camera because the monitor
screen may be adversely affected.
Do not use wax on the camera window. Wipe off
any wax with a clean cloth that has been damp-
ened with a mild detergent diluted with water.
NAA1240
Display screen, heater and air conditioner, and audio system4-11
Page 130 of 297

Downloaded from www.Manualslib.com manuals search engine –Type A: CD player
– Type B: 6 CD changer
j1 Power ON/OFF button
j2CD player: MUTE button
j2a 6 CD changer: CD Load button
j3CD play mode button
j4CD slot
j5 button
j6AUX button
j7Display
j8CD EJECT button
j9MENU button
j10Telephone button
j11Radio mode: Manual tune buttons
CD mode: Fast forward (Cue)/Fast reverse
(Review) buttons
j12Phone disconnect/BACK button
j13Phone book button
j14CD player: Preset station buttons
6 CD changer:
Radio mode: Preset station buttons
CD mode: CD select buttons
j15ENTER (Confirmation) button
j16Volume control/Menu adjustment dial
j17CD player: Preset station buttons
6 CD changer:
Radio mode: Preset station buttons
CD mode: CD select buttons
j18Sound preference button
j19RPT (Repeat)/MIX (Random) button
j20Radio mode: Seek tuning buttons
CD mode: Track Up/Down buttons
j21TA (Traffic Announcement)/NEWS button
NAA1215
LW-MW-FM RADIO WITH CD PLAYER OR 6 CD CHANGER
Display screen, heater and air conditioner, and audio system4-23
Page 135 of 297

Downloaded from www.Manualslib.com manuals search engine CD insert (CD player)
Insert the CD into the slot with the label side facing
up. The CD will be guided automatically into the slot
and will start playing. After loading the CD, the track
information will be displayed.
If the radio is already operating, it will be automati-
cally turned off and the CD player will start playing.
CD Play button
Press the
CD. Playing starts from the track that was being
played when the CD play mode was switched off.
CD Load button (6 CD
Changer)
To insert a CD into the CD changer proceed as fol-
lows:
1) Press the
button for less than 1.5 seconds
2) Select an unoccupied slot by pressing the corre- sponding CD select button. If no slot is selected,
the CD changer will select the first available slot
after 5 seconds. If the selected slot is already
occupied with a CD then the display will show a
notification message that this slot is not avail-
able.
3) Insert the CD into the slot with the CD label side facing up when the display shows [LOAD CD].
The CD will be guided automatically into the slot
and will start playing. After loading the disc, the track number and the
occupied slot number will appear in the display.
If the CD is not loaded within 10 seconds, the CD
changer will start to play the last CD or return to the
last received radio station.
To insert 6 CDs into the CD changer in succession,
press and hold the
button for more than 1.5
seconds.
CD select buttonsj1j2j3j4j5j6(6
CD Changer)
To change to another CD stored in the CD changer,
press the corresponding CD select button. When a
CD is selected, it will start to play from the first
track.
Fast Forward (Cue),
Fast reverse (Review)
buttons
When the(Cue) or(Review) button is
pressed continuously, the track will be played at
high speed. When the button is released, the CD
will return to normal playing speed.
Track up/down buttons
Pressing theorbutton once will cause the
CD to skip forward or backward to the beginning of
the next track. Press the
orbutton to skip
through the CD tracks. The CD will skip the number
of times the button is pressed.
Repeat/MIX button
Pressing thebutton repeatedly will change the
play mode as follows:
CD player:
[RPT TRACK] →[MIX DISC] →[RPT ALL] →[RPT
TRACK]
[RPT TRACK]: The current track will be played continuously.
[MIX DISC]: All the tracks will be played in a random order.
[RPT ALL]: All the tracks will be played in sequential order.
6 CD changer:
[RPT TRACK] →[RPT DISC] →[MIX DISC] →
[MIX ALL] →[RPT ALL] →[RPT TRACK]
[RPT
TRACK]: The current track will be played
continuously.
[RPT
DISC]: The currently played CD will be
played repeatedly.
[MIX
DISC]: All the tracks on the currently
played CD will be played in a
random order.
[MIX ALL]: All the tracks on all of the CDs will be played in a random order.
[RPT ALL]: All the tracks on all the CDs will be played continuously in sequential
order.
4-28Display screen, heater and air conditioner, and audio system
Page 137 of 297

Downloaded from www.Manualslib.com manuals search engine 1.Power ON·OFF button/Volume control (VOL)
knob
2. CD play mode button
3. button
4. Mute button (where fitted) or
(Day/Night)
button (where fitted)
5. Radio mode: Preset button CD mode: Repeat (RPT) button
6. Radio mode: Preset button
CD mode: MIX button
7. Display
8. Radio mode: Preset buttons
9. Radio mode: Preset button Audio unit mode: Display (DISP) button
10. Radio mode: Preset button
CD, AUX or Phone mode: Quick search but-
ton
11. CD slot
12. CD eject button
13. Auxiliary (AUX) source button
14. Telephone button
15. Radio mode: TUNE dial
Audio unit mode: MENU dial
Confirmation (ENTER) button
16. Back button
17. SETUP button
18. Fast Forward (Cue) play/Forward Track but-
ton
19. Fast Reverse (Review) play/Reverse Track
button
20. Traffic announcement (TA) button
NAA1216
FM AM RADIO WITH CD PLAYER
4-30Display screen, heater and air conditioner, and audio system
Page 142 of 297
![NISSAN QASHQAI 2012 Owners Manual Downloaded from www.Manualslib.com manuals search engine [Russian]
Scroll direction
Sets the scroll direction of the<TUNE/MENU>dial.
For example, to change the way in which you turn
the dial (anticloc NISSAN QASHQAI 2012 Owners Manual Downloaded from www.Manualslib.com manuals search engine [Russian]
Scroll direction
Sets the scroll direction of the<TUNE/MENU>dial.
For example, to change the way in which you turn
the dial (anticloc](/manual-img/5/56764/w960_56764-141.png)
Downloaded from www.Manualslib.com manuals search engine [Russian]
Scroll direction
Sets the scroll direction of the
For example, to change the way in which you turn
the dial (anticlockwise or clockwise) in order to scroll
up or down a list.
COMPACT DISC (CD) OPERATION
The CD player can play a music CD or an encoded
MP3/WMA CD and while listening to those CD’s
certain text might be able to be displayed (when CD
encoded with text is being used).
Press the
start to play.
When
mode is already operating, it will automatically turn
off the playing source and the CD play mode will
start.
However, if the CD disc is not loaded, then a notifi-
cation message will be displayed and the audio unit
remains in radio or AUX source mode.
CAUTION
Do not force the CD into the slot. This could
damage the player.
Do not use 8 cm (3.1 in) discs.
CD insert (CD player)
Insert the CD disc into the slot with the label side
facing up. The disc will be guided automatically into
the slot and will start playing. After loading the disc,
track information will be displayed.
NOTE
The CD player accepts normal audio CD or
CD recorded with MP3/WMA files.
Inserting a CD recorded with MP3/WMA files,
the audio unit will automatically detect and
[MP3CD] will be indicated.
An error notification message will be
displayed when inserting a wrong disc type
(e.g. DVD), or the player cannot read the CD
disc. Eject the disc and insert another disc.
CD button
Press the
CD. Playing starts from the track that was being
played when the CD play mode was switched off.
Audio main operation
List view:
While the track is being played, press either the
button to display the available
tracks in a listed view mode. To select a track from
the list, or a track to start listening from, turn the
In the list view mode, quick search can be per-
formed to find a track from the list.
Push the
j6 button then turn the
of the track title then press
a list of the available tracks will be displayed. Select,
and press
Fast Forward (Cue), Fast
Reverse (Review) buttons:
When the
(Cue) or(Review) button is
pressed continuously, the track will be played at
high speed. When the button is released, the track
will be played at normal playing speed.
Track up/down buttons:
Pressing the
orbutton once, the track will
be skipped forward to the next track or backward to
the beginning of the current played track. Press the
orbutton more than once to skip through
the tracks.
Folder browsing:
If the recorded media contains folders with music
files, pressing the
orbutton will play in
sequence the tracks of each folder.
To select a preferred folder:
1. Press the
button and a list of
tracks in the current folder is displayed.
2. Press the
button.
Display screen, heater and air conditioner, and audio system4-35
Page 148 of 297

Downloaded from www.Manualslib.com manuals search engine
To operate the Bluetooth audio streaming use one
of the following methods:
Press the
Press
lighted, then press
The type of display,
jAorjB , shown on the audio
system can vary depending on the Bluetooth® ver-
sion of the device.
Fast Forward (Cue), Fast
Reverse (Review) buttons:
When the
(Cue) or(Review) button is
pressed continuously, the track will be played at
high speed. When the button is released, the track
will be played at normal playing speed.
Track up/down buttons:
Pressing the
orbutton once, the track will
be skipped forward to the next track or backward to
the beginning of the current played track. Press the
orbutton more than once to skip through
the tracks.
Play/Pause:
Press the
press
mbuttonj5 (Type B display screen
only)
If the song contains music information tags (ID3–
tags), the title of the played song will be displayed.
If tags are not provided then the display will not
show any messages.
When the
j5 button is pressed repeatedly fur-
ther information about the song can be displayed
along with the song title.
A long press on
j5 will turn the display into a
detailed overview which after a few seconds returns
to the main display; or press
j5 briefly.
Bluetooth®mobile phone feature
This system offers a hands-free facility for your mo-
bile telephone with Bluetooth® to enhance driving
safety, and comfort.
For details, see “Mobile phone integration for FM
AM radio with CD player” later in this section.
Display screen, heater and air conditioner, and audio system4-41
Page 175 of 297

Downloaded from www.Manualslib.com manuals search engine mately 1/3 to the floor) and hold it then crank
the engine. Release the ignition switch and
the accelerator pedal when the engine starts.
CAUTION
Do not operate the starter for more than 15
seconds at a time. If the engine does not start,
turn the ignition switch to the “OFF” position
and wait 10 seconds (Petrol engine models)
or 20 seconds (Diesel engine models) before
cranking again, otherwise the starter could be
damaged.
If it becomes necessary to start the engine
with a booster battery and jumper leads, the
instructions and cautions contained in the
“Jump-starting” in the “6. In case of
emergency” section should be carefully fol-
lowed.
7. Warm-up
Allow the engine to idle for at least 30 seconds
after starting. Drive at moderate speed for a short
distance first, especially in cold weather.
WARNING
Do not leave the vehicle unattended while the
engine is warming up.
DRIVING WITH MANUAL
TRANSMISSION
CAUTION
Do not rest your foot on the clutch pedal while
driving. This may cause clutch damage.
Stop your vehicle completely before shifting
into the R (Reverse) position.
When you are shifting from one gear to an-
other, be certain to depress the clutch pedal
all the way to the floor to avoid clashing or
chipping the gears.
Avoid abrupt starts and acceleration for your
safety.
When quick acceleration is required for some
reason, shift to a lower gear and accelerate
until the vehicle reaches the maximum speed
in each gear. Do not exceed the speed limit of
any gear. Pay special attention when acceler-
ating or when shifting into a lower gear on
slippery surfaces. Sudden acceleration or
down shifting could cause the wheels to skid
and result in loss of control.
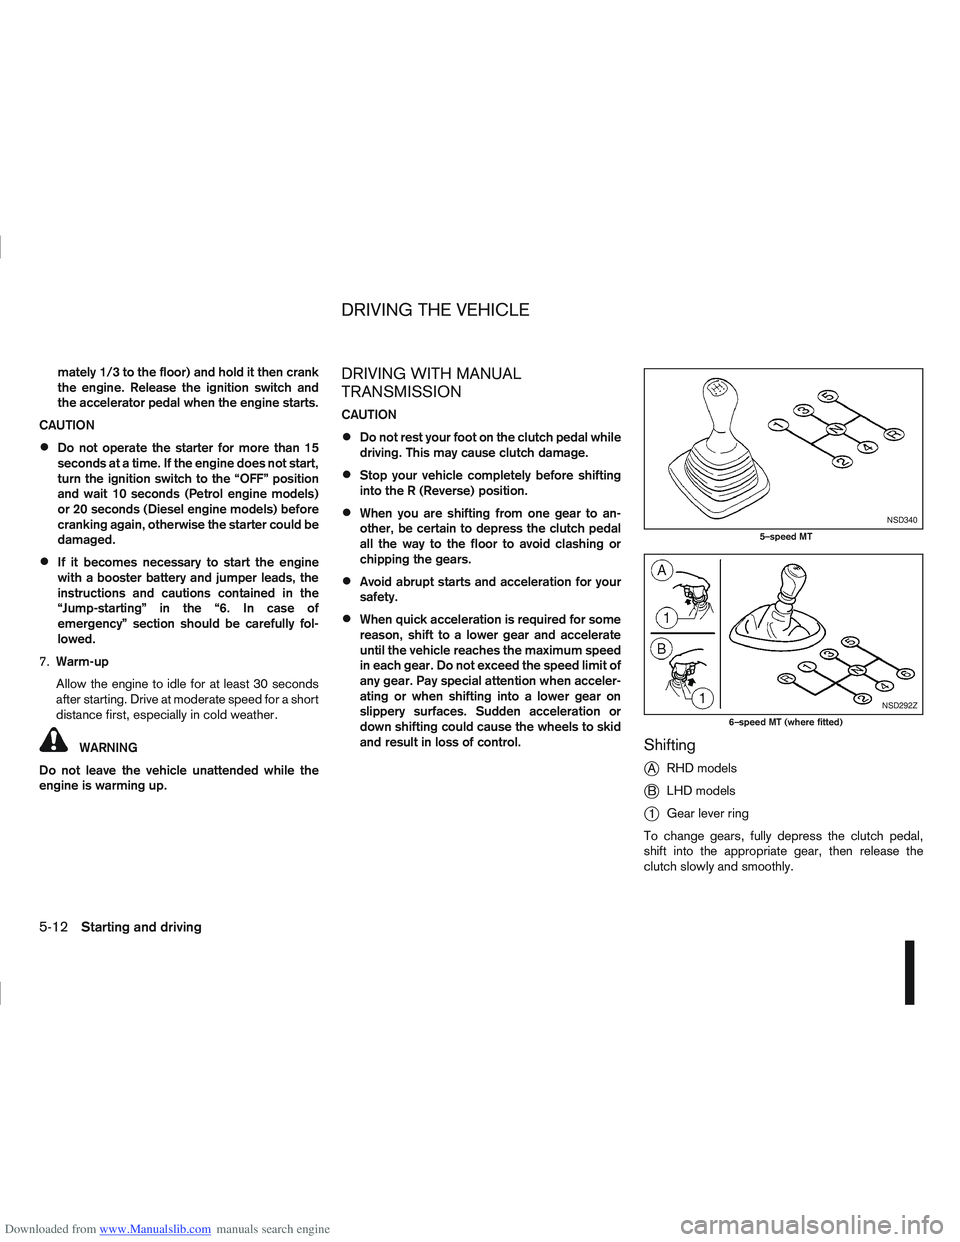
Shifting
j
A RHD models
jB LHD models
j1Gear lever ring
To change gears, fully depress the clutch pedal,
shift into the appropriate gear, then release the
clutch slowly and smoothly.
NSD340
5–speed MT
NSD292Z
6–speed MT (where fitted)
DRIVING THE VEHICLE
5-12Starting and driving
Page 176 of 297

Downloaded from www.Manualslib.com manuals search engine To ensure smooth gear changes, fully depress the
clutch pedal before operating the gear lever. If the
clutch pedal is not fully depressed before the trans-
mission is shifted, a gear noise may be heard. This
could result in damage to the transmission.
Start the vehicle in 1st gear and shift through the
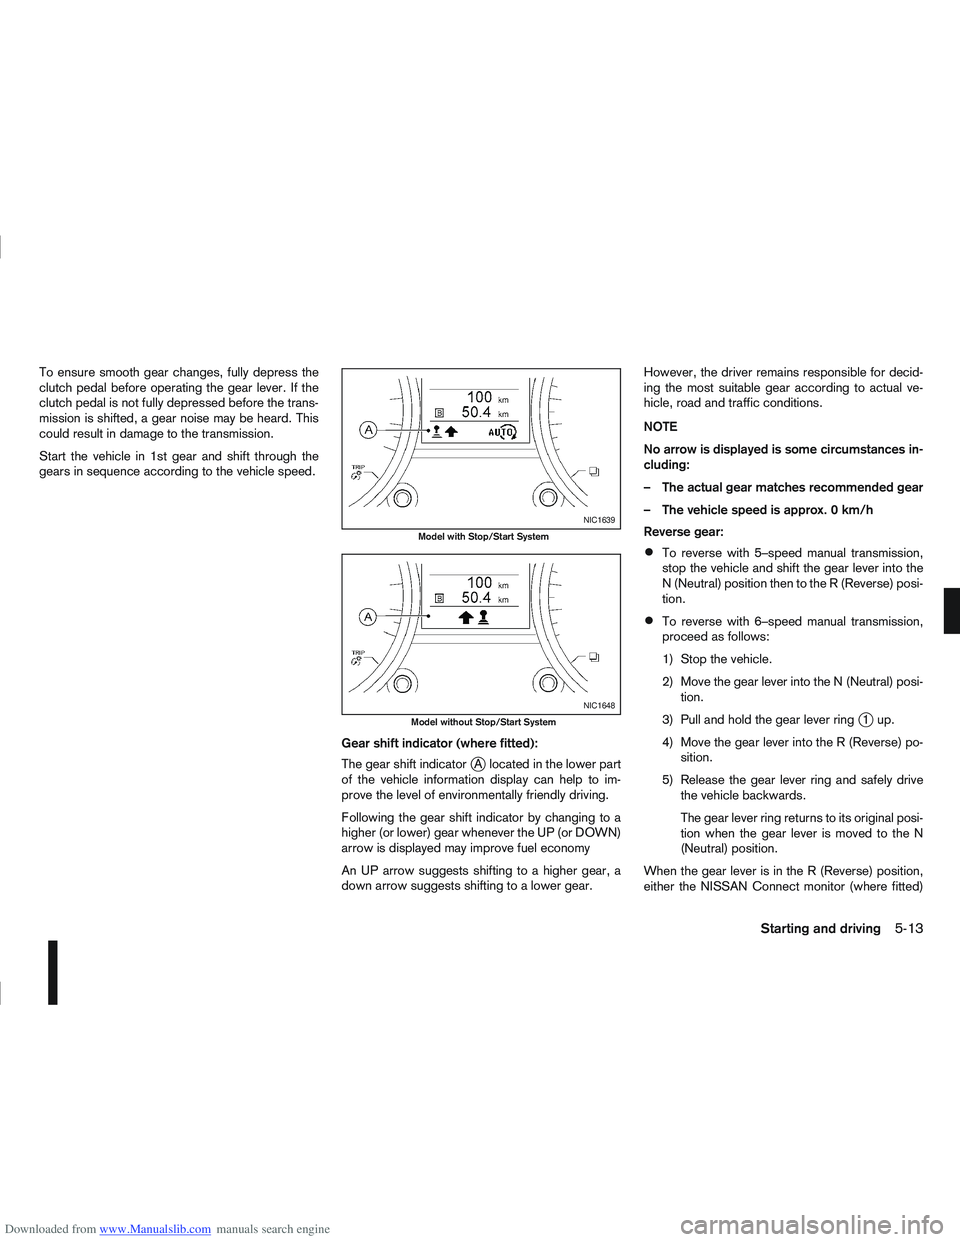
gears in sequence according to the vehicle speed.Gear shift indicator (where fitted):
The gear shift indicator
jA located in the lower part
of the vehicle information display can help to im-
prove the level of environmentally friendly driving.
Following the gear shift indicator by changing to a
higher (or lower) gear whenever the UP (or DOWN)
arrow is displayed may improve fuel economy
An UP arrow suggests shifting to a higher gear, a
down arrow suggests shifting to a lower gear. However, the driver remains responsible for decid-
ing the most suitable gear according to actual ve-
hicle, road and traffic conditions.
NOTE
No arrow is displayed is some circumstances in-
cluding:
– The actual gear matches recommended gear
– The vehicle speed is approx. 0 km/h
Reverse gear:
To reverse with 5–speed manual transmission,
stop the vehicle and shift the gear lever into the
N (Neutral) position then to the R (Reverse) posi-
tion.
To reverse with 6–speed manual transmission,
proceed as follows:
1) Stop the vehicle.
2) Move the gear lever into the N (Neutral) posi-
tion.
3) Pull and hold the gear lever ring
j1up.
4) Move the gear lever into the R (Reverse) po- sition.
5) Release the gear lever ring and safely drive the vehicle backwards.
The gear lever ring returns to its original posi-
tion when the gear lever is moved to the N
(Neutral) position.
When the gear lever is in the R (Reverse) position,
either the NISSAN Connect monitor (where fitted)
NIC1639
Model with Stop/Start System
NIC1648
Model without Stop/Start System
Starting and driving5-13