2012 NISSAN QASHQAI engine size
[x] Cancel search: engine sizePage 43 of 297

Downloaded from www.Manualslib.com manuals search engine Rear facing
If you must install a child restraint system in the front
seat, follow these steps:
1. Deactivate the front passenger air bag. See“Front passenger air bag deactivation system”
earlier in this section for further details.
2. Move the seat to the rearmost position.
3. Adjust the head restraint to its highest position. Remove it if it interferes with the child restraint
installation. In such situations, securely store the
head restraint in the luggage compartment so
that it does not become a dangerous projectile
during a sudden stop or in an accident.
4. Position the child restraint system in the front passenger seat.
Always follow the child restraint system manu-
facturer’s instructions for installation and use. 5. Route the seat belt tongue through the child re-
straint system and insert it into the buckle until
you hear and feel the latch engage.
To prevent slack in the lap belt, secure the shoul-
der belt in place with a locking clip
jA. Use a
locking clip attached to the child restraint sys-
tem, or one which is equivalent in dimensions
and strength.
Be sure to follow the child restraint system
manufacturer’s instructions for belt routing.
6. Slide the seat forwards so that the seat belt fully tightens the child restraint system and the child
restraint reaches the vehicle dashboard.
7. Test the child restraint system before you place the child in it. Check that it does not tilt too far
from side to side. Try to tug it forwards and check
if it is held securely in place.
INSTALLATION OF A CHILD
RESTRAINT SYSTEM ON REAR
SEATS
WARNING
NISSAN recommends that infants or small
children be seated in a child restraint system.
According to accident statistics, children are
safer when properly restrained in the rear seat
than in the front seat.
The direction of the child restraint system de-
pends on the type of the child restraint sys-
tem and the size of the child.
Front-facing
When you install a front-facing child restraint system
in a rear outer or centre seat, follow these steps:
1.5-seater: Position the front passenger seat as
far forwards as possible.
SSS0513Z
SSS0374AZ
Rear outer seat (5-seater)
NPA975
Rear seat (7-seater)
1-24Safety — seats, seat belts and supplemental restraint system
Page 114 of 297

Downloaded from www.Manualslib.com manuals search engine In R (Reverse) gear rear view and bird’s-eye viewj2 are shown. The view on the screen on the
passenger’s side switches to the front side view
j4 when the
Push the
back to rear view and bird’s-eye view
j2.
Pushing the CAMERA button
When the
View Monitor operates and the front view and
bird’s-eye view are displayed
j1.
The front view and bird’s-eye view are displayedj1 . The view on the screen on the passenger’s
side switches to the front-side view when the
j3 . Pushing the
Monitor off.
To switch the driver’s side screen between front
view and rear view use the gear selector lever.
GUIDE LINES
WARNING
The distance guide line and the vehicle width
line should be used as a reference only when
the vehicle is on a paved, level surface. The
distance viewed on the monitor is for refer-
ence only and may be different than the ac-
tual distance between the vehicle and dis-
played objects.
Use the displayed lines and the bird’s-eye
view as a reference. The lines and the bird’s- eye view are greatly affected by the number
of occupants, fuel level, vehicle position, road
condition and road grade.
If the tyres are replaced with different sized
tyres, the predictive course line and the bird’s-
eye view may be displayed incorrectly.
When driving the vehicle up a hill, objects
viewed in the monitor are further than they
appear. When driving the vehicle down a hill,
objects viewed in the monitor are closer than
they appear. Use the mirrors or actually look
to properly judge distances to other objects.
The vehicle width and predictive course lines
are wider than the actual width and course.
Front and rear view
Guiding lines, which indicate the vehicle width and
distances to objects with reference to the vehicle
body line
jA , are displayed on the monitor.
Distance guide lines:
Indicate distances from the vehicle body.
Red linej1 : approx. 0.5 m (1.5 ft)
SAA1840Z
Front view
SAA1896Z
Rear view
Display screen, heater and air conditioner, and audio system4-7
Page 115 of 297

Downloaded from www.Manualslib.com manuals search engine Yellow linej2 :approx.1m(3ft)
Green linej3 :approx.2m(7ft)
Green linej4 :approx.3m(10ft)
Vehicle width guide lines
j5:
Indicate the vehicle width when reversing.
Predictive course lines
j6:
Indicate the predictive course when operating the
vehicle. The predictive course lines will be displayed
on the monitor when the steering wheel is turned.
The predictive course lines will move depending on
how much the steering wheel is turned and will not
be displayed while the steering wheel is in the neu-
tral position.
The front view will not be displayed when the vehicle
speed is above 10 km/h (6 MPH).
WARNING
The distance between objects viewed in the
rear view differs from actual distance because
a wide-angle lens is used. Objects in the rear
view will appear visually opposite than when
viewed in the rear view and outside mirrors.
On a snow-covered or slippery road, there
may be a difference between the predictive
course line and the actual course line.
If the battery is disconnected or becomes dis-
charged, the predictive course lines may be
displayed incorrectly. If this occurs visit a
NISSAN dealer or qualified workshop.
If predictive course lines are displayed incor-
rectly visit a NISSAN dealer or qualified work-
shop.
The displayed lines on the rear view will ap-
pear slightly off to the right because the rear
view camera is not installed in the rear centre
of the vehicle.
NOTE
When the monitor displays the front view and the
steering wheel turns about 90 degrees or less
from the neutral position, both the right and left
predictive course lines
j6 are displayed. When
the steering wheel turns about 90 degrees or
more, a line is displayed only on the opposite
side of the turn.
Bird’s-eye view
The bird’s-eye view shows the overhead view of the
vehicle which helps to confirm the vehicle position.
The vehicle icon
j1 shows the position of the ve-
hicle.
NOTE
The size of the vehicle icon on the bird’s-eye
view may differ somewhat from the actual ve-
hicle.
The areas that the cameras cannot cover are indi-
cated in black.
At first operation, the corner lines
j2 on all four cor-
ners of the vehicle icon are blinking yellow for about
3 seconds. The four corners
j3 of the vehicle are
displayed in red.
NOTE
Corner lines
j2 blink (yellow) on all four corners
of the vehicle icon as a reminder to be cautious.
This is not a malfunction.
WARNING
Objects in the bird’s-eye view will appear fur-
ther than the actual distance because the
bird’s-eye view is a pseudo view that is pro-
cessed by combining the views from the cam-
eras on the outside mirrors, the front and the
rear of the vehicle.NAA1236
Bird’s-eye view
4-8Display screen, heater and air conditioner, and audio system
Page 189 of 297
Downloaded from www.Manualslib.com manuals search engine Even if the mode automatically changes to AUTO
mode, when driving in the LOCK mode, the indi-
cator light stays in the LOCK mode.
CAUTION
Only use the 4WD mode control when driving
in a straight direction (to select 2WD, AUTO or
LOCK).
Do not use the 4WD mode control when turn-
ing or reversing.
Do not use the 4WD mode control with the
front wheels spinning (to select 2WD, AUTO,
or LOCK).
Be especially careful when starting or driving
on slippery surfaces with the 4WD mode set
to AUTO.
Do not drive on dry, hard surfaced roads in
the LOCK position.
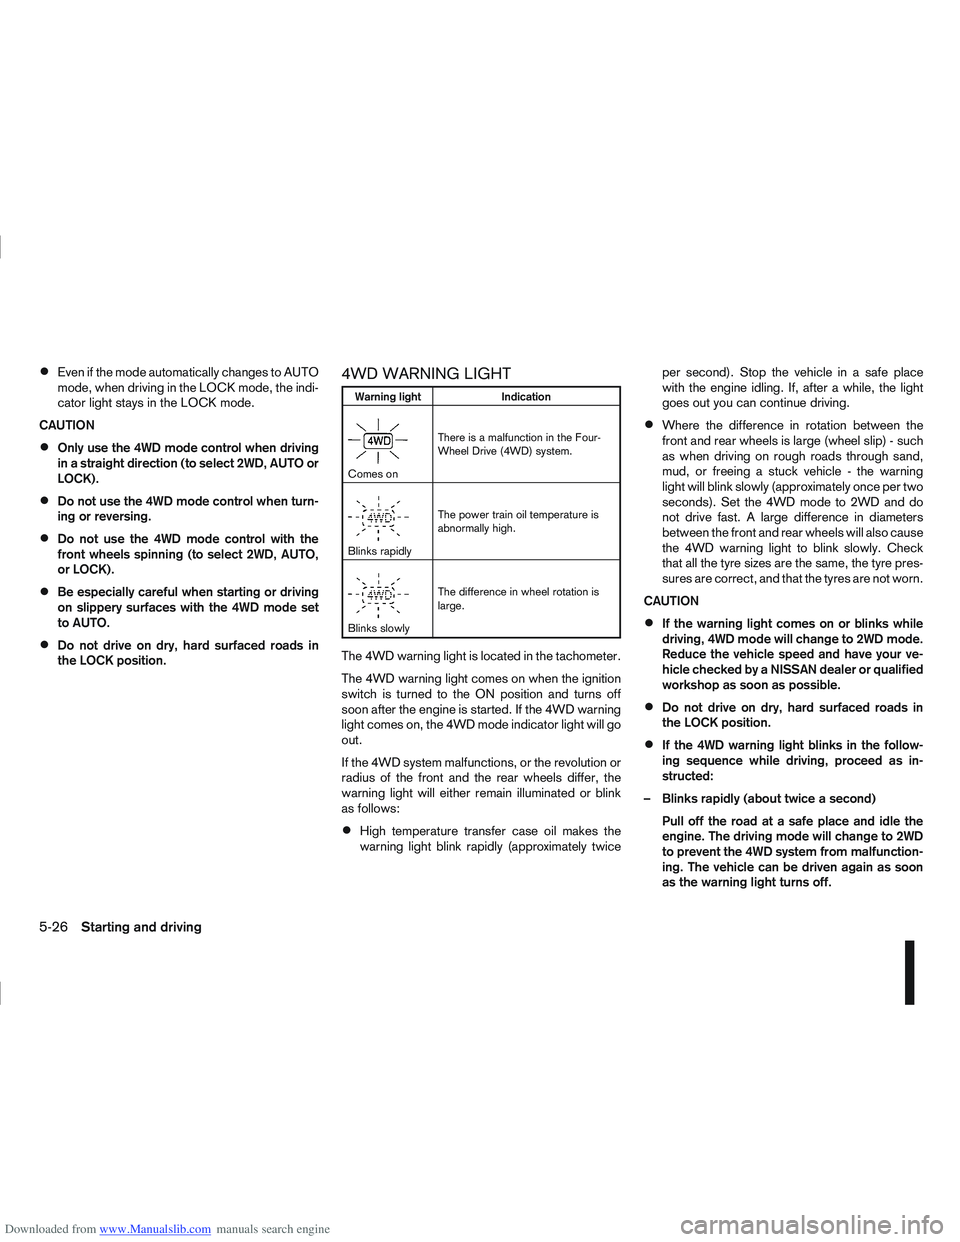
4WD WARNING LIGHT
Warning light Indication
mComes onThere is a malfunction in the Four-
Wheel Drive (4WD) system.
mBlinks rapidlyThe power train oil temperature is
abnormally high.
mBlinks slowlyThe difference in wheel rotation is
large.
The 4WD warning light is located in the tachometer.
The 4WD warning light comes on when the ignition
switch is turned to the ON position and turns off
soon after the engine is started. If the 4WD warning
light comes on, the 4WD mode indicator light will go
out.
If the 4WD system malfunctions, or the revolution or
radius of the front and the rear wheels differ, the
warning light will either remain illuminated or blink
as follows:
High temperature transfer case oil makes the
warning light blink rapidly (approximately twice per second). Stop the vehicle in a safe place
with the engine idling. If, after a while, the light
goes out you can continue driving.
Where the difference in rotation between the
front and rear wheels is large (wheel slip) - such
as when driving on rough roads through sand,
mud, or freeing a stuck vehicle - the warning
light will blink slowly (approximately once per two
seconds). Set the 4WD mode to 2WD and do
not drive fast. A large difference in diameters
between the front and rear wheels will also cause
the 4WD warning light to blink slowly. Check
that all the tyre sizes are the same, the tyre pres-
sures are correct, and that the tyres are not worn.
CAUTION
If the warning light comes on or blinks while
driving, 4WD mode will change to 2WD mode.
Reduce the vehicle speed and have your ve-
hicle checked by a NISSAN dealer or qualified
workshop as soon as possible.
Do not drive on dry, hard surfaced roads in
the LOCK position.
If the 4WD warning light blinks in the follow-
ing sequence while driving, proceed as in-
structed:
– Blinks rapidly (about twice a second) Pull off the road at a safe place and idle the
engine. The driving mode will change to 2WD
to prevent the 4WD system from malfunction-
ing. The vehicle can be driven again as soon
as the warning light turns off.
5-26Starting and driving
Page 191 of 297
Downloaded from www.Manualslib.com manuals search engine Unsecured cargo can be thrown around when
driving over rough terrain. Properly secure it so
that it will not be thrown forwards and cause
injury to you or your passengers.
To avoid raising the centre of gravity excessively,
do not exceed the rated capacity of the roof rack/
gear bin (where fitted) and evenly distribute the
load. Secure heavy loads in the luggage area as
far forwards and as low as possible. Do not equip
the vehicle with tyres larger than specified. This
could cause your vehicle to rollover.
Accelerating quickly, sharp steering manoeuvres
or sudden braking may cause loss of control.
Do not drive beyond the performance of the
tyres, even with 4WD. Sudden acceleration,
steering or braking may result in loss of control
and could cause the vehicle to become stuck.
If at all possible, avoid sharp turning manoeuvres,
particularly at high speeds. Your 4WD vehicle
has a higher centre of gravity than a 2WD ve-
hicle and can tip over more easily. The vehicle is
not designed for cornering at the same speeds
as conventional 2WD models any more than low
sports cars are designed to perform satisfacto-
rily under off-road conditions. Failure to operate
this vehicle correctly could result in loss of con-
trol and/or a rollover accident.
Do not grip the inside or spokes of the steering
wheel when driving off-road. The steering wheel
could jerk and injure your hands. Instead, drive
with your fingers and thumbs on the outside of
the rim.
Before operating the vehicle, ensure that the
driver and all passengers have their seat belts
fastened.
Avoid raising the centre of gravity by loading
things on the roof or equipping the vehicle with
tyres larger than specified in this manual.
Always drive with the floor mats in place as the
floor may become very hot. Particular care
should be taken if you are barefoot.
Lower your speed when encountering strong
crosswinds. With its higher centre of gravity your
NISSAN is more affected by gusty side winds.
Slower speeds ensure better vehicle control.
Be sure to check the brakes immediately after
driving in mud or water as specified in “Wet
brakes” later in this section.
Whenever you drive off-road through sand, mud
or water as deep as the wheel hub, more fre-
quent maintenance may be required. For details,
refer to the separately provided Warranty Infor-
mation and Maintenance Booklet.
Rinse the underside of the vehicle with fresh
water after driving through mud or sand. Re-
move any brush or sticks that are trapped.
Install the same size of winter tyres on all four (4)
wheels (such as studless tyres) or install snow
chains to the front wheels when driving on slip-
pery roads (e.g. after a snowfall) and drive care-
fully using 4WD.
Avoid parking your vehicle on steep hills. If you
get out of the vehicle and it rolls forwards, back-
wards or sideways, you could be injured.
5-28Starting and driving
Page 202 of 297
Downloaded from www.Manualslib.com manuals search engine The brake system has two separate hydraulic cir-
cuits. If one circuit malfunctions, you will still have
braking ability with two wheels.
BRAKE PRECAUTIONS
Vacuum assisted brake
The brake booster aids braking by using engine
vacuum. If the engine stops or the drive belt is bro-
ken, you can stop the vehicle by depressing the
brake pedal. However, greater foot pressure on the
brake pedal will be required to stop the vehicle and
the stopping distance will be longer.
Wet brakes
When the vehicle is washed or driven through wa-
ter, the brakes may get wet. As a result, your brak-
ing distance will be longer and the vehicle may pull
to one side during braking.
To dry brakes, drive the vehicle at a safe speed
while lightly pressing the brake pedal to heat up the
brakes. Do this until the brakes return to normal.
Avoid driving the vehicle at high speeds until the
brakes function correctly.
Using the brakes
Avoid resting your foot on the brake pedal while
driving. This will overheat the brakes, wear out the
brake linings and pads faster and reduce fuel
economy performance.
To help reduce brake wear and to prevent the brakes
from overheating, reduce speed and downshift to a
lower gear before going down a slope or long down-hill gradient. Overheated brakes may reduce brak-
ing performance and could result in loss of vehicle
control.
CAUTION
While driving on a slippery surface, be careful
when braking, accelerating or downshifting.
Abrupt braking actions or sudden acceleration
could cause the wheels to skid and result in an
accident.
Be aware that brakes will fade if repeated heavy
brake applications are made.
Driving uphill
When starting on a steep gradient, it is sometimes
difficult to operate the brake (AT or CVT models) or
both the brake and clutch (MT models). Use the
handbrake to hold the vehicle. Do not slip the clutch
(MT models). When ready to start, slowly release
the handbrake while depressing the accelerator
pedal and releasing the clutch (MT models) or de-
pressing the accelerator pedal (AT or CVT models).
Driving downhill
The engine braking action is effective for controlling
the vehicle while descending hills.
The gear lever (MT models) should be placed in a
gear position low enough to obtain sufficient engine
braking.
For the AT or CVT models, a low gear position in
the manual shift mode, low enough to obtain suffi-
cient engine braking, should be selected.
ANTI-LOCK BRAKING SYSTEM (ABS)
WARNING
The Anti-lock Braking System (ABS) is a so-
phisticated device, but it cannot prevent acci-
dents resulting from careless or dangerous
driving techniques. It can help maintain ve-
hicle control during braking on slippery sur-
faces. Remember that stopping distances
may also be longer on rough, gravel or snow
covered roads, or if you are using snow
chains. Always maintain a safe distance from
the vehicle in front of you. Ultimately, the
driver is responsible for safety.
Tyre type and condition may also affect brak-
ing effectiveness.
– When replacing tyres, install the specified
size of tyres on all four wheels.
– When installing a spare tyre, make sure it is the proper size and type as specified on
the tyre placard. See “Vehicle
identification” in the “9. Technical
information” section for the tyre placard
location.
– For detailed information, see “Wheels and tyres” in the “8. Maintenance and
do-it-yourself” section.
The Anti-lock Braking System (ABS) controls the
brakes so that the wheels do not lock during hard
braking or when braking on slippery surfaces. The
system detects the rotation speed at each wheel
BRAKE SYSTEM
Starting and driving5-39
Page 206 of 297
Downloaded from www.Manualslib.com manuals search engine BATTERY
If the battery is not fully charged during extremely
cold weather conditions, the battery fluid may freeze
and damage the battery. To maintain maximum effi-
ciency, the battery should be checked regularly. For
details, see “Battery” in the “8. Maintenance and
do-it-yourself” section.
ENGINE COOLANT
If the vehicle is to be left outside without anti-freeze,
drain the cooling system. Refill before operating the
vehicle. For details, see “Engine cooling system” in
the “8. Maintenance and do-it-yourself” section.
TYRE EQUIPMENT
1) The SUMMER tyres are of a tread design to pro-vide superior performance on dry surfaces. How-
ever, the performance of these tyres will be sub-
stantially reduced in snowy and icy conditions. If
you operate your vehicle on snowy or icy roads,
NISSAN recommends the use of MUD & SNOW
or ALL SEASON tyres on all four wheels. Please
consult a NISSAN dealer or qualified workshop
for tyre type, size, speed rating and availability
information.
2) For additional traction on icy roads, studded tyres may be used. However, some countries,
provinces and states prohibit their use. Check
applicable laws before installing studded tyres. CAUTION
Skid and traction capabilities of studded snow
tyres on wet or dry surfaces may be poorer
than that of non-studded snow tyres.
3) Snow chains may be used, if desired. But the use of snow chains may be prohibited in some
areas. Therefore, check the local laws before
installing snow chains. When installing snow
chains, make sure they are of proper size for the
tyres on your vehicle and are installed according
to the snow chain manufacturer’s instructions.
Use chain tensioners when recommended by the
snow chain manufacturer to ensure a tight fit.
Loose end links of the snow chain must be se-
cured or removed to prevent the possibility of
whipping action damage to the wings or under-
carriage. In addition, drive at a reduced speed,
otherwise, your vehicle may be damaged and/or
vehicle handling and performance may be ad-
versely affected.
SPECIAL WINTER EQUIPMENT
It is recommended to carry the following items in the
vehicle during winter:
A scraper and stiff-bristled brush to remove ice
and snow from the windows.
A sturdy, flat board to be placed under the jack
to give it firm support.
A shovel to dig the vehicle out of snowdrifts.
Extra windscreen washer fluid to refill the reser-
voir tank.
CORROSION PROTECTION
Chemicals used for road surface de-icing are ex-
tremely corrosive and will accelerate corrosion and
the deterioration of underbody components such as
the exhaust system, fuel and brake lines, brake
cables, floor pan, and wings.
In the winter, the underbody must be cleaned
periodically. For additional information, see “Cor-
rosion protection” in the “7. Appearance and
care” section .
For additional protection against rust and corrosion,
which may be required in some areas, consult a
NISSAN dealer or qualified workshop.
Starting and driving5-43
Page 262 of 297
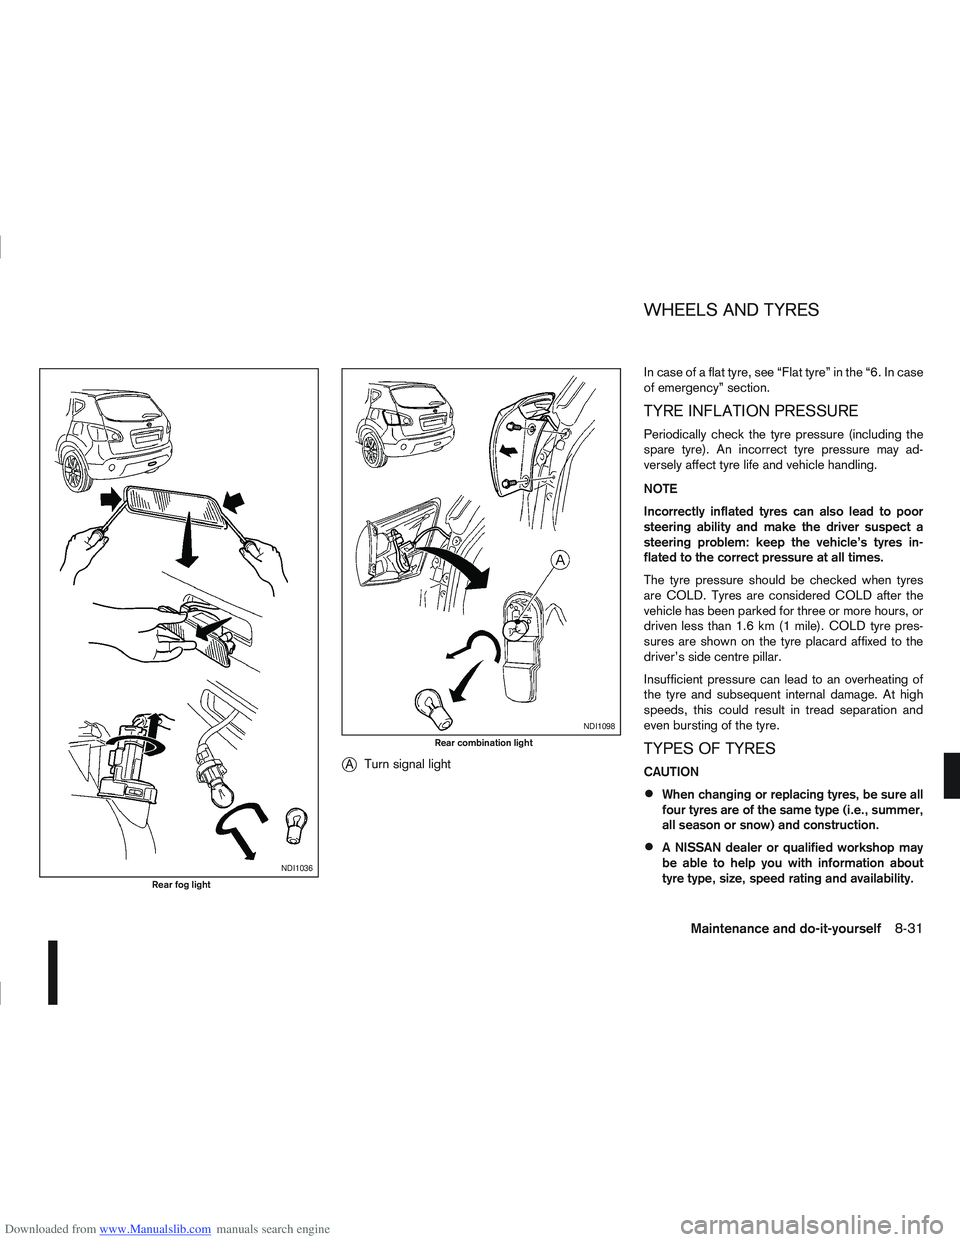
Downloaded from www.Manualslib.com manuals search engine jATurn signal light In case of a flat tyre, see “Flat tyre” in the “6. In case
of emergency” section.
TYRE INFLATION PRESSURE
Periodically check the tyre pressure (including the
spare tyre). An incorrect tyre pressure may ad-
versely affect tyre life and vehicle handling.
NOTE
Incorrectly inflated tyres can also lead to poor
steering ability and make the driver suspect a
steering problem: keep the vehicle’s tyres in-
flated to the correct pressure at all times.
The tyre pressure should be checked when tyres
are COLD. Tyres are considered COLD after the
vehicle has been parked for three or more hours, or
driven less than 1.6 km (1 mile). COLD tyre pres-
sures are shown on the tyre placard affixed to the
driver’s side centre pillar.
Insufficient pressure can lead to an overheating of
the tyre and subsequent internal damage. At high
speeds, this could result in tread separation and
even bursting of the tyre.
TYPES OF TYRES
CAUTION
When changing or replacing tyres, be sure all
four tyres are of the same type (i.e., summer,
all season or snow) and construction.
A NISSAN dealer or qualified workshop may
be able to help you with information about
tyre type, size, speed rating and availability.
NDI1036
Rear fog light
NDI1098
Rear combination light
WHEELS AND TYRES
Maintenance and do-it-yourself8-31