Page 62 of 235
MAP SYMBOLS
This navigation system uses symbols to display facilities.
3-22Map settings
Page 69 of 235
![NISSAN PATHFINDER 2012 R52 / 4.G 06IT Navigation Manual the list screen. If this occurs, enter more
characters to further reduce the number of
matches.
6. The selected destination is displayed at thecenter of the map. Highlight [Start] after
confirming the NISSAN PATHFINDER 2012 R52 / 4.G 06IT Navigation Manual the list screen. If this occurs, enter more
characters to further reduce the number of
matches.
6. The selected destination is displayed at thecenter of the map. Highlight [Start] after
confirming the](/manual-img/5/280/w960_280-68.png)
the list screen. If this occurs, enter more
characters to further reduce the number of
matches.
6. The selected destination is displayed at thecenter of the map. Highlight [Start] after
confirming the location of the displayed
destination, and push .The
system sets the destination to the selected
location and starts calculating a route.
INFO:
Even after setting a destination, you can
adjust the location of the destination, store
the route, etc.
“OPERATIONS AFTER SETTING A
DESTINATION” (page 4-24)
Voice command
1. Push located on the steering switch.
2. After the tone sounds, speak a command.
To set the destination from a street address:
“Navigation” “Address” (Standard mode)
“Address” (Alternate command mode)
INFO:
When using a voice command to set a street
name, the complete street name must be stated.
Examples:
Correct input – North Elm Street East Jefferson Boulevard
Incorrect input – Elm Street East Jefferson
SETTING A POINT OF INTEREST
This allows you to find a facility by type, and then
have the system calculate a route to that
destination. Specify the region and city of the
destination to find it more quickly.
NOTE:
Locations and business hours of facilities
are subject to change, which may not be
reflected in the map data. Double-check
this information before you go to an
emergency facility to ensure that you can
receive the proper support. Otherwise, you may not receive emergency help even
when you arrive at the destination.
A confirmation message also appears on
the navigation screen. Follow the dis-
played instructions and check the items
required.
1. Push
.
2. Highlight [Points of Interest] and push .
3. Select whether to search by directly input-
ting the facility name, or by selecting from
Setting a destination4-5
Page 77 of 235

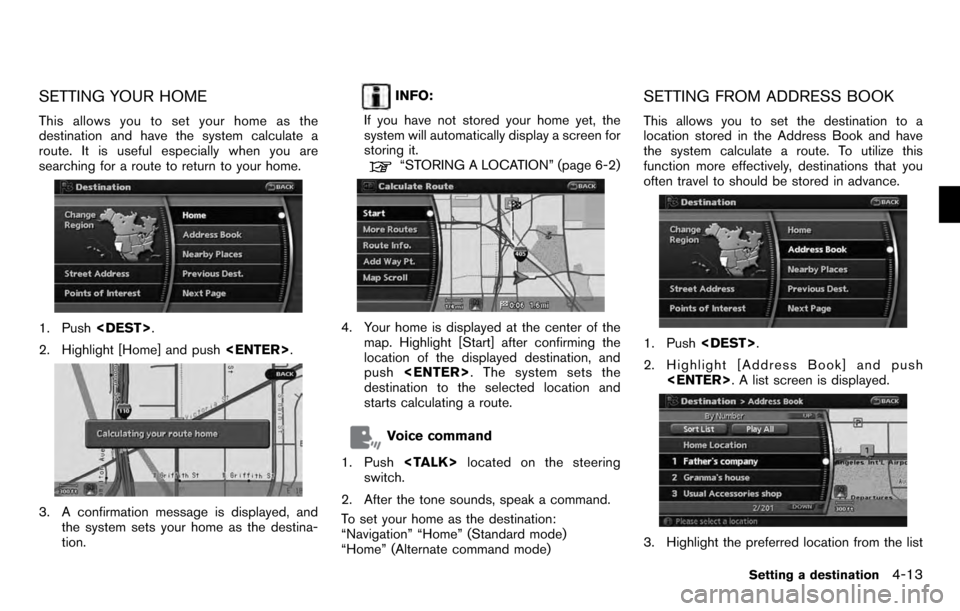
SETTING YOUR HOME
This allows you to set your home as the
destination and have the system calculate a
route. It is useful especially when you are
searching for a route to return to your home.
1. Push.
2. Highlight [Home] and push .
3. A confirmation message is displayed, and
the system sets your home as the destina-
tion.
INFO:
If you have not stored your home yet, the
system will automatically display a screen for
storing it.
“STORING A LOCATION” (page 6-2)
4. Your home is displayed at the center of the map. Highlight [Start] after confirming the
location of the displayed destination, and
push . The system sets the
destination to the selected location and
starts calculating a route.
Voice command
1. Push located on the steering
switch.
2. After the tone sounds, speak a command.
To set your home as the destination:
“Navigation” “Home” (Standard mode)
“Home” (Alternate command mode)
SETTING FROM ADDRESS BOOK
This allows you to set the destination to a
location stored in the Address Book and have
the system calculate a route. To utilize this
function more effectively, destinations that you
often travel to should be stored in advance.
1. Push .
2. Highlight [Address Book] and push . A list screen is displayed.
3. Highlight the preferred location from the list
Setting a destination4-13
Page 80 of 235
![NISSAN PATHFINDER 2012 R52 / 4.G 06IT Navigation Manual Other settings
You can also set the destination by pushing
<ENTER>in the current location map screen
and selecting [Nearby].
Voice command
1. Push <TALK> located on the steering
switch.
2. After the t NISSAN PATHFINDER 2012 R52 / 4.G 06IT Navigation Manual Other settings
You can also set the destination by pushing
<ENTER>in the current location map screen
and selecting [Nearby].
Voice command
1. Push <TALK> located on the steering
switch.
2. After the t](/manual-img/5/280/w960_280-79.png)
Other settings
You can also set the destination by pushing
in the current location map screen
and selecting [Nearby].
Voice command
1. Push located on the steering
switch.
2. After the tone sounds, speak a command.
To display the nearby category list and select the
destination from it:
“Navigation” “Places” (Standard mode)
“Nearby
” (Alternate command
mode)
“Nearby Places” (Alternate command mode)
SETTING A PREVIOUS DESTINATION
This allows you to set the destination to a
location that you have previously set as the destination and have the system calculate a
route. Up to 100 previous destinations will be
automatically stored.
If the number of previous destinations exceeds
100, the oldest one will be replaced by the new
one.
1. Push
.
2. Highlight [Previous Dest.] and push . A list screen is displayed.
3. Highlight the preferred destination from the
list and push .
4. The selected destination is displayed at the
center of the map. Highlight [Start] after
confirming the location of the displayed
destination, and push .The
system sets the destination to the selected
location and starts calculating a route.
INFO:
Even after setting a destination, you can adjust
the location of the destination, store the route,
etc.
“OPERATIONS AFTER SETTING A
DESTINATION” (page 4-24)
Voice command
1. Push located on the steering
switch.
2. After the tone sounds, speak a command.
4-16Setting a destination
Page 81 of 235

To display the Previous Destinations list:
“Navigation” “Previous Destinations” (Standard
mode)
“Previous Destinations” (Alternate command
mode)
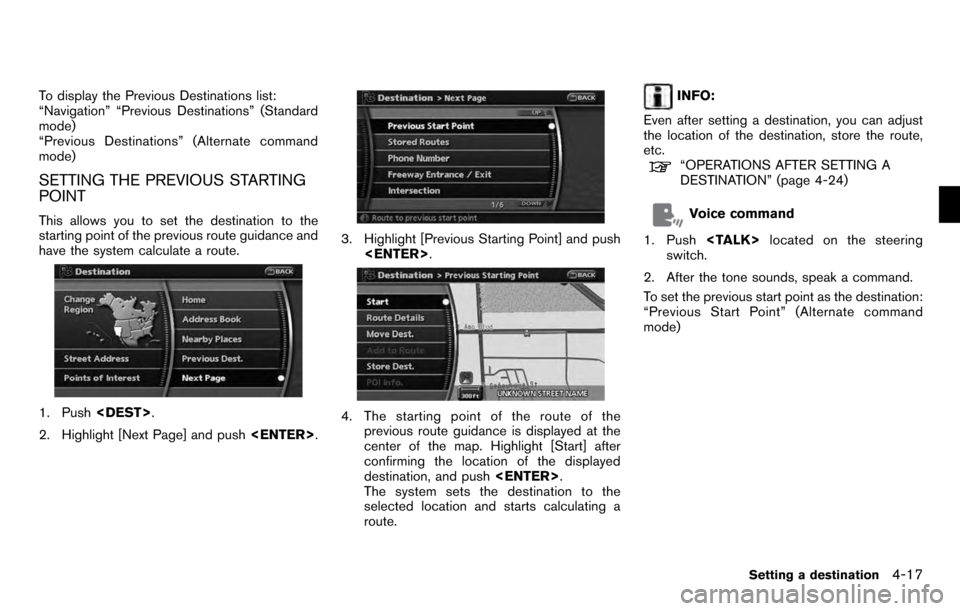
SETTING THE PREVIOUS STARTING
POINT
This allows you to set the destination to the
starting point of the previous route guidance and
have the system calculate a route.
1. Push.
2. Highlight [Next Page] and push .
3. Highlight [Previous Starting Point] and push
.
4. The starting point of the route of the
previous route guidance is displayed at the
center of the map. Highlight [Start] after
confirming the location of the displayed
destination, and push .
The system sets the destination to the
selected location and starts calculating a
route.
INFO:
Even after setting a destination, you can adjust
the location of the destination, store the route,
etc.
“OPERATIONS AFTER SETTING A
DESTINATION” (page 4-24)
Voice command
1. Push located on the steering
switch.
2. After the tone sounds, speak a command.
To set the previous start point as the destination:
“Previous Start Point” (Alternate command
mode)
Setting a destination4-17
Page 115 of 235
![NISSAN PATHFINDER 2012 R52 / 4.G 06IT Navigation Manual After setting the route, select [Start] to begin
route guidance.
Throughout route guidance, the system navi-
gates you through the guide points using visual
and voice guidance.
CAUTION
.The navigation NISSAN PATHFINDER 2012 R52 / 4.G 06IT Navigation Manual After setting the route, select [Start] to begin
route guidance.
Throughout route guidance, the system navi-
gates you through the guide points using visual
and voice guidance.
CAUTION
.The navigation](/manual-img/5/280/w960_280-114.png)
After setting the route, select [Start] to begin
route guidance.
Throughout route guidance, the system navi-
gates you through the guide points using visual
and voice guidance.
CAUTION
.The navigation system’s visual and
voice guidance is for reference
purposes only. The contents of the
guidance may be inappropriate de-
pending on the situation.
. When driving along the suggested
route, follow all traffic regulations
(e.g., one-way traffic) .
“ROUTE GUIDANCE” (page 10-9)
VOICE GUIDANCE DURING ROUTE
GUIDANCE
When approaching a guide point (intersection or
corner) , destination, etc. during route guidance,
voice guidance announces the remaining dis-
tance and/or turning direction. Push
to repeat voice guidance.
Example of voice guidance
&1“In about one quarter mile (400 meters) ,
right (left) turn.”
“Right (left) turn ahead.”
&2“In about one quarter mile (400 meters)
freeway entrance on your right onto (road
number and direction) .”
“Freeway entrance on your right onto (road
number and direction) .”
&3“In about one mile (1.6 kilometers) , exit on
your right.”
“Take the second exit on your right.”
&4“You have arrived at your destination. Ending
route guidance.”
ABOUT ROUTE GUIDANCE
Route guidance5-23
Page 120 of 235
Locations that you often visit can be stored in
the Address Book. The stored locations can be
easily retrieved to set them as a destination or
waypoint.
INFO:
. The Address Book can store up to 200
locations.
. New information placed in the same storage
position will overwrite the old data.
STORING A LOCATION BY SEARCH-
ING
After you have searched for a location as
previously described, you can store the location
for future use.
1. Push .
2. Highlight [Navigation] and push .
3. Highlight [Address Book] and push
.
4. Highlight [Stored Location] and push
.
5. Highlight [Home Location (Add New)] or
[None (Add New)] and push .
6. Highlight the appropriate method to search
for a location and push .
“4. Setting a destination”
STORING A LOCATION
6-2Storing a location/route
Page 123 of 235
3. Highlight [Store Route] and push .
4. A confirmation message is displayed. Con-
firm the contents of the message, highlight
[Yes] and push .
The current route is stored.
OTHER SETTINGS
You can also store a route using the following
procedure.
1) Push .
2) Highlight [Navigation] and push .
3) Highlight [Address Book] and push .
4) Highlight [Stored Routes] and push .
5) Highlight [None (Add New)] and push .
6) A confirmation message is displayed. Con- firm the contents of the message, highlight
[Yes] and push .
The current route is stored.
INFO:
. The route is stored in the first available
position number in the store current route
list.
. A maximum of 5 routes can be stored. When
5 routes are stored in the Address Book, a
new route cannot be stored until a route is
deleted.
“DELETING A STORED ITEM” (page
6-20)
. If you have not set any waypoints on the
route, the route cannot be stored.
Storing a location/route6-5