Page 54 of 235
![NISSAN PATHFINDER 2012 R52 / 4.G 06IT Navigation Manual Other settings
You can also set the map view using the
following procedure.
1) Push<SETTING> .
2) Highlight [Navigation] and push <ENTER>.
3) Highlight [Map Settings] and push <ENTER> .
Voice command
NISSAN PATHFINDER 2012 R52 / 4.G 06IT Navigation Manual Other settings
You can also set the map view using the
following procedure.
1) Push<SETTING> .
2) Highlight [Navigation] and push <ENTER>.
3) Highlight [Map Settings] and push <ENTER> .
Voice command](/manual-img/5/280/w960_280-53.png)
Other settings
You can also set the map view using the
following procedure.
1) Push .
2) Highlight [Navigation] and push .
3) Highlight [Map Settings] and push .
Voice command
1. Push located on the steering
switch.
2. After the tone sounds, speak a command. . To display a map in Plan View:
“Plan View map” (Alternate command mode)
. To display a map in Birdview
TM:
“Birdview map” (Alternate command mode) .
To display a split map in Plan View:
“Plan View Split Map” (Alternate command
mode)
. To display a split map in Birdview
TM:
“Birdview Split Map” (Alternate command
mode)
SETTINGS OF HEADING/LONG
RANGE MAP VIEW
You can change the map direction (orientation)
in Plan View or change the position of the
vehicle icon to view a wider area in the traveling
direction.
These settings are available only in the Plan
View or Split (Plan View) mode.
1. Push while the current location
map screen is displayed.
2. Highlight [Map Settings] and push
.
3. Highlight [Settings] and push .
3-14Map settings
Page 55 of 235
4. Highlight the preferred map orientation andpush . The indicator of the
selected map orientation illuminates.
5. Push
Page 56 of 235
Other settings
You can also set the orientation of the map using
the following procedure.
1) Push .
2) Highlight [Navigation] and push .
3) Highlight [Map Settings] and push .
4) Highlight [Settings] and push .
INFO:
Touching the icon on the map can also change
the direction of the map.
Voice command
1. Push located on the steering
switch.
2. After the tone sounds, speak a command.
To charge the map direction:
“North Up” (Alternate command mode)
“Heading Up” (Alternate command mode)
CHANGING THE BirdviewTMANGLE
This changes the BirdviewTMangle.
This setting is available only in the BirdviewTMor
Split (BirdviewTM) mode.
1. Push while the current location
map screen is displayed.
2. Highlight [Map settings] and push
.
3. Highlight [Settings] and push .
3-16Map settings
Page 57 of 235
4. Highlight [Birdview Angle] and push
.
5. Adjust the BirdviewTMangle by moving the
cursor in the direction ofor. 6. Push
Page 58 of 235
OPERATION WITH SPLIT SCREEN
DISPLAY
When the split screen is displayed, you can
operate the left/right screen.
1. Push while the current location
map screen is displayed.
2. Highlight [Map Settings] and push .
3. Highlight [Left Settings] or [Right Settings]
and push .
4. Highlight the preferred map view and push
. The indicator of the selected
map view illuminates.
5. Push
Page 59 of 235
Other settings
You can also change the scale of the left screen
using the following procedure.
1) Push .
2) Highlight [Navigation] and push .
3) Highlight [Map Settings] and push .
4) Highlight [Left Settings] or [Right Settings] and push . You can display icons on the map and view
information about destinations or landmarks.
DISPLAYING LANDMARK ICONS
This allows you to display or hide the landmark
icons by type.
Landmark icons that can be displayed
.Restaurant
.
Gas Station
.
Hotel
.
AT M
.
Rest Area
1. Push while the current location
map screen is displayed.
2. Highlight [Landmark Icons] and push .
LOOKING AT INFORMATION ON
THE MAP
Map settings3-19
Page 60 of 235

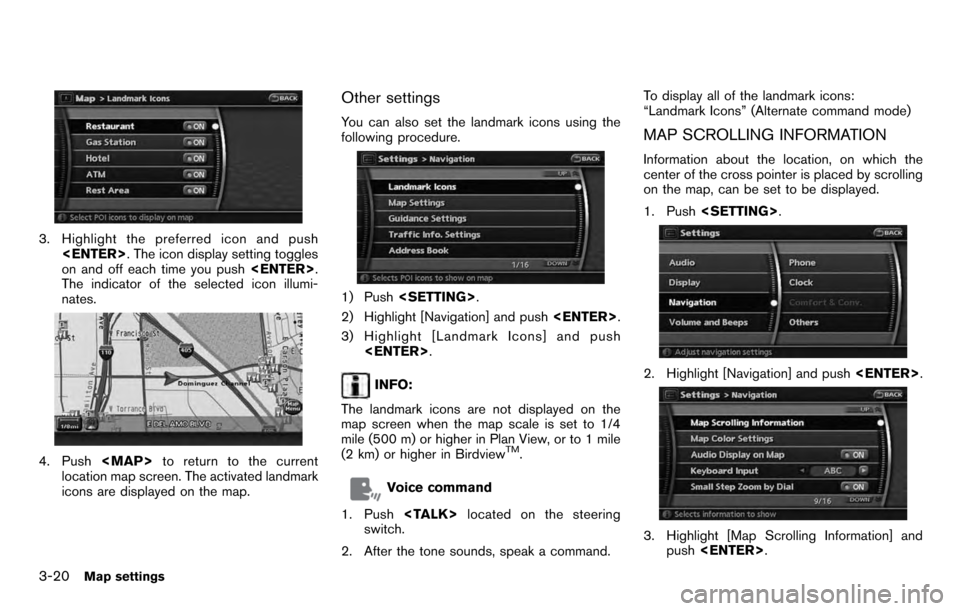
3. Highlight the preferred icon and push . The icon display setting toggles
on and off each time you push .
The indicator of the selected icon illumi-
nates.
4. Push
Page 61 of 235
4. Highlight the preferred information item andpush . The indicator of the
selected information item illuminates.
Available information items:
.Address Book Icons.Destination/Waypoint Icons.Building Names.Latitude/Longitude Info.
5. Push