Page 154 of 453
TROUBLESHOOTING GUIDE
Verify the location of all Intelligent Keys that are
programmed for the vehicle. If another Intelligent
Key is in range or inside the vehicle, the vehicle
system may respond differently than expected.
Page 156 of 453
●Closely supervise children when they
are around cars to prevent them from
playing and becoming locked in the
trunk where they could be seriously in-
jured. Keep the car locked, with the rear
seatback and trunk lid securely latched
when not in use, and prevent children’s
access to car keys.
To open the trunk lid, push the opener switch
down.
To close the trunk lid, lower and push the trunk lid
down securely.
NOTE:
You can open the trunk lid with the Intelli-
gent Key. Refer to “NISSAN Intelligent
Key™” in this section.
Cancel switch
When the switch, located inside the glove box, is
in the OFF position, the power to the trunk lid will
be cancelled. The trunk can only be opened with
the master key or keyfob.
The trunk lid cannot be opened when: ● using the trunk lid release switch,
● the trunk open request switch (if so
equipped) is pushed, when the Intelligent
Key is in range of the vehicle or
● the HOLD button on the Intelligent Key is
pressed.
INTERIOR TRUNK LID RELEASE
Page 167 of 453
*For Navigation system control buttons, refer to
the separate Navigation System Owner’s
Manual.
When you use this system, make sure the engine
is running.
If you use the system with the engine not
running (ignition ON or ACC) for a long
time, it will discharge the battery, and the
engine will not start.
Reference symbols:
“Example” — Words marked in quotes refer to a
key shown only on the display. These keys can be
selected by touching the screen.
HOW TO USE THE TOUCH
SCREEN
Page 168 of 453

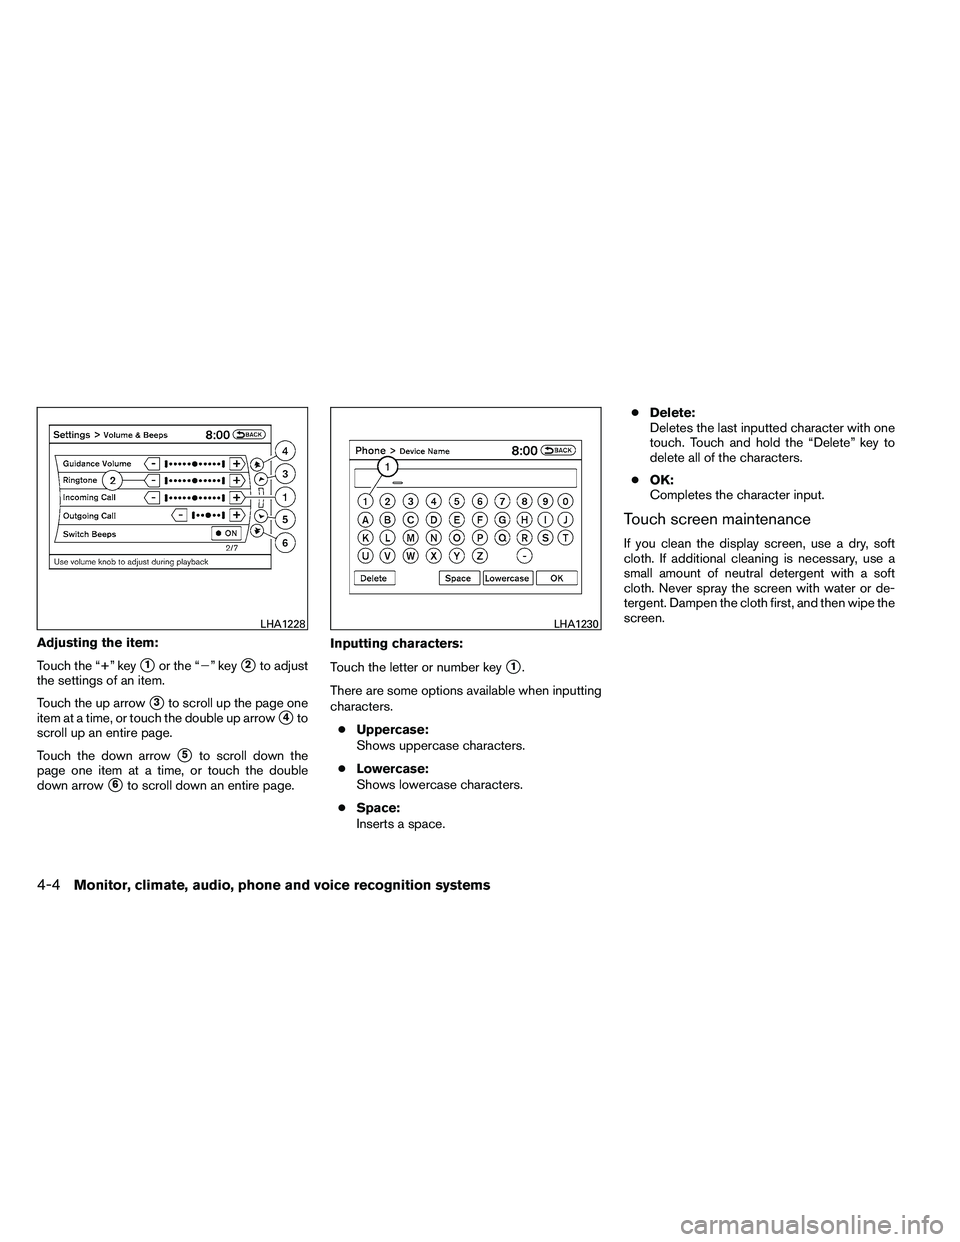
Adjusting the item:
Touch the “+” key
�1or the “�” key�2to adjust
the settings of an item.
Touch the up arrow
�3to scroll up the page one
item at a time, or touch the double up arrow
�4to
scroll up an entire page.
Touch the down arrow
�5to scroll down the
page one item at a time, or touch the double
down arrow
�6to scroll down an entire page. Inputting characters:
Touch the letter or number key
�1.
There are some options available when inputting
characters. ● Uppercase:
Shows uppercase characters.
● Lowercase:
Shows lowercase characters.
● Space:
Inserts a space. ●
Delete:
Deletes the last inputted character with one
touch. Touch and hold the “Delete” key to
delete all of the characters.
● OK:
Completes the character input.
Touch screen maintenance
If you clean the display screen, use a dry, soft
cloth. If additional cleaning is necessary, use a
small amount of neutral detergent with a soft
cloth. Never spray the screen with water or de-
tergent. Dampen the cloth first, and then wipe the
screen.
Page 169 of 453

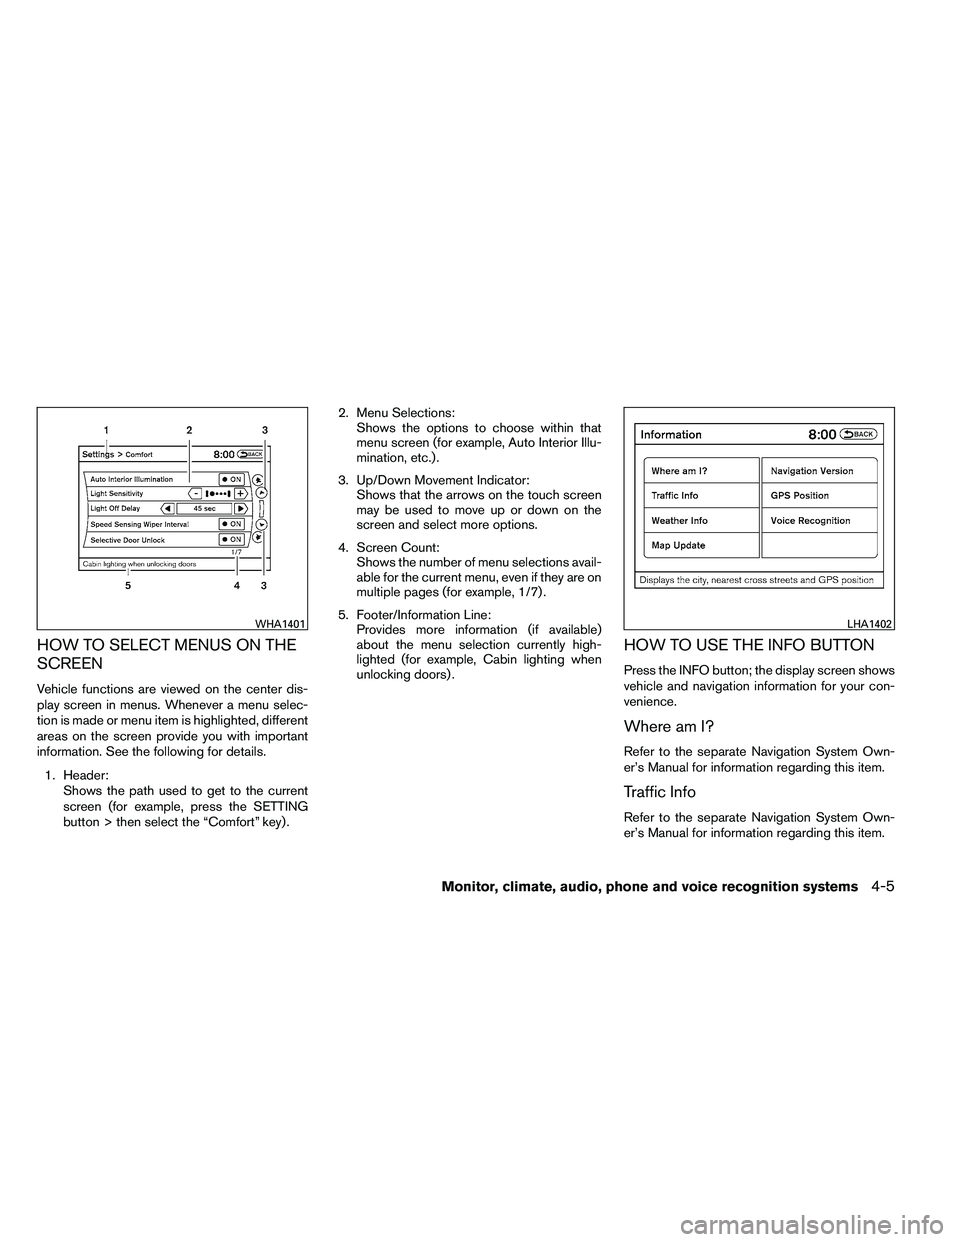
HOW TO SELECT MENUS ON THE
SCREEN
Vehicle functions are viewed on the center dis-
play screen in menus. Whenever a menu selec-
tion is made or menu item is highlighted, different
areas on the screen provide you with important
information. See the following for details.1. Header: Shows the path used to get to the current
screen (for example, press the SETTING
button > then select the “Comfort” key) . 2. Menu Selections:
Shows the options to choose within that
menu screen (for example, Auto Interior Illu-
mination, etc.) .
3. Up/Down Movement Indicator: Shows that the arrows on the touch screen
may be used to move up or down on the
screen and select more options.
4. Screen Count: Shows the number of menu selections avail-
able for the current menu, even if they are on
multiple pages (for example, 1/7) .
5. Footer/Information Line: Provides more information (if available)
about the menu selection currently high-
lighted (for example, Cabin lighting when
unlocking doors) .
HOW TO USE THE INFO BUTTON
Press the INFO button; the display screen shows
vehicle and navigation information for your con-
venience.
Where am I?
Refer to the separate Navigation System Own-
er’s Manual for information regarding this item.
Traffic Info
Refer to the separate Navigation System Own-
er’s Manual for information regarding this item.
Page 171 of 453

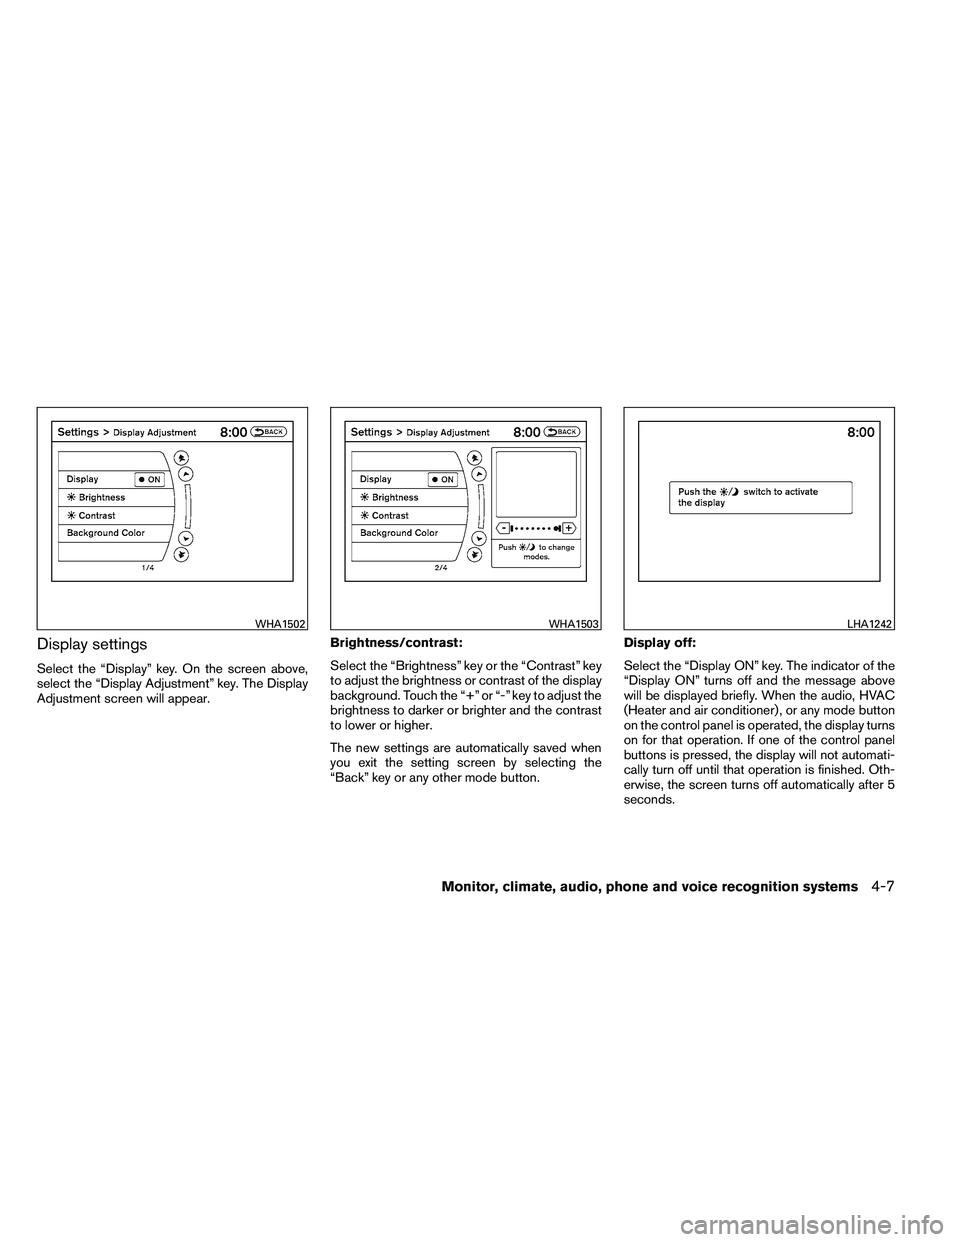
Display settings
Select the “Display” key. On the screen above,
select the “Display Adjustment” key. The Display
Adjustment screen will appear.Brightness/contrast:
Select the “Brightness” key or the “Contrast” key
to adjust the brightness or contrast of the display
background. Touch the “+” or “-” key to adjust the
brightness to darker or brighter and the contrast
to lower or higher.
The new settings are automatically saved when
you exit the setting screen by selecting the
“Back” key or any other mode button.Display off:
Select the “Display ON” key. The indicator of the
“Display ON” turns off and the message above
will be displayed briefly. When the audio, HVAC
(Heater and air conditioner) , or any mode button
on the control panel is operated, the display turns
on for that operation. If one of the control panel
buttons is pressed, the display will not automati-
cally turn off until that operation is finished. Oth-
erwise, the screen turns off automatically after 5
seconds.
Page 172 of 453
To turn the screen on:● Press the SETTING button and select the
“Display” key and then select the “Display
ON” key, or
● Press the
Page 173 of 453
Clock Format (24h):
When this item is enabled (indicator light illumi-
nated) , the clock format will change from the
default 12-hour display to a 24-hour display.
Offset (hour):
Adjust the time by increasing or decreasing the
hours.
Offset (minute):
Adjust the time by increasing or decreasing the
minutes.
Daylight Savings Time:
When this item is enabled (indicator light illumi-
nated) , daylight savings time is on. To turn off the
daylight savings time, touch the “ON” key; the
amber indicator light will go out.Time Zone:
Select the “Time Zone” key; the Time Zone
screen will appear.
Select one of the following zones, depending on
the current location, by selecting the correct time
zone key to enable that time zone (indicator light
will illuminate for that location) .
● Pacific
● Mountain
● Central
● Eastern
● Atlantic ●
Newfoundland
● Hawaii
● Alaska
After selection/settings, select the “Back” key or
any other mode button to accept the changes.