Page 3 of 453

Welcome to the growing family of new NISSAN
owners. This vehicle is delivered to you with
confidence. It was produced using the latest
techniques and strict quality control.
This manual was prepared to help you under-
stand the operation and maintenance of your
vehicle so that you may enjoy many miles (kilome-
ters) of driving pleasure. Please read through this
manual before operating your vehicle.
A separate Warranty Information Booklet
explains details about the warranties cov-
ering your vehicle. The “NISSAN Service
and Maintenance Guide” explains details
about maintaining and servicing your ve-
hicle. Additionally, a separate Customer
Care/Lemon Law Booklet (U.S. only) will
explain how to resolve any concerns you
may have with your vehicle, as well as
clarify your rights under your state’s lemon
law.
Your NISSAN dealership knows your vehicle
best. When you require any service or have any
questions, they will be glad to assist you with the
extensive resources available to them.In addition to factory installed options, your ve-
hicle may also be equipped with additional ac-
cessories installed by Nissan or by your autho-
rized Nissan dealer prior to delivery. It is important
that you familiarize yourself with all disclosures,
warnings, cautions and instructions concerning
proper use of such accessories prior to operating
the vehicle and/or accessory. Please see your
dealer for details concerning the particular ac-
cessories with which your vehicle is equipped.Before driving your vehicle, please read this Own-
er’s Manual carefully. This will ensure familiarity
with controls and maintenance requirements, as-
sisting you in the safe operation of your vehicle.
Page 28 of 453
FOLDING REAR SEAT
Interior trunk access
The trunk can be accessed from the passenger
side of the rear seat for loading and unloading, as
shown.1. Open the access cover on the rear parcel
shelf.
2. Push down on the button on the rear parcel shelf.
3. Fold down the passenger’s side seatback.
To remove or reinstall the seatback release but-
ton access covers, see “Upper tether anchor/key
cylinder covers” in the “Maintenance and do-it-
yourself” section of this manual.
Page 57 of 453
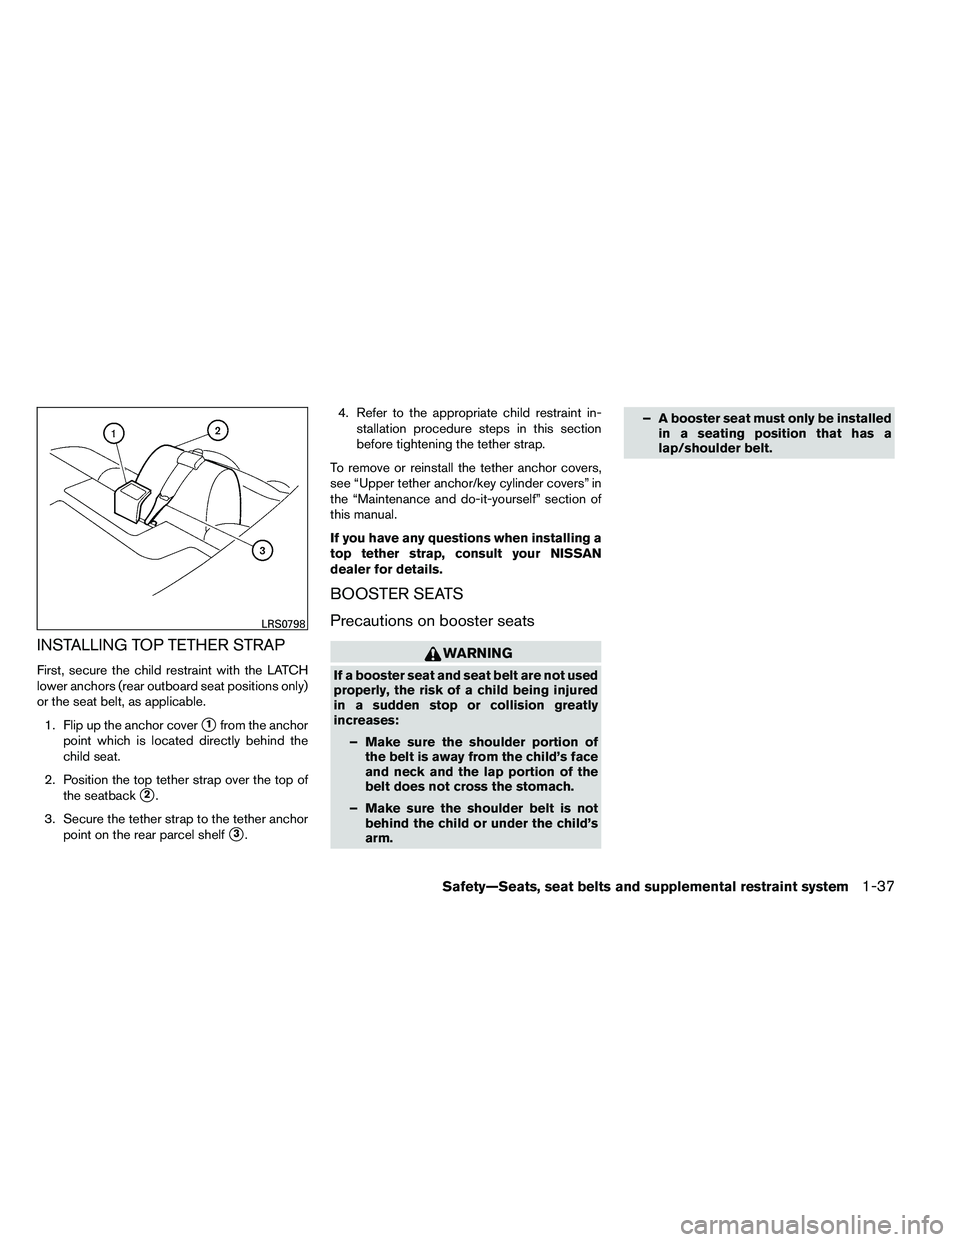
INSTALLING TOP TETHER STRAP
First, secure the child restraint with the LATCH
lower anchors (rear outboard seat positions only)
or the seat belt, as applicable.1. Flip up the anchor cover
�1from the anchor
point which is located directly behind the
child seat.
2. Position the top tether strap over the top of the seatback
�2.
3. Secure the tether strap to the tether anchor point on the rear parcel shelf
�3. 4. Refer to the appropriate child restraint in-
stallation procedure steps in this section
before tightening the tether strap.
To remove or reinstall the tether anchor covers,
see “Upper tether anchor/key cylinder covers” in
the “Maintenance and do-it-yourself” section of
this manual.
If you have any questions when installing a
top tether strap, consult your NISSAN
dealer for details.
BOOSTER SEATS
Precautions on booster seats
Page 97 of 453
Range mode
The range mode can be selected to give you an
estimation of the distance that can be driven
before refueling. The range is constantly calcu-
lated based on the amount of fuel in the fuel tank
and the actual fuel consumption.Exterior temperature mode
The exterior temperature mode can be selected
to provide you with the temperature outside of
your vehicle.
Setting mode
The setting mode allows you to set reminders or
preferences for alerts, maintenance intervals or
language displays.
In the setting mode screen press
Page 98 of 453
Alert mode
The alert mode allows you to set alerts notifying
you of time to rest or icy conditions.
The time to rest alert lets you know when you
have been traveling for a long time and may need
a break.
The icy alert notifies you that icy driving condi-
tions may exist.Reset mode
The reset mode can be selected in any screen
that allows for preferences to be programmed.
Once the screen is selected, you have the option
to reset the selected distances or time to a new
setting.
Maintenance mode
The maintenance mode allows you to set alerts
for the reminding of maintenance intervals for the
following:
● tires
● oil
● filter
● other
Set a desired interval by pushing
Page 99 of 453
For additional information, see “Indicators for
maintenance” later in this section.Options mode
The LANGUAGE/UNIT screen will appear when
selecting the “Language/Unit” key and
pressing
Page 100 of 453
Indicators for maintenance
1. Engine oil replacement indicatorThis indicator appears when the customer
set distance comes for changing the engine
oil. You can set or reset the distance for
changing the engine oil. See “Maintenance
mode” earlier in this section.
2. Oil filter replacement indicator This indicator appears when the customer
set distance comes for replacing the oil filter.
You can set or reset the distance for replac-
ing the oil filter. See “Maintenance mode”
earlier in this section.
3. Tire replacement indicator This indicator appears when the customer
set distance comes for replacing tires. You
can set or reset the distance for replacing
tires. See “Maintenance mode” earlier in this
section.
Page 102 of 453

11. NISSAN Intelligent Key™ removal indicator
12. NISSAN Intelligent Key™ battery dischargeindicator
13. Loose fuel cap warning
14. Check tire pressure warning
Door and trunk open warning
This warning illuminates when a door or the trunk
has been opened when the engine is running.
Push warning (CVT models)
After the Shift P warning illuminates, the Push
warning will illuminate if the ignition switch is
placed in the ACC position when the shift selec-
tor is moved to the P (Park) position.
See “Shift P warning (CVT models)” in this sec-
tion for additional information.
To turn off the Push warning, place the ignition
switch in the ON position and then in the LOCK
position.
Low fuel warning
This warning illuminates when the fuel level in the
fuel tank is getting low. Refuel as soon as it is
convenient, preferably before the fuel gauge
reaches E (Empty) . There will be a small re-
serve of fuel in the tank when the fuel
gauge needle reaches E (Empty) . Low windshield-washer fluid warning
This warning illuminates when the windshield-
washer fluid is at a low level. Add windshield-
washer fluid as necessary. See “Windshield-
washer fluid” in the “Maintenance and do-it-
yourself” section of this manual.
No key warning
This warning illuminates following two condi-
tions:
1. When the ignition switch is pushed and the Intelligent Key cannot be recognized by the
system. If this warning illuminates, you can-
not start the engine.
Check for the following causes and perform
the assigned remedies:
– The battery of the Intelligent Key carried with you is discharged completely. Re-
place the battery with a new one.
– The Intelligent Key carried with you is not registered to the system. Use the regis-
tered Intelligent Key.
– You do not have an Intelligent Key with you. Carry an Intelligent Key with you. 2. When the door is closed with the Intelligent
Key left outside the vehicle and the ignition
switch is placed in the ACC or ON position.
A chime will also sound.
Parking brake warning
This warning illuminates when the parking brake
is set and the vehicle is driven.
SHIFT P warning (CVT models)
This warning illuminates when the ignition switch
is pushed to stop the engine with the shift selec-
tor in any position except in the P (Park) position.
If this warning illuminates, the ignition switch is
placed in the OFF position. Move the shift selec-
tor to the P (Park) position or place the ignition
switch in the ON position.
An inside warning chime will also sound.
If the shift selector is moved to the P (Park)
position, the Push warning will appear. Refer to
“Push warning (CVT models)” in this section.
For additional information about Intelligent Key,
see “NISSAN Intelligent Key™ ” in the “Pre-
driving checks and adjustments” section.
2-24Instruments and controls