Page 54 of 453

Refer to all Warnings and Cautions in the “Child
Safety” and “Child Restraint” sections before in-
stalling a child restraint.
Follow these steps to install a forward-facing
child restraint using the vehicle seat belt in the
rear seats or in the front passenger seat:1. If you must install a child restraint in
the front seat, it should be placed in a
forward-facing direction only. Move
the seat to the rearmost position. Child
restraints for infants must be used in the rear-facing direction and, there-
fore, must not be used in the front seat.
2. Position the child restraint on the seat. Al- ways follow the child restraint manufactur-
er’s instructions.
The back of the child restraint should be
secured against the vehicle seatback.
If necessary, adjust or remove the head re-
straint to obtain the correct child restraint fit.
If the head restraint is removed, store it in a
secure place. Be sure to reinstall the
head restraint when the child restraint
is removed. See “Head restraints” in this
section for head restraint adjustment, re-
moval and installation information.
If the seating position does not have an
adjustable head restraint and it is interfering
with the proper child restraint fit, try another
seating position or a different child restraint. 3. Route the seat belt tongue through the child
restraint and insert it into the buckle until you
hear and feel the latch engage. Be sure to
follow the child restraint manufacturer’s in-
structions for belt routing.
If the child restraint is equipped with a top
tether strap, route the top tether strap and
secure the tether strap to the tether anchor
point (rear seat installation only) . See “In-
stalling top tether strap” in this section. Do
not install child restraints that require the use
of a top tether strap in seating positions that
do not have a top tether anchor.
Page 57 of 453
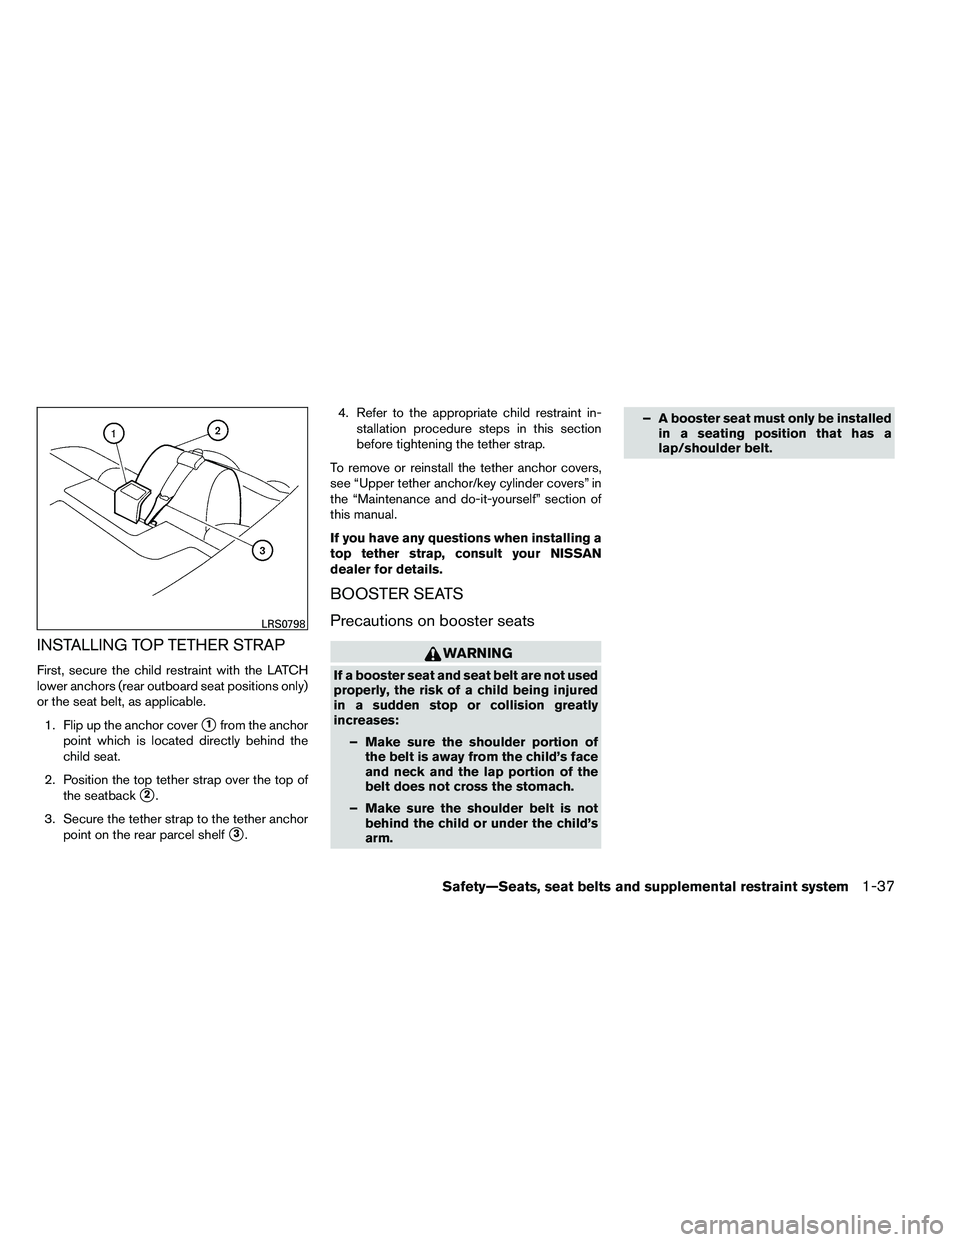
INSTALLING TOP TETHER STRAP
First, secure the child restraint with the LATCH
lower anchors (rear outboard seat positions only)
or the seat belt, as applicable.1. Flip up the anchor cover
�1from the anchor
point which is located directly behind the
child seat.
2. Position the top tether strap over the top of the seatback
�2.
3. Secure the tether strap to the tether anchor point on the rear parcel shelf
�3. 4. Refer to the appropriate child restraint in-
stallation procedure steps in this section
before tightening the tether strap.
To remove or reinstall the tether anchor covers,
see “Upper tether anchor/key cylinder covers” in
the “Maintenance and do-it-yourself” section of
this manual.
If you have any questions when installing a
top tether strap, consult your NISSAN
dealer for details.
BOOSTER SEATS
Precautions on booster seats
Page 135 of 453
Mechanical key
The Intelligent Key contains the mechanical key.
To remove the mechanical key, release the lock
knob on the back of the Intelligent Key.
To install the mechanical key, firmly insert it into
the Intelligent Key until the lock knob returns to
the lock position.
Use the mechanical key to lock or unlock the
doors, trunk lid, glove box and rear seatback lock.
See “Doors” and “Trunk lid” in this section, “Stor-
age” in the “Instruments and controls” section,
“Seats” in the “Safety — Seats, seat belts and
supplemental restraint system” section, and “Up-per tether anchor/key cylinder covers” in the
“Maintenance and do-it-yourself” section of this
manual.
Page 361 of 453

●Do not apply wheel cleaners to the
wheels when they are hot. The wheel
temperature should be the same as am-
bient temperature.
● Rinse the wheel to completely remove
the cleaner within 15 minutes after the
cleaner is applied.
CHROME PARTS
Clean all chrome parts regularly with a non-
abrasive chrome polish to maintain the finish.
TIRE DRESSINGS
NISSAN does not recommend the use of tire
dressings. Tire manufacturers apply a coating to
the tires to help reduce discoloration of the rub-
ber. If a tire dressing is applied to the tires, it may
react with the coating and form a compound. This
compound may come off the tire while driving and
stain the vehicle paint.
If you choose to use a tire dressing, take the
following precautions:
● Use a water-based tire dressing. The coat-
ing on the tire dissolves more easily than
with an oil-based tire dressing. ●
Apply a light coat of tire dressing to help
prevent it from entering the tire
tread/grooves (where it would be difficult to
remove) .
● Wipe off excess tire dressing using a dry
towel. Make sure the tire dressing is com-
pletely removed from the tire tread/grooves.
● Allow the tire dressing to dry as recom-
mended by the tire dressing manufacturer. Occasionally remove loose dust from the interior
trim, plastic parts and seats using a vacuum
cleaner or soft bristled brush. Wipe the vinyl and
leather surfaces with a clean, soft cloth damp-
ened in mild soap solution, then wipe clean with a
dry, soft cloth.
Regular care and cleaning is required in order to
maintain the appearance of the leather.
Before using any fabric protector, read the manu-
facturer’s recommendations. Some fabric pro-
tectors contain chemicals that may stain or
bleach the seat material.
Use a cloth dampened only with water to clean
the meter and gauge lens.