2012 NISSAN 370Z COUPE CD player
[x] Cancel search: CD playerPage 197 of 427
Compressed Video Files (models with
navigation system)
Explanation of terms:
.DivX®- DivX®refers to the DivX®codec
owned by DivX, Inc. used for a lossy
compression of video based on MPEG-4.
. AVI - AVI stands for Audio Video Interleave.
It is a standard file format originated by
Microsoft Corporation. A “.divx” encoded file
can be saved into the “.avi” file format for
playback on this system if it meets the
requirements stated in the table in this
section. However, not all the “.avi” files are
playable on this system since different
encodings can be used than the DivX
®
codec.
. ASF - ASF stands for Advanced Systems
Format. It is a file format owned by Microsoft
Corporation. Note: Only “.asf” files that meet
the requirements stated in the table in this
section can be played.
. Bit rate — Bit rate denotes the number of
bits per second used by a digital video file.
The size and quality of a compressed digital
audio file is determined by the bit rate used
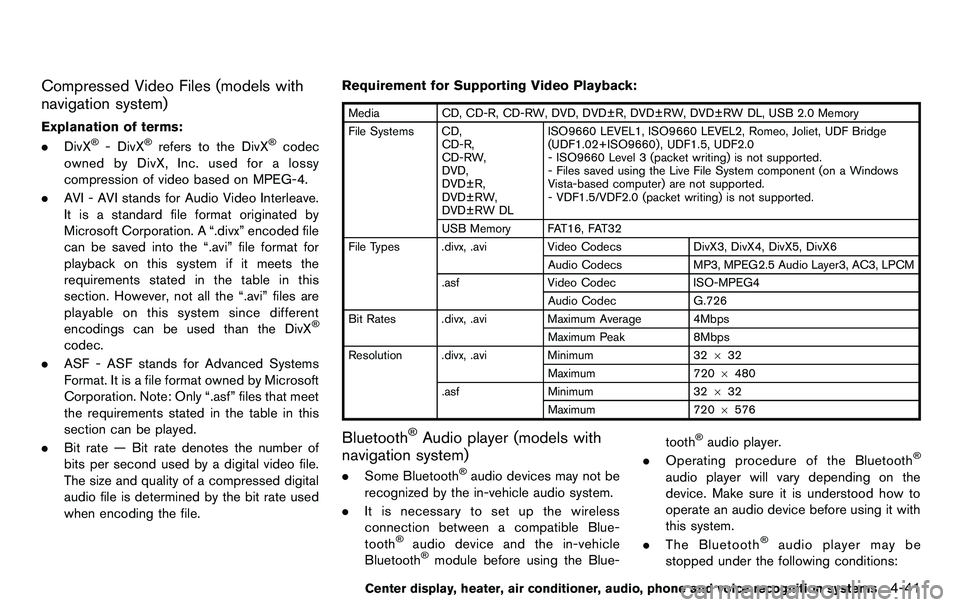
when encoding the file. Requirement for Supporting Video Playback:
Media
CD, CD-R, CD-RW, DVD, DVD±R, DVD±RW, DVD±RW DL, USB 2.0 Memory
File Systems CD, CD-R,
CD-RW,
DVD,
DVD±R,
DVD±RW,
DVD±RW DL ISO9660 LEVEL1, ISO9660 LEVEL2, Romeo, Joliet, UDF Bridge
(UDF1.02+ISO9660) , UDF1.5, UDF2.0
- ISO9660 Level 3 (packet writing) is not supported.
- Files saved using the Live File System component (on a Windows
Vista-based computer) are not supported.
- VDF1.5/VDF2.0 (packet writing) is not supported.
USB Memory FAT16, FAT32
File Types .divx, .avi Video CodecsDivX3, DivX4, DivX5, DivX6
Audio Codecs MP3, MPEG2.5 Audio Layer3, AC3, LPCM
.asf Video Codec ISO-MPEG4
Audio Codec G.726
Bit Rates .divx, .avi Maximum Average 4Mbps
Maximum Peak 8Mbps
Resolution .divx, .avi Minimum32632
Maximum 7206480
.asf Minimum 32632
Maximum 720 6576
Bluetooth®Audio player (models with
navigation system)
. Some Bluetooth®audio devices may not be
recognized by the in-vehicle audio system.
. It is necessary to set up the wireless
connection between a compatible Blue-
tooth
®audio device and the in-vehicle
Bluetooth®module before using the Blue- tooth
®audio player.
. Operating procedure of the Bluetooth®
audio player will vary depending on the
device. Make sure it is understood how to
operate an audio device before using it with
this system.
. The Bluetooth
®audio player may be
stopped under the following conditions:
Center display, heater, air conditioner, audio, phone and voice recognition systems4-41
Page 199 of 427
SAA2742
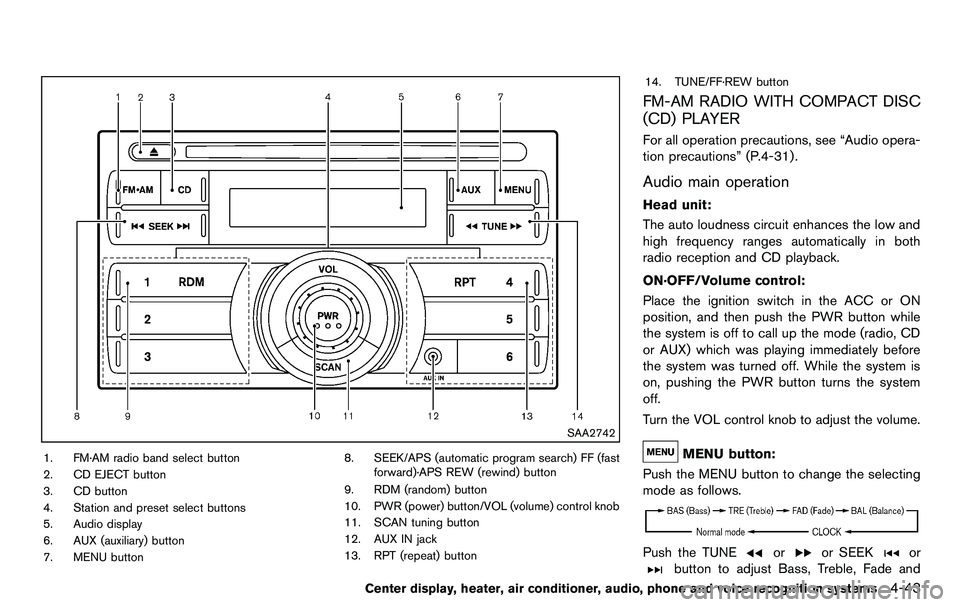
1. FM·AM radio band select button
2. CD EJECT button
3. CD button
4. Station and preset select buttons
5. Audio display
6. AUX (auxiliary) button
7. MENU button8. SEEK/APS (automatic program search) FF (fast
forward)·APS REW (rewind) button
9. RDM (random) button
10. PWR (power) button/VOL (volume) control knob
11. SCAN tuning button
12. AUX IN jack
13. RPT (repeat) button 14. TUNE/FF·REW button
FM-AM RADIO WITH COMPACT DISC
(CD) PLAYER
For all operation precautions, see “Audio opera-
tion precautions” (P.4-31) .
Audio main operation
Head unit:
The auto loudness circuit enhances the low and
high frequency ranges automatically in both
radio reception and CD playback.
ON·OFF/Volume control:
Place the ignition switch in the ACC or ON
position, and then push the PWR button while
the system is off to call up the mode (radio, CD
or AUX) which was playing immediately before
the system was turned off. While the system is
on, pushing the PWR button turns the system
off.
Turn the VOL control knob to adjust the volume.
MENU button:
Push the MENU button to change the selecting
mode as follows.
Push the TUNEoror SEEKor
button to adjust Bass, Treble, Fade and
Center display, heater, air conditioner, audio, phone and voice recognition systems4-43
Page 201 of 427
SCAN tuning:
Push the SCAN tuning button to tune from low
to high frequencies and stops at each broad-
casting station for 5 seconds. Pushing the
button again during this 5 seconds period will
stop SCAN tuning and the radio will remain
tuned to that station.
If the SCAN tuning button is not pushed within 5
seconds, SCAN tuning moves to the next
station.
toStation memory operations:
Twelve stations can be set for the FM band (6
each for FM1 and FM2) and 6 stations can be
set for the AM band.
1. Choose the radio band AM, FM1 or FM2 using the radio band select button.
2. Tune to the desired station using the SEEK, SCAN or TUNE button.
3. Select the desired station and push and hold the desired station preset buttons 1 to
6 until a beep sound is heard. (The radio
mutes when the select button is pushed.)
4. The station indicator will then come on and the sound will resume. Memorizing is now
complete.
5. Other buttons can be set in the same manner. If the battery cable is disconnected, or if the fuse
blows, the radio memory will be erased. In that
case, reset the desired stations.
Compact Disc (CD) player operation
Place the ignition switch in the ACC or ON
position, and insert the CD into the slot with the
label side facing up. The CD will be guided
automatically into the slot and start playing.
After loading the disc, the number of tracks on
the disc will appear on the display.
If the radio is already operating, it will auto-
matically turn off and the CD will play.
If the system has been turned off while the CD
was playing, pushing the PWR button will start
the CD.
MP3 or WMA CDs are not supported with this
CD player. If an MP3 or WMA CD is inserted
into the slot, the counter on the audio display
automatically advances without sound. However
this is a specification of the CD mechanism and
not a malfunction.
Do not use 3.1 in (8 cm) discs.
CD PLAY:
When the CD button is pushed with the system
off and the CD loaded, the system will turn on
and the CD will start to play. When the CD button is pushed with the CD
loaded and the radio playing, the radio will
automatically be turned off and the CD will start
to play.
FF (Fast Forward) , REW (Rewind):
When the
orof the TUNE button is
pushed while the CD is being played, the CD
will play while fast forwarding or rewinding.
When the button is released, the CD will return
to normal play speed.
APS (Automatic Program Search) FF,
APS REW:
When the
of the SEEK button is pushed
while the CD is being played, the next track or
the current track on the CD will start to play from
its beginning. Push several times to skip through
tracks. The CD will advance the number of times
the button is pushed. (When the last track on
the CD is skipped through, the first track will be
played.)
When the
button is pushed, the track being
played returns to its beginning. Push several
times to skip back through tracks. The CD will
go back the number of times the button is
pushed.
Center display, heater, air conditioner, audio, phone and voice recognition systems4-45
Page 202 of 427
4-46Center display, heater, air conditioner, audio, phone and voice recognition systems
REPEAT (RPT)/RANDOM
(RDM) play:
When the RPT or RDM button is pushed while a
CD is being played, the play pattern can be
changed as follows:
RPT button:
1 Disc Repeat (Normal play) ↔1 Track Repeat
RDM button:
1 Disc Repeat (Normal play) ↔1 Disc Random
The display shows the following symbols:
(No mark): 1 Disc Repeat 1: 1 Track Repeat
RDM: 1 Disc Random
CD EJECT:
When the CD EJECT button is pushed with the
CD loaded, the CD will be ejected.
When this button is pushed while the CD is
being played, the CD will come out and the
system will turn off.
If the CD comes out and is not removed, it
will be pulled back into the slot to protect
it.
SCAN tuning:
When the SCAN tuning button is pushed while the CD is being played, the beginning of all the
tracks of the CDs will be played for 10 seconds
in sequence.
Pushing the button again during this 10 second
period will stop SCAN tuning.
If the SCAN tuning button is not pushed within
10 seconds, SCAN tuning continues to move to
the next CD track.
AUX (Auxiliary) input
AUX IN jack:
The AUX IN jack is located on the audio unit.
The AUX IN audio input jack accepts any
standard analog audio input such as from a
portable cassette tape/CD player, MP3 player or
laptop computer.
AUX (Auxiliary) button:
Push the AUX button to play a compatible
device when it is plugged into the AUX IN jack.
When the AUX button is pushed with no device
plugged into the jack, the audio system does not
change to the AUX mode (the AUX button is
invalid).
NISSAN strongly recommends using a stereo
mini plug cable when connecting your music
device to the audio system. Music may not play
properly when a monaural cable is used.
Page 206 of 427
4-50Center display, heater, air conditioner, audio, phone and voice recognition systems
PLAY:
When the DISC (CD play) button is pushed with
the system off and the CD loaded, the system
will turn on and the CD will start to play.
When the DISC button is pushed with the CD
loaded and the radio playing, the radio will
automatically be turned off and the CD will start
to play.
When the DISC button is pushed while a CD is
loaded and a medium is played using the
auxiliary input jacks, you can toggle back and
forth between CD and medium.
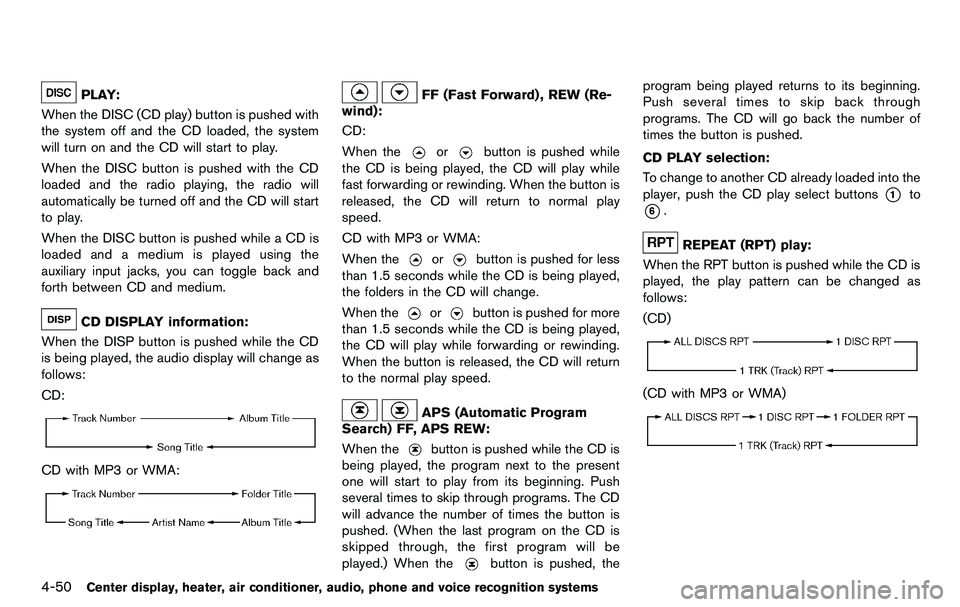
CD DISPLAY information:
When the DISP button is pushed while the CD
is being played, the audio display will change as
follows:
CD:
CD with MP3 or WMA:
FF (Fast Forward) , REW (Re-
wind):
CD:
When the
orbutton is pushed while
the CD is being played, the CD will play while
fast forwarding or rewinding. When the button is
released, the CD will return to normal play
speed.
CD with MP3 or WMA:
When the
orbutton is pushed for less
than 1.5 seconds while the CD is being played,
the folders in the CD will change.
When the
orbutton is pushed for more
than 1.5 seconds while the CD is being played,
the CD will play while forwarding or rewinding.
When the button is released, the CD will return
to the normal play speed.
APS (Automatic Program
Search) FF, APS REW:
When the
button is pushed while the CD is
being played, the program next to the present
one will start to play from its beginning. Push
several times to skip through programs. The CD
will advance the number of times the button is
pushed. (When the last program on the CD is
skipped through, the first program will be
played.) When the
button is pushed, the program being played returns to its beginning.
Push several times to skip back through
programs. The CD will go back the number of
times the button is pushed.
CD PLAY selection:
To change to another CD already loaded into the
player, push the CD play select buttons
*1to
*6.
REPEAT (RPT) play:
When the RPT button is pushed while the CD is
played, the play pattern can be changed as
follows:
(CD)
(CD with MP3 or WMA)
Page 207 of 427
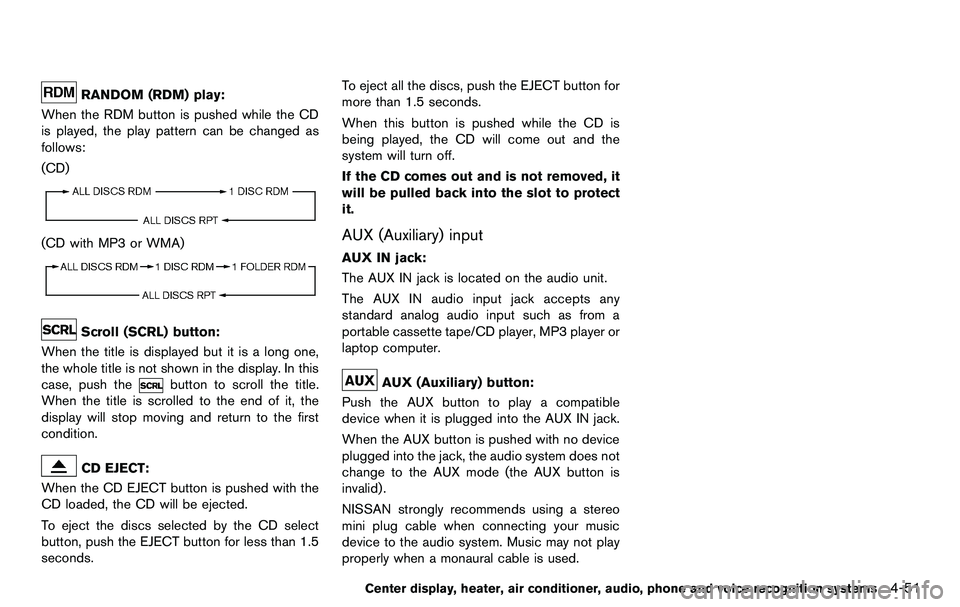
RANDOM (RDM) play:
When the RDM button is pushed while the CD
is played, the play pattern can be changed as
follows:
(CD)
(CD with MP3 or WMA)
Scroll (SCRL) button:
When the title is displayed but it is a long one,
the whole title is not shown in the display. In this
case, push the
button to scroll the title.
When the title is scrolled to the end of it, the
display will stop moving and return to the first
condition.
CD EJECT:
When the CD EJECT button is pushed with the
CD loaded, the CD will be ejected.
To eject the discs selected by the CD select
button, push the EJECT button for less than 1.5
seconds. To eject all the discs, push the EJECT button for
more than 1.5 seconds.
When this button is pushed while the CD is
being played, the CD will come out and the
system will turn off.
If the CD comes out and is not removed, it
will be pulled back into the slot to protect
it.
AUX (Auxiliary) input
AUX IN jack:
The AUX IN jack is located on the audio unit.
The AUX IN audio input jack accepts any
standard analog audio input such as from a
portable cassette tape/CD player, MP3 player or
laptop computer.
AUX (Auxiliary) button:
Push the AUX button to play a compatible
device when it is plugged into the AUX IN jack.
When the AUX button is pushed with no device
plugged into the jack, the audio system does not
change to the AUX mode (the AUX button is
invalid).
NISSAN strongly recommends using a stereo
mini plug cable when connecting your music
device to the audio system. Music may not play
properly when a monaural cable is used.
Center display, heater, air conditioner, audio, phone and voice recognition systems4-51
Page 208 of 427
4-52Center display, heater, air conditioner, audio, phone and voice recognition systems
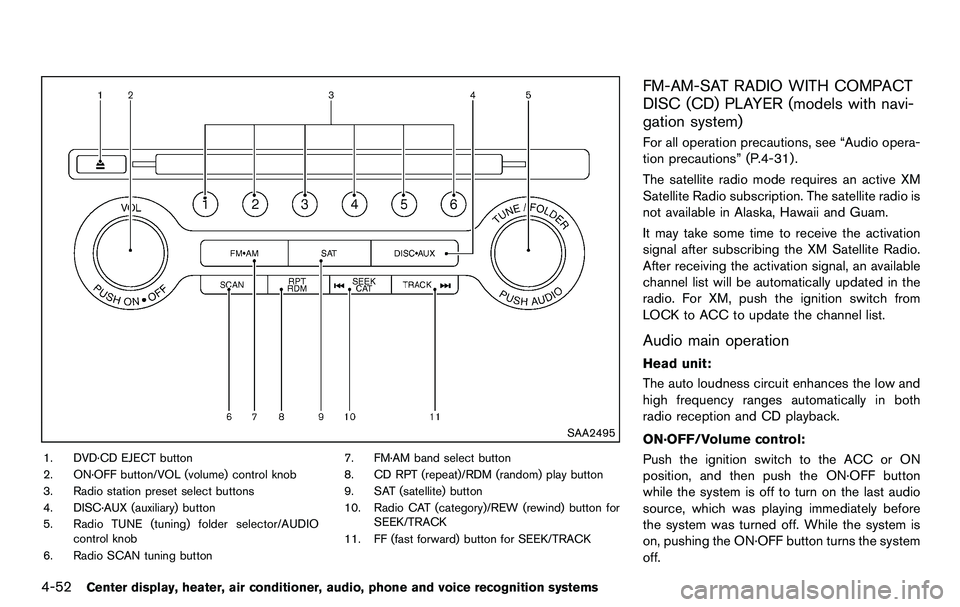
SAA2495
1. DVD·CD EJECT button
2. ON·OFF button/VOL (volume) control knob
3. Radio station preset select buttons
4. DISC·AUX (auxiliary) button
5. Radio TUNE (tuning) folder selector/AUDIOcontrol knob
6. Radio SCAN tuning button 7. FM·AM band select button
8. CD RPT (repeat)/RDM (random) play button
9. SAT (satellite) button
10. Radio CAT (category)/REW (rewind) button for
SEEK/TRACK
11. FF (fast forward) button for SEEK/TRACK
FM-AM-SAT RADIO WITH COMPACT
DISC (CD) PLAYER (models with navi-
gation system)
For all operation precautions, see “Audio opera-
tion precautions” (P.4-31) .
The satellite radio mode requires an active XM
Satellite Radio subscription. The satellite radio is
not available in Alaska, Hawaii and Guam.
It may take some time to receive the activation
signal after subscribing the XM Satellite Radio.
After receiving the activation signal, an available
channel list will be automatically updated in the
radio. For XM, push the ignition switch from
LOCK to ACC to update the channel list.
Audio main operation
Head unit:
The auto loudness circuit enhances the low and
high frequency ranges automatically in both
radio reception and CD playback.
ON·OFF/Volume control:
Push the ignition switch to the ACC or ON
position, and then push the ON·OFF button
while the system is off to turn on the last audio
source, which was playing immediately before
the system was turned off. While the system is
on, pushing the ON·OFF button turns the system
off.
Page 210 of 427
4-54Center display, heater, air conditioner, audio, phone and voice recognition systems
.UPDATING (When the satellite radio sub-
scription is not active)
SCAN tuning:
Push the SCAN tuning button to tune from low
to high frequencies and stop at each broad-
casting station/channel for 5 seconds. Pushing
the button again during this 5 seconds period
will stop SCAN tuning and the radio will remain
tuned to that station/channel.
If the SCAN tuning button is not pushed within 5
seconds, SCAN tuning moves to the next
station/channel.
*1to*6Station memory operations:
12 stations/channels can be set for the FM band
(6 each for FM1 and FM2), 18 for XM radio (6
each for XM1, XM2 and XM3) and 6 stations
can be set for the AM band.
1. Choose the radio band using the radio band select button.
2. Tune to the desired station/channel using the SEEK/TRACK, SCAN button or the
radio TUNE knob.
3. Push and hold the desired station preset button
*1to*6until the radio mutes.
4. The station indicator will then come on and the sound will resume. Memorizing is now
complete. 5. Other buttons can be set in the same
manner.
If the battery cable is disconnected, or if the fuse
opens, the radio memory will be erased. In that
case, reset the desired stations/channels.
List (AM and FM radio):
When the “List” key on the display is selected
while the FM or AM radio is being played, the
preset station list will be displayed.
If 1 of the 6 preset stations listed is touched and
held, the current station will be stored as the
new preset.
Menu (XM Satellite Radio):
When the “Menu” key on the display is selected
while the XM Satellite Radio is being played, the
menu list will be displayed.
The following items are available.
. Preset List
Displays the preset channel list. If 1 of the 6
preset stations listed is touched and held,
the current station will be stored as the new
preset.
. Customize Channel List
Selects specific channels to skip while using
the TUNE, SEEK/CATEGORY or Menu-
Categories feature. .
Favorite Artists & Songs
Stores the current artist or song that is being
played. Touch the “Alert” key to be reminded
when the stored artist or song is playing on a
station while listening to XM.
. Categories
Selecting a category will go to the first
channel in that category as defined by XM
Radio.
. Direct Tune
Inputs the channel number by using a
keypad.
Compact Disc (CD) player operation
Push the ignition switch to the ACC or ON
position and insert the Compact Disc (CD) into
the slot with the label side facing up. The CD will
be guided automatically into the slot and start
playing.
After loading the CD, the number of tracks on
the CD and the play time will appear on the
display.
If the radio is already operating, it will auto-
matically turn off and the CD will play.
If the system has been turned off while the CD
was playing, pushing the ON·OFF button will
start the CD.
Do not use 3.1 in (8 cm) discs.