2012 NISSAN 370Z COUPE phone
[x] Cancel search: phonePage 5 of 427
NISSAN CUSTOMER CARE PROGRAM
NISSAN CARES ...
Both NISSAN and your NISSAN dealer are dedicated to serving all your automotive needs. Your satisfaction with your vehicle and your NISSAN dealer are
our primary concerns. Your NISSAN dealer is always available to assist you with all your automobile sales and service needs.
However, if there is something that your
NISSAN dealer cannot assist you with or you
would like to provide NISSAN directly with
comments or questions, please contact the
NISSAN Consumer Affairs Department using
our toll-free number:For U.S. customers1-800-NISSAN-1
(1-800-647-7261)
For Canadian customers 1-800-387-0122 The Consumer Affairs Department will ask for
the following information:
.
Your name, address, and telephone number
. Vehicle identification number (attached to
the top of the instrument panel on the
driver’s side)
. Date of purchase
. Current odometer reading
. Your NISSAN dealer’s name
. Your comments or questions
OR You can write to NISSAN with the information on
the left at:
For U.S. customersNissan North America, Inc.
Consumer Affairs Department
P.O. Box 685003
Franklin, TN 37068-5003
or via e-mail at:
[email protected]
For Canadian customers For Canadian customers
Nissan Canada Inc.
5290 Orbitor Drive
Mississauga, Ontario L4W 4Z5
or via e-mail at:
information.centre@nissancanada.
com
If you prefer, visit us at:
www.nissanusa.com(for U.S. customers) or
www.nissan.ca(for Canadian customers)
We appreciate your interest in NISSAN and
thank you for buying a quality NISSAN vehicle.
Page 7 of 427
Illustrated table of contents0
Safety — Seats, seat belts and supplemental
restraint system1
Instruments and controls
Pre-driving checks and adjustments
Center display, heater, air conditioner, audio, phone
and voice recognition systems
Starting and driving
In case of emergency
Appearance and care
Maintenance and do-it-yourself
Technical and consumer information
Index
2
3
4
5
6
7
8
9
10
Table of
Contents
Page 18 of 427

0-10Illustrated table of contents
SSI0652
1. Vehicle Dynamic Control (VDC) OFF switch(P.5-28)
2. Headlight, fog light and turn signal switch (P.2-31)
3. Meters and Gauges (combimeter) (P.2-5)
4. Triple meter (P.2-8)
5. Windshield wiper and washer switch (P.2-29) 6. Hood release handle (P.3-16)
7. Intelligent Key port (P.5-10)
8. Paddle shifter (if so equipped) (P.5-14)
9. Steering-wheel-mounted controls (left side)
— Menu control switch or tuning switch
(P.4-77)
— BACK switch (P.4-77) — Phone switch (if so equipped) (P.4-81,
P.4-91)
— Volume control switches (P.4-77)
— Source select switch (P.4-77)
10. Tilt steering lever (P.3-36)
11. Steering wheel — Horn (P.2-36)
— Driver supplemental air bag (P.1-28)
12. Steering-wheel-mounted controls (right side) — Cruise control switches (P.5-21)
13. Selector lever for automatic transmission (P.5-12)/Shift lever for manual transmission
(P.5-16)
14. Parking brake (P.5-20)
COCKPIT
Page 19 of 427
SSI0653
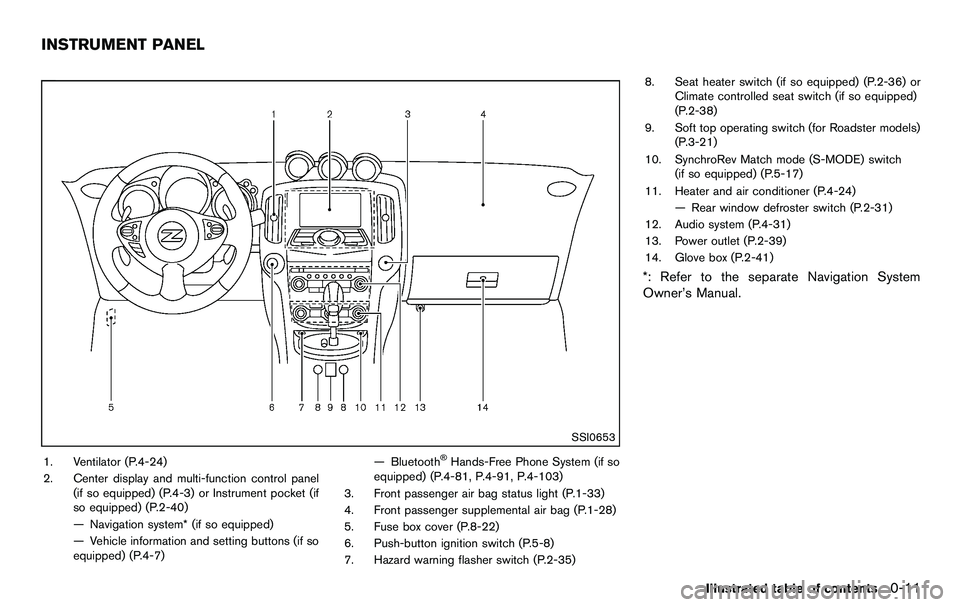
1. Ventilator (P.4-24)
2. Center display and multi-function control panel(if so equipped) (P.4-3) or Instrument pocket (if
so equipped) (P.2-40)
— Navigation system* (if so equipped)
— Vehicle information and setting buttons (if so
equipped) (P.4-7) — Bluetooth®Hands-Free Phone System (if so
equipped) (P.4-81, P.4-91, P.4-103)
3. Front passenger air bag status light (P.1-33)
4. Front passenger supplemental air bag (P.1-28)
5. Fuse box cover (P.8-22)
6. Push-button ignition switch (P.5-8)
7. Hazard warning flasher switch (P.2-35) 8. Seat heater switch (if so equipped) (P.2-36) or
Climate controlled seat switch (if so equipped)
(P.2-38)
9. Soft top operating switch (for Roadster models) (P.3-21)
10. SynchroRev Match mode (S-MODE) switch (if so equipped) (P.5-17)
11. Heater and air conditioner (P.4-24) — Rear window defroster switch (P.2-31)
12. Audio system (P.4-31)
13. Power outlet (P.2-39)
14. Glove box (P.2-41)
*: Refer to the separate Navigation System
Owner’s Manual.
Illustrated table of contents0-11
INSTRUMENT PANEL
Page 67 of 427

SSI0652
1. Vehicle Dynamic Control (VDC) OFF switch(P.5-28)
2. Headlight, fog light and turn signal switch (P.2-31)
3. Meters and Gauges (combimeter) (P.2-5)
4. Triple meter (P.2-8)
5. Windshield wiper and washer switch (P.2-29) 6. Hood release handle (P.3-16)
7. Intelligent Key port (P.5-10)
8. Paddle shifter (if so equipped) (P.5-14)
9. Steering-wheel-mounted controls (left side)
— Menu control switch or tuning switch
(P.4-77)
— BACK switch (P.4-77) — Phone switch (if so equipped) (P.4-81)
— Volume control switches (P.4-77)
— Source select switch (P.4-77)
10. Tilt steering lever (P.3-36)
11. Steering wheel — Horn (P.2-36)
— Driver supplemental air bag (P.1-28)
12. Steering-wheel-mounted controls (right side)
— Cruise control switches (P.5-21)
13. Selector lever for automatic transmission (P.5-12)/Shift lever for manual transmission
(P.5-16)
14. Parking brake (P.5-20)
Instruments and controls2-3
COCKPIT
Page 68 of 427
2-4Instruments and controls
SSI0653
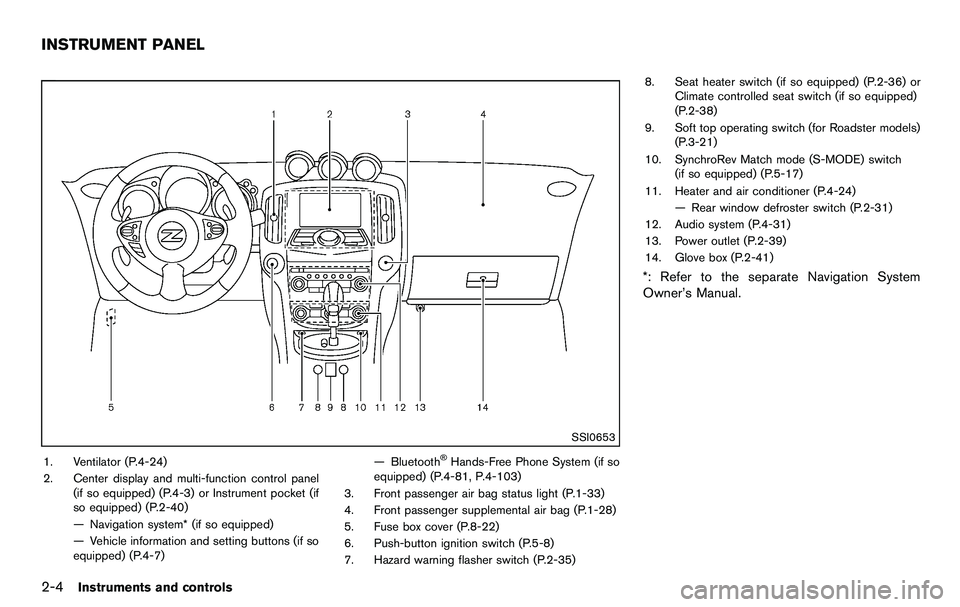
1. Ventilator (P.4-24)
2. Center display and multi-function control panel(if so equipped) (P.4-3) or Instrument pocket (if
so equipped) (P.2-40)
— Navigation system* (if so equipped)
— Vehicle information and setting buttons (if so
equipped) (P.4-7) — Bluetooth®Hands-Free Phone System (if so
equipped) (P.4-81, P.4-103)
3. Front passenger air bag status light (P.1-33)
4. Front passenger supplemental air bag (P.1-28)
5. Fuse box cover (P.8-22)
6. Push-button ignition switch (P.5-8)
7. Hazard warning flasher switch (P.2-35) 8. Seat heater switch (if so equipped) (P.2-36) or
Climate controlled seat switch (if so equipped)
(P.2-38)
9. Soft top operating switch (for Roadster models) (P.3-21)
10. SynchroRev Match mode (S-MODE) switch (if so equipped) (P.5-17)
11. Heater and air conditioner (P.4-24) — Rear window defroster switch (P.2-31)
12. Audio system (P.4-31)
13. Power outlet (P.2-39)
14. Glove box (P.2-41)
*: Refer to the separate Navigation System
Owner’s Manual.
INSTRUMENT PANEL
Page 116 of 427
2-52Instruments and controls
surface. Hold the transmitter in that position
for up to 15 seconds. If HomeLink®is not
programmed within that time, try holding the
transmitter in another position - keeping the
indicator light in view at all times.
If you continue to have programming difficulties,
please contact the NISSAN Consumer Affairs
Department. The phone numbers are located in
the Foreword of this Owner’s Manual.
CLEARING THE PROGRAMMED IN-
FORMATION
Individual buttons cannot be cleared, however to
clear all programming, push and hold the two
outside buttons and release when the indicator
light begins to flash (in approximately 20
seconds) .
REPROGRAMMING A SINGLE
HomeLink®BUTTON
To reprogram a HomeLink®Universal Transcei-
ver button, complete the following.
1. Push and hold the desired HomeLink
®
button. Do not release the button until step
4 has been completed.
2. When the indicator light begins to flash slowly (after 20 seconds) , position the
hand-held transmitter 2 to 5 in (50 to 127
mm) away from the HomeLink
®surface. 3. Push and hold the hand-held transmitter
button.
4. The HomeLink
®indicator light will flash, first
slowly and then rapidly. When the indicator
light begins to flash rapidly, release both
buttons.
The HomeLink
®Universal Transceiver button
has now been reprogrammed. The new device
can be activated by pushing the HomeLink
®
button that was just programmed. This proce-
dure will not affect any other programmed
HomeLink
®buttons.
IF YOUR VEHICLE IS STOLEN
If your vehicle is stolen, you should change the
codes of any non-rolling code device that has
been programmed into HomeLink
®. Consult the
Owner’s Manual of each device or call the
manufacturer or dealer of those devices for
additional information.
When your vehicle is recovered, you will
need to reprogram the HomeLink
®Univer-
sal Transceiver with your new transmitter
information. FCC Notice:
For USA:
This device complies with Part 15 of the
FCC Rules. Operation is subject to the
following two conditions:
(1) This device may not cause harmful
interference, and (2) this device must
accept any interference received, including
interference that may cause undesired
operation.
Note: Changes or modifications not ex-
pressly approved by the party responsible
for compliance could void the user’s
authority to operate the equipment.
For Canada:
This device complies with RSS-210 of
Industry Canada. Operation is subject to
the following two conditions:
(1) this device may not cause interference,
and (2) this device must accept any inter-
ference, including interference that may
cause undesired operation of the device.
Page 119 of 427
ceed 1408F (608C) .
— Do not change or modify the Intelligent Key.
— Do not use a magnet key holder.
— Do not place the Intelligent Key near an electric appliance such
as a television set, personal
computer or cellular phone.
— Do not allow the Intelligent Key to come into contact with water
or salt water, and do not wash it
in a washing machine. This
could affect the system function.
. If an Intelligent Key is lost or stolen,
NISSAN recommends erasing the ID
code of that Intelligent Key. This will
prevent the Intelligent Key from
unauthorized use to unlock the
vehicle. For information regarding
the erasing procedure, please con-
tact a NISSAN dealer.
SPA2033
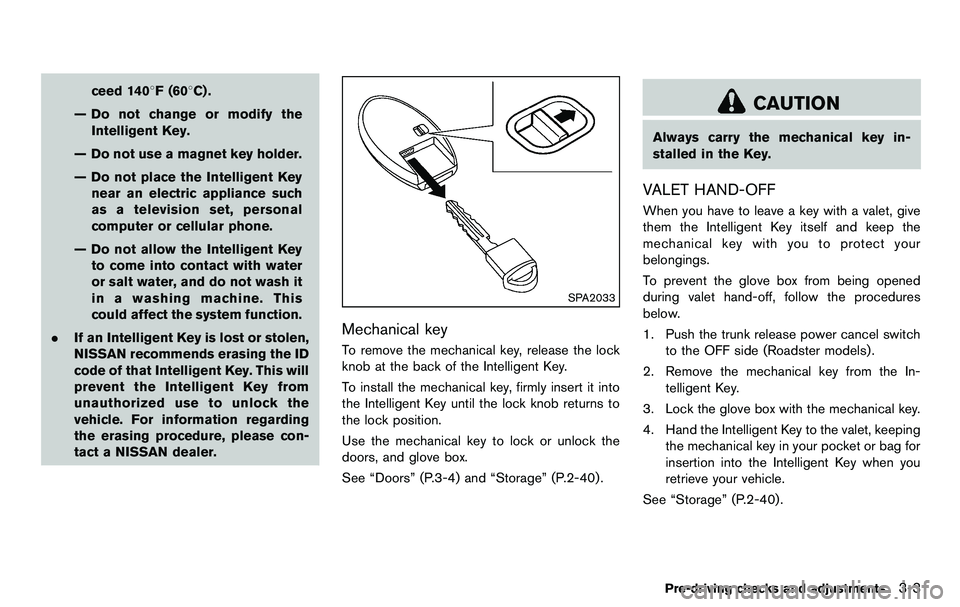
Mechanical key
To remove the mechanical key, release the lock
knob at the back of the Intelligent Key.
To install the mechanical key, firmly insert it into
the Intelligent Key until the lock knob returns to
the lock position.
Use the mechanical key to lock or unlock the
doors, and glove box.
See “Doors” (P.3-4) and “Storage” (P.2-40) .
CAUTION
Always carry the mechanical key in-
stalled in the Key.
VALET HAND-OFF
When you have to leave a key with a valet, give
them the Intelligent Key itself and keep the
mechanical key with you to protect your
belongings.
To prevent the glove box from being opened
during valet hand-off, follow the procedures
below.
1. Push the trunk release power cancel switch
to the OFF side (Roadster models) .
2. Remove the mechanical key from the In- telligent Key.
3. Lock the glove box with the mechanical key.
4. Hand the Intelligent Key to the valet, keeping the mechanical key in your pocket or bag for
insertion into the Intelligent Key when you
retrieve your vehicle.
See “Storage” (P.2-40) .
Pre-driving checks and adjustments3-3