2012 MITSUBISHI ASX window
[x] Cancel search: windowPage 59 of 378
Passenger’s switches
The
passenger’s switches can be used to operate
the corresponding passenger’s door windows. Press
the switch down for opening the window, and pull
up the switch for closing it. NOTE
l Repeated
operation with the engine stopped
will run down the battery. Operate the elec-
tric window switches only while the engine
is running.
l The rear door windows only open halfway.
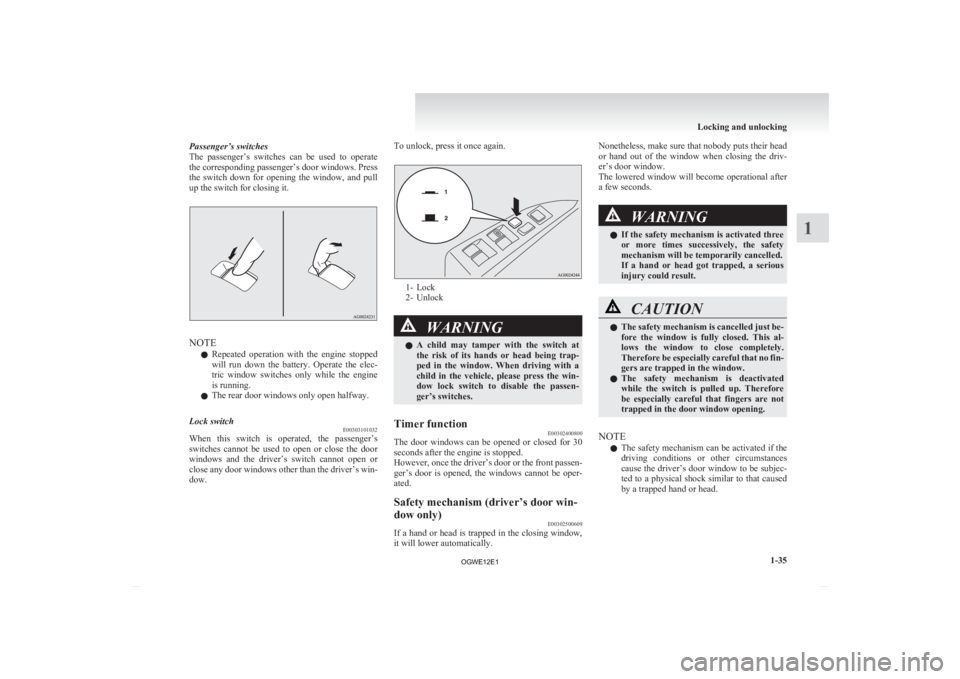
Lock switch E00303101032
When this switch is operated, the passenger’s
switches
cannot be used to open or close the door
windows and the driver’s switch cannot open or
close any door windows other than the driver’s win-
dow. To unlock, press it once again.
1- Lock
2-
Unlock WARNING
l A
child may tamper with the switch at
the risk of its hands or head being trap-
ped in the window. When driving with a
child in the vehicle, please press the win-
dow lock switch to disable the passen-
ger’s switches.
Timer function E00302400800
The door windows can be opened or closed for 30
seconds after the engine is stopped.
However,
once the driver’s door or the front passen-
ger’s door is opened, the windows cannot be oper-
ated.
Safety mechanism (driver’s door win-
dow only) E00302500609
If a hand or head is trapped in the closing window,
it will lower automatically. Nonetheless, make sure that nobody puts their head
or
hand out of the window when closing the driv-
er’s door window.
The lowered window will become operational after
a few seconds. WARNING
l If
the safety mechanism is activated three
or more times successively, the safety
mechanism will be temporarily cancelled.
If a hand or head got trapped, a serious
injury could result. CAUTION
l
The
safety mechanism is cancelled just be-
fore the window is fully closed. This al-
lows the window to close completely.
Therefore be especially careful that no fin-
gers are trapped in the window.
l The safety mechanism is deactivated
while the switch is pulled up. Therefore
be especially careful that fingers are not
trapped in the door window opening.
NOTE l The
safety mechanism can be activated if the
driving conditions or other circumstances
cause the driver’s door window to be subjec-
ted to a physical shock similar to that caused
by a trapped hand or head. Locking and unlocking
1-35 1
OGWE12E1
Page 60 of 378

l
If the safety mechanism is activated three or
more times in a row, the safety mechanism
will be cancelled and the door window will
not close correctly.
In such a case, the following procedure
should be implemented to rectify this situa-
tion. If the window is open, repeatedly raise
the driver’s door window switch until the win-
dow has been fully closed. Following this, re-
lease the switch, raise the switch once again
and hold it in this condition for at least 1 sec-
ond, then release it. You should now be able
to operate the driver’s door window in the nor-
mal fashion. Sunshade*
E00302800279 WARNING
l Never
leave a child (or other person who
might not be capable of safe operation of
the sunshade switch) in the vehicle alone.
l Before operating the sunshade, make
sure that nothing can be trapped (head,
hand, finger, etc.).
l Do not bring your head, hand, finger, etc.
near the opening edge of the sunshade re-
ceptacle while the vehicle is in motion.
It may cause injury to your head, hand,
finger, etc. in the event of sudden braking. CAUTION
l
Do
not place heavy luggage on the panor-
amic glass roof. Doing so could damage
the glass roof.
l Do not hang heavy luggage from, allow a
person to hang onto, or apply any other
strong force to the opening of the sun-
shade receptacle or the parts between the
ceiling and the sunshade opening on ei-
ther side. Doing so could damage the sun-
shade.
NOTE l Release
the switch as soon as the sunshade
reaches the fully open or fully closed position. l
If
the sunshade does not operate when the sun-
shade switch is operated, release the switch
and check whether something is trapped by
the sunshade. If nothing is trapped, we recom-
mend you to have the sunshade checked.
l Operating the sunshade repeatedly with the
engine stationary will run down the battery.
Operate the sunshade while the engine is run-
ning.
l Close the sunshade when parking the vehicle
for a long time. Parking in the hot sun with
the sunshade open will make the vehicle in-
side extremely hot.
The sunshade can only be operated with the igni-
tion switch or the operation mode in ON. 1- Open
2-
Close
3- Stop
To open, press the switch (1).
Press and hold the switch (1), the sunshade automat-
ically opens. Release the switch once the sunshade
starts moving automatically.
To stop the moving sunshade, press the switch (1),
(2) or (3). Locking and unlocking
1-36
1
OGWE12E1
Page 87 of 378
![MITSUBISHI ASX 2012 Owners Manual (in English) Only when the ignition switch or the operation
mode
is under the following conditions, the airbags
will operate.
[Except vehicles equipped with keyless operation
system]
The ignition swit](/manual-img/19/34862/w960_34862-86.png "MITSUBISHI ASX 2012 Owners Manual (in English) Only when the ignition switch or the operation
mode
is under the following conditions, the airbags
will operate.
[Except vehicles equipped with keyless operation
system]
The ignition swit")
Only when the ignition switch or the operation
mode
is under the following conditions, the airbags
will operate.
[Except vehicles equipped with keyless operation
system]
The ignition switch is in the “ON” or “START” po-
sition.
[Vehicles equipped with keyless operation system]
The operation mode is in ON.
The airbags deployment produces a sudden, loud
noise, and releases some smoke and powder, but
these conditions are not injurious, and do not indi-
cate a fire in the vehicle. People with respiratory
problems may feel some temporary irritation from
chemicals used to produce the deployment; open
the windows after airbag deployment, if safe to do
so.
The airbags deflate very rapidly after deployment,
so there is little danger of obscured vision. CAUTION
l
Airbags
inflate at an extremely rapid
speed. In certain situations, contact with
inflating airbags can result in abrasions,
bruises, and the like. WARNING
l IT
IS VERY IMPORTANT TO BE PROP-
ERLY SEATED.
A driver or front passenger too close to
the steering wheel or instrument panel
during airbag deployment can be killed
or seriously injured.
Airbags inflate very fast, and with great
force.
If the driver and front passenger are not
properly seated and restrained, the air-
bags may not protect you properly, and
could cause serious or fatal injuries when
it inflates.
l Do not sit on the edge of the seat or sit
with your lower legs too close to the in-
strument panel, or lean head or chest
close to the steering wheel or instrument
panel. Do not put feet or legs on or
against the instrument panel.
l Place all infants and small children in the
rear seat and properly restrained using
an appropriate child restraint system.
The rear seat is the safest place for in-
fants and children. WARNING
l Infants and small children should never
be unrestrained, stand up against the in-
strument panel or be held in your arms
or on your lap. They could be seriously in-
jured or killed in a collision, including
when the airbag inflates. They should be
properly seated in the rear seat in an ap-
propriate child restraint system. See the
“Child restraint” section of this owner’s
manual. Seat and seat belts
2-25 2
OGWE12E1
Page 95 of 378

WARNING
l The side airbags and curtain airbags are
designed to supplement the driver and pas-
senger seat belts in certain side impacts.
Seat belts should always be worn proper-
ly, and the driver and passenger should
sit well back and upright without leaning
against the window or door.
l The side airbags and curtain airbags in-
flate with great force. The driver and pas-
senger should not put their arms out the
window, and should not lean against the
door, in order to reduce risk of serious or
possible fatal injury from the deploying
side airbags and curtain airbags. WARNING
l Do
not allow any rear seat occupant to
hold onto the seatback of either front
seat, in order to reduce risk of injury
from the deploying side airbags. Special
care should be taken with children. WARNING
l Do
not place any objects near or in front
of the seatback of either front seat. They
could interfere with proper side airbag in-
flation, and also could cause injury if
thrown free by side airbag deployment.
l Do not place stickers, labels or additional
trim on the seatback of either front seat.
They could interfere with proper side air-
bag inflation.
l Do not install seat covers on seats with
side airbags. Do not re-cover seats that
have side airbags. This could interfere
with proper side airbag inflation.
l Do not attach a microphone (A) or any
other device or object around the part
where the curtain airbags (B) activate
such as on the windscreen, side door
glass, front and rear pillars and roof side
or assist grips. When the curtain airbags
inflate, the microphone or other device or
object will be hurled with great force or
the curtain airbags may not activate cor-
rectly, resulting in death or serious injury. WARNING
l Do not put a hanger or any heavy or poin-
ted object on the coat hook. If the curtain
airbag was activated, any such item could
be propelled away with great force and
could prevent the curtain airbag from in-
flating correctly. Hang clothes directly on
the coat hook (without using a hanger).
Make sure there are no heavy or sharp ob-
jects in the pockets of clothes that you
hang on the coat hook.
l Never install a rearward facing child re-
straint in the front passenger seat. A for-
ward facing child restraint should be
used in the rear seat whenever possible. If
a forward facing child restraint must be
used in the front passenger seat, adjust
the seat to the most rearward position,
and ensure that the child stays in the
child restraint and away from the door.
l Do not allow a child to lean against or
close to the front door even if the child is
seated in a child restraint system.
The child’s head should also not be
leaned against or be close to the area
where the side airbags and curtain air-
bags are located. It is dangerous if the
side airbags and curtain airbags inflate.
Failure to follow all of these instructions
could lead to serious or fatal injury to the
child.
l We recommend work around and on the
side airbags and curtain airbags system
to be done by a MITSUBISHI MOTORS
Authorized Service Point. Seat and seat belts
2-33 2
OGWE12E1
Page 97 of 378

Instruments...................................................................................
3-02
Multi-information display .............................................................3-03
Indication lamp, warning lamp, and information screen display list.................................................................................3-24
Indication lamps ........................................................................... 3-39
Warning lamps .............................................................................. 3-40
Information screen display ........................................................... 3-41
Combination headlamps and dipper switch ..................................3-44
Headlamp levelling ....................................................................... 3-48
Turn-signal lever...........................................................................3-49
Hazard warning flasher switch ..................................................... 3-49
Fog lamp switch............................................................................3-50
Wiper and washer switch .............................................................. 3-51
Headlamp washer switch* ............................................................ 3-55
Rear window demister switch.......................................................3-56
Horn switch...................................................................................3-57 Instruments and controls
3
OGWE12E1
Page 147 of 378

Wiper and washer switch
E00507101218CAUTION
l
If the washer is used in cold weather, the
washer fluid sprayed against the glass
may freeze, which may hinder visibility.
Warm the glass with the defroster or rear
window demister before using the washer.
Windscreen wipers E00516900459
NOTE l To
ensure a clear rearward view, the rear win-
dow wiper will automatically perform sever-
al continuous operations if the gearshift lever
or the selector lever is put in the “R” position
while the windscreen wipers are operating.
Refer to “Rear window wiper and washer”
on page 3-55.
Except for vehicles equipped with rain sensor
The windscreen wipers can be operated with the ig-
nition switch or the operation mode is in ON or ACC. If the blades are frozen to the windscreen or rear
window,
do not operate the wipers until the ice has
melted and the blades are freed, otherwise the wip-
er motor may be damaged. MIST- Misting function
The wipers will operate once.
OFF- Off
INT- Intermittent (Speed sensitive)
LO- Slow
HI- Fast To adjust intermittent intervals
With
the lever in the “INT” (speed-sensitive) posi-
tion, the intermittent intervals can be adjusted by
turning the knob (A). 1- Fast
2-
Slow
NOTE l The speed-sensitive-operation function of the
windscreen wipers can be deactivated.
For further information, we recommend you
to consult a MITSUBISHI MOTORS Author-
ized Service Point.
On vehicles equipped with MITSUBISHI
Multi-Communication System (MMCS),
screen operations can be used to make the ad-
justment. Refer to the separate owner’s man-
ual for details.
Misting function
The misting function can be operated with the igni-
tion switch or the operation mode is in ON or ACC. Instruments and controls
3-51 3
OGWE12E1
Page 148 of 378

The wipers will operate once if the wiper lever is
raised
to the “MIST” position and released. This op-
eration is useful when it is drizzling, etc. The wip-
ers will continue to operate while the lever is held
in the “MIST” position. Vehicles with rain sensor
E00517000301
The windscreen wipers can be operated with the ig-
nition
switch or the operation mode is in ON or ACC. If the blades are frozen to the windscreen or rear
window,
do not operate the wipers until the ice has
melted and the blades are freed, otherwise the wip-
er motor may be damaged. MIST- Misting function
The wipers will operate once.
OFF- Off
AUTO- Auto-wiper control Rain sensor
The
wipers will automatically operate de-
pending on the degree of wetness on the
windscreen.
LO- Slow
HI- Fast
Rain sensor
Can
only be used when the ignition switch or the
operation mode is in ON.
If the lever is put in the “AUTO” position, the rain
sensor (A) will detect the extent of rain (or snow,
other moisture, dust, etc.) and the wipers will oper-
ate automatically.
Keep the lever in the “OFF” position if the wind-
screen is dirty and the weather is dry. Wiper operation under these conditions can scratch
the windscreen and damage the wipers.
CAUTION
l
With
the ignition switch or the operation
mode in ON and lever in the “AUTO” po-
sition, the wipers may automatically oper-
ate in the situations described below.
If your hands get trapped, you could suf-
fer injuries or the wipers could malfunc-
tion. Be sure to turn the ignition switch to
the “OFF” position or put the operation
mode in OFF, or move lever to the
“OFF” position to deactivate the rain sen-
sor. • When cleaning the outside surface ofthe windscreen, if you touch on top of
the rain sensor.
• When cleaning the outside surface of the windscreen, if you wipe with a
cloth on top of the rain sensor.
• When using an automatic car wash.
• A physical shock is applied to the wind- screen. Instruments and controls
3-52
3
OGWE12E1
Page 151 of 378

Rear window wiper and washer
E00507301148
The
rear window wiper and washer switch can be
operated with the ignition switch or the operation
mode in ON or ACC. INT- The wiper operates continuously for
several seconds then operates inter-
mittently at intervals of about every
8 seconds
OFF- Off -
The washer fluid will be sprayed on-
to the rear window when the knob is
turned fully in either direction.
The wipers operate automatically
several times while the washer fluid
is being sprayed. NOTE
l The
rear window wiper will automatically per-
form several continuous operations if the gear-
shift lever or the selector lever is put in the
“R” position while the windscreen wipers or
the rear window wiper is operating. (automat-
ic operation mode).
After the automatic operation, the rear win-
dow wiper will stop operating if the knob is
in the “OFF” position. If the knob is in the
“INT” position, the rear window wiper will
return to the intermittent operation.
It is possible to set the rear window wiper to
perform the automatic operation only if the
gearshift lever or the selector lever is put in
the “R” position while the rear window wip-
er is operating with the knob in the “INT” po-
sition.
For further information, we recommend you
to consult a MITSUBISHI MOTORS Author-
ized Service Point.
l If the knob is in the “OFF” position, turn the
knob to the “INT” position twice quickly to
operate the rear window wiper continuously.
(continuous operation mode)
Turn the knob to the “OFF” position to stop
the rear window wiper continuous operation.
l The interval for intermittent operation can be
adjusted.
For further information, we recommend you
to consult a MITSUBISHI MOTORS Author-
ized Service Point.
On vehicles equipped with MITSUBISHI
Multi-Communication System (MMCS),
screen operations can be used to make the ad-
justment. Refer to the separate owner’s man-
ual for details. Headlamp washer switch*
E00507800289
The
headlamp washer can be operated with the ig-
nition switch or the operation mode in ON or ACC
and the lamp switch at the “ ” position.
Push
the button once and the washer fluid will be
sprayed on to the headlamps. NOTE
l If
the ignition switch or the operation mode
is in ON or ACC and the headlamps are on,
the headlamp washer operates together with
the windscreen washer the first time the wind-
screen washer lever is pulled. Instruments and controls
3-55 3
OGWE12E1