2012 MERCEDES-BENZ SLS AMG ROADSTER charging
[x] Cancel search: chargingPage 6 of 288
1, 2, 3 ...
12 V socket see Sockets
A
ABS (Anti-lock Braking System) Function/notes ................................ 55
Warning lamp ................................. 192
Activating/deactivating cooling
with air dehumidification ................. 106
ADAPTIVE BRAKE ................................. 59
Additional speedometer ................... 157
Additives (engine oil) ........................ 282
Adjusting lumbar support .................. 86
Air bags Display message ............................ 171
Front air bag (driver, front
passenger) ....................................... 39
Important safety notes ....................38
Knee bag .......................................... 40
PASSENGER AIR BAG OFF
indicator lamp .................................. 42
Safety guidelines ............................. 37
Side impact air bag ..........................40
Air-conditioning system
see Climate control
Air filter (display message) .............. 180
Air pressure see Tire pressure
AIRSCARF
Setting the vents ........................... 111
Switching on/off .............................. 87
Air vents
Important safety notes ..................110
Setting ........................................... 110
Setting the AIRSCARF vents ..........111
Setting the center air vents ...........110
Setting the side air vents ...............110
Switching AIRSCARF on/off ............87
Alarm system
see ATA (Anti-Theft Alarm system)
AMG
Adaptive sport suspension
system ........................................... 138
Button for AMG menu ....................126
E-SELECT lever .............................. 119
Menu (on-board computer) ............160
SETUP ............................................ 126
SPEEDSHIFT DCT 7-gear sport
transmission .................................. 119
Anti-lock Braking System
see ABS (Anti-lock Braking System)
Anti-Theft Alarm system
see ATA (Anti-Theft Alarm system)
Ashtray ............................................... 203
ASSYST PLUS service interval
display Hiding service messages ...............222
Service messages ..........................222
ATA (Anti-Theft Alarm system)
Activating/deactivating ...................59
Function ........................................... 59
Switching off the alarm ....................59
Audio menu (on-board computer) .... 154
Audio system see separate operating instructions
Authorized Mercedes-Benz Center
see Qualified specialist workshop
Authorized workshop
see Qualified specialist workshop
AUTO lights
Display message ............................ 174
Automatic headlamp mode ................ 95
B
Back support see Lumbar support
Backup lamp
Display message ............................ 175
BAS (Brake Assist System) ................. 55
Basic settings see Settings
Battery
Display message ............................ 185
Battery (SmartKey)
Checking .......................................... 66
Important safety notes ....................65
Replacing ......................................... 66
Battery (vehicle)
Charging ........................................ 242
Display message ............................ 178
Important safety notes ..................240
4Index
Page 96 of 288

Useful information
i This Operator's Manual describes all
models and all standard and optional
equipment of your vehicle available at the
time of publication of the Operator's
Manual. Country-specific differences are
possible. Please note that your vehicle may
not be equipped with all features
described. This also applies to safety-
related systems and functions.
i Please read the information on qualified
specialist workshops ( Y page 21).
Exterior lighting
Important safety notes
For reasons of safety, Mercedes-Benz
recommends that you drive with the lights
switched on even during the daytime. In some
countries, operation of the headlamps varies
due to legal requirements and self-imposed
obligations.
Information about driving abroad
Converting to symmetrical low beam
when driving abroad: switch the headlamps
to symmetrical low beam in countries in
which traffic drives on the opposite side of the
road to the country where the vehicle is
registered. This prevents glare to oncoming
traffic. Symmetrical lights do not illuminate
as large an area of the edge of the road.
Have the headlamps converted at a qualified
specialist workshop, e.g. an authorized
Mercedes-Benz Center, as close to the border
as possible before driving in these countries.
Converting to asymmetrical low beam
after returning: have the headlamps
converted back to asymmetrical low beam at
a qualified specialist workshop, e.g. an
authorized Mercedes-Benz Center, as soon as
possible after crossing the border again.
Light switch
Operation1 WLeft-hand standing lamps2XRight-hand standing lamps3TParking lamps, license plate and
instrument cluster lighting4 ÃAutomatic headlamp mode/daytime
running lamps5 LLow-beam/high-beam headlamps
The turn signals, high-beam headlamps and
the high-beam flasher are operated using the
combination switch ( Y page 96).
! Switch off the parking lamps and standing
lamps when you leave the vehicle. This
prevents the battery from discharging.
The exterior lighting (except the parking/
standing lamps) switches off automatically if
you:
R remove the SmartKey from the ignition lock
R open the driver's door with the SmartKey
in position 0.
If you hear a warning tone when you leave the
vehicle, the lights may still be switched on.
XTurn the light switch to Ã.94Exterior lightingLights and windshield wipers
Page 99 of 288
The hazard warning lamps are deactivated
automatically if the vehicle returns to a speed
of over 6 mph (10 km/h) after a full
application of the brakes.
i The hazard warning lamps still operate if
the ignition is switched off.
Headlamp cleaning system
The headlamps are cleaned automatically if
the "Wipe with washer fluid" function is
operated ten times while the lights are on and
the engine is running ( Y page 99). When you
switch off the ignition, the automatic
headlamp cleaning system is reset and
counting is resumed from 0.
Headlamps fogged up on the inside
The headlamps may fog up on the inside if
there is high atmospheric humidity.
XDrive with the headlamps switched on.
The level of moisture diminishes,
depending on the length of the journey and
the weather conditions (humidity and
temperature).
If the level of moisture does not diminish:
XHave the headlamps checked at a qualified
specialist workshop.Interior lighting
Overview of interior lighting
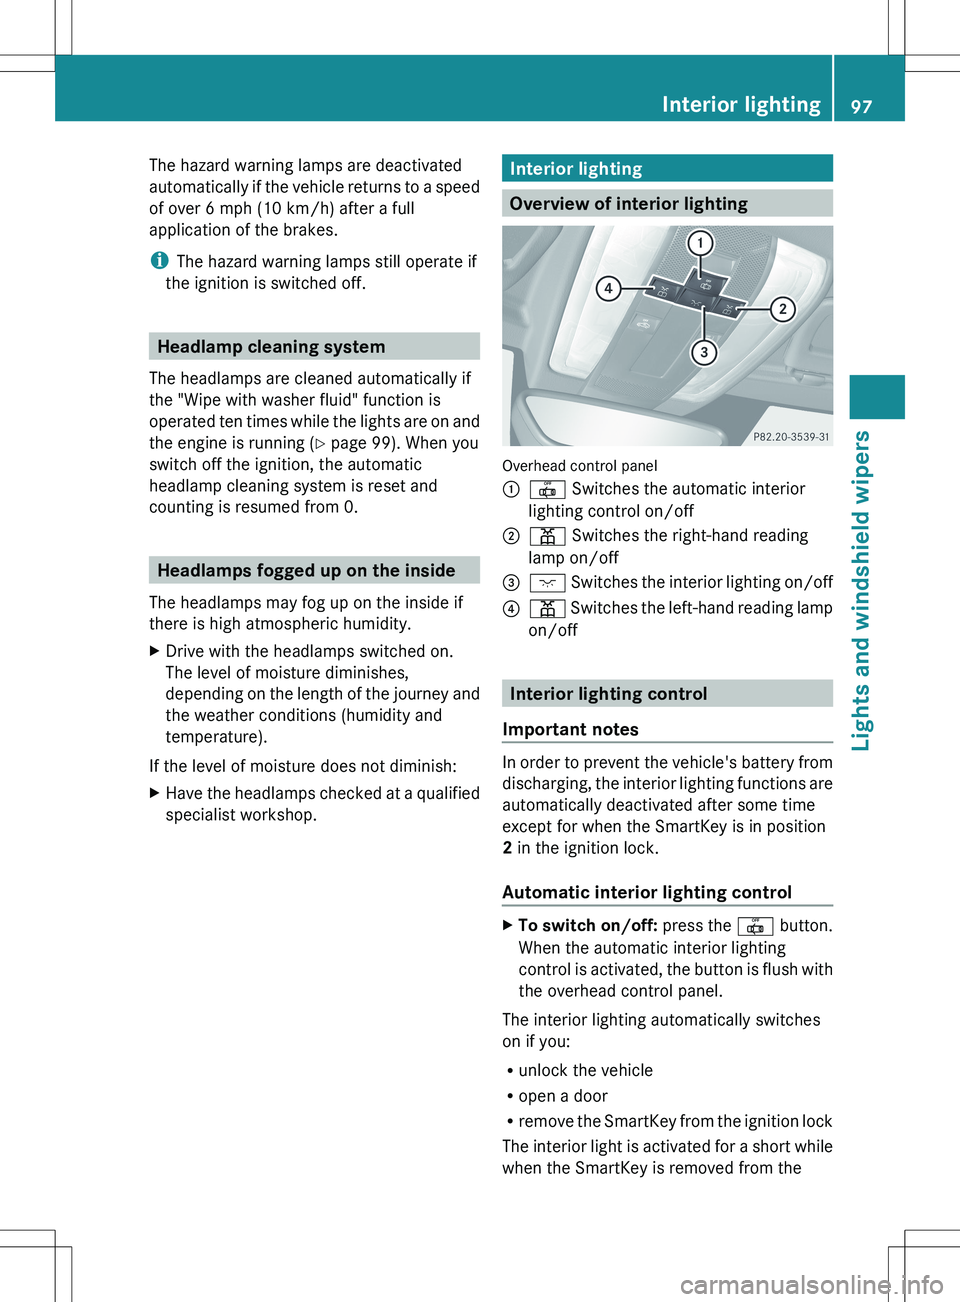
Overhead control panel
:| Switches the automatic interior
lighting control on/off;p Switches the right-hand reading
lamp on/off=c Switches the interior lighting on/off?p Switches the left-hand reading lamp
on/off
Interior lighting control
Important notes
In order to prevent the vehicle's battery from
discharging, the interior lighting functions are
automatically deactivated after some time
except for when the SmartKey is in position
2 in the ignition lock.
Automatic interior lighting control
XTo switch on/off: press the | button.
When the automatic interior lighting
control is activated, the button is flush with
the overhead control panel.
The interior lighting automatically switches
on if you:
R unlock the vehicle
R open a door
R remove the SmartKey from the ignition lock
The interior light is activated for a short while
when the SmartKey is removed from the
Interior lighting97Lights and windshield wipersZ
Page 133 of 288
Applying/releasing manually
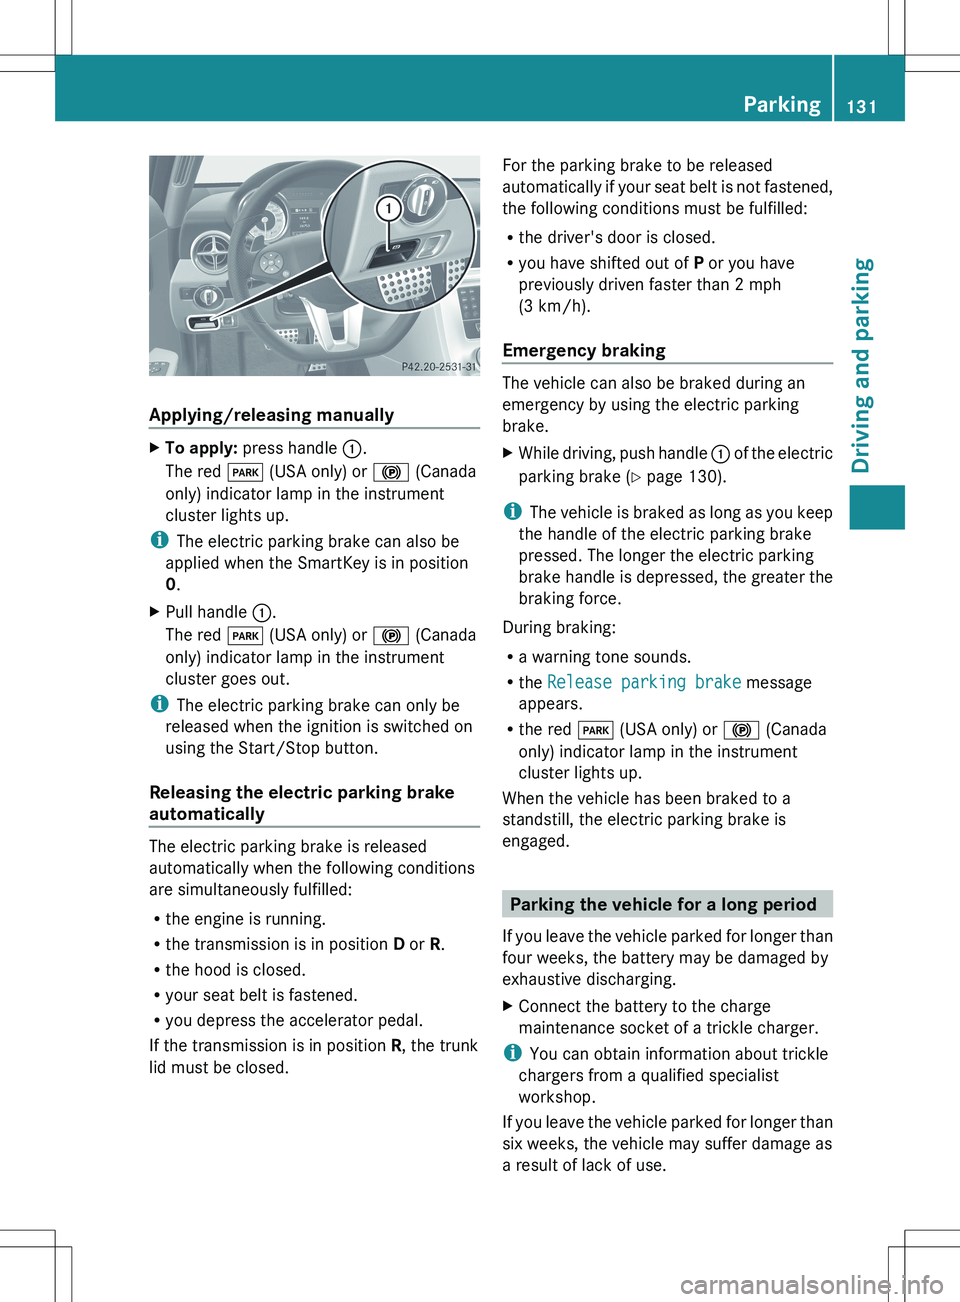
XTo apply: press handle :.
The red F (USA only) or ! (Canada
only) indicator lamp in the instrument
cluster lights up.
i The electric parking brake can also be
applied when the SmartKey is in position
0 .
XPull handle :.
The red F (USA only) or ! (Canada
only) indicator lamp in the instrument
cluster goes out.
i The electric parking brake can only be
released when the ignition is switched on
using the Start/Stop button.
Releasing the electric parking brake
automatically
The electric parking brake is released
automatically when the following conditions
are simultaneously fulfilled:
R the engine is running.
R the transmission is in position D or R.
R the hood is closed.
R your seat belt is fastened.
R you depress the accelerator pedal.
If the transmission is in position R, the trunk
lid must be closed.
For the parking brake to be released
automatically if your seat belt is not fastened,
the following conditions must be fulfilled:
R the driver's door is closed.
R you have shifted out of P or you have
previously driven faster than 2 mph
(3 km/h).
Emergency braking
The vehicle can also be braked during an
emergency by using the electric parking
brake.
XWhile driving, push handle : of the electric
parking brake ( Y page 130).
i
The vehicle is braked as long as you keep
the handle of the electric parking brake
pressed. The longer the electric parking
brake handle is depressed, the greater the
braking force.
During braking:
R a warning tone sounds.
R the Release parking brake message
appears.
R the red F (USA only) or ! (Canada
only) indicator lamp in the instrument
cluster lights up.
When the vehicle has been braked to a
standstill, the electric parking brake is
engaged.
Parking the vehicle for a long period
If you leave the vehicle parked for longer than
four weeks, the battery may be damaged by
exhaustive discharging.
XConnect the battery to the charge
maintenance socket of a trickle charger.
i You can obtain information about trickle
chargers from a qualified specialist
workshop.
If you leave the vehicle parked for longer than
six weeks, the vehicle may suffer damage as
a result of lack of use.
Parking131Driving and parkingZ
Page 169 of 288
Display messagesPossible causes/consequences and M Solutions! The indicator lamp (red) flashes.
The power supply for the electric parking brake was interrupted.XPull the electric parking brake handle.
or
XPull away carefully.
or
XPull the electric parking brake handle until the display message
disappears.! The indicator lamp (red) flashes and the warning lamp
(yellow) lights up.
The electric parking brake is malfunctioning.XSwitch off the ignition and turn it back on.XEngage or release the electric parking brake.
or
XPull away carefully.XVisit a qualified specialist workshop.! The warning lamp (yellow) lights up. In addition, the indicator
lamp (red) flashes for about 10 seconds after the electric parking
brake has been engaged or released. It then goes out or remains
lit.
The electric parking brake is malfunctioning, e.g. because of
overvoltage or undervoltage.XPull away carefully.XVisit a qualified specialist workshop.
If there is overvoltage or undervoltage:
XRemove the cause for the overvoltage or undervoltage, e.g. by
charging the battery or restarting the engine.XSwitch the ignition off and on, and then engage or release the
electric parking brake.
If this does not release the electric parking brake:
XDo not drive on.XConsult a qualified specialist workshop.Displays and operation167On-board computer and displaysZ
Page 218 of 288
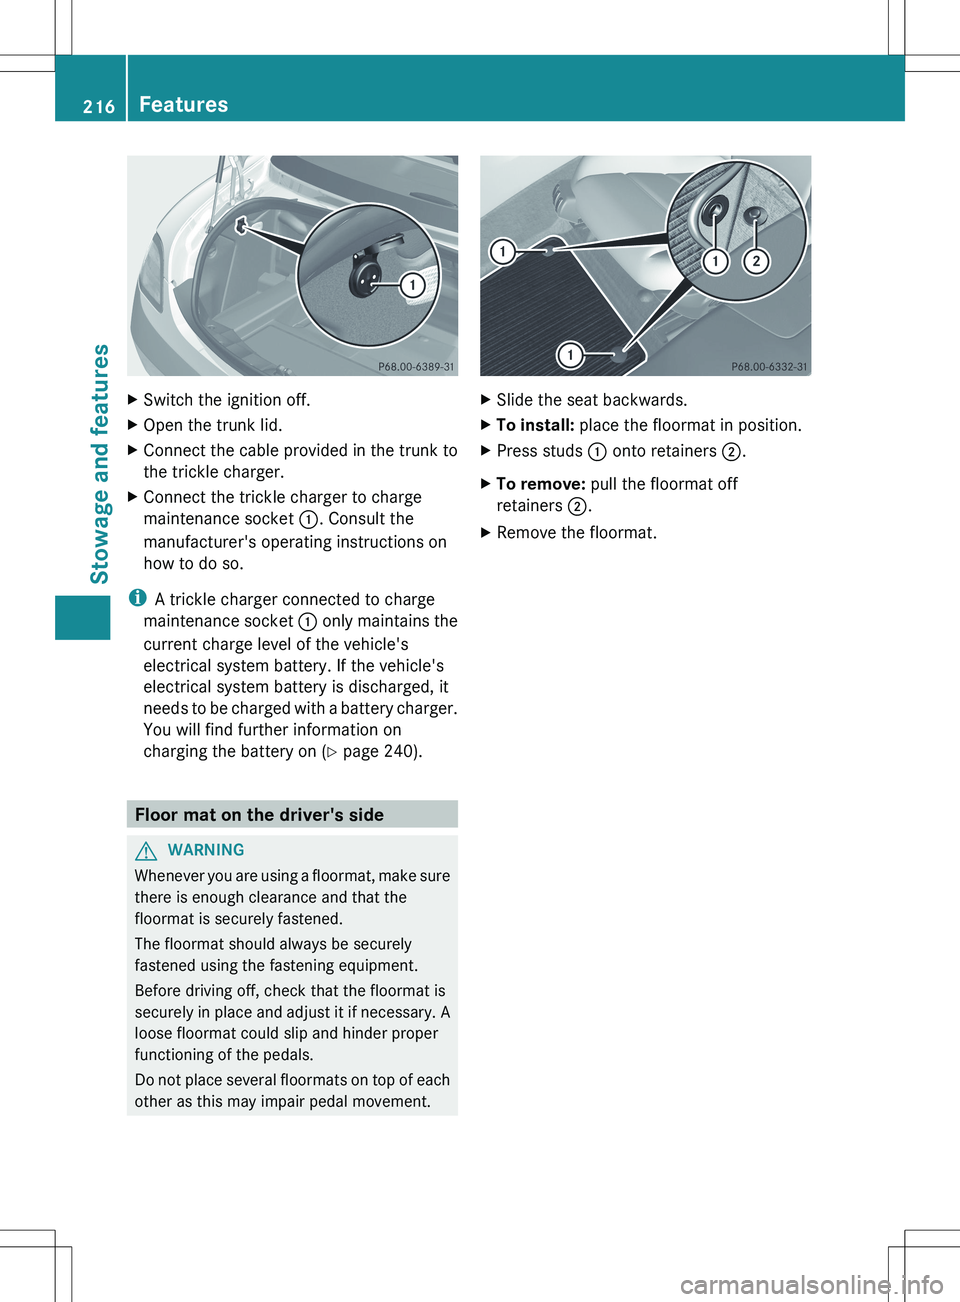
XSwitch the ignition off.XOpen the trunk lid.XConnect the cable provided in the trunk to
the trickle charger.XConnect the trickle charger to charge
maintenance socket :. Consult the
manufacturer's operating instructions on
how to do so.
i A trickle charger connected to charge
maintenance socket : only maintains the
current charge level of the vehicle's
electrical system battery. If the vehicle's
electrical system battery is discharged, it
needs to be charged with a battery charger.
You will find further information on
charging the battery on ( Y page 240).
Floor mat on the driver's side
GWARNING
Whenever you are using a floormat, make sure
there is enough clearance and that the
floormat is securely fastened.
The floormat should always be securely
fastened using the fastening equipment.
Before driving off, check that the floormat is
securely in place and adjust it if necessary. A
loose floormat could slip and hinder proper
functioning of the pedals.
Do not place several floormats on top of each
other as this may impair pedal movement.
XSlide the seat backwards.XTo install: place the floormat in position.XPress studs : onto retainers ;.XTo remove: pull the floormat off
retainers ;.XRemove the floormat.216FeaturesStowage and features
Page 244 of 288
Mercedes-Benz recommends that you do not
carry out work on batteries yourself, e.g.
removing or charging. Always have this work
performed at a qualified specialist workshop,
e.g. an authorized Mercedes-Benz Center.
i If the battery power supply has been
interrupted, e.g. if the battery has been
reconnected, you must reset the function
for automatically folding the exterior
mirrors in/out by folding the mirrors out
once ( Y page 90).
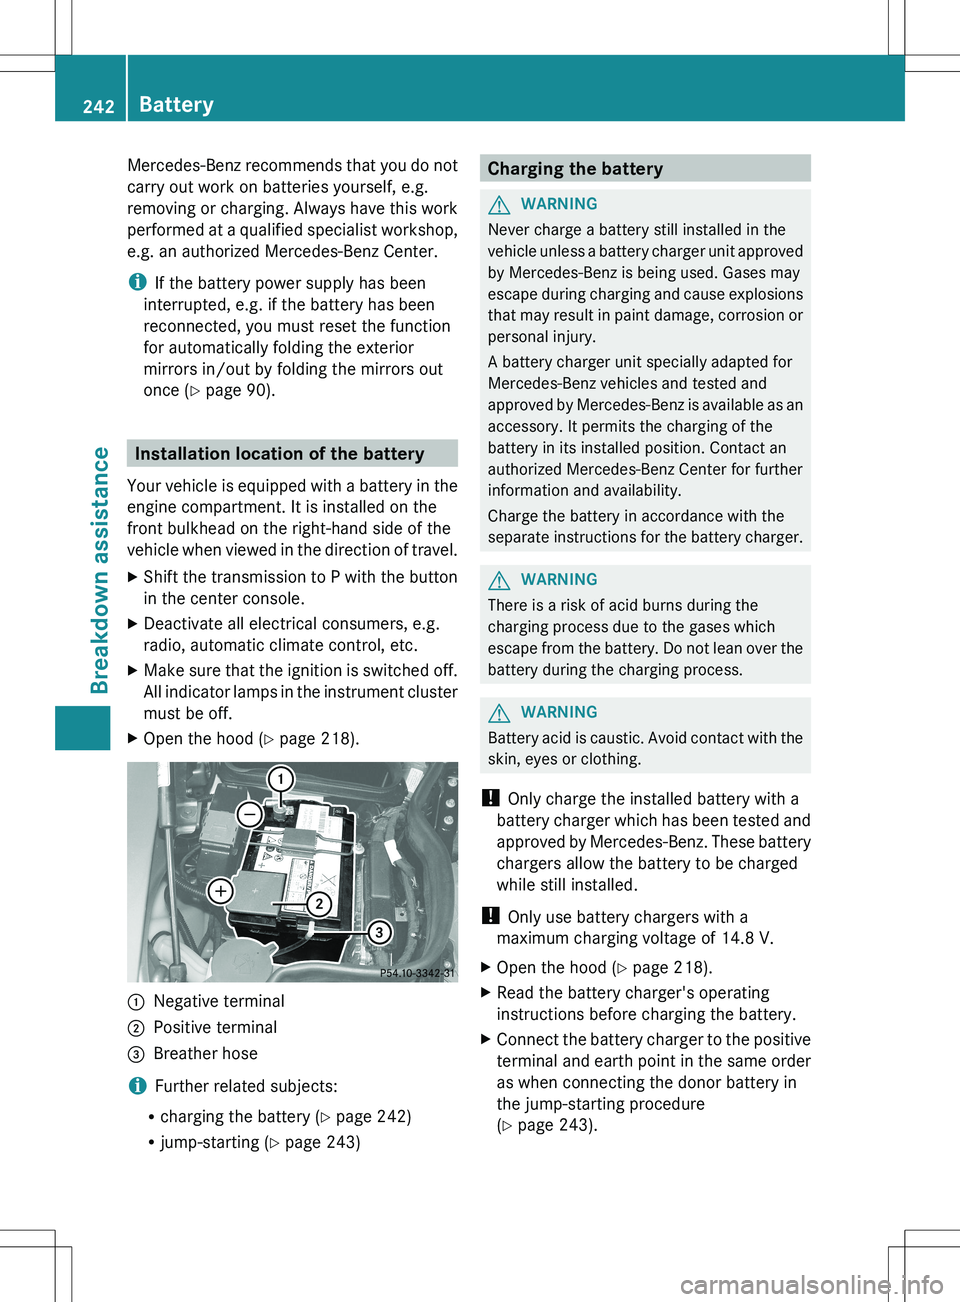
Installation location of the battery
Your vehicle is equipped with a battery in the
engine compartment. It is installed on the
front bulkhead on the right-hand side of the
vehicle when viewed in the direction of travel.
XShift the transmission to P with the button
in the center console.XDeactivate all electrical consumers, e.g.
radio, automatic climate control, etc.XMake sure that the ignition is switched off.
All indicator lamps in the instrument cluster
must be off.XOpen the hood ( Y page 218).:Negative terminal;Positive terminal=Breather hose
i Further related subjects:
R charging the battery ( Y page 242)
R jump-starting ( Y page 243)
Charging the batteryGWARNING
Never charge a battery still installed in the
vehicle unless a battery charger unit approved
by Mercedes-Benz is being used. Gases may
escape during charging and cause explosions
that may result in paint damage, corrosion or
personal injury.
A battery charger unit specially adapted for
Mercedes-Benz vehicles and tested and
approved by Mercedes-Benz is available as an
accessory. It permits the charging of the
battery in its installed position. Contact an
authorized Mercedes-Benz Center for further
information and availability.
Charge the battery in accordance with the
separate instructions for the battery charger.
GWARNING
There is a risk of acid burns during the
charging process due to the gases which
escape from the battery. Do not lean over the
battery during the charging process.
GWARNING
Battery acid is caustic. Avoid contact with the
skin, eyes or clothing.
! Only charge the installed battery with a
battery charger which has been tested and
approved by Mercedes-Benz. These battery
chargers allow the battery to be charged
while still installed.
! Only use battery chargers with a
maximum charging voltage of 14.8 V.
XOpen the hood ( Y page 218).XRead the battery charger's operating
instructions before charging the battery.XConnect the battery charger to the positive
terminal and earth point in the same order
as when connecting the donor battery in
the jump-starting procedure
( Y page 243).242BatteryBreakdown assistance
Page 245 of 288
Jump-startingGWARNING
Failure to follow these directions will cause damage to the electronic components, and can lead
to a battery explosion and severe injury or death.
Never lean over batteries while connecting or jump starting. You might get injured.
Battery fluid contains sulfuric acid. Do not allow this fluid to come in contact with eyes, skin or
clothing. In case it does, immediately flush affected area with water, and seek medical help if
necessary.
A battery will also produce hydrogen gas, which is flammable and explosive. Keep flames or
sparks away from battery, avoid improper connection of jumper cables, smoking, etc.
Attempting to jump start a frozen battery can result in it exploding, causing personal injury.
Read all instructions before proceeding.
! Avoid repeated and lengthy starting attempts. Otherwise, non-combusted fuel may
damage the catalytic converter and create a risk of fire.
Do not use a rapid charging device to start the vehicle.
Make sure the jumper cables are not damaged.
Make sure the jumper cables are not touching any other metal objects when they are
connected to the battery.
If your vehicle's battery is discharged, the engine can be jump-started from another vehicle
or from a second battery using jumper cables.
Observe the following points:
XThe battery is not accessible in all vehicles. If the other vehicle's battery is not accessible,
jump-start the vehicle using a second battery or a jump-starting device.XYou may only jump-start the vehicle when the engine and catalytic converter are cold.XDo not start the engine if the battery is frozen. Let the battery thaw first.XJump-starting may only be performed from batteries with a nominal voltage of 12 V.XOnly use jumper cables which have a sufficient cross-section and insulated terminal clamps.XMake sure that the jumper cables cannot come into contact with parts, such as the pulley
or the fan. These parts move when the engine is started and while it is running.XIf the battery is fully discharged, leave the battery that is being used to jump-start connected
for a few minutes before attempting to start. This charges the empty battery a little.
i Jumper cables and further information about jump-starting can be obtained from any
authorized Mercedes-Benz Center, for example.
XMake sure that the two vehicles do not touch.XPress the electric parking brake handle.XShift the transmission to P with the button in the center console.XDeactivate all electrical consumers, e.g. radio, automatic climate control, etc.XOpen the hood ( Y page 218).Jump-starting243Breakdown assistanceZ