2012 MERCEDES-BENZ SLS AMG ROADSTER remote control
[x] Cancel search: remote controlPage 12 of 288
L
Lamps see Warning and indicator lamps
Lap time (RACETIMER) ...................... 161
License plate lamp Changing bulbs ................................ 99
Display message ............................ 175
Lighting
see Lights
Lights
Activating/deactivating the
interior lighting delayed switch-off . 159
Automatic headlamp mode ..............95
Display message ............................ 173
Driving abroad ................................. 94
Hazard warning lamps .....................96
High beam flasher ............................ 96
High-beam headlamps .....................96
Light switch ..................................... 94
Low-beam headlamps ......................95
Switching the daytime running
lamps on/off (on-board
computer) ...................................... 157
Switching the daytime running
lamps on/off (switch) ......................95
Switching the exterior lighting
delayed switch-off on/off (on-
board computer) ............................ 158
Switching the surround lighting
on/off (on-board computer) ..........158
Turn signals ..................................... 96
see Changing bulbs
LIM indicator lamp
Cruise control ................................ 137
Locking
see Central locking
Locking (doors)
Automatic ........................................ 71
Emergency locking ........................... 72
From inside (central locking
button) ............................................. 70
Locking centrally
see Central locking
Locking verification signal (on-
board computer) ............................... 159Low-beam headlamps
Display message ............................ 174
Setting for driving abroad
(symmetrical) ................................... 94
Switching on/off .............................. 95
M
M+S tires ............................................ 252
Malfunction message see Display messages
Manual drive program ...................... 126
Matte finish (cleaning
instructions) ...................................... 225
mbrace Call priority .................................... 209
Display message ............................ 173
Downloading destinations
(COMAND) ..................................... 209
Emergency call .............................. 206
Important safety notes ..................205
Locating a stolen vehicle ...............210
MB info call button ........................208
Remote vehicle locking ..................210
Roadside Assistance button ..........207
Search & Send ............................... 209
Self-test ......................................... 205
System .......................................... 205
Mechanical key
Function/notes ................................ 65
Locking vehicle ................................ 72
Unlocking the driver's door ..............71
Memory card (audio) ......................... 154
Memory function ................................. 91
Message memory (on-board
computer) .......................................... 164
Messages see Display messages
Mirrors
see Exterior mirrors
see Rear-view mirror
see Vanity mirror
Mobile phone
Menu (on-board computer) ............155
Modifying the programming
(SmartKey) ........................................... 65
10Index
Page 14 of 288
Product information ............................ 18
Program selector ............................... 122
Pulling away ...................................... 117
Q
Qualified specialist workshop ........... 21
R
RACE START ....................................... 123
RACETIMER (on-board computer) .... 161
Radio Selecting a station .........................154
see separate operating instructions
Reading lamp ....................................... 97
Rear spoiler Display message ............................ 189
Extending/retracting .....................210
Problem ......................................... 212
Rear view camera
Cleaning instructions .....................228
Function/notes ............................. 142
Rear-view mirror
Anti-glare (manual) ..........................89
Dipping (automatic) .........................90
Rear window defroster
Problem (malfunction) ...................109
Switching on/off ........................... 109
Refueling
Fuel gauge ....................................... 27
Important safety notes ..................127
Refueling process ..........................127
see Fuel
Remote control
Garage door opener .......................212
Reporting safety defects .................... 22
Reserve (fuel tank) see Fuel
Reserve fuel
Display message ............................ 179
Warning lamp ................................. 195
see Fuel
Restraint system
see SRS (Supplemental Restraint
System)
Roadside Assistance (breakdown) .... 19
Roof
see Soft top
Route
see Route guidance (navigation)
Route guidance (navigation) ............ 153
S
Safety Children in the vehicle .....................51
Child restraint systems ....................51
Occupant Classification System
(OCS) ............................................... 42
Overview of occupant safety
systems ........................................... 36
Safety systems
see Driving safety systems
Seat belts
Belt force limiters ............................ 50
Cleaning ......................................... 229
Correct usage .................................. 48
Emergency Tensioning Devices ........ 50
Fastening ......................................... 49
Important safety guidelines .............47
Releasing ......................................... 49
Safety guidelines ............................. 37
Special seat belt retractor ...............53
Warning lamp ................................. 191
Warning lamp (function) ................... 49
Seats
Adjusting (electrically) .....................86
Adjusting lumbar support ................86
Cleaning the cover .........................229
Correct driver's seat position ........... 84
Important safety notes ....................85
Seat heating problem ......................87
Storing settings (memory
function) .......................................... 91
Switching AIRSCARF on/off ............87
Switching seat heating on/off .........86
Selector lever
Positions ........................................ 119
Sensors (cleaning instructions) ....... 228
Service Center see Qualified specialist workshop
Service interval display
Displaying service messages .........222
Hiding service messages ...............222
12Index
Page 76 of 288
! The trunk lid swings upwards when
opened. Therefore, make sure that there is
sufficient clearance above the trunk lid.
Coupe: to open the trunk lid fully, a minimum
clearance of 5.5 ft (1.68 m) from the ground
is required.
Roadster: to open the trunk lid fully, a
minimum clearance of 5.7 ft (1.75 m) from
the ground is required.
The trunk lid can be:
R opened automatically from outside
R opened automatically from inside
R locked separately
R unlocked with the mechanical key
R opened with the emergency release button
Opening/closing the trunk
Opening and closing from outside the
vehicle
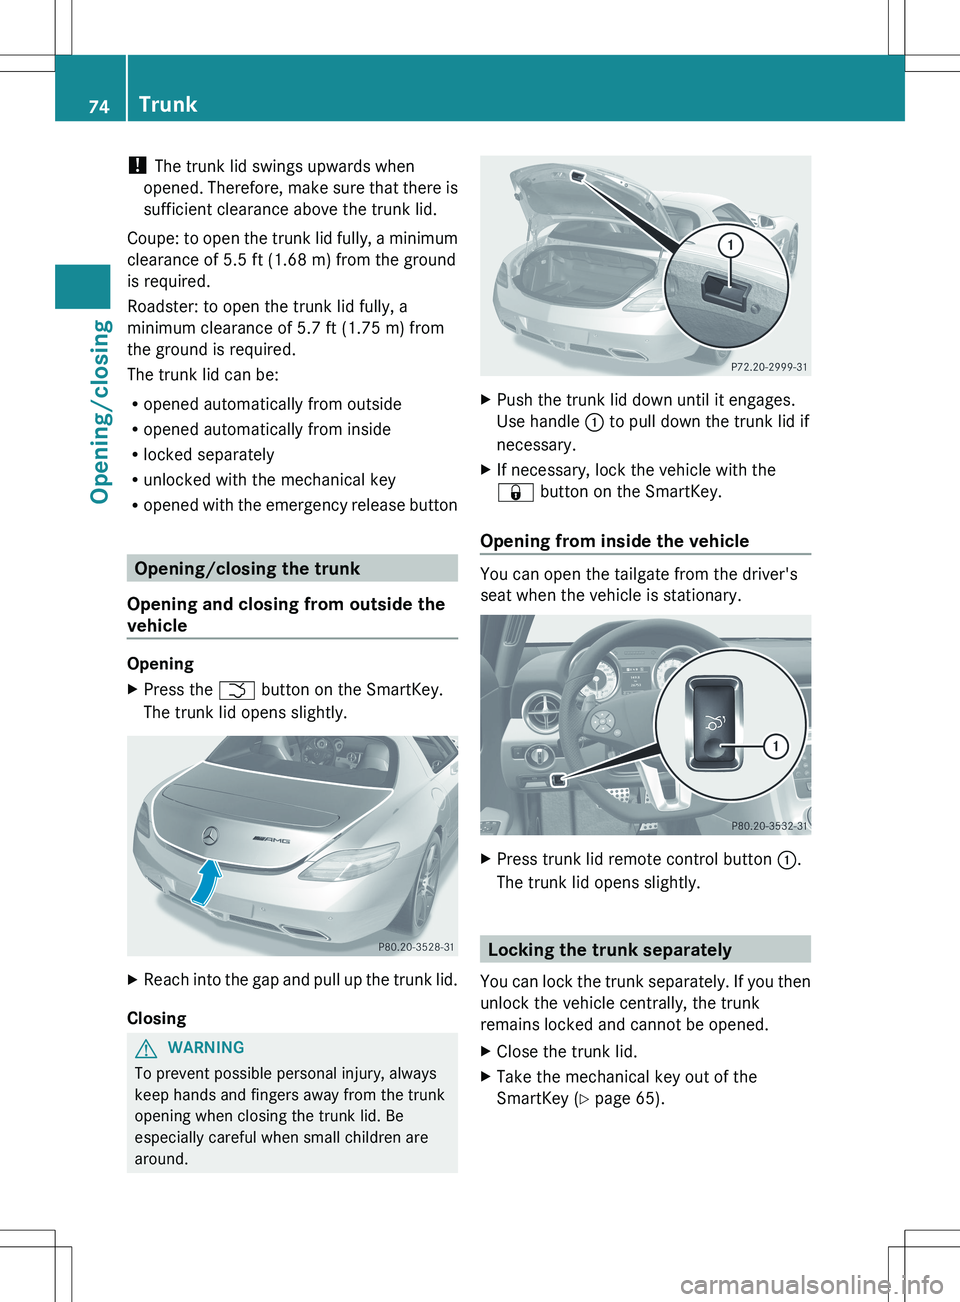
Opening
XPress the F button on the SmartKey.
The trunk lid opens slightly.XReach into the gap and pull up the trunk lid.
Closing
GWARNING
To prevent possible personal injury, always
keep hands and fingers away from the trunk
opening when closing the trunk lid. Be
especially careful when small children are
around.
XPush the trunk lid down until it engages.
Use handle : to pull down the trunk lid if
necessary.XIf necessary, lock the vehicle with the
& button on the SmartKey.
Opening from inside the vehicle
You can open the tailgate from the driver's
seat when the vehicle is stationary.
XPress trunk lid remote control button :.
The trunk lid opens slightly.
Locking the trunk separately
You can lock the trunk separately. If you then
unlock the vehicle centrally, the trunk
remains locked and cannot be opened.
XClose the trunk lid.XTake the mechanical key out of the
SmartKey ( Y page 65).74TrunkOpening/closing
Page 77 of 288
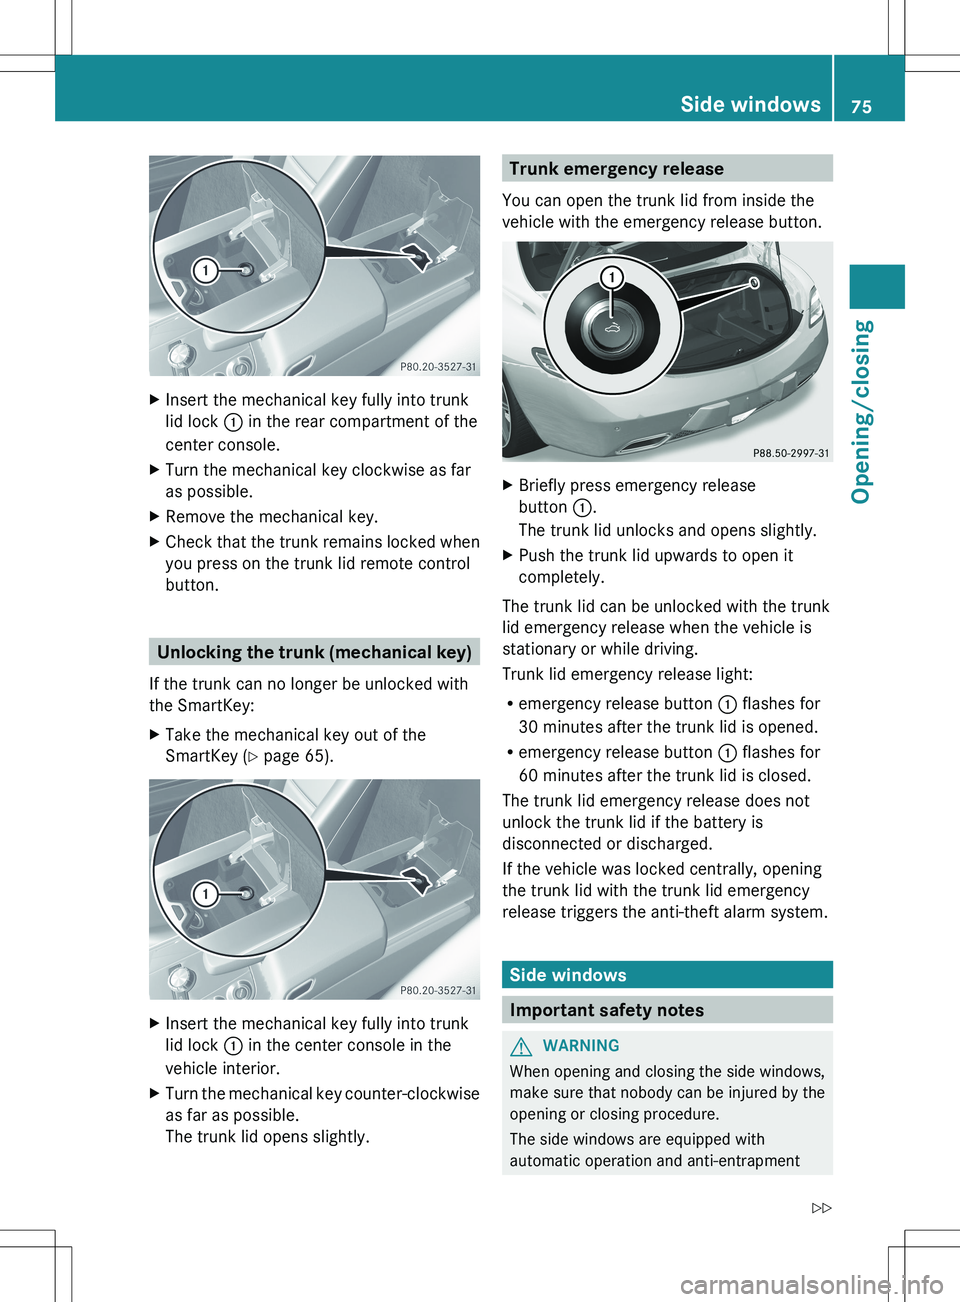
XInsert the mechanical key fully into trunk
lid lock : in the rear compartment of the
center console.XTurn the mechanical key clockwise as far
as possible.XRemove the mechanical key.XCheck that the trunk remains locked when
you press on the trunk lid remote control
button.
Unlocking the trunk (mechanical key)
If the trunk can no longer be unlocked with
the SmartKey:
XTake the mechanical key out of the
SmartKey ( Y page 65).XInsert the mechanical key fully into trunk
lid lock : in the center console in the
vehicle interior.XTurn the mechanical key counter-clockwise
as far as possible.
The trunk lid opens slightly.Trunk emergency release
You can open the trunk lid from inside the
vehicle with the emergency release button.XBriefly press emergency release
button :.
The trunk lid unlocks and opens slightly.XPush the trunk lid upwards to open it
completely.
The trunk lid can be unlocked with the trunk
lid emergency release when the vehicle is
stationary or while driving.
Trunk lid emergency release light:
R emergency release button : flashes for
30 minutes after the trunk lid is opened.
R emergency release button : flashes for
60 minutes after the trunk lid is closed.
The trunk lid emergency release does not
unlock the trunk lid if the battery is
disconnected or discharged.
If the vehicle was locked centrally, opening
the trunk lid with the trunk lid emergency
release triggers the anti-theft alarm system.
Side windows
Important safety notes
GWARNING
When opening and closing the side windows,
make sure that nobody can be injured by the
opening or closing procedure.
The side windows are equipped with
automatic operation and anti-entrapment
Side windows75Opening/closingZ
Page 212 of 288
Vehicle remote closing
If you forget to lock your vehicle but are no
longer in the vicinity of the vehicle, it can be
locked for you by the Mercedes-Benz
Customer Assistance Center.
The vehicle can be locked remotely up to four
days after the ignition was last switched off.
XContact the following service hotlines:
R USA: Mercedes-Benz Customer
Assistance Center under
1-800-FOR-MERCedes
(1-800-367-6372) or 1-888-990-9007
R Canada: Customer Service at
1-888-923-8367
You will be asked for your PIN.
The next time you are in your vehicle and
switch on the ignition, the Tele Aid Doors
Locked Remotely message appears in the
multifunction display.
Alternatively, the vehicle can also be locked
via the Internet or an iPhone in the "Owners
Online" section using your ID number and
password.
i The vehicle valet locking feature is
available when the relevant mobile phone
network is available and data connection is
possible.
Service for recovering a stolen vehicle
If your vehicle has been stolen:
XNotify the police.
The police will issue a numbered incident
report.XThis number will be forwarded to the
Mercedes-Benz Customer Assistance
Center together with your PIN.
The Mercedes-Benz Customer Assistance
Center then attempts to locate the mbrace
system. The Mercedes-Benz Customer
Assistance Center contacts you and the
local law enforcement agency if the vehicle
is located. However, only the law
enforcement agency is informed of the
location of the vehicle.i If the anti-theft alarm system is active for
longer than 30 seconds, mbrace
automatically informs the Mercedes-Benz
Customer Assistance Center.
Rear spoiler
The rear spoiler improves the handling of the
vehicle. It adapts the vehicle's aerodynamics
to the operating conditions, dependent on the
speed of the vehicle.
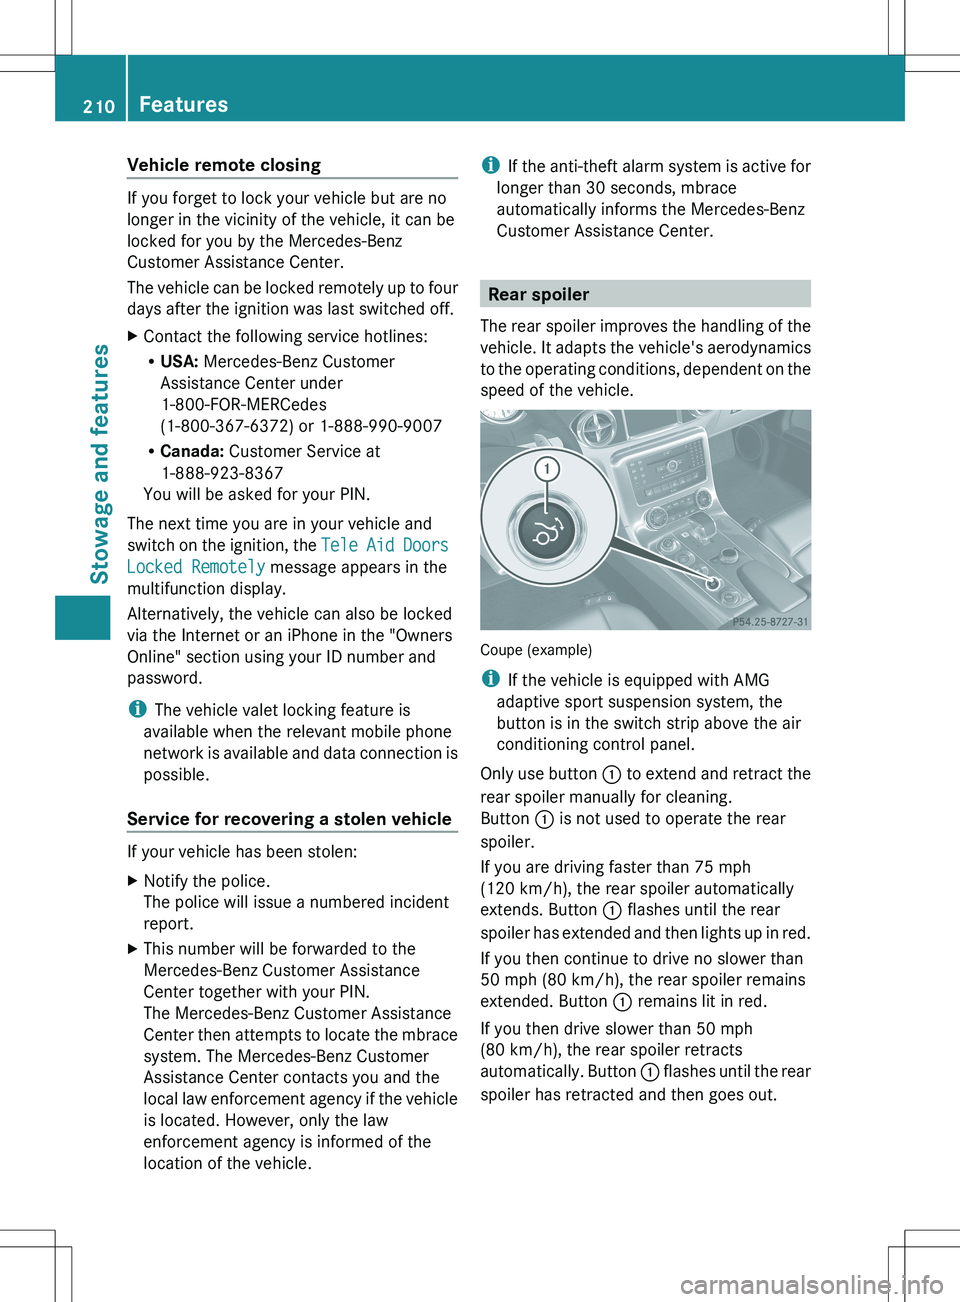
Coupe (example)
i If the vehicle is equipped with AMG
adaptive sport suspension system, the
button is in the switch strip above the air
conditioning control panel.
Only use button : to extend and retract the
rear spoiler manually for cleaning.
Button : is not used to operate the rear
spoiler.
If you are driving faster than 75 mph
(120 km/h), the rear spoiler automatically
extends. Button : flashes until the rear
spoiler has extended and then lights up in red.
If you then continue to drive no slower than
50 mph (80 km/h), the rear spoiler remains
extended. Button : remains lit in red.
If you then drive slower than 50 mph
(80 km/h), the rear spoiler retracts
automatically. Button : flashes until the rear
spoiler has retracted and then goes out.
210FeaturesStowage and features
Page 214 of 288
Problems with the rear spoilerProblemPossible causes/consequences and M SolutionsThe rear spoiler stops
before reaching the
end position when
retracting manually.You have opened the trunk lid while manually retracting the rear
spoiler.XClose the trunk lid.
The rear spoiler extends or, if you press and hold the
button :, continues retracting.The rear spoiler stops
before reaching the
end position when
retracting/extending
manually.You have switched off the ignition.XSwitch on the ignition again.XPress button : to extend/retract the rear spoiler.
The rear spoiler extends/retracts.The rear spoiler cannot
be retracted again after
manually extending it.You have opened the trunk lid while manually extending the rear
spoiler.XClose the trunk lid.The rear spoiler does
not extend or retract
automatically.The rear spoiler's movement is blocked, e.g. by an object jammed
between the body and the rear spoiler.XRemove the object.Garage door opener
Important safety notes
The HomeLink ®
garage door opener
integrated in the rear-view mirror allows you
to operate up to three different door and gate
systems.
i Certain garage door drives are
incompatible with the integrated garage
door opener. If you experience difficulties
programming the integrated garage door
opener, contact an authorized Mercedes-
Benz Service center.
Alternatively, you can call the following
telephone assistance services:
R USA: Mercedes-Benz Customer
Assistance Center at
1-800-FOR-MERCedes
R Canada: Customer Service at
1-800-387-0100
GWARNING
Before programming the integrated remote
control to a garage door opener or gate
operator, make sure people and objects are
out of the way of the device to prevent
potential harm or damage. When
programming a garage door opener, the door
moves up or down. When programming a gate
operator, the gate opens or closes.
Do not use the integrated remote control with
any garage door opener that lacks safety stop
and reverse features as required by U.S.
federal safety standards (this includes any
garage door opener model manufactured
before April 1, 1982). A garage door that
cannot detect an object - signaling the door
to stop and reverse - does not meet current
U.S. federal safety standards.
When programming a garage door opener,
park vehicle outside the garage.
212FeaturesStowage and features
Page 215 of 288
Do not run the engine while programming the
integrated remote control. Inhalation of
exhaust gas is hazardous to your health. All
exhaust gas contains carbon monoxide (CO),
and inhaling it can cause unconsciousness
and possible death. All exhaust gas contains
carbon monoxide (CO), and inhaling it can
cause unconsciousness and possible death.
i USA only:
this device complies with part 15 of the
FCC Rules. Operation is subject to the
following two conditions:
1. This device may not cause harmful
interference, and
2. this device must accept any interference
received, including interference that may
cause undesired operation.
Any unauthorized modification to this
device could void the user's authority to
operate the equipment.
FCC ID: CB2HMIHL4
i Canada only:
This device complies with RSS-210 of
Industry Canada. Operation is subject to
the following two conditions:
1. This device may not cause harmful
interference, and
2. this device must accept any interference
received, including interference that may
cause undesired operation of the device.
Any unauthorized modification to this
device could void the user's authority to
operate the equipment.
IC: 279B-HMIHL4
Programming the integrated garage
door opener on the rear-view mirror
Programming
GWARNING
Only press the button on the integrated
garage door opener if there are no persons or
objects present within the sweep of the
garage door. Persons could otherwise be
injured as the door moves.
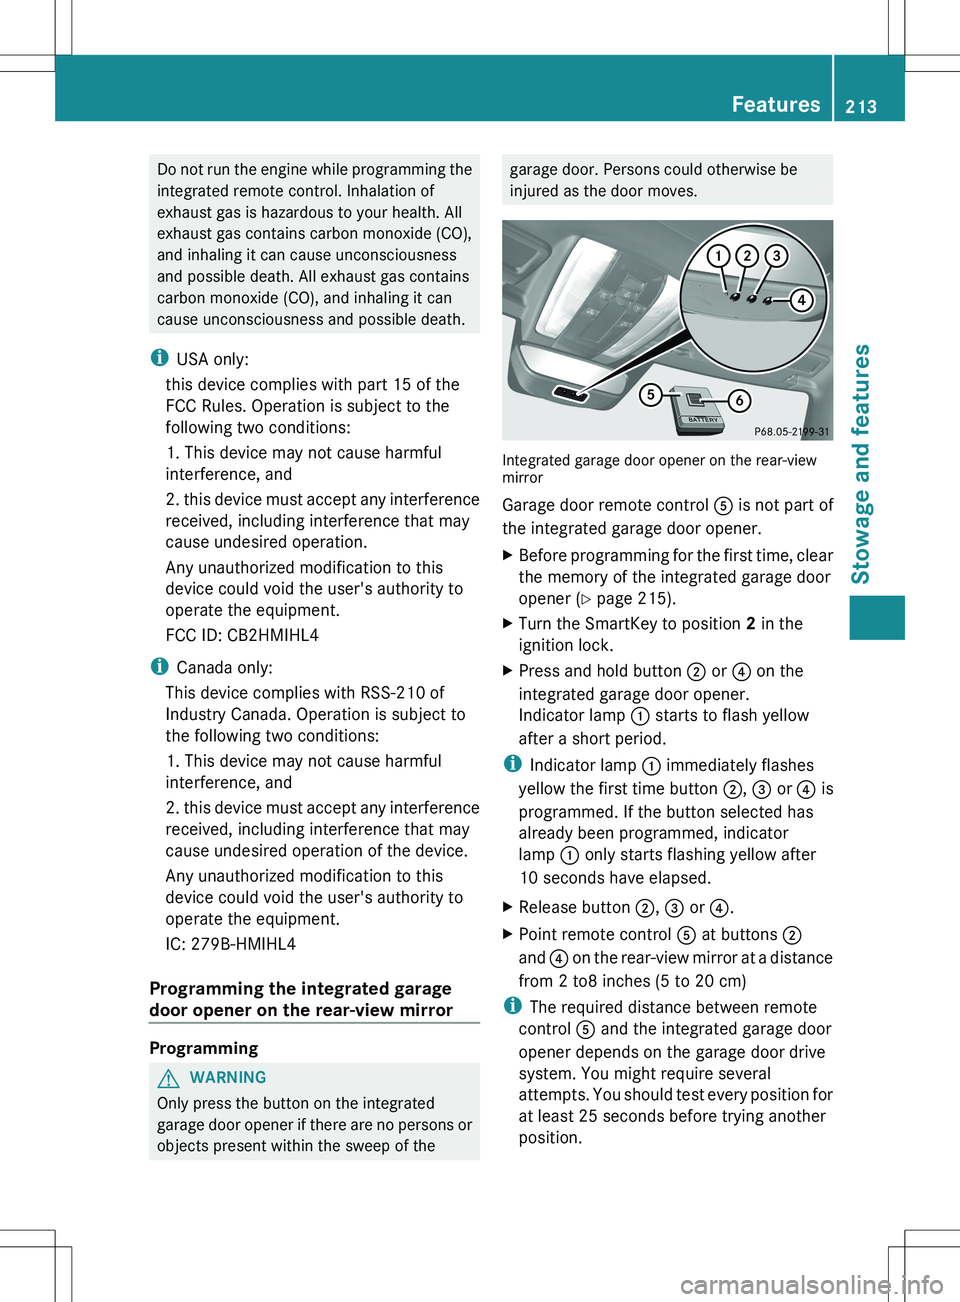
Integrated garage door opener on the rear-view
mirror
Garage door remote control A is not part of
the integrated garage door opener.
XBefore programming for the first time, clear
the memory of the integrated garage door
opener ( Y page 215).XTurn the SmartKey to position 2 in the
ignition lock.XPress and hold button ; or ? on the
integrated garage door opener.
Indicator lamp : starts to flash yellow
after a short period.
i Indicator lamp : immediately flashes
yellow the first time button ;, = or ? is
programmed. If the button selected has
already been programmed, indicator
lamp : only starts flashing yellow after
10 seconds have elapsed.
XRelease button ;, = or ?.XPoint remote control A at buttons ;
and ? on the rear-view mirror at a distance
from 2 to8 inches (5 to 20 cm)
i The required distance between remote
control A and the integrated garage door
opener depends on the garage door drive
system. You might require several
attempts. You should test every position for
at least 25 seconds before trying another
position.
Features213Stowage and featuresZ
Page 216 of 288
XPress and hold button B on remote control
A until indicator lamp : lights up green.
The programming has been successful if
indicator lamp : lights up or flashes
green.XRelease button ;, = or ? on the
integrated garage door opener and button
B on garage door remote control A.
If indicator lamp : lights up red:
XRepeat the programming operation for the
corresponding button on the rear-view
mirror. When doing so, vary the distance
between remote control A and the rear-
view mirror.
i If the indicator lamp flashes green after
successful programming, the garage door
system is operating on a rolling code. After
programming, you must synchronize the
garage door opener integrated in the rear-
view mirror with the receiver of the garage
door system.
Synchronizing the rolling code
Your vehicle must be within range of the
garage or gate opener drive. Make sure that
neither your vehicle nor any persons/objects
are present within the sweep of the door or
gate.
Observe the safety notes when performing
the rolling code synchronization
( Y page 212).
XTurn the SmartKey to position 2 in the
ignition lock.XPress the programming button of the door
or gate drive (see the door or gate drive
operating instructions, e.g. under
"Programming of additional remote
controls").
i Usually, you now have 30seconds to
initiate the next step.
XPress the previously programmed
button ;, = or ? of the integratedgarage door opener repeatedly until the
door starts to move.
The rolling code synchronization is then
complete.
Notes on programming the remote
control
Canadian radio frequency laws require a
"break" (or interruption) of the transmission
signals after broadcasting for a few seconds.
Therefore, these signals may not last long
enough for the integrated remote control. The
signal is not recognized during programming.
Comparable with Canadian law, some U.S.
garage door openers are designed to "time-
out" in the same manner.
Proceed as follows:
R if you live in Canada.
R if you have difficulties programming the
garage door opener (regardless of where
you live) when using the programming
steps.
XPress and hold one of the buttons ;
to ? on the integrated garage door
opener.
Indicator lamp : starts to flash yellow
after a short period.XRelease the switch.XPress button B of garage door remote
control A for two seconds, then release it
for two seconds.XPress button B again for two seconds.XRepeat this sequence on button B of
remote control A until indicator lamp :
lights up green.
Repeat the process if indicator lamp :
turns red.XContinue with the other programming
steps (see above).214FeaturesStowage and features