2012 MERCEDES-BENZ SLS AMG ROADSTER climate control
[x] Cancel search: climate controlPage 107 of 288
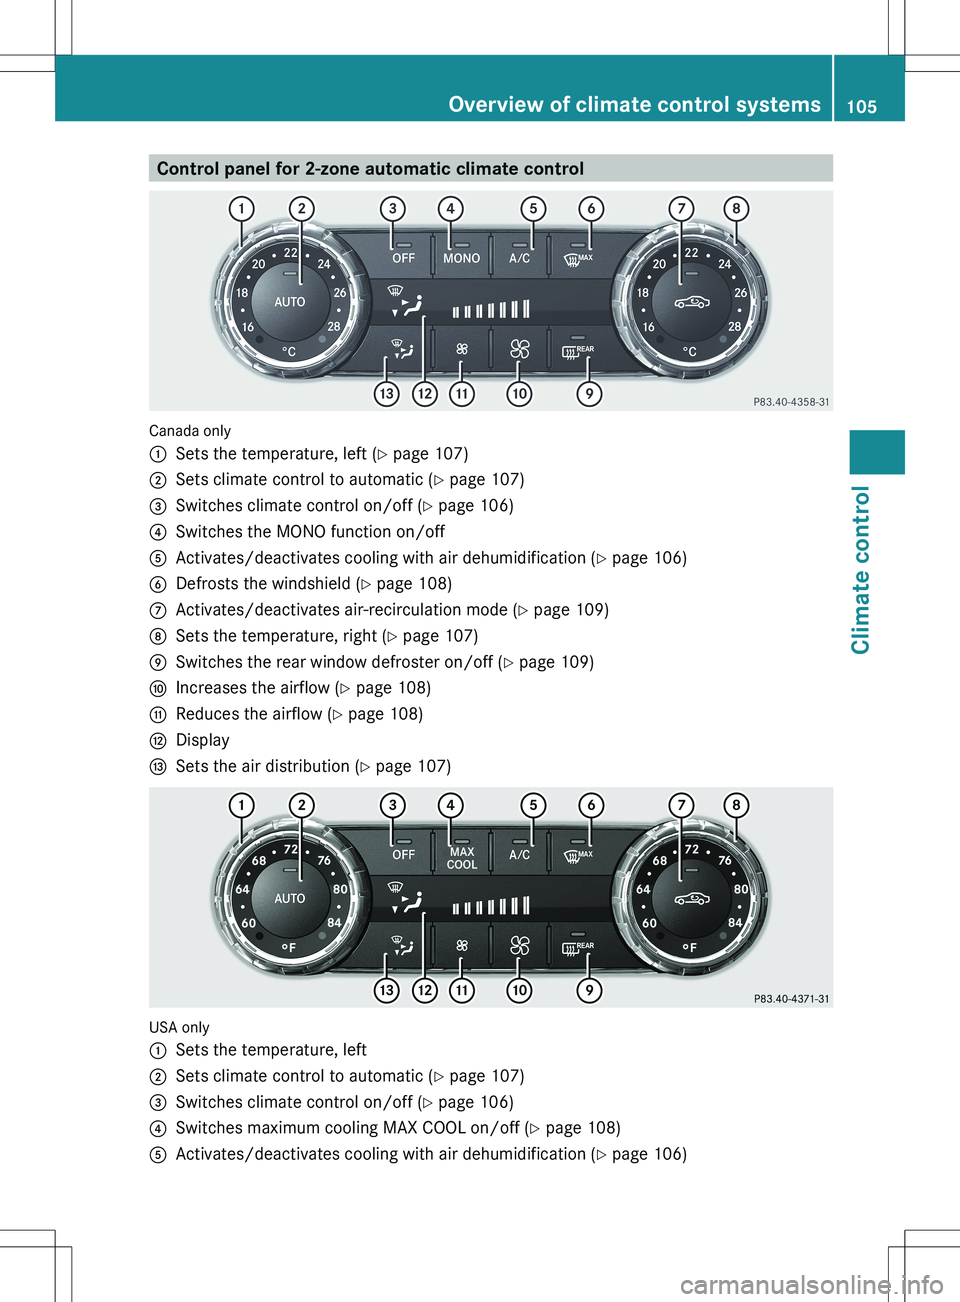
Control panel for 2-zone automatic climate control
Canada only
:Sets the temperature, left (Y page 107);Sets climate control to automatic ( Y page 107)=Switches climate control on/off ( Y page 106)?Switches the MONO function on/offAActivates/deactivates cooling with air dehumidification ( Y page 106)BDefrosts the windshield ( Y page 108)CActivates/deactivates air-recirculation mode ( Y page 109)DSets the temperature, right ( Y page 107)ESwitches the rear window defroster on/off ( Y page 109)FIncreases the airflow ( Y page 108)GReduces the airflow ( Y page 108)HDisplayISets the air distribution ( Y page 107)
USA only
:Sets the temperature, left;Sets climate control to automatic ( Y page 107)=Switches climate control on/off ( Y page 106)?Switches maximum cooling MAX COOL on/off ( Y page 108)AActivates/deactivates cooling with air dehumidification ( Y page 106)Overview of climate control systems105Climate controlZ
Page 108 of 288
BDefrosts the windshield (Y page 108)CActivates/deactivates air-recirculation mode ( Y page 109)DSets the temperature, right ( Y page 107)ESwitches the rear window defroster on/off ( Y page 109)FIncreases the airflow ( Y page 108)GReduces the airflow ( Y page 108)HDisplayISets the air distribution ( Y page 107)Notes on using 2-zone automatic
climate control
The following contains instructions and
recommendations to enable you to get the
most out of your automatic climate control.
R Activate climate control using the à and
¿ buttons. The indicator lamps in the
à and ¿ buttons light up.
R Set the temperature to 72 ‡ (22 † ).
R Only use the "defrosting" function briefly
until the windshield is clear again.
R Only use "air-recirculation" mode briefly,
e.g. if there are unpleasant outside odors
or when in a tunnel. The windows could
otherwise fog up as in air-recirculation
mode no fresh air is drawn into the vehicle.
R Use the MONO function if you want to
adopt the temperature and air distribution
settings from the driver's side for all
climate zones. The indicator lamp in the
º button lights up.
Operating the climate control system
Activating/deactivating climate
control
GWARNING
When the climate control system is
deactivated, the outside air supply and
circulation are also deactivated. Only choose
this setting for a short time. Otherwise the
windows could fog up, impairing visibility and
endangering you and others.
i Switch on climate control primarily using
the à button ( Y page 107).XSelect key position 2 with the Start/Stop
button.XTo switch on: press the à button.
The indicator lamp in the à button lights
up. Airflow and air distribution are set to
automatic mode.
or
XPress the ^ button.
The indicator lamp in the ^ button goes
out. The previously selected settings come
into effect again.XTo switch off: press the ^ button.
The indicator lamp in the ^ button lights
up.
Activating/deactivating the cooling
with air dehumidification function
Important information
The cooling with air dehumidification function
is only available when the engine is running.
The air inside the vehicle is cooled and
dehumidified according to the temperature
selected.
GWARNING
If you switch off the cooling function, the
vehicle will not be cooled when weather
conditions are warm. The windows can fog up
more quickly. Window fogging may impair
visibility and endanger you and others.
106Operating the climate control systemClimate control
Page 109 of 288
Condensation may drip from the underside of
the vehicle when it is in cooling mode.
Activating/deactivatingXTo activate: press the ¿ button.
The indicator lamp in the ¿ button lights
up.XTo switch off: press the ¿ button.
The indicator lamp in the ¿ button goes
out. The cooling with air dehumidification
function has a delayed switch-off feature.
Problems with the cooling with air
dehumidification function
When you press the ¿ button, the
indicator lamp in the button flashes three
times or remains off. You can no longer switch
on the cooling with air dehumidification
function.
XConsult a qualified specialist workshop.
Setting climate control to automatic
GWARNING
If you switch off the cooling function, the
vehicle will not be cooled when weather
conditions are warm. The windows can fog up
more quickly. Window fogging may impair
visibility and endanger you and others.
In automatic mode, the set temperature is
controlled automatically. The system
automatically regulates the temperature of
the dispensed air, the airflow and the air
distribution.
Automatic mode will achieve optimal
operation if cooling with air dehumidification
is also activated. If desired, cooling with air
dehumidification can be deactivated.
XSelect key position 2 with the Start/Stop
button.XSet the desired temperature.XTo activate: press the à button.
The indicator lamp in the à button lights
up. Automatic air distribution and airflow
are activated.XTo switch off: press the à button.
The indicator lamp in the à button goes
out. Automatic air distribution and airflow
are deactivated.
Setting the temperature
Different temperatures can be set for the
driver's and front-passenger sides.
XSelect key position 2 with the Start/Stop
button.XTo increase/reduce: turn controls : and
D clockwise or counter-clockwise
( Y page 105).
Only change the temperature setting in
small increments. Start at 72 ‡ (22 †).
Setting the air distribution
¯Directs the airflow through the
defroster ventsPDirects the airflow through the center
and side air ventsODirects the airflow through the
footwell air ventsSDirects the airflow through the center
and side air vents as well as the
footwell air vents_Directs the airflow to the entire vehicle
interiorbDirects the airflow through the center
and side air vents, as well as the
defroster ventsaDirects the airflow through the
footwell and defroster ventsOperating the climate control system107Climate controlZ
Page 110 of 288
XSelect key position 2 with the Start/Stop
button.XPress the _ button repeatedly until the
desired symbol appears in the display.
The indicator lamp in the à button goes
out. Automatic control is deactivated and
the air distribution is controlled according
to the selected setting.
Setting the airflow
XSelect key position 2 with the Start/Stop
button.XTo increase/reduce: press the K or
I button.
Switching the mono function on/off
The MONO function is only available in
vehicles for Canada.
You can use the MONO function to adopt the
temperature and air distribution settings on
the driver's side for the front-passenger side.
XPress the º button.
The indicator lamp in the º button lights
up or goes out.
Defrosting the windshield
i You should only select the defrosting
function until the windshield is clear again.
XSelect key position 2 with the Start/Stop
button.XTo activate: press the ¬ button.
The indicator lamp in the ¬ button lights
up.
The system automatically switches to the
following functions:
R cooling with air dehumidification on
R high airflow 7
R high temperature 7R
air distribution to the windshield and
front side windows
R air-recirculation mode offXTo switch off: press the ¬ button.
The indicator lamp in the ¬ button goes
out. The previously selected settings come
into effect again. The cooling with air
dehumidification function remains on. Air-
recirculation mode remains deactivated.
or
XPress the à button.
The indicator lamp in the ¬ button goes
out. Airflow and air distribution are set to
automatic mode.
or
XTurn controls : or D clockwise or
counter-clockwise ( Y page 105).
or
XPress the K or I button.
Switching maximum cooling MAX
COOL on/off
The MAX COOL function is only available in
vehicles for the USA.
MAX COOL is only operational when the
engine is running.
When you activate MAX COOL, climate
control switches to the following functions:
R maximum cooling
R maximum airflow
R air-recirculation mode on
XTo activate: press the Ù button.
The indicator lamp in the button lights up.XTo deactivate: press the Ù button
again.
The indicator lamp in the button goes out.
The previously selected settings come into
effect again.
i To deactivate MAX COOL press the ^,
à , or ¬ button.
7
Depending on the outside temperature.108Operating the climate control systemClimate control
Page 111 of 288
Defrosting the windows
Windows fogged up on the insideXActivate the cooling with air
dehumidification function.XActivate automatic mode.XIf the windows continue to fog up, activate
the defrosting function.
Windows fogged up on the outside
XActivate the windshield wipers.XPress the _ button repeatedly until the
O or P symbol appears in the
display.
i You should only select this setting until
the windshield is clear again.
Rear window defroster
Activating/deactivating
GWARNING
Any accumulation of snow and ice should be
removed from the rear window before driving.
Visibility could otherwise be impaired,
endangering you and others.
The rear window defroster has a high current
draw. You should therefore switch it off as
soon as the window is clear. It otherwise
switches off automatically after several
minutes.
If the battery voltage is too low, the rear
window defroster may switch off.
XSelect SmartKey position 2 with the Start/
Stop button.XPress the ¤ button.
The indicator lamp in the ¤ button lights
up or goes out.Problems with the rear window
defroster
The rear window defroster has deactivated
prematurely or cannot be activated. The on-
board voltage is too low because too many
electrical consumers are switched on.
XSwitch off any consumers that are not
required, e.g. seat heating or interior
lighting.
When the battery is sufficiently charged,
the rear window defroster is activated
again automatically.
Activating/deactivating air-
recirculation mode
You can deactivate the flow of fresh air if
unpleasant odors are entering the vehicle
from outside. The air already inside the
vehicle will then be recirculated.
GWARNING
Fogged windows impair visibility,
endangering you and others. If the windows
begin to fog on the inside, switching off the
air recirculation mode immediately should
clear interior window fogging. If interior
window fogging persists, make sure the air
conditioning is activated, or press the ¬
button.
XSelect SmartKey position 2 with the Start/
Stop button.XTo activate: press the g button.
The indicator lamp in the g button lights
up.
i Air-recirculation mode is activated
automatically at high outside
temperatures. When air-recirculation mode
is activated automatically, the indicator
lamp in the g button is not lit.
Outside air is added after about 30
minutes.
Operating the climate control system109Climate controlZ
Page 112 of 288
XTo switch off: press the g button.
The indicator lamp in the g button goes
out.
i Air-recirculation mode deactivates
automatically:
R after approximately five minutes if
outside temperatures are less than about
41 ‡ (5 †)
R after approximately five minutes if
cooling with air dehumidification is
deactivated
R after approximately 30 minutes if outside
temperatures are over about
41 ‡ (5 †)
Setting the air vents
Important safety notes
GWARNING
When operating the climate control, the air
that enters the passenger compartment
through the air vents can be very hot or very
cold (depending on the set temperature). This
could cause burns or frostbite to unprotected
skin in the immediate area of the air vents.
Always keep sufficient distance between
unprotected parts of the body and the air
vents. If necessary, use the air distribution
adjustment to direct the air to air vents in the
vehicle interior that are not in the immediate
area of unprotected skin.
In order to ensure the direct flow of fresh air
through the air vents into the vehicle interior,
please observe the following notes:
R keep the air inlet on the right-hand side of
the hood free of blockages, such as ice,
snow or leaves.
R never cover the air vents or air intake grilles
in the vehicle interior.
i For virtually draft-free ventilation, adjust
the sliders of the air vents to the center
position.
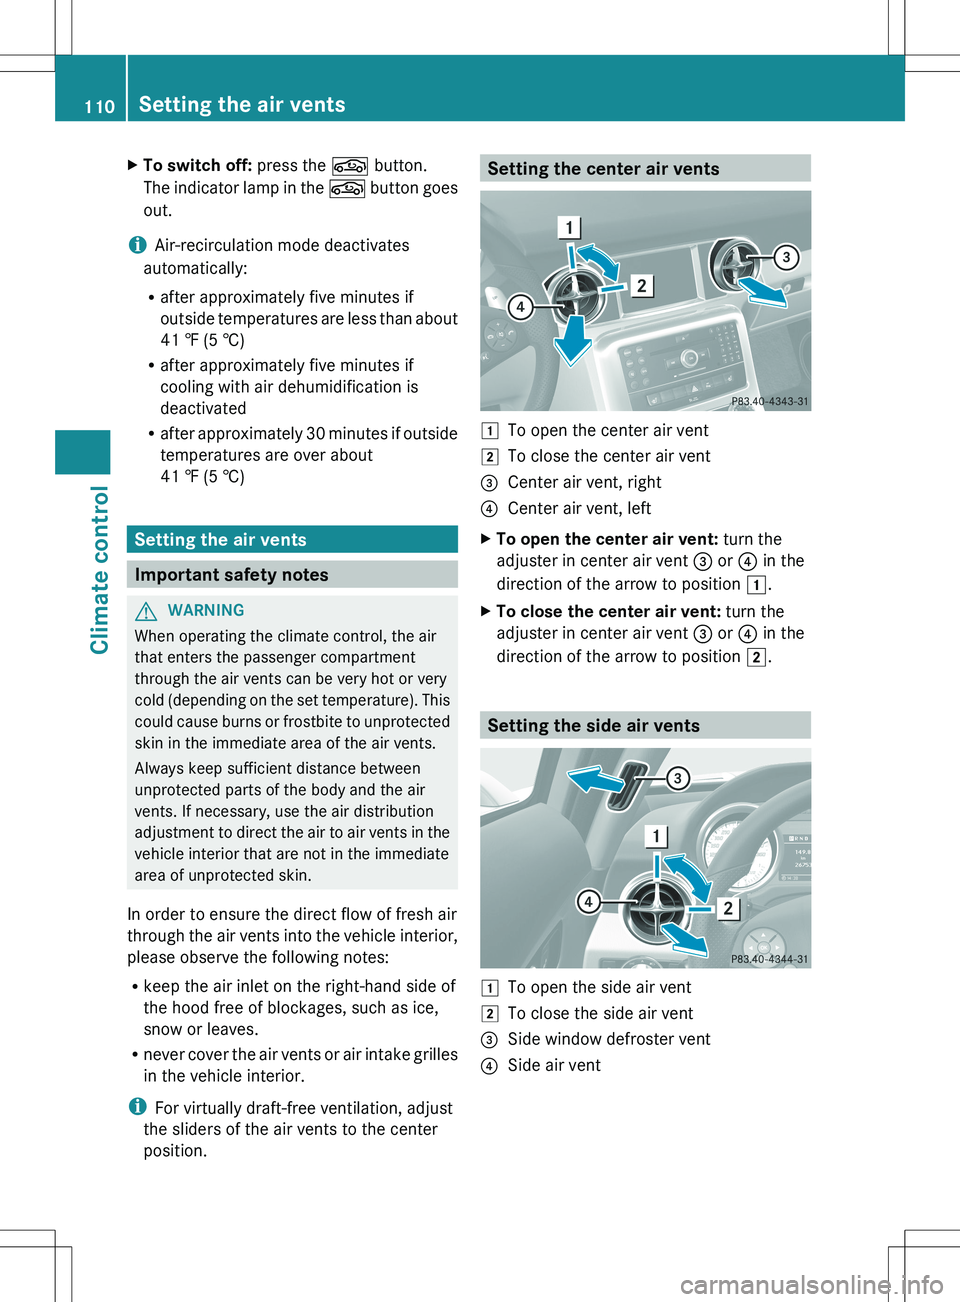
Setting the center air vents1To open the center air vent2To close the center air vent=Center air vent, right?Center air vent, leftXTo open the center air vent: turn the
adjuster in center air vent = or ? in the
direction of the arrow to position 1.XTo close the center air vent: turn the
adjuster in center air vent = or ? in the
direction of the arrow to position 2.
Setting the side air vents
1To open the side air vent2To close the side air vent=Side window defroster vent?Side air vent110Setting the air ventsClimate control
Page 113 of 288
XTo open the side air vent: turn the
adjuster in side air vent ? in the direction
of the arrow to position 1.XTo close the side air vent: turn the
adjuster in side air vent ? in the direction
of the arrow to position 2.
Setting the AIRSCARF vents
(Roadster)
GWARNING
When operating the climate control, the air
that enters the passenger compartment
through the air vents can be very hot or very
cold (depending on the set temperature). This
could cause burns or frostbite to unprotected
skin in the immediate area of the air vents.
Always keep sufficient distance between
unprotected parts of the body and the air
vents. If necessary, use the air distribution
adjustment to direct the air to air vents in the
vehicle interior that are not in the immediate
area of unprotected skin.
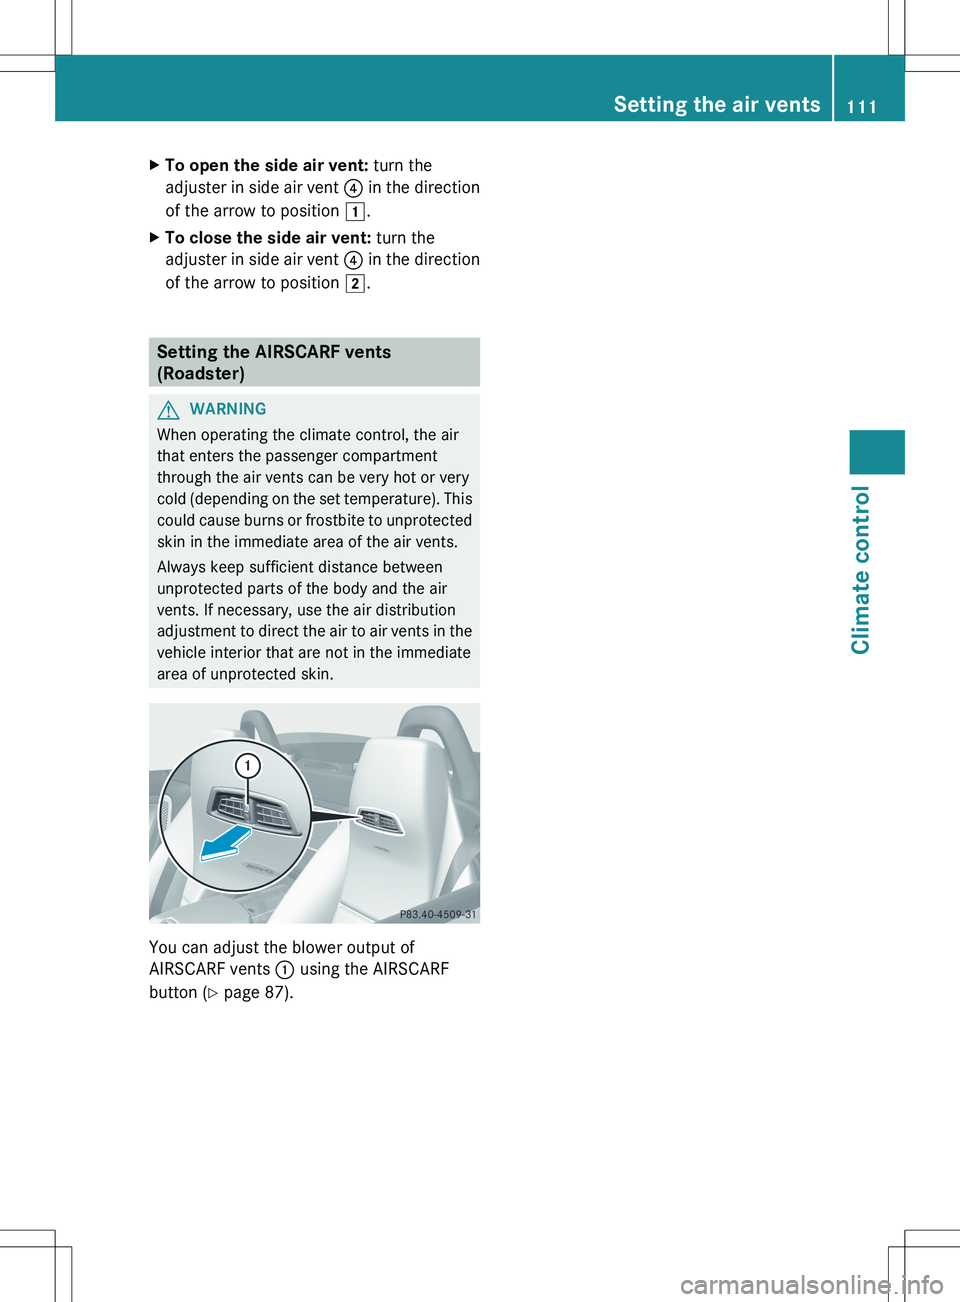
You can adjust the blower output of
AIRSCARF vents : using the AIRSCARF
button ( Y page 87).
Setting the air vents111Climate controlZ
Page 244 of 288
Mercedes-Benz recommends that you do not
carry out work on batteries yourself, e.g.
removing or charging. Always have this work
performed at a qualified specialist workshop,
e.g. an authorized Mercedes-Benz Center.
i If the battery power supply has been
interrupted, e.g. if the battery has been
reconnected, you must reset the function
for automatically folding the exterior
mirrors in/out by folding the mirrors out
once ( Y page 90).
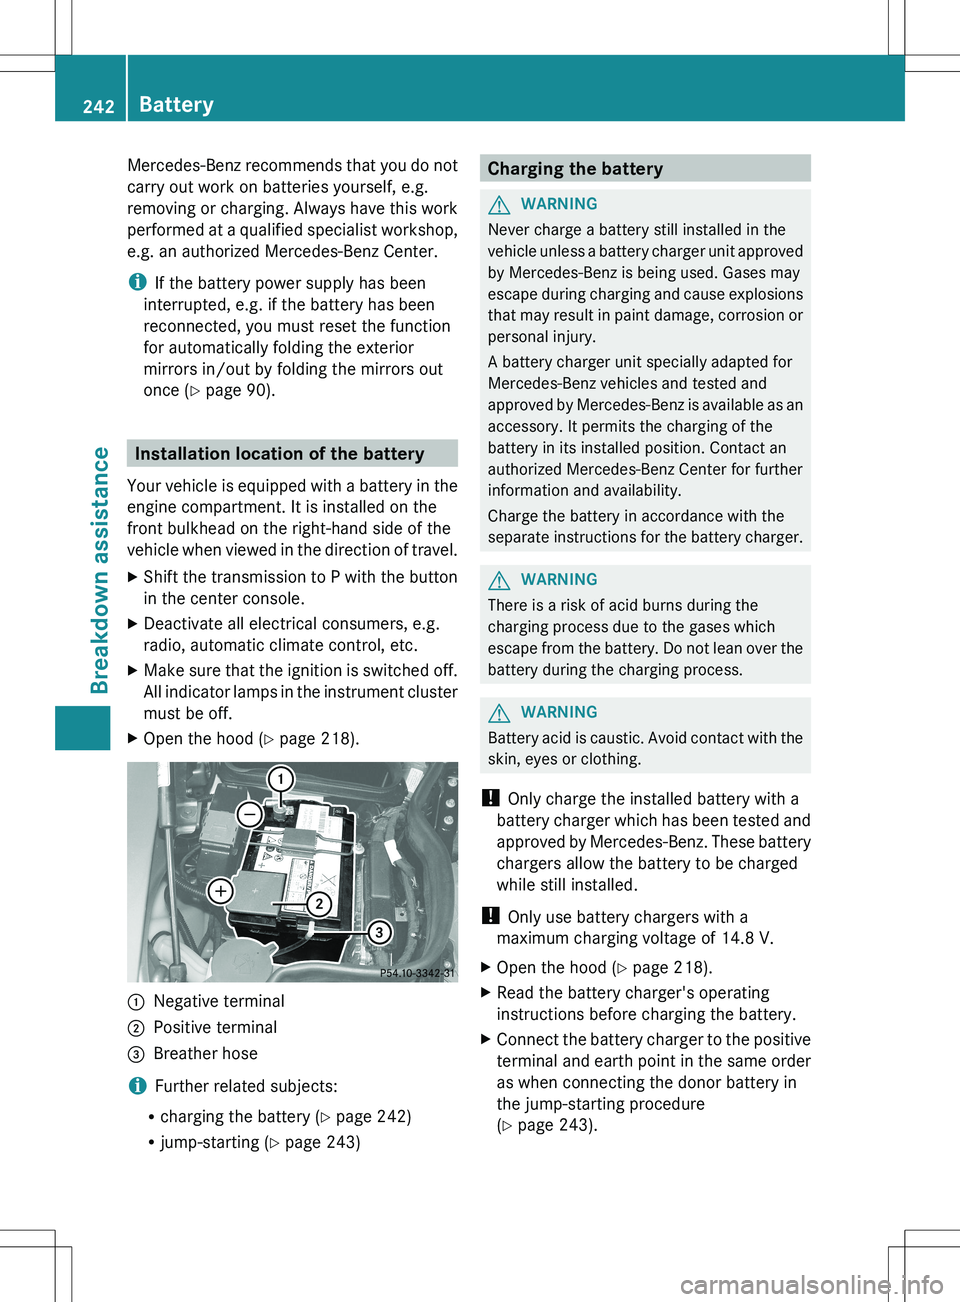
Installation location of the battery
Your vehicle is equipped with a battery in the
engine compartment. It is installed on the
front bulkhead on the right-hand side of the
vehicle when viewed in the direction of travel.
XShift the transmission to P with the button
in the center console.XDeactivate all electrical consumers, e.g.
radio, automatic climate control, etc.XMake sure that the ignition is switched off.
All indicator lamps in the instrument cluster
must be off.XOpen the hood ( Y page 218).:Negative terminal;Positive terminal=Breather hose
i Further related subjects:
R charging the battery ( Y page 242)
R jump-starting ( Y page 243)
Charging the batteryGWARNING
Never charge a battery still installed in the
vehicle unless a battery charger unit approved
by Mercedes-Benz is being used. Gases may
escape during charging and cause explosions
that may result in paint damage, corrosion or
personal injury.
A battery charger unit specially adapted for
Mercedes-Benz vehicles and tested and
approved by Mercedes-Benz is available as an
accessory. It permits the charging of the
battery in its installed position. Contact an
authorized Mercedes-Benz Center for further
information and availability.
Charge the battery in accordance with the
separate instructions for the battery charger.
GWARNING
There is a risk of acid burns during the
charging process due to the gases which
escape from the battery. Do not lean over the
battery during the charging process.
GWARNING
Battery acid is caustic. Avoid contact with the
skin, eyes or clothing.
! Only charge the installed battery with a
battery charger which has been tested and
approved by Mercedes-Benz. These battery
chargers allow the battery to be charged
while still installed.
! Only use battery chargers with a
maximum charging voltage of 14.8 V.
XOpen the hood ( Y page 218).XRead the battery charger's operating
instructions before charging the battery.XConnect the battery charger to the positive
terminal and earth point in the same order
as when connecting the donor battery in
the jump-starting procedure
( Y page 243).242BatteryBreakdown assistance