2012 MERCEDES-BENZ SLS AMG COUPE key
[x] Cancel search: keyPage 217 of 288
Problems when programming
If you are experiencing problems
programming the integrated garage door
opener on the rear-view mirror, take note of
the following instructions:
R Check remote control frequency of garage
door drive remote control A. This is
usually located on the back of the remote
control.
The integrated garage door opener is
compatible with devices that have units
which operate in the frequency range of
280 to 390 MHz.
R Change the batteries in garage door remote
control A. This increases the likelihood
that garage door remote control A will
send a strong and precise signal to the
integrated garage door opener in the rear-
view mirror.
R When programming, hold remote control
A at varying distances and angles from the
button which you are programming. Try
various angles at a distance of between 2
to 12 inches (5 to 30 cm) or at the same
angle but at varying distances.
R if another remote control for the same
garage door drive is available, repeat the
same programming steps with this remote
control. Before performing these steps,
make sure that new batteries have been
installed in garage door drive remote
control A.
R note that some remote controls only
transmit for a limited amount of time (the
indicator lamp on the remote control goes
out). Press button B on remote control
A before transmission ends.
R align the antenna cable of the garage door
opener unit. This can improve signal
reception/transmission.
Opening/closing the garage door
After it has been programmed, the integrated
garage door opener performs the function of
the garage door system remote control.
Please also read the operating instructions
for the garage door system.XTurn the SmartKey to position 2 in the
ignition lock.XPress one of the buttons ;, = or ?;
whichever one is programmed to operate
the garage door.
Garage door system with a fixed code:
indicator lamp : lights up green.
Garage door system with a rolling code:
indicator lamp : flashes green.
i
The transmitter will transmit a signal for
as long as the button is pressed. The
transmission is halted after a maximum of
ten seconds and indicator lamp : flashes
yellow. Press button ;, = or ? again if
necessary.
Clearing the memory of the integrated
garage door opener on the rear-view
mirror
XTurn the SmartKey to position 2 in the
ignition lock.XPress buttons ; and ?.
The indicator lamp lights up yellow.XPress and hold buttons ; and ? until the
indicator lamp turns green.
i Make sure that you clear the memory of
the integrated garage door opener before
selling the vehicle.
Charge maintenance socket
The battery may drain if the vehicle is left
stationary for long periods. In this case,
Mercedes-Benz recommends attaching the
trickle charger to the charge maintenance
socket.
The charge maintenance socket is designed
solely for connecting a trickle charger. A
trickle charger can be obtained from an
authorized Mercedes-Benz Center, for
example.
Features215Stowage and featuresZ
Page 220 of 288
Useful information
i This Operator's Manual describes all
models and all standard and optional
equipment of your vehicle available at the
time of publication of the Operator's
Manual. Country-specific differences are
possible. Please note that your vehicle may
not be equipped with all features
described. This also applies to safety-
related systems and functions.
i Please read the information on qualified
specialist workshops ( Y page 21).
Engine compartment
Hood
Opening the hood
GWARNING
Do not pull the release lever while the vehicle
is in motion. Otherwise, the hood could be
forced open by passing air flow.
This could cause the hood to come loose and
injure you and/or others.
GWARNING
Do not open the hood when the engine is
overheated. You could be seriously injured.
Observe the coolant temperature gauge to
determine whether the engine may be
overheated. If you see flames or smoke
coming from the engine compartment, move
away from the vehicle. Wait until the engine
has cooled. If necessary, call the fire
department.
GWARNING
There is a risk of injury if the hood is open,
even if the engine is not running.
Some engine components can become very
hot.
To avoid the risk of burns, only touch those
components described in the Operator's
Manual and observe the relevant safety notes.
GWARNING
To help prevent personal injury, stay clear of
moving parts when the hood is open and the
engine is running.
The radiator fan may continue to run for
approximately 30 seconds or may even
restart after the engine has been turned off.
Stay clear of fan blades.
GWARNING
The engine is equipped with a transistorized
ignition system. Because of the high voltage,
it is dangerous to touch any components
(ignition coils, spark plug sockets, diagnostic
socket) of the ignition system:
R with the engine running
R while starting the engine
R when the ignition is switched on and the
engine is turned manually
XMake sure that the windshield wipers are
switched off.GWARNING
The windshield wipers and wiper linkage
could be set in motion.
When the hood is open, you or others could
be injured by the wiper linkage.
Make sure that the windshield wipers are
switched off. When using KEYLESS-GO, make
sure that no ignition position is selected. All
indicator lamps in the instrument cluster must
be off.
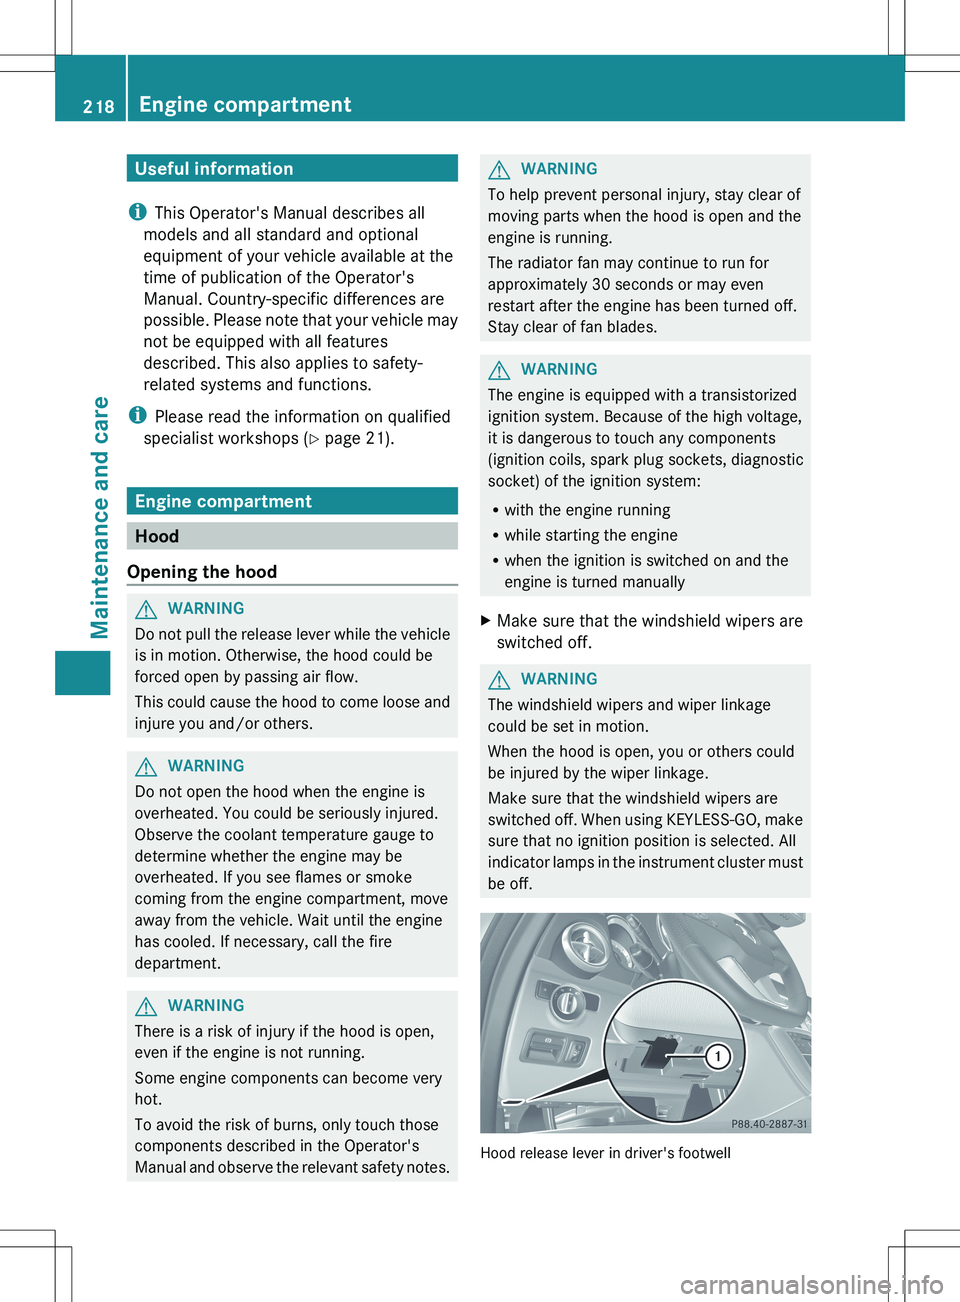
Hood release lever in driver's footwell
218Engine compartmentMaintenance and care
Page 222 of 288
Adding engine oilHEnvironmental note
When adding oil, take care not to spill any. If
oil enters the soil or waterways, it is harmful
to the environment.
! Use only engine oils and oil filters that
have been approved for vehicles equipped
with a service system. A list of the engine
oils and oil filters tested and approved in
accordance with the Mercedes-Benz
Specifications for Service Products can be
called up by visiting http://
www.mbusa.com (USA only). More
information about tested and approved
engine oils and oil filters is available from
any authorized Mercedes-Benz Center.
Damage to the engine or exhaust system is
caused by the following:
R using engine oils and oil filters which
have not been specifically approved for
the service system.
R replacing the engine oil or oil filter after
the replacement interval required by the
service system has elapsed
R using engine oil additives.
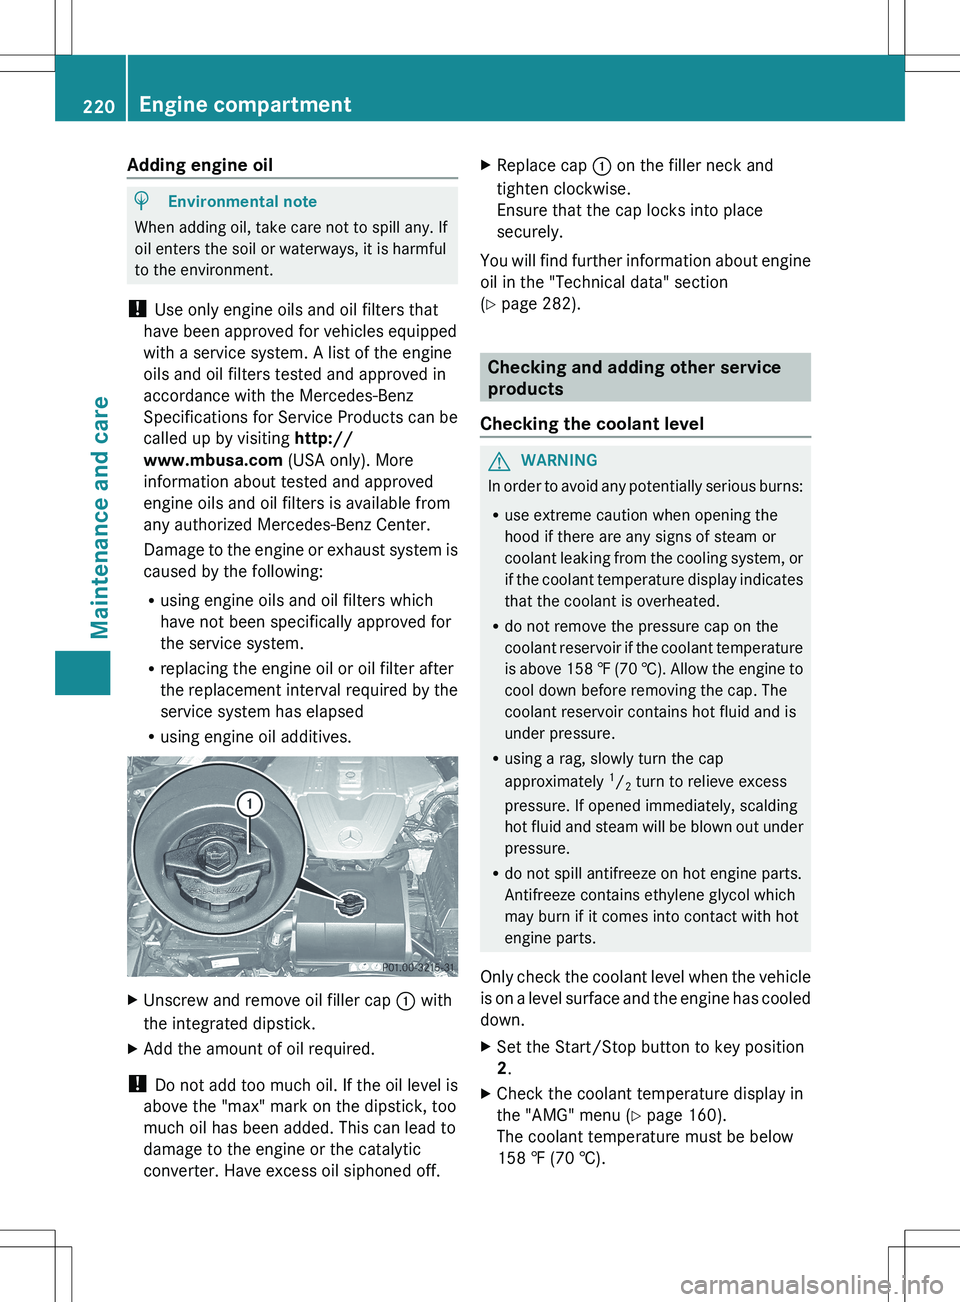
XUnscrew and remove oil filler cap : with
the integrated dipstick.XAdd the amount of oil required.
! Do not add too much oil. If the oil level is
above the "max" mark on the dipstick, too
much oil has been added. This can lead to
damage to the engine or the catalytic
converter. Have excess oil siphoned off.
XReplace cap : on the filler neck and
tighten clockwise.
Ensure that the cap locks into place
securely.
You will find further information about engine
oil in the "Technical data" section
( Y page 282).
Checking and adding other service
products
Checking the coolant level
GWARNING
In order to avoid any potentially serious burns:
R use extreme caution when opening the
hood if there are any signs of steam or
coolant leaking from the cooling system, or
if the coolant temperature display indicates
that the coolant is overheated.
R do not remove the pressure cap on the
coolant reservoir if the coolant temperature
is above 158 ‡ (70 †). Allow the engine to
cool down before removing the cap. The
coolant reservoir contains hot fluid and is
under pressure.
R using a rag, slowly turn the cap
approximately 1
/ 2 turn to relieve excess
pressure. If opened immediately, scalding
hot fluid and steam will be blown out under
pressure.
R do not spill antifreeze on hot engine parts.
Antifreeze contains ethylene glycol which
may burn if it comes into contact with hot
engine parts.
Only check the coolant level when the vehicle
is on a level surface and the engine has cooled
down.
XSet the Start/Stop button to key position
2 .XCheck the coolant temperature display in
the "AMG" menu ( Y page 160).
The coolant temperature must be below
158 ‡ (70 †).220Engine compartmentMaintenance and care
Page 225 of 288
Have service work carried out as described
in the Maintenance Booklet. This may
otherwise lead to increased wear and
damage to the major assemblies or the
vehicle.
Driving abroad
An extensive Mercedes-Benz Service network
is also available in other countries. You can
obtain further information from any
authorized Mercedes-Benz Center.
Care
Notes on care
Regular care of your vehicle is a condition for
retaining the quality in the long term.
Use care products and cleaning agents
recommended and approved by Mercedes-
Benz.
GWARNING
Many cleaning products can be hazardous.
Some are poisonous, others are flammable.
Always follow the instructions on the
particular container. Always open your
vehicle's doors or windows when cleaning the
inside.
Never use fluids or solvents that are not
designed for cleaning your vehicle.
Always lock away cleaning products and keep
them out of reach of children.
! For cleaning your vehicle, do not use any
of the following:
R dry, rough or hard cloths
R abrasive cleaning agents
R solvents
R cleaning agents containing solvents
Do not scrub.
Do not touch the surfaces or protective
films with hard objects, e.g. a ring or ice
scraper. You could otherwise scratch or
damage the surfaces and protective film.
HEnvironmental note
Dispose of empty packaging and cleaning
cloths in an environmentally responsible
manner.
! Do not park the vehicle for an extended
period right after cleaning it, particularly
after having cleaned the wheels with wheel
cleaner. Wheel cleaners could cause
increased corrosion of the brake discs and
brake pads/linings. For this reason, you
should drive for a few minutes after
cleaning. Braking heats the brake discs and
brake pads, thus drying them. The vehicle
can then be parked.
Exterior care
Automatic car wash
GWARNING
Braking efficiency is reduced after washing
the vehicle. This could cause an accident.
After the vehicle has been washed, brake
firmly while paying attention to the traffic
conditions. This will warm up the brake discs,
thereby drying them more quickly. After
washing the vehicle, drive particularly
carefully until the brakes are dry and braking
power has been fully restored.
You can wash the vehicle in an automatic car
wash from the very start.
If the vehicle is very dirty, pre-wash it before
cleaning it in an automatic car wash.
! Never clean your vehicle in a Touchless
Automatic Car Wash as these use special
cleaning agents. These cleaning agents can
damage the paintwork or plastic parts.
! When washing your vehicle in a tow-
through car wash, use the SmartKey
instead of the Start/Stop button.
Start the engine using the SmartKey.. Move
the transmission to N with the E-SELECT
lever. Use the SmartKey to switch the
engine off again and then turn the
Care223Maintenance and careZ
Page 226 of 288
SmartKey to position 2. Make sure that you
then leave the SmartKey in position 2. You
may otherwise damage the vehicle, the
transmission or the car wash.
Check the transmission position in the
instrument cluster.
! Use the E-SELECT lever to shift the
transmission to N before switching the
engine off. If you open the driver's or front-
passenger door, the transmission remains
in this position for up to 30 minutes if the
SmartKey is in the ignition, even if the
engine is switched off. If you do not shift
the transmission to N using the E-SELECT
lever beforehand, it shifts automatically to
parking position P and locks the wheels if
the driver's or front-passenger door is
opened and the engine is switched off. This
may damage the vehicle, the transmission
or the car wash.
Observe the information on maneuvering
( Y page 129).
! Before driving into an automatic car wash,
make sure that it is suitable for the
dimensions of the vehicle. In particular,
make sure that:
R there is enough ground clearance
between the vehicle underbody and the
guide rails of the automatic car wash.
R the clearance width of the automatic car
wash is sufficient, particularly the width
of the guide rails.
R you enter the automatic car wash
straight and in the center of the guide
rails in order to avoid damaging the tires
or wheel rims.
Fold in the exterior mirrors before the
vehicle is washed. The exterior mirrors
could otherwise be damaged.
! Make sure that:R
the side windows are fully closed.
R the ventilation/heating is switched off
(the OFF button has been pressed/the
airflow control is set to position 0).
R that the windshield wiper switch is in
position 0.
Otherwise, the vehicle might be damaged.
! In portal car washes, the windshield
wipers may be moved up the windshield by
the cleaning brushes when the ignition is
switched off.
Set the Start/Stop button to key position
2 to reset the windshield wipers to their
original position.
! Vehicles with a matte finish:
Do not use wash programs with a hot wax
treatment under any circumstances.
After using an automatic car wash, wipe off
wax and drying agents from the windshield
and the wiper blades. This will prevent smears
and reduce wiping noises caused by residue
on the windshield.
Power washersGWARNING
Using power washers with circular-jet nozzles
(dirt grinders) may cause damage to the
vehicle, in particular to the tires.
Using damaged tires results in an increased
risk of accident. A sudden loss of tire pressure
while you are driving may cause you to lose
control of your vehicle, cause an accident and
injure yourself and others.
! Maintain a minimum distance of
11.8 in (30 cm) between the vehicle and the
power washer nozzle. Information about
the correct distance is available from the
equipment manufacturer.
Move the power washer nozzle around
when cleaning your vehicle.
224CareMaintenance and care
Page 235 of 288
XRemove the jack from the left-hand
stowage space in the trunk to allow the
stowage compartment to be opened.XTurn fastener ; in the direction of the
arrow.XOpen stowage compartment :.XRemove the TIREFIT kit, wheel chock,
alignment bolt and gloves.
Flat tire
Preparing the vehicle
Your vehicle is equipped with a TIREFIT kit.
XStop the vehicle on solid, non-slippery and
level ground, as far away as possible from
traffic.XSwitch on the hazard warning lamps.XApply the electric parking brake manually
( Y page 130).XBring the front wheels into the straight-
ahead position.XShift the transmission to P using the button
on the center console.XSwitch off the engine.XRemove the SmartKey from the ignition
lock.XAll occupants must get out of the vehicle.
Make sure that they are not endangered as
they do so.XMake sure that no one is near the danger
area while a wheel is being changed.
Anyone who is not directly assisting in the
wheel change should, for example, stand
behind the barrier.XGet out of the vehicle. Pay attention to
traffic conditions when doing so.XClose the driver's door.TIREFIT kit
Using the TIREFIT kitGWARNING
TIREFIT is a limited repair device. TIREFIT
cannot be used for cuts or punctures larger
than approximately 0.16 in (4 mm) and tire
damage caused by driving with extremely low
tire inflation pressure, or on a flat tire, or a
damaged wheel.
Do not drive the vehicle under such
circumstances.
Contact the nearest authorized Mercedes-
Benz Center for assistance or call Roadside
Assistance.
GWARNING
Take care not to allow the contents of TIREFIT
to come in contact with hair, eyes or clothing.
TIREFIT is harmful if inhaled, swallowed or
absorbed through the skin - causes skin, eye
and respiratory irritation.
Any contact with eyes or skin should be
flushed immediately with plenty of water.
If clothing comes in contact with TIREFIT,
change clothing as soon as possible.
In case of allergic reaction or rash, consult a
physician immediately.
GWARNING
Keep TIREFIT away from children. If
swallowed, rinse mouth immediately with
plenty of water and drink plenty of water.
Do not induce vomiting.
Consult a doctor immediately.
Keep away from open flame or heat source.
You can use the TIREFIT kit to seal small
punctures, particularly those in the tire tread.
You can use TIREFIT at outside temperatures
down to -40 †.
Flat tire233Breakdown assistanceZ
Page 236 of 288
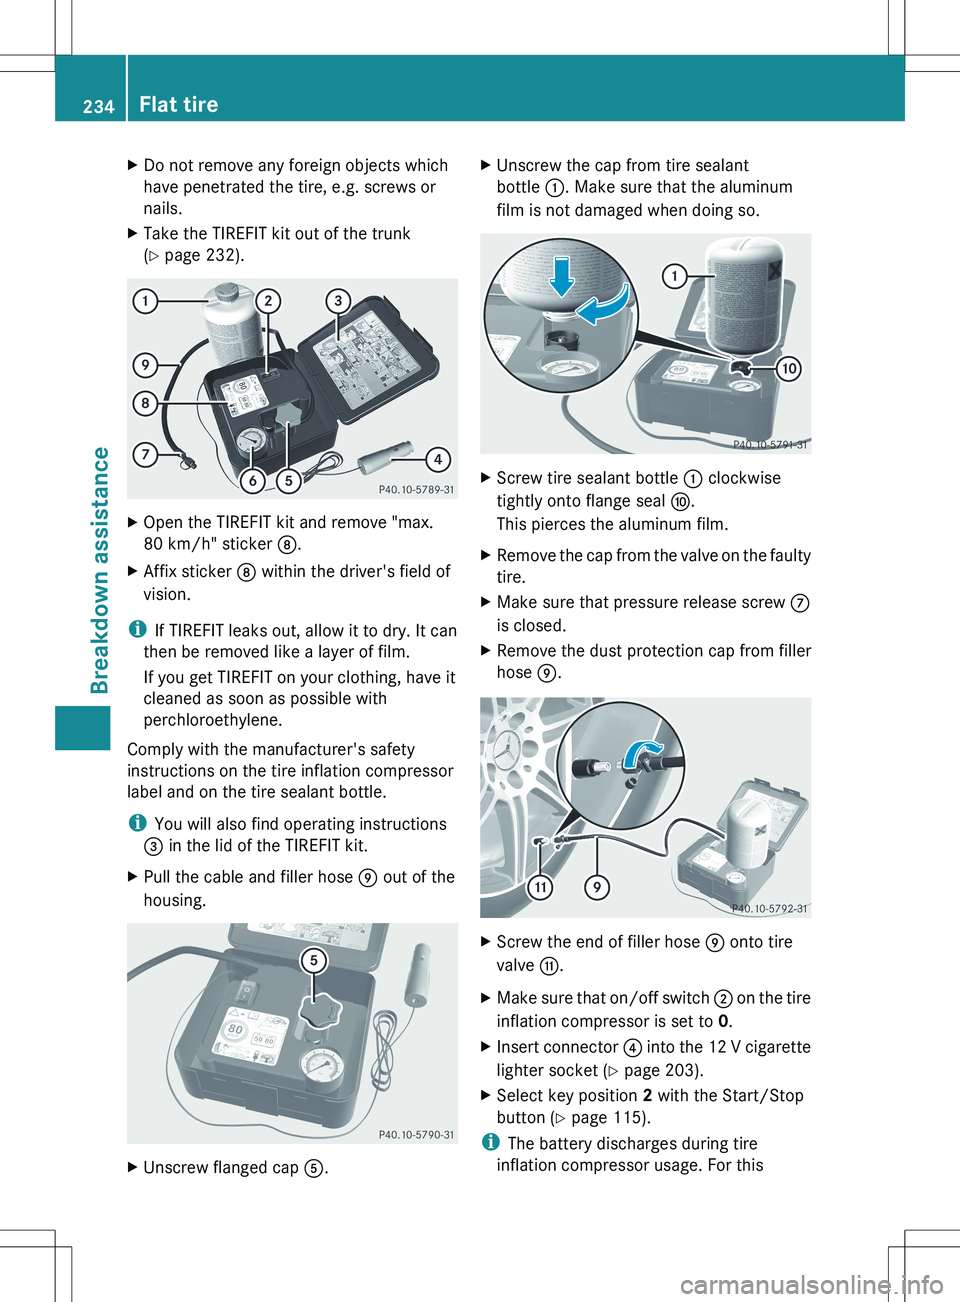
XDo not remove any foreign objects which
have penetrated the tire, e.g. screws or
nails.XTake the TIREFIT kit out of the trunk
( Y page 232).XOpen the TIREFIT kit and remove "max.
80 km/h" sticker D.XAffix sticker D within the driver's field of
vision.
i If TIREFIT leaks out, allow it to dry. It can
then be removed like a layer of film.
If you get TIREFIT on your clothing, have it
cleaned as soon as possible with
perchloroethylene.
Comply with the manufacturer's safety
instructions on the tire inflation compressor
label and on the tire sealant bottle.
i You will also find operating instructions
= in the lid of the TIREFIT kit.
XPull the cable and filler hose E out of the
housing.XUnscrew flanged cap A.XUnscrew the cap from tire sealant
bottle :. Make sure that the aluminum
film is not damaged when doing so.XScrew tire sealant bottle : clockwise
tightly onto flange seal F.
This pierces the aluminum film.XRemove the cap from the valve on the faulty
tire.XMake sure that pressure release screw C
is closed.XRemove the dust protection cap from filler
hose E.XScrew the end of filler hose E onto tire
valve G.XMake sure that on/off switch ; on the tire
inflation compressor is set to 0.XInsert connector ? into the 12 V cigarette
lighter socket ( Y page 203).XSelect key position 2 with the Start/Stop
button ( Y page 115).
i
The battery discharges during tire
inflation compressor usage. For this
234Flat tireBreakdown assistance
Page 247 of 288
vehicle with a tow rope or tow bar. Observe
the following notes.GWARNING
If the brake system is malfunctioning, you
must use a rigid tow bar to tow the vehicle.
Before towing away, make sure that the
steering can be moved and is not locked.
If there is a malfunction in the power supply
or the vehicle's electrical system, you must
not tow the vehicle.
GWARNING
The following can occur if the vehicle is towed:
R the engine may not start.
R the on-board electronics may fail.
R the battery voltage may drop too much.
In these cases, the rear axle will be locked.
As a result, you might lose control of the
vehicle, cause an accident and injure yourself
and others.
! Use the SmartKey instead of the Start/
Stop button when towing the vehicle.
Start the engine and keep it running. Turn
the SmartKey to position 2 in the ignition.
Set the transmission to N using the E-
SELECT lever. Make sure that you then
leave the SmartKey in position 2.
Check the transmission position in the
instrument cluster.
! Make sure that the electric parking brake
is released. If the electric parking brake is
faulty, visit a qualified specialist workshop.
Mercedes-Benz recommends that you use
an authorized Mercedes-Benz Center for
this purpose.
! When towing, pull away slowly and
smoothly. If the tractive power is too high,
the vehicles could be damaged.
! Only secure the tow rope or tow bar at the
towing eyes. Otherwise, the vehicle could
be damaged.
! Do not use the towing eye for recovery,
as this could damage the vehicle. If in
doubt, recover the vehicle with a crane.
! You may only tow the vehicle a maximum
distance of 30 miles (50 km). A towing
speed of 30 mph (50 km/h) must not be
exceeded.
For towing distances over 30 miles
(50 km), the vehicle must loaded onto a
transporter.
! Do not tow with sling-type equipment.
This could damage the vehicle.
! Tow-starting the vehicle is not permitted.
The transmission may otherwise be
damaged.
Also observe the following notes:
R if the engine does not start, try jump-
starting it ( Y page 243). Tow-starting the
vehicle is not permitted.
R if it is not possible to jump-start the vehicle,
have it transported to the nearest qualified
specialist workshop, e.g. an authorized
Mercedes-Benz Center.
R if the transmission has been damaged,
have the vehicle transported to the nearest
qualified specialist workshop, e.g. an
authorized Mercedes-Benz Center.
Observe the display messages in the
instrument cluster.
Installing/removing the towing eye
Installing the towing eye
XTake the towing eye and the wheel
wrench 17
out of the wheel-change tool kit
( Y page 232).
The bracket for the removable towing eye is
in the bumper at the front. It is located under
the cover.
17 Not included in the scope of delivery.Towing and tow-starting245Breakdown assistanceZ