2012 MERCEDES-BENZ SLS AMG COUPE key
[x] Cancel search: keyPage 188 of 288
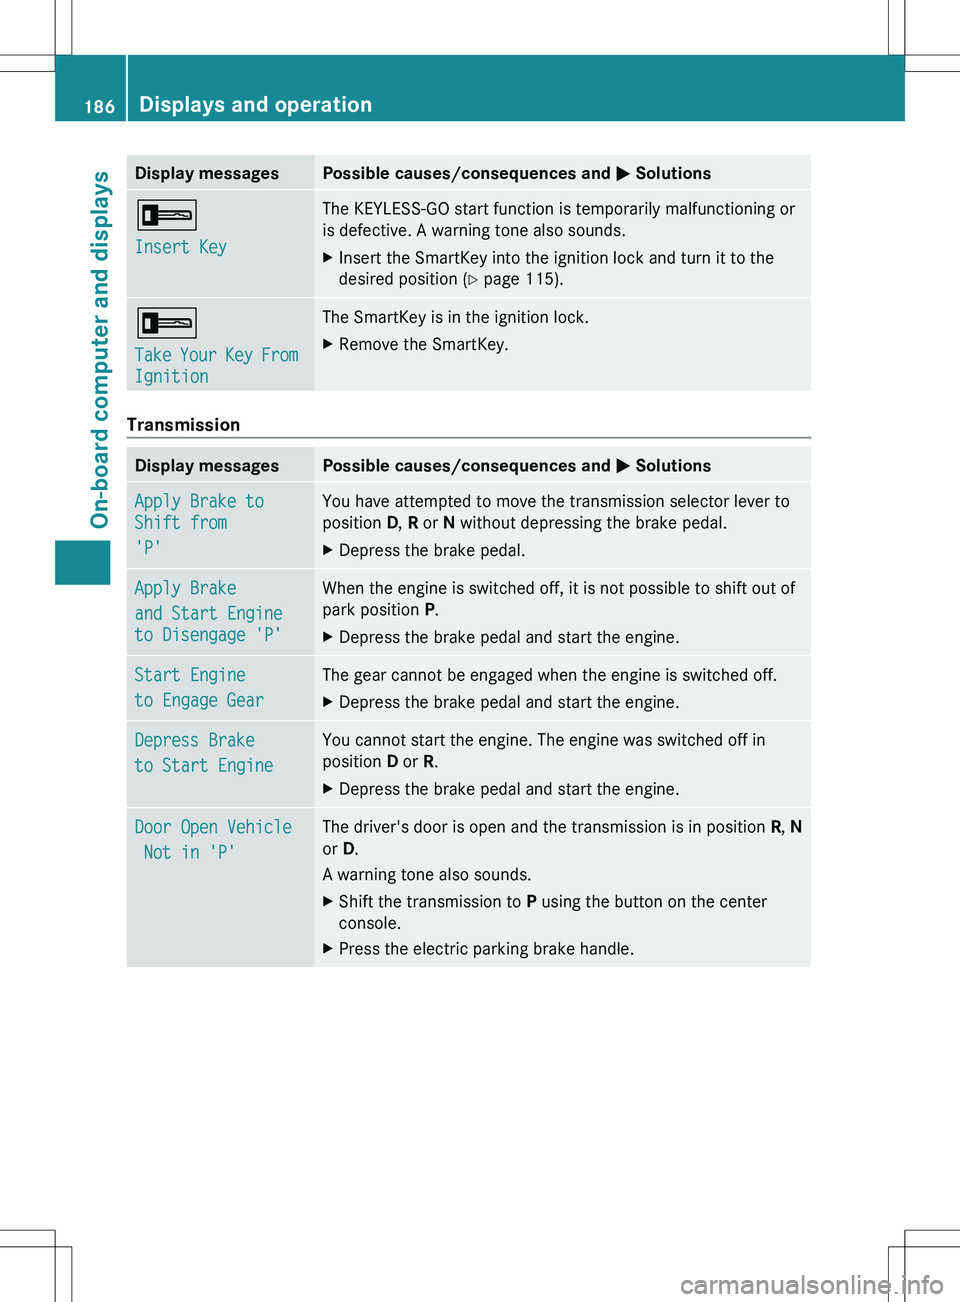
Display messagesPossible causes/consequences and M Solutions+
Insert KeyThe KEYLESS-GO start function is temporarily malfunctioning or
is defective. A warning tone also sounds.XInsert the SmartKey into the ignition lock and turn it to the
desired position ( Y page 115).+
Take Your Key From
IgnitionThe SmartKey is in the ignition lock.XRemove the SmartKey.
Transmission
Display messagesPossible causes/consequences and M SolutionsApply Brake to
Shift from
'P'You have attempted to move the transmission selector lever to
position D, R or N without depressing the brake pedal.XDepress the brake pedal.Apply Brake
and Start Engine
to Disengage 'P'When the engine is switched off, it is not possible to shift out of
park position P.XDepress the brake pedal and start the engine.Start Engine
to Engage GearThe gear cannot be engaged when the engine is switched off.XDepress the brake pedal and start the engine.Depress Brake
to Start EngineYou cannot start the engine. The engine was switched off in
position D or R.XDepress the brake pedal and start the engine.Door Open Vehicle
Not in 'P'The driver's door is open and the transmission is in position R, N
or D.
A warning tone also sounds.XShift the transmission to P using the button on the center
console.XPress the electric parking brake handle.186Displays and operationOn-board computer and displays
Page 202 of 288
Useful information
i This Operator's Manual describes all
models and all standard and optional
equipment of your vehicle available at the
time of publication of the Operator's
Manual. Country-specific differences are
possible. Please note that your vehicle may
not be equipped with all features
described. This also applies to safety-
related systems and functions.
i Please read the information on qualified
specialist workshops ( Y page 21).
Stowage areas
Stowage space
Important safety notes
GWARNING
To help avoid personal injury during a collision
or sudden maneuver, exercise care when
storing objects in the vehicle. Put luggage or
cargo in the trunk if possible.
Keep compartment lids closed. This will help
to prevent stored objects from being thrown
about and injuring vehicle occupants during
R braking
R vehicle maneuvers
R an accident
Stowage compartments in the front
Glove box
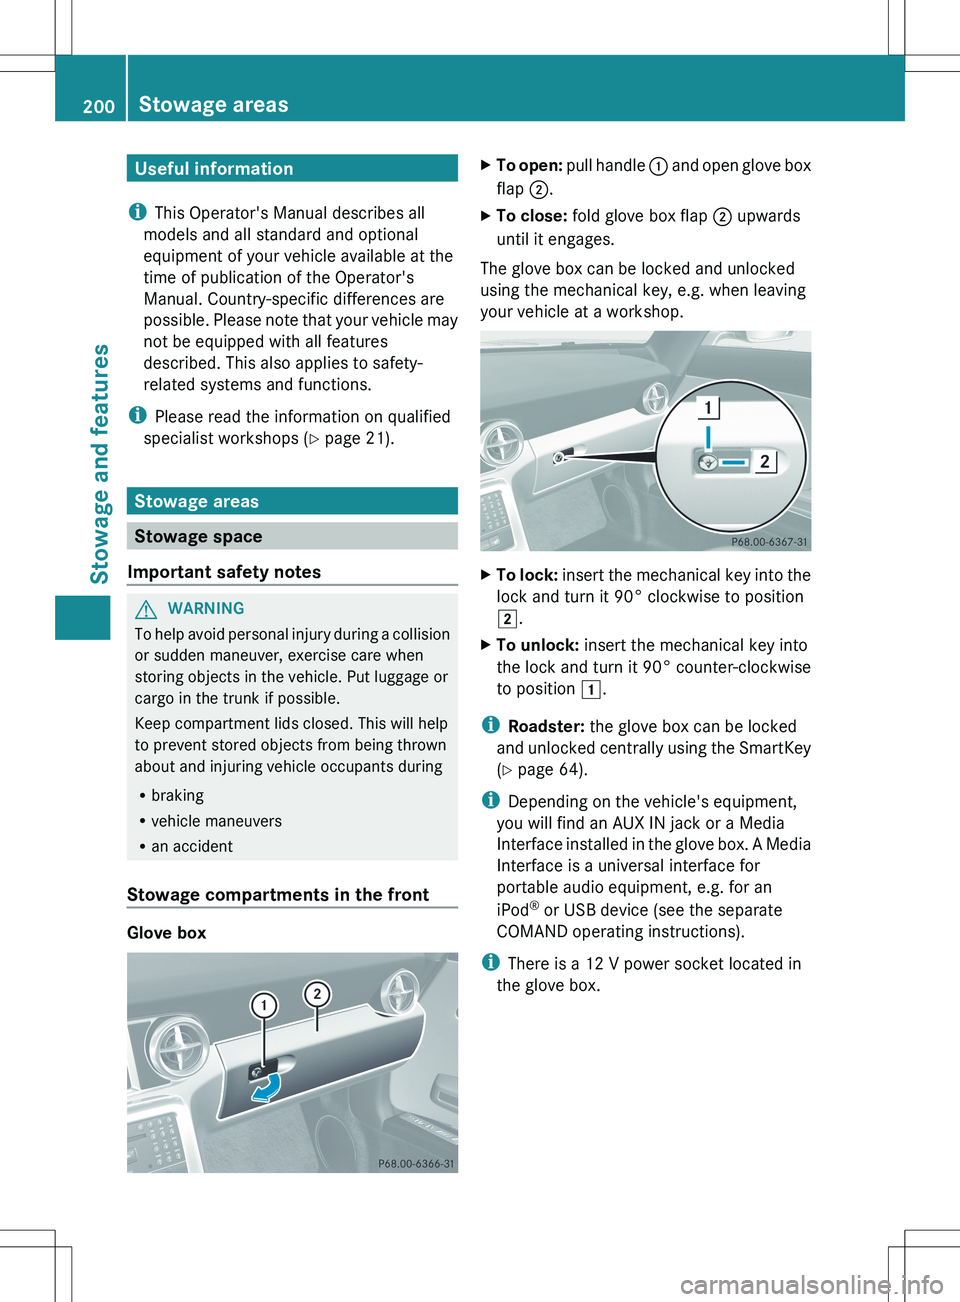
XTo open: pull handle : and open glove box
flap ;.XTo close: fold glove box flap ; upwards
until it engages.
The glove box can be locked and unlocked
using the mechanical key, e.g. when leaving
your vehicle at a workshop.
XTo lock: insert the mechanical key into the
lock and turn it 90° clockwise to position
2 .XTo unlock: insert the mechanical key into
the lock and turn it 90° counter-clockwise
to position 1.
i
Roadster: the glove box can be locked
and unlocked centrally using the SmartKey
( Y page 64).
i Depending on the vehicle's equipment,
you will find an AUX IN jack or a Media
Interface installed in the glove box. A Media
Interface is a universal interface for
portable audio equipment, e.g. for an
iPod ®
or USB device (see the separate
COMAND operating instructions).
i There is a 12 V power socket located in
the glove box.
200Stowage areasStowage and features
Page 203 of 288
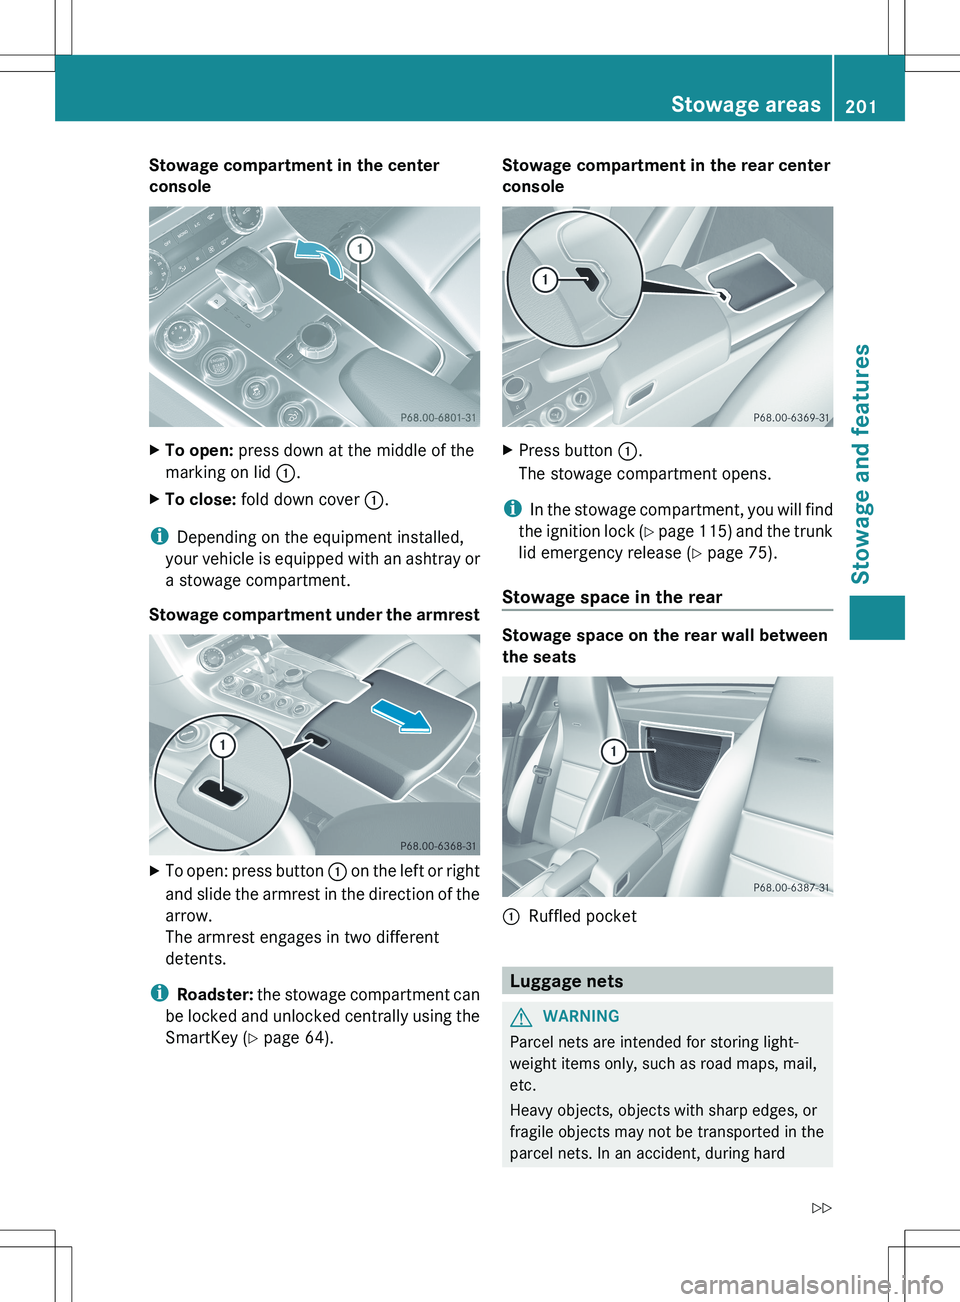
Stowage compartment in the center
consoleXTo open: press down at the middle of the
marking on lid :.XTo close: fold down cover :.
i
Depending on the equipment installed,
your vehicle is equipped with an ashtray or
a stowage compartment.
Stowage compartment under the armrest
XTo open: press button : on the left or right
and slide the armrest in the direction of the
arrow.
The armrest engages in two different
detents.
i Roadster: the stowage compartment can
be locked and unlocked centrally using the
SmartKey ( Y page 64).
Stowage compartment in the rear center
consoleXPress button :.
The stowage compartment opens.
i In the stowage compartment, you will find
the ignition lock (Y page 115) and the trunk
lid emergency release ( Y page 75).
Stowage space in the rear
Stowage space on the rear wall between
the seats
:Ruffled pocket
Luggage nets
GWARNING
Parcel nets are intended for storing light-
weight items only, such as road maps, mail,
etc.
Heavy objects, objects with sharp edges, or
fragile objects may not be transported in the
parcel nets. In an accident, during hard
Stowage areas201Stowage and featuresZ
Page 205 of 288
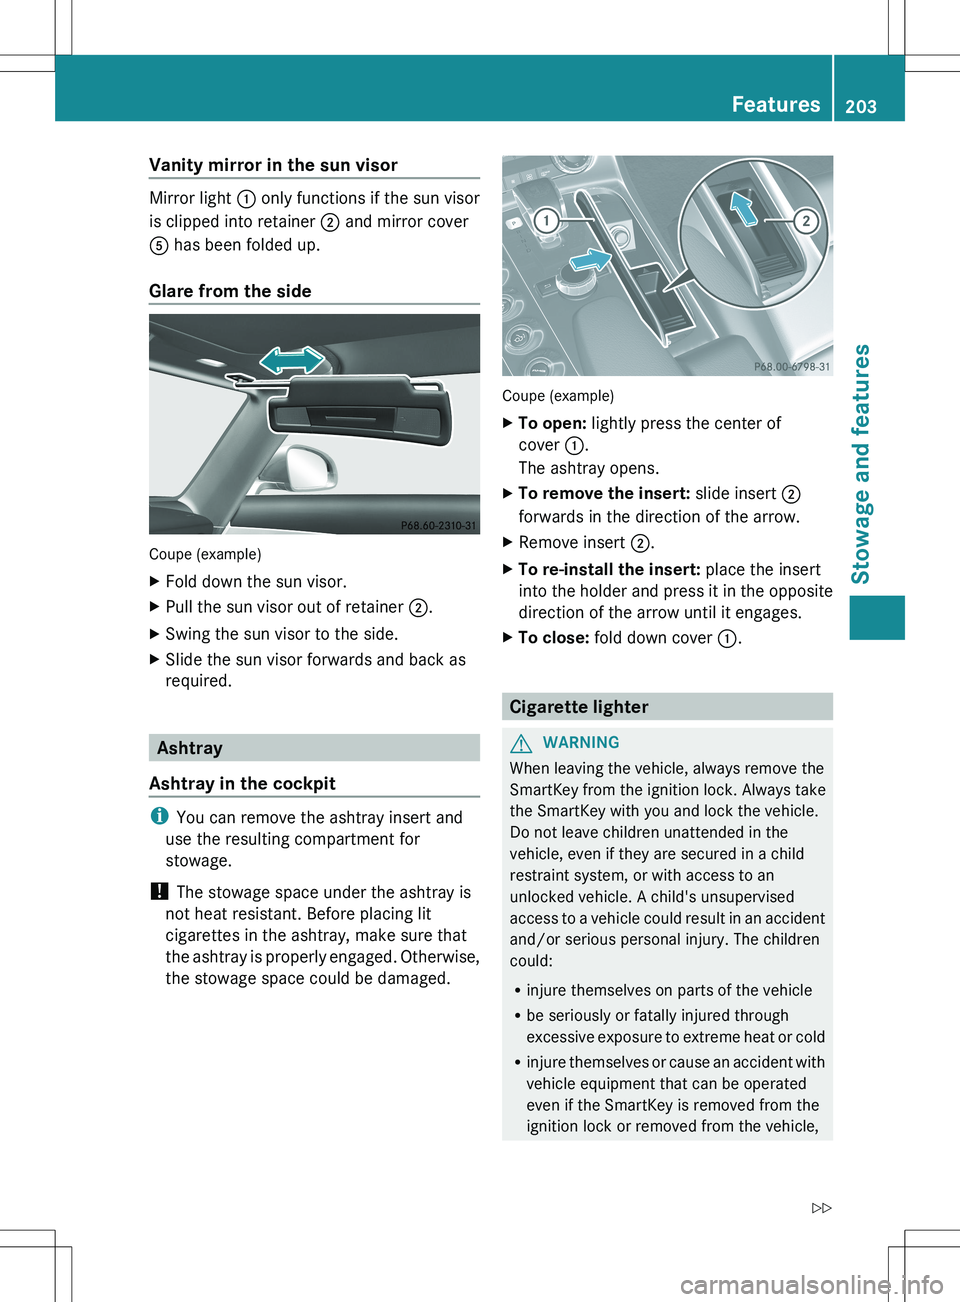
Vanity mirror in the sun visor
Mirror light : only functions if the sun visor
is clipped into retainer ; and mirror cover
A has been folded up.
Glare from the side
Coupe (example)
XFold down the sun visor.XPull the sun visor out of retainer ;.XSwing the sun visor to the side.XSlide the sun visor forwards and back as
required.
Ashtray
Ashtray in the cockpit
i You can remove the ashtray insert and
use the resulting compartment for
stowage.
! The stowage space under the ashtray is
not heat resistant. Before placing lit
cigarettes in the ashtray, make sure that
the ashtray is properly engaged. Otherwise,
the stowage space could be damaged.
Coupe (example)
XTo open: lightly press the center of
cover :.
The ashtray opens.XTo remove the insert: slide insert ;
forwards in the direction of the arrow.XRemove insert ;.XTo re-install the insert: place the insert
into the holder and press it in the opposite
direction of the arrow until it engages.XTo close: fold down cover :.
Cigarette lighter
GWARNING
When leaving the vehicle, always remove the
SmartKey from the ignition lock. Always take
the SmartKey with you and lock the vehicle.
Do not leave children unattended in the
vehicle, even if they are secured in a child
restraint system, or with access to an
unlocked vehicle. A child's unsupervised
access to a vehicle could result in an accident
and/or serious personal injury. The children
could:
R injure themselves on parts of the vehicle
R be seriously or fatally injured through
excessive exposure to extreme heat or cold
R injure themselves or cause an accident with
vehicle equipment that can be operated
even if the SmartKey is removed from the
ignition lock or removed from the vehicle,
Features203Stowage and featuresZ
Page 206 of 288
such as seat adjustment, steering wheel
adjustment, or the memory function
If children open a door, they could injure other
persons or get out of the vehicle and injure
themselves or be injured by following traffic.
Do not expose the child restraint system to
direct sunlight. The child restraint system's
metal parts, for example, could become very
hot, and the child could be burned on these
parts.GWARNING
Never touch the heating element or sides of
the lighter; they are extremely hot. Hold the
knob only.
Make sure any children traveling with you do
not injure themselves or start a fire with the
hot cigarette lighter.
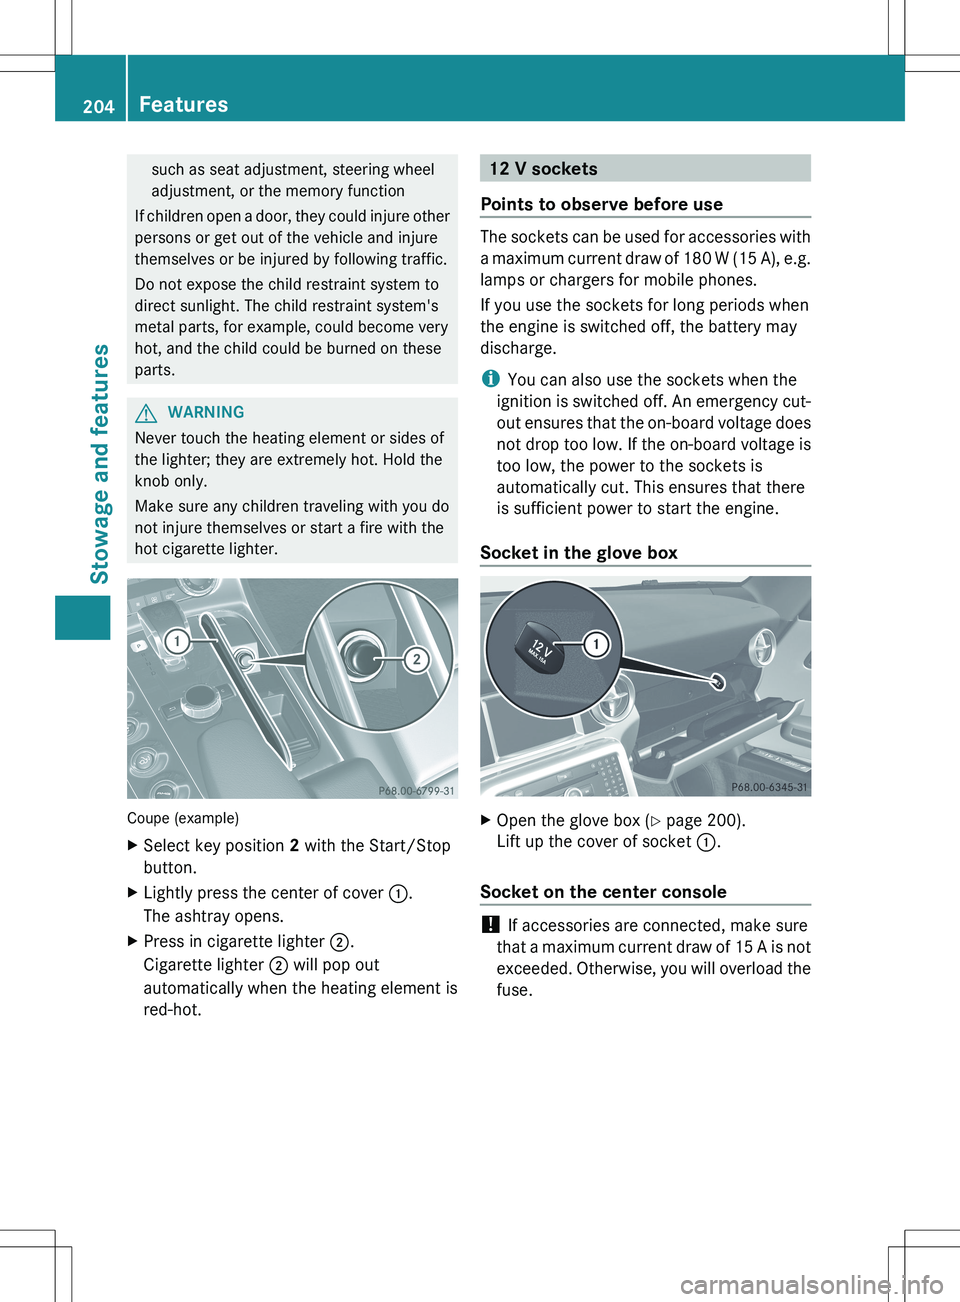
Coupe (example)
XSelect key position 2 with the Start/Stop
button.XLightly press the center of cover :.
The ashtray opens.XPress in cigarette lighter ;.
Cigarette lighter ; will pop out
automatically when the heating element is
red-hot.12 V sockets
Points to observe before use
The sockets can be used for accessories with
a maximum current draw of 180 W (15 A), e.g.
lamps or chargers for mobile phones.
If you use the sockets for long periods when
the engine is switched off, the battery may
discharge.
i You can also use the sockets when the
ignition is switched off. An emergency cut-
out ensures that the on-board voltage does
not drop too low. If the on-board voltage is
too low, the power to the sockets is
automatically cut. This ensures that there
is sufficient power to start the engine.
Socket in the glove box
XOpen the glove box ( Y page 200).
Lift up the cover of socket :.
Socket on the center console
!
If accessories are connected, make sure
that a maximum current draw of 15 A is not
exceeded. Otherwise, you will overload the
fuse.
204FeaturesStowage and features
Page 213 of 288
Extending and retracting the rear
spoiler manually
You can extend and retract the rear spoiler
manually for cleaning.
GWARNING
During manual retraction of the rear spoiler,
make sure that nobody becomes trapped. If
there is a danger of someone becoming
trapped, release the rear spoiler button to
pause retraction. The rear spoiler is then
extended again.
Never leave children unsupervised in the
vehicle. They could unintentionally retract the
extended rear spoiler. Someone could then
become trapped and seriously injured.
! Do not enter an automatic car wash with
the rear spoiler extended. Otherwise, the
rear spoiler may be damaged.
Only extend the rear spoiler in order to
clean it by hand. Retract it again when you
have finished cleaning it.
XClose the trunk lid.XSelect key position 2 with the Start/Stop
button.X To extend: press button :.
The rear spoiler is extended.
Button : flashes until the rear spoiler has
extended and then lights up in red.XTo retract: press and hold button : until
the rear spoiler is completely retracted.
Button : flashes until the rear spoiler has
retracted and then goes out.
Rear Spoiler retracts manually
appears in the display.
i If you release button : while retracting
the rear spoiler, it extends again
automatically.
Features211Stowage and featuresZ
Page 215 of 288
Do not run the engine while programming the
integrated remote control. Inhalation of
exhaust gas is hazardous to your health. All
exhaust gas contains carbon monoxide (CO),
and inhaling it can cause unconsciousness
and possible death. All exhaust gas contains
carbon monoxide (CO), and inhaling it can
cause unconsciousness and possible death.
i USA only:
this device complies with part 15 of the
FCC Rules. Operation is subject to the
following two conditions:
1. This device may not cause harmful
interference, and
2. this device must accept any interference
received, including interference that may
cause undesired operation.
Any unauthorized modification to this
device could void the user's authority to
operate the equipment.
FCC ID: CB2HMIHL4
i Canada only:
This device complies with RSS-210 of
Industry Canada. Operation is subject to
the following two conditions:
1. This device may not cause harmful
interference, and
2. this device must accept any interference
received, including interference that may
cause undesired operation of the device.
Any unauthorized modification to this
device could void the user's authority to
operate the equipment.
IC: 279B-HMIHL4
Programming the integrated garage
door opener on the rear-view mirror
Programming
GWARNING
Only press the button on the integrated
garage door opener if there are no persons or
objects present within the sweep of the
garage door. Persons could otherwise be
injured as the door moves.
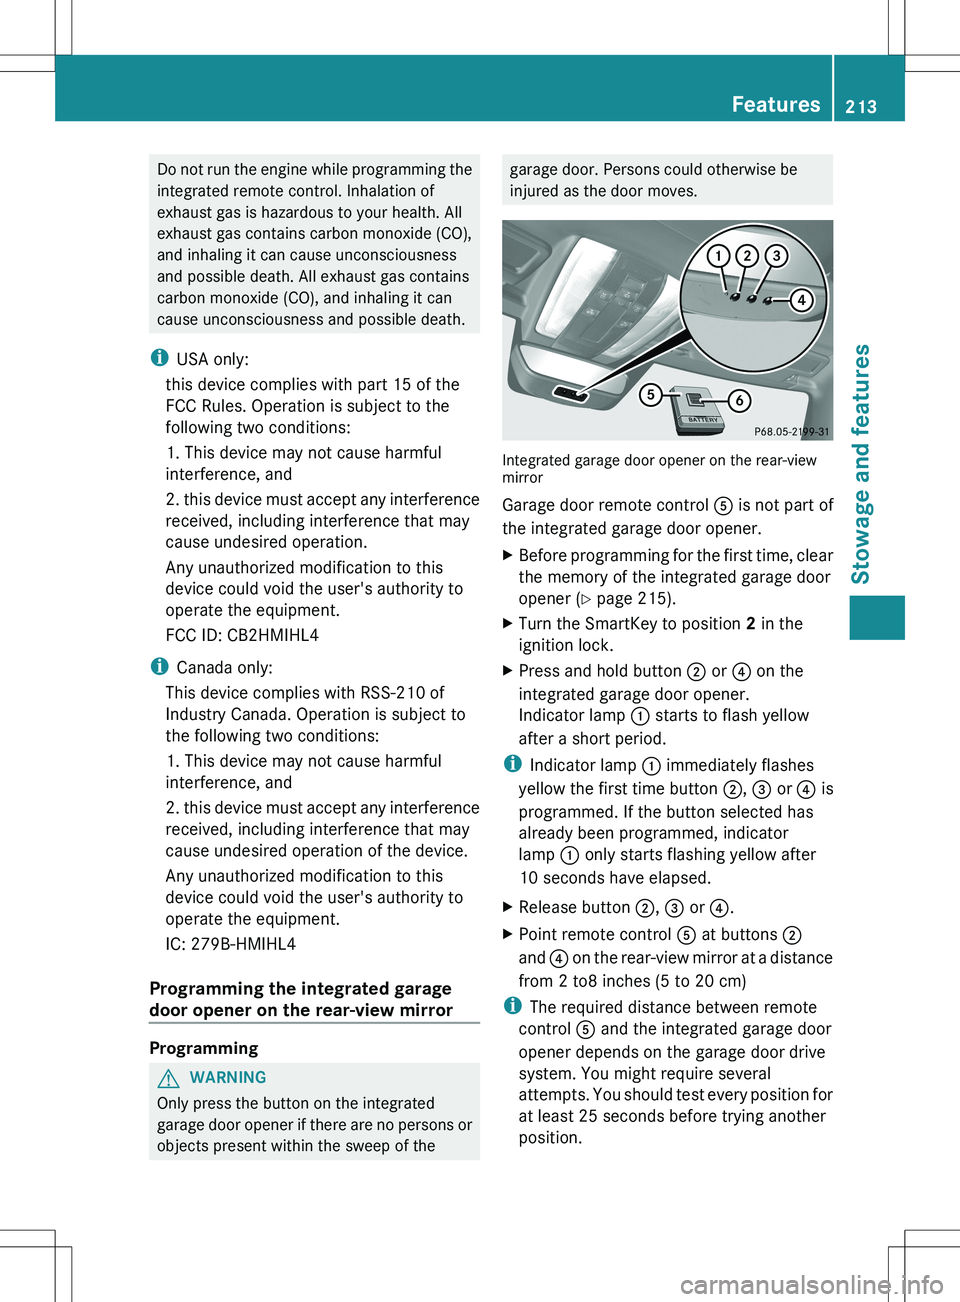
Integrated garage door opener on the rear-view
mirror
Garage door remote control A is not part of
the integrated garage door opener.
XBefore programming for the first time, clear
the memory of the integrated garage door
opener ( Y page 215).XTurn the SmartKey to position 2 in the
ignition lock.XPress and hold button ; or ? on the
integrated garage door opener.
Indicator lamp : starts to flash yellow
after a short period.
i Indicator lamp : immediately flashes
yellow the first time button ;, = or ? is
programmed. If the button selected has
already been programmed, indicator
lamp : only starts flashing yellow after
10 seconds have elapsed.
XRelease button ;, = or ?.XPoint remote control A at buttons ;
and ? on the rear-view mirror at a distance
from 2 to8 inches (5 to 20 cm)
i The required distance between remote
control A and the integrated garage door
opener depends on the garage door drive
system. You might require several
attempts. You should test every position for
at least 25 seconds before trying another
position.
Features213Stowage and featuresZ
Page 216 of 288
XPress and hold button B on remote control
A until indicator lamp : lights up green.
The programming has been successful if
indicator lamp : lights up or flashes
green.XRelease button ;, = or ? on the
integrated garage door opener and button
B on garage door remote control A.
If indicator lamp : lights up red:
XRepeat the programming operation for the
corresponding button on the rear-view
mirror. When doing so, vary the distance
between remote control A and the rear-
view mirror.
i If the indicator lamp flashes green after
successful programming, the garage door
system is operating on a rolling code. After
programming, you must synchronize the
garage door opener integrated in the rear-
view mirror with the receiver of the garage
door system.
Synchronizing the rolling code
Your vehicle must be within range of the
garage or gate opener drive. Make sure that
neither your vehicle nor any persons/objects
are present within the sweep of the door or
gate.
Observe the safety notes when performing
the rolling code synchronization
( Y page 212).
XTurn the SmartKey to position 2 in the
ignition lock.XPress the programming button of the door
or gate drive (see the door or gate drive
operating instructions, e.g. under
"Programming of additional remote
controls").
i Usually, you now have 30seconds to
initiate the next step.
XPress the previously programmed
button ;, = or ? of the integratedgarage door opener repeatedly until the
door starts to move.
The rolling code synchronization is then
complete.
Notes on programming the remote
control
Canadian radio frequency laws require a
"break" (or interruption) of the transmission
signals after broadcasting for a few seconds.
Therefore, these signals may not last long
enough for the integrated remote control. The
signal is not recognized during programming.
Comparable with Canadian law, some U.S.
garage door openers are designed to "time-
out" in the same manner.
Proceed as follows:
R if you live in Canada.
R if you have difficulties programming the
garage door opener (regardless of where
you live) when using the programming
steps.
XPress and hold one of the buttons ;
to ? on the integrated garage door
opener.
Indicator lamp : starts to flash yellow
after a short period.XRelease the switch.XPress button B of garage door remote
control A for two seconds, then release it
for two seconds.XPress button B again for two seconds.XRepeat this sequence on button B of
remote control A until indicator lamp :
lights up green.
Repeat the process if indicator lamp :
turns red.XContinue with the other programming
steps (see above).214FeaturesStowage and features