2012 MERCEDES-BENZ SLK ROADSTER door lock
[x] Cancel search: door lockPage 198 of 321
X
Press the :or9 button to select the
Belt adjustment function.
You will see the selected setting: on or
off .
X Press the abutton to save the setting.
Switching the fold in mirrors when lock-
ing function on/off
If you switch on the Fold mirrors in when
locking: function, the exterior mirrors fold
in when you lock the vehicle. When you
unlock the vehicle and then open a door, the
exterior mirrors fold out again.
If you have switched the function on and you
fold the exterior mirrors in using the button
on the door (Y page 94), they will not fold out
automatically. The exterior mirrors can then
only be folded out using the button on the
door.
X Press the =or; button on the steer-
ing wheel to select the Settings menu.
X Press the :or9 button to select the
Convenience submenu.
X Press the abutton to confirm.
X Press the :or9 button to select the
Fold mirrors in when locking: func-
tion.
You will see the selected setting: on or
off .
X Press the abutton to save the setting.
Resetting to factor ysettings For safety reasons, no
tall functions are reset:
the Limit speed (winter tyres) function
in permanent SPEEDTRONIC can only be set
in the Vehicle submenu. If you want to reset
the Daytime driving lights function in
the Light submenu, you must tur
nthe key in
the ignition lock to position 1.
X Press the =or; button on the steer-
ing wheel to select the Settings menu.
X Press the :or9 button to select the
Factory setting submenu.X
Press the abutton to confirm.
The Reset all settings? message
appears.
X Press the :or9 button to select
No or
Yes .
X Press the abutton to confirm the selec-
tion.
If you have selected Yes , the multifunction
display shows a confirmation message. AMG menu in AMG vehicles
AMG displays X
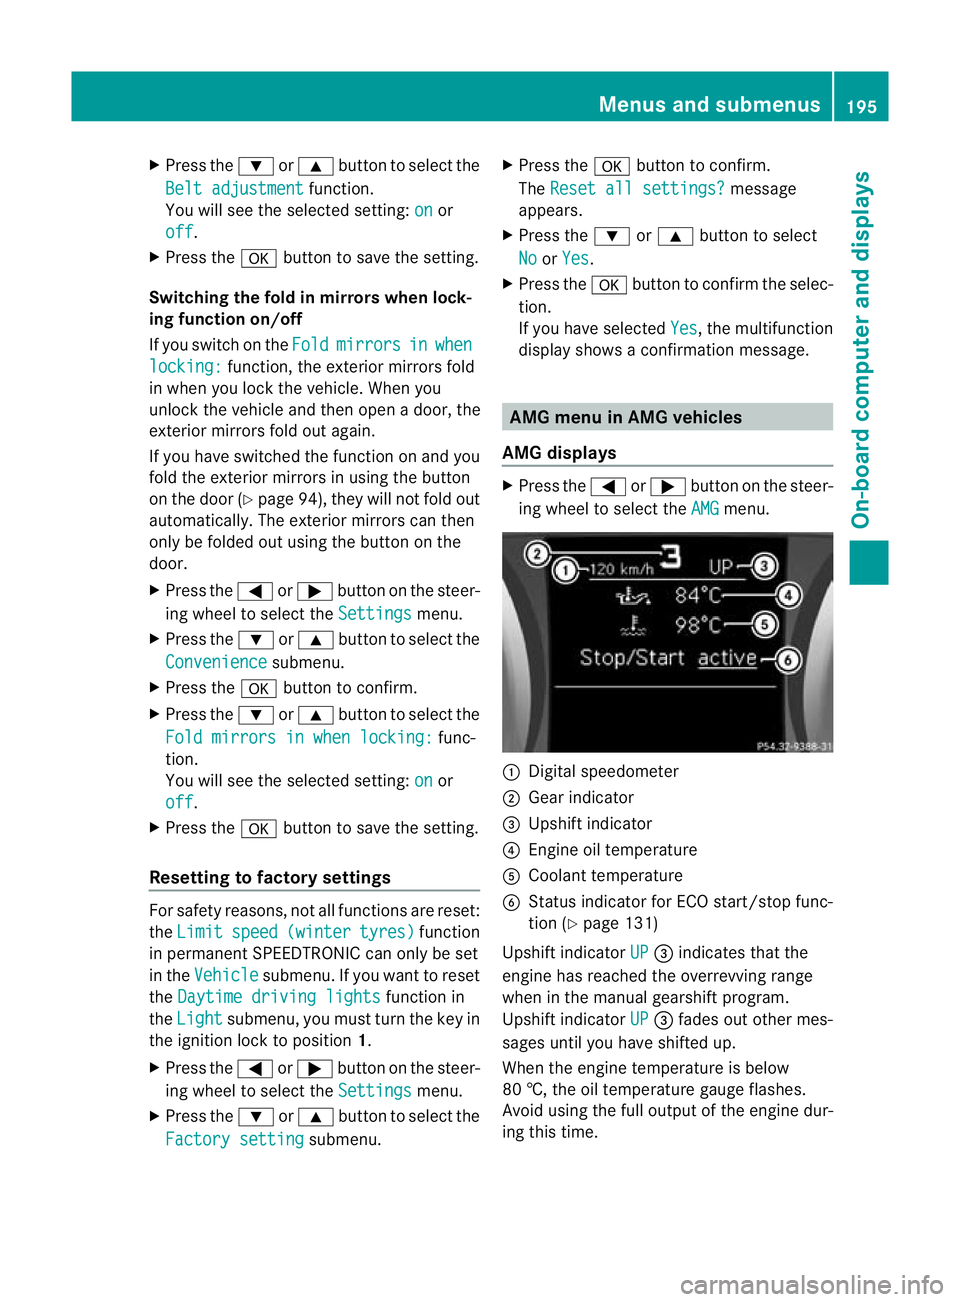
Press the =or; button on the steer-
ing wheel to select the AMG menu.
:
Digital speedometer
; Gear indicator
= Upshift indicator
? Engine oil temperature
A Coolant temperature
B Status indicator for ECO start/stop func-
tion (Y page 131)
Upshift indicator UP =
indicates that the
engine has reached the overrevving range
when in the manual gearshift program.
Upshift indicator UP =
fades out other mes-
sages until you have shifted up.
When the engine temperature is below
80 †, the oil temperature gauge flashes.
Avoid using the full output of the engine dur-
ing this time. Menus and submenus
195On-board computer and displays Z
Page 223 of 321
Vehicle
Display messages Possible causes/consequences and
M Solutions
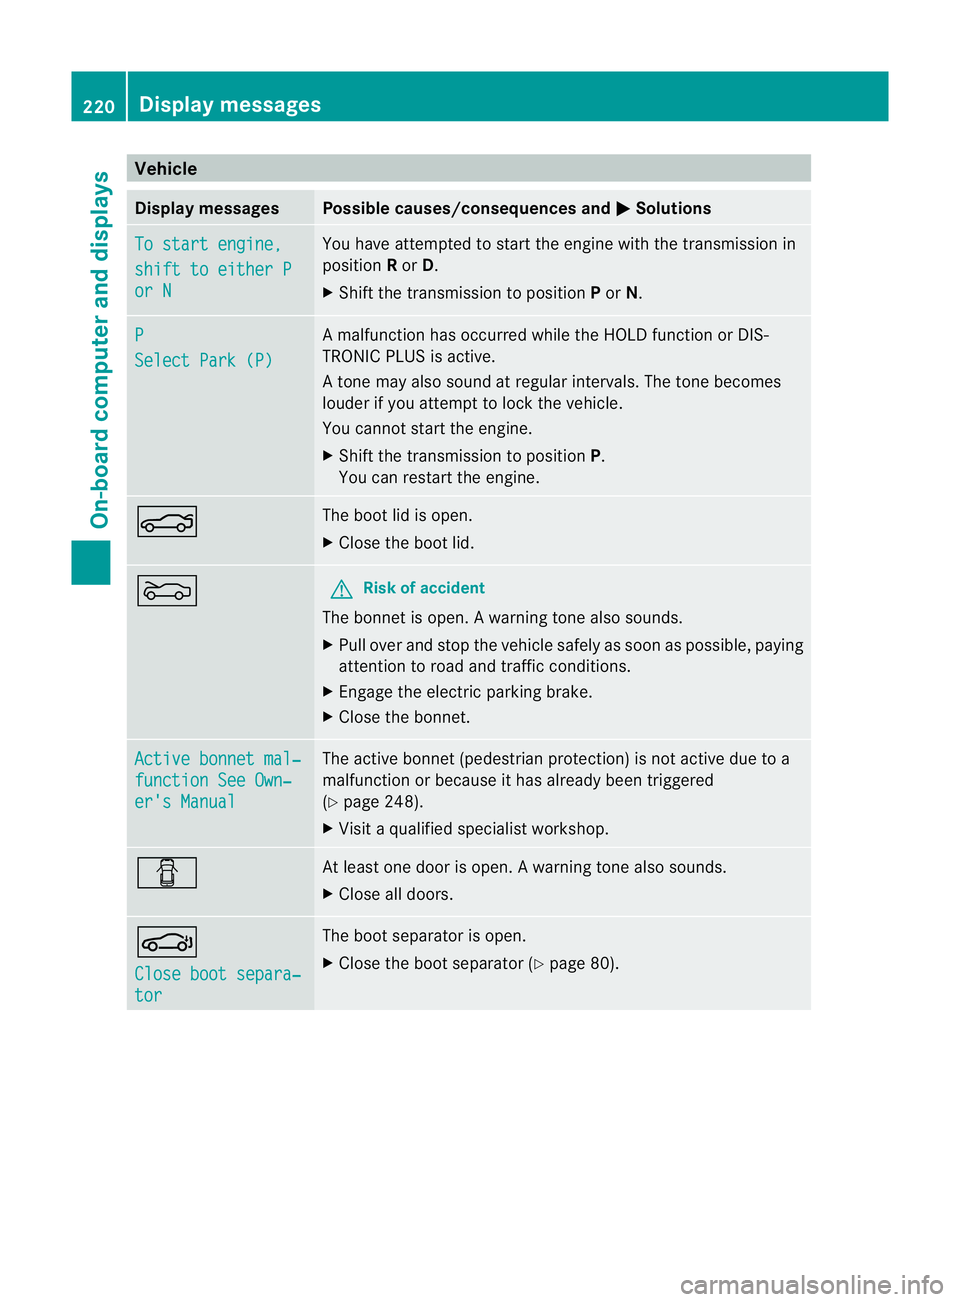
To start engine,
shift to either P
or N You have attempted to start the engine with the transmission in
position
Ror D.
X Shift the transmission to position Por N. P
Select Park (P) A malfunction has occurred while the HOLD function or DIS-
TRONIC PLUS is active.
At
one may also sound at regular intervals. The tone becomes
louder if you attempt to lock the vehicle.
You cannot start the engine.
X Shift the transmission to position P.
You can restart the engine. N The boot lid is open.
X
Close the boot lid. M G
Risk of accident
The bonnet is open. Awarning tone also sounds.
X Pull ove rand stop the vehicle safely as soo nas possible, paying
attention to road and traffic conditions.
X Engage the electric parking brake.
X Close the bonnet. Active bonnet mal‐
function See Own‐
er's Manual The active bonnet (pedestrian protection) is not active due to a
malfunction or because it has already been triggered
(Y
page 248).
X Visit a qualified specialist workshop. C At least one door is open.
Awarning tone also sounds.
X Close all doors. J
Close boot separa‐
tor The boot separato
ris open.
X Close the boot separator (Y page 80).220
Display messagesOn-board computer and displays
Page 226 of 321
Display messages Possible causes/consequences and
M Solutions
The KEYLESS-GO key is no
tdetected while the engine is running
because there is interference from a strong source of radio waves.
Aw arning tone also sounds.
X Pull ove rand stop the vehicle safely as soo nas possible, paying
attention to road and traffic conditions.
X Engage the electric parking brake.
X Operate the vehicle with the key in the ignition lock if necessary. +
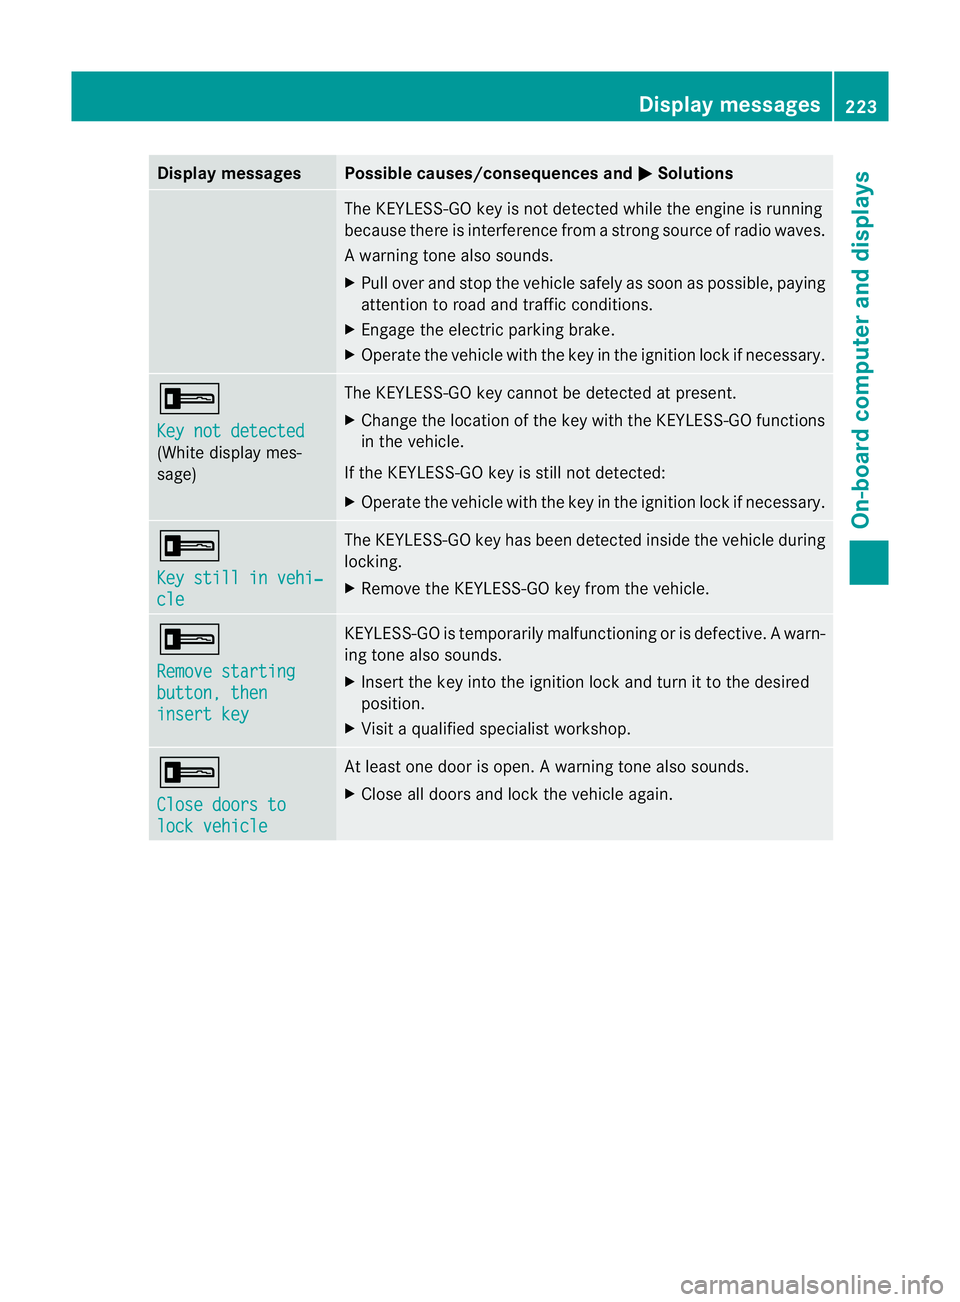
Key not detected
(White display mes-
sage) The KEYLESS-GO key cannot be detected at present.
X
Change the location of the key with the KEYLESS-GO functions
in the vehicle.
If the KEYLESS-GO key is still not detected:
X Operate the vehicle with the key in the ignition lock if necessary. +
Key still in vehi‐
cle The KEYLESS-GO key has been detected inside the vehicle during
locking.
X
Remove the KEYLESS-GO key from the vehicle. +
Remove starting
button, then
insert key KEYLESS-GO is temporarily malfunctioning or is defective.
Awarn-
ing tone also sounds.
X Insert the key into the ignition lock and turn it to the desired
position.
X Visi taqualified specialist workshop. +
Close doors to
lock vehicle At least one door is open.
Awarning tone also sounds.
X Close all doors and loc kthe vehicle again. Display messages
223On-board computer and displays Z
Page 246 of 321
Operating the mobile phone
You can operate the telephon
eusing the
6 and~ buttons on the multifunction
steering wheel. You can operate other mobile
phone functions via the on-board computer
(Y page 187).
When you remove the key from the ignition
lock, the mobile phone stays switched on.
However, you can no longer use the hands-
free system.
If you have an active call and would like to
take the key out of the ignition lock, first
remove the mobile phone from the bracket.
Otherwise, the call is ended.
i When using a bracket connected to the
mobile phone via Bluetooth ®
:ify ou wish to
continue a call in private mode, you will
need to perform the necessary steps on the
mobile phone. Information can be found in
the separate mobile phone operating
instructions. Garage door opener
Important safety notes The HomeLink
®
garage door opener integra-
ted in the rear-view mirror allows you to oper-
ate up to three different door and gate sys-
tems.
i The garage door opener is only available
for certain countries. Observe the legal
requirements for each individual country.
The HomeLink ®
garage door opener is
compatible with most European garage and
gate opener drives. More information on
HomeLink ®
and/or compatible products is
available from:
R any Mercedes-Benz Service Centre
R the HomeLink ®
hotline
(0) 08000 466 354 65 (free of charge) or
+49 (0) 6838 907 277 (charges apply)
R on the Internet at:
http://www.homelink.com Programming the integrated garage
door opener in the rear-view mirror Programming
G
WARNING
Only press the button on the integrated
garage door opener if there are no persons or
objects present within the sweep of the
garage door. Persons could otherwise be
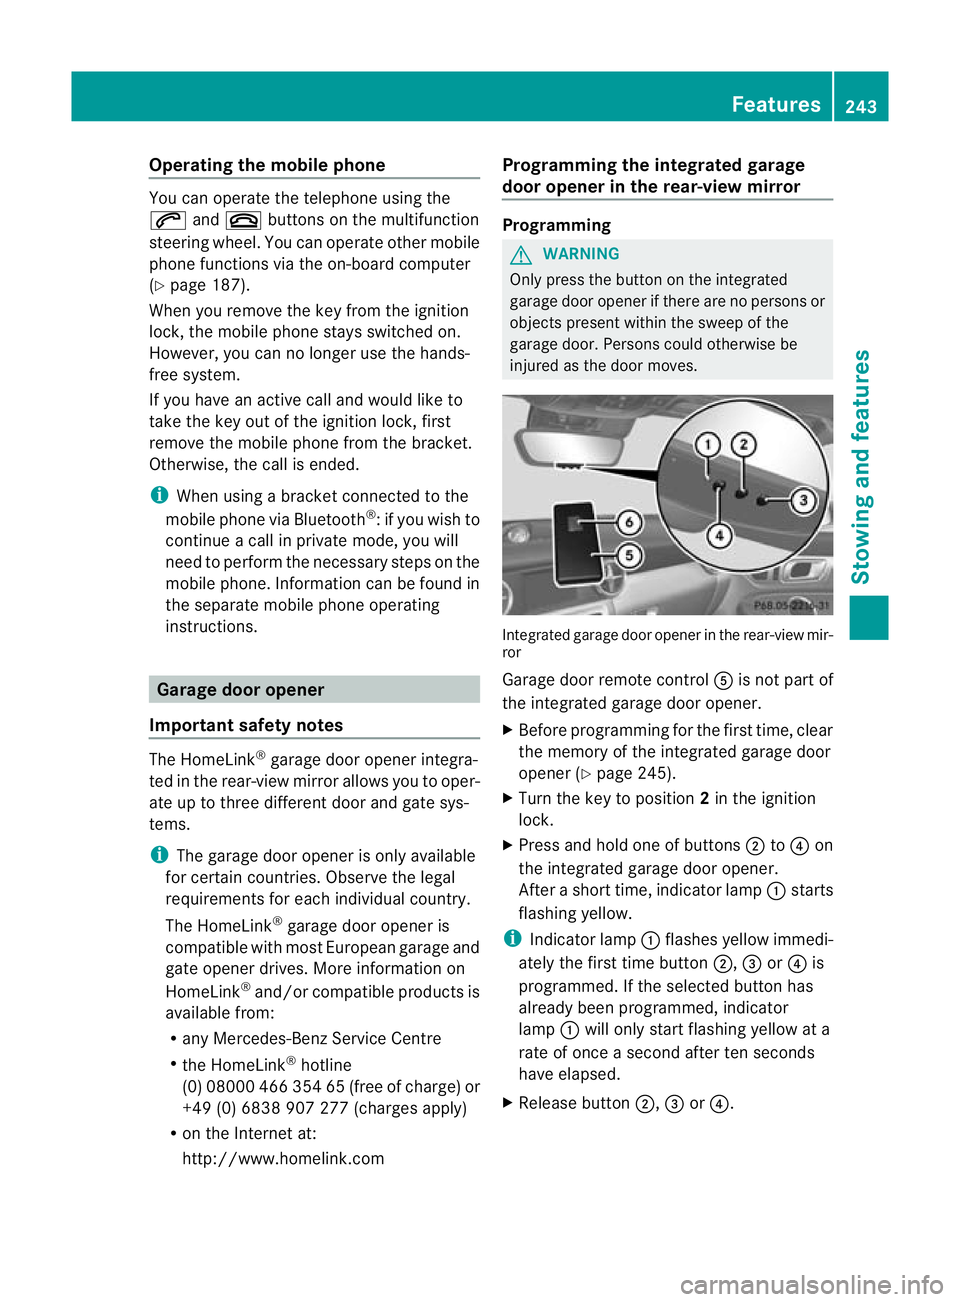
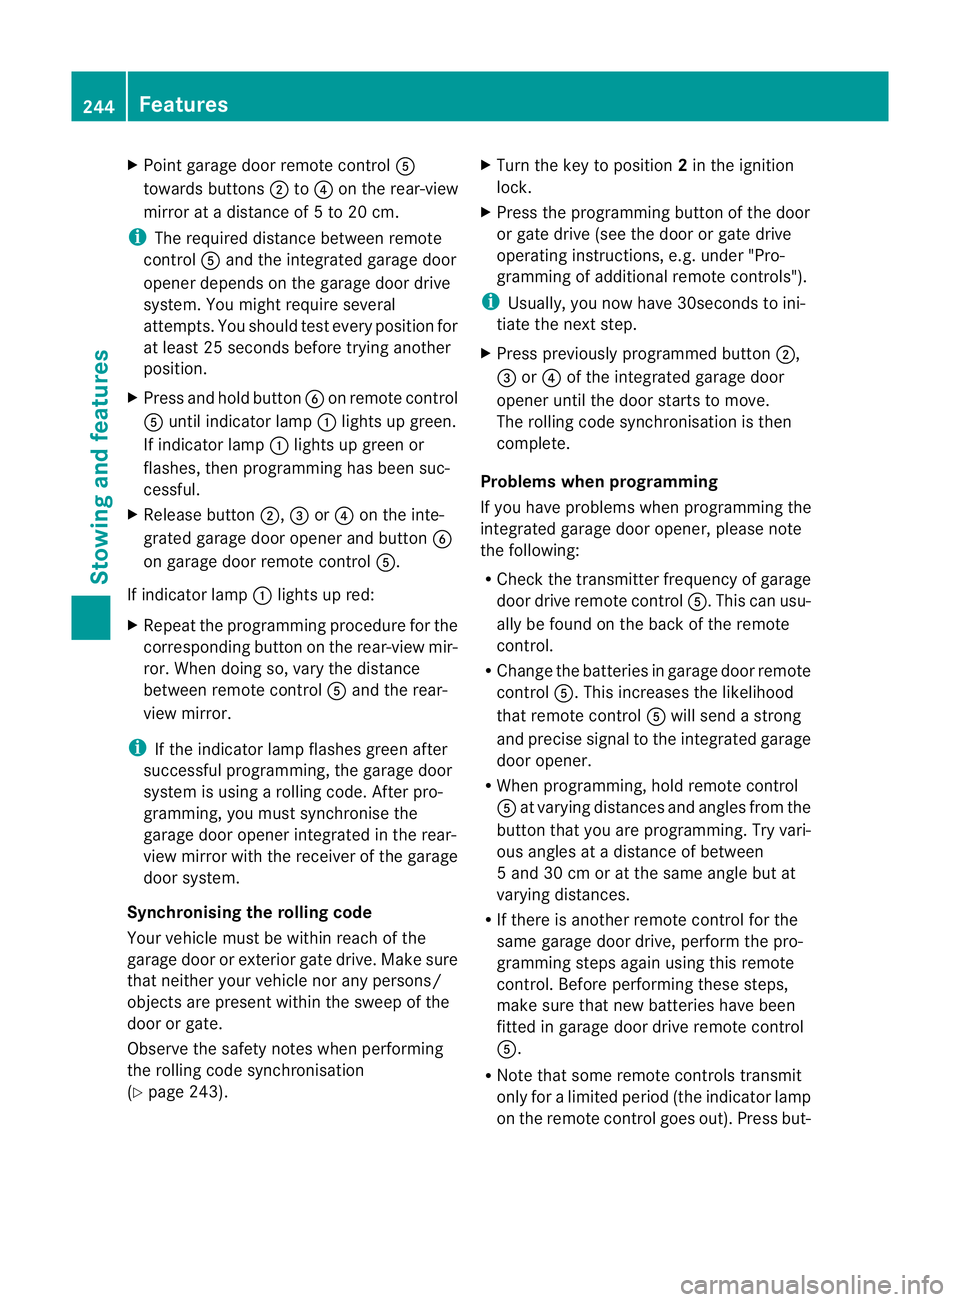
injured as the door moves. Integrated garage door opener in the rear-view mir-
ror
Garage door remote control
Ais not part of
the integrated garage door opener.
X Before programming for the first time, clear
the memory of the integrated garage door
opener (Y page 245).
X Turn the key to position 2in the ignition
lock.
X Press and hold one of buttons ;to? on
the integrated garage door opener.
After a short time, indicator lamp :starts
flashing yellow.
i Indicator lamp :flashes yellow immedi-
ately the first time button ;,=or? is
programmed. If the selected button has
already been programmed, indicator
lamp :will only start flashing yellow at a
rate of once a second after ten seconds
have elapsed.
X Release button ;,=or?. Features
243Stowing and features Z
Page 247 of 321
X
Point garage door remote control A
towards buttons ;to? on the rear-view
mirror at a distance of 5 to 20 cm.
i The required distance between remote
control Aand the integrated garage door
opener depends on the garage door drive
system. You might require several
attempts. You should test every position for
at least 25 seconds before trying another
position.
X Press and hold button Bon remot econtrol
A until indicator lamp :lights up green.
If indicator lamp :lights up green or
flashes, then programming has been suc-
cessful.
X Release button ;,=or? on the inte-
grated garage door opener and button B
on garage door remote control A.
If indicator lamp :lights up red:
X Repeat the programming procedure for the
corresponding button on the rear-view mir-
ror. When doing so, vary the distance
between remote control Aand the rear-
view mirror.
i If the indicator lamp flashes green after
successful programming, the garage door
system is using a rolling code. After pro-
gramming, you must synchronise the
garage door opener integrated in the rear-
view mirror with the receiver of the garage
door system.
Synchronising the rolling code
Your vehicle must be within reach of the
garage door or exterior gate drive. Make sure
that neither your vehicle nor any persons/
objects are present within the sweep of the
door or gate.
Observe the safety notes when performing
the rolling code synchronisation
(Y page 243). X
Turn the key to position 2in the ignition
lock.
X Press the programming button of the door
or gate drive (see the door or gate drive
operating instructions, e.g. under "Pro-
gramming of additional remote controls").
i Usually, you now have 30seconds to ini-
tiate the next step.
X Press previously programmed button ;,
= or? of the integrated garage door
opener until the door starts to move.
The rolling code synchronisation is then
complete.
Problems when programming
If you have problems when programming the
integrated garage door opener, please note
the following:
R Check the transmitter frequency of garage
door drive remote control A.This can usu-
ally be found on the back of the remote
control.
R Change the batteries in garage door remote
control A.This increases the likelihood
that remote control Awill send a strong
and precise signal to the integrated garage
door opener.
R When programming, hold remote control
A at varying distances and angles from the
button that you are programming. Try vari-
ous angles at a distance of between
5 and 30 cm or at the same angle but at
varying distances.
R If there is another remote control for the
same garage door drive, perform the pro-
gramming steps again using this remote
control. Before performing these steps,
make sure that new batteries have been
fitted in garage door drive remote control
A.
R Note that some remote controls transmit
only for a limited period (the indicator lamp
on the remote control goes out). Press but- 244
FeaturesStowing and features
Page 248 of 321
ton
Bon remote control Aagai nbefore
transmission ends.
R Align the aerial cable of the garage door
opener unit. This can improve signal recep-
tion/transmission.
Opening or closing the garage door Once programmed, the integrated garage
door opener will assume the function of the
garage door system's remote control. Please
also read the operating instructions for the
garage door system.
X Turn the key to position 2in the ignition
lock.
X Press button ;,=or? that you have
programmed to operate the garage door.
Garage door system with a fixed code: indi-
cator lamp :lights up green.
Garage door system with a rolling code:
indicator lamp :flashes green.
i The transmitter will transmit a signal for
as long as the button is pressed. The trans-
mission is halted after a maximum of ten
seconds and indicator lamp :flashes yel-
low. Press button ;,=or? again if nec-
essary.
Clearing the memory of the integrated
garage door opener in the rear-view mir-
ror X
Turn the key to position 2in the ignition
lock.
X Press buttons ;and ?.
The indicator lamp lights up yellow.
X Press and hold buttons ;and ?until the
indicator lamp turns green.
i Make sure that you clear the memory of
the integrated garage door opener before
selling the vehicle. Features
245Stowing and features Z
Page 266 of 321
X
Place the bag with the collapsible emer-
gency spare wheel in the boot.
X Hook in the retaining strap carabiners and
lash the collapsible emergenc yspare wheel
to the bracket. Flat tyre
Preparing the vehicle
Your vehicle may be equipped with:
R a TIREFIT kit
R an emergency spare wheel
R MOExtended tyres (tyres with run-flat char-
acteristics) (Y page 272)
i Vehicle preparation is not necessary on
vehicles with MOExtended tyres.
i Vehicles with MOExtended tyres are not
equipped with a TIREFIT kit at the factory.
It is therefore recommended that you addi-
tionally equip your vehicle with a TIREFIT kit
if you fit tyres that do not feature run-flat
characteristics, e.g. winter tyres. A TIREFIT
kit can be obtained from a Mercedes-Benz
Service Centre.
X Stop the vehicle as far away as possible
from traffic on solid, non-slippery and level
ground.
X Switch on the hazard warning lamps.
X Apply the electric parkin gbrake manually
(Y page 147).
X Bring the front wheels into the straight-
ahead position.
X Vehicles with manual transmission:
engage first or reverse gear.
X Vehicles with automatic transmission:
move the selector leve rtoP.
X Switch off the engine. X
Vehicles without KEYLESS-GO: remove
the key from the ignition lock.
X Vehicles with KEYLESS-GO: open the
driver's door.
The on-board electronics have status 0,
which is the same as the key having been
removed.
X Vehicles with KEYLESS-GO: remove the
Start/Stop button from the ignition lock
(Y page 127).
X All occupants must get out of the vehicle.
Make sure that they are not endangered as
they do so.
X Make sure that no one is near the danger
area whilst a wheel is being changed. Any-
one who is not directly assisting in the
wheel change should, for example, stand
behind the barrier.
X Get out of the vehicle. Pay attention to traf-
fic conditions when doing so.
X Close the driver's door.
X Place the warning triangle (Y page 260) a
suitable distance away.O bserve legal
requirements. TIREFIT kit
Using the TIREFIT kit TIREFIT is a tyre sealant.
You can use TIREFIT to seal punctures of up
to 4 mm, particularly those in the tyre tread.
You can use TIREFIT at outside temperatures
down to
Ò20 †. G
WARNING
In the following situations, the tyre sealant is
unable to provide sufficient breakdown assis-
tance, as it is unable to seal the tyre properly:
R there are cuts or punctures in the tyre
larger than those mentioned above.
R the wheel rim is damaged.
R you have driven at very low tyre pressures
or on a flat tyre. Flat tyre
263Breakdown assistance
Z
Page 271 of 321
Securing the vehicle on slight downhill gradients
X
On downhill gradients: place chocks or
othe rsuitable items in fron tofthe wheels
of the front and rear axle.
Raising the vehicle G
WARNING
If you do not position the jack correctly at the
appropriate jacking point of the vehicle, the
jack could tip over with the vehicle raised.
There is a risk of injury.
Only position the jack at the appropriate jack-
ing point of the vehicle. The base of the jack
must be positioned vertically, directly under
the jacking point of the vehicle.
The following must be observed when raising
the vehicle:
R to raise the vehicle, only use the vehicle-
specific jack that has been tested and
approved by Mercedes-Benz. If used incor-
rectly, the jack could tip over with the vehi-
cle raised.
R the jack is designed only to raise and hold
the vehicle for a short time while a wheel
is being changed. It is not suited for per-
forming maintenance work under the vehi-
cle.
R avoid changing the wheel on uphill and
downhill slopes.
R before raising the vehicle, secure it from
rolling away by applying the parking brake
and inserting wheel chocks. Never disen-
gage the parking brake while the vehicle is
raised. R
the jack must be placed on a firm, flat and
non-slip surface. On a loose surface, a
large, load-bearing underlay must be used.
On a slippery surface, a non-slip underlay
must be used, e.g. rubber mats.
R do not use wooden blocks or similar
objects as a jack underlay. Otherwise, the
jack will not be able to achieve its load-
bearing capacity due to the restricted
height.
R make sure that the distance between the
underside of the tyres and the ground does
not exceed 3 cm.
R never place your hands and feet under the
raised vehicle.
R never lie under the raised vehicle.
R never start the engine when the vehicle is
raised.
R never open or close a door or the boot lid
when the vehicle is raised.
R make sure that no persons are present in
the vehicle when the vehicle is raised. X
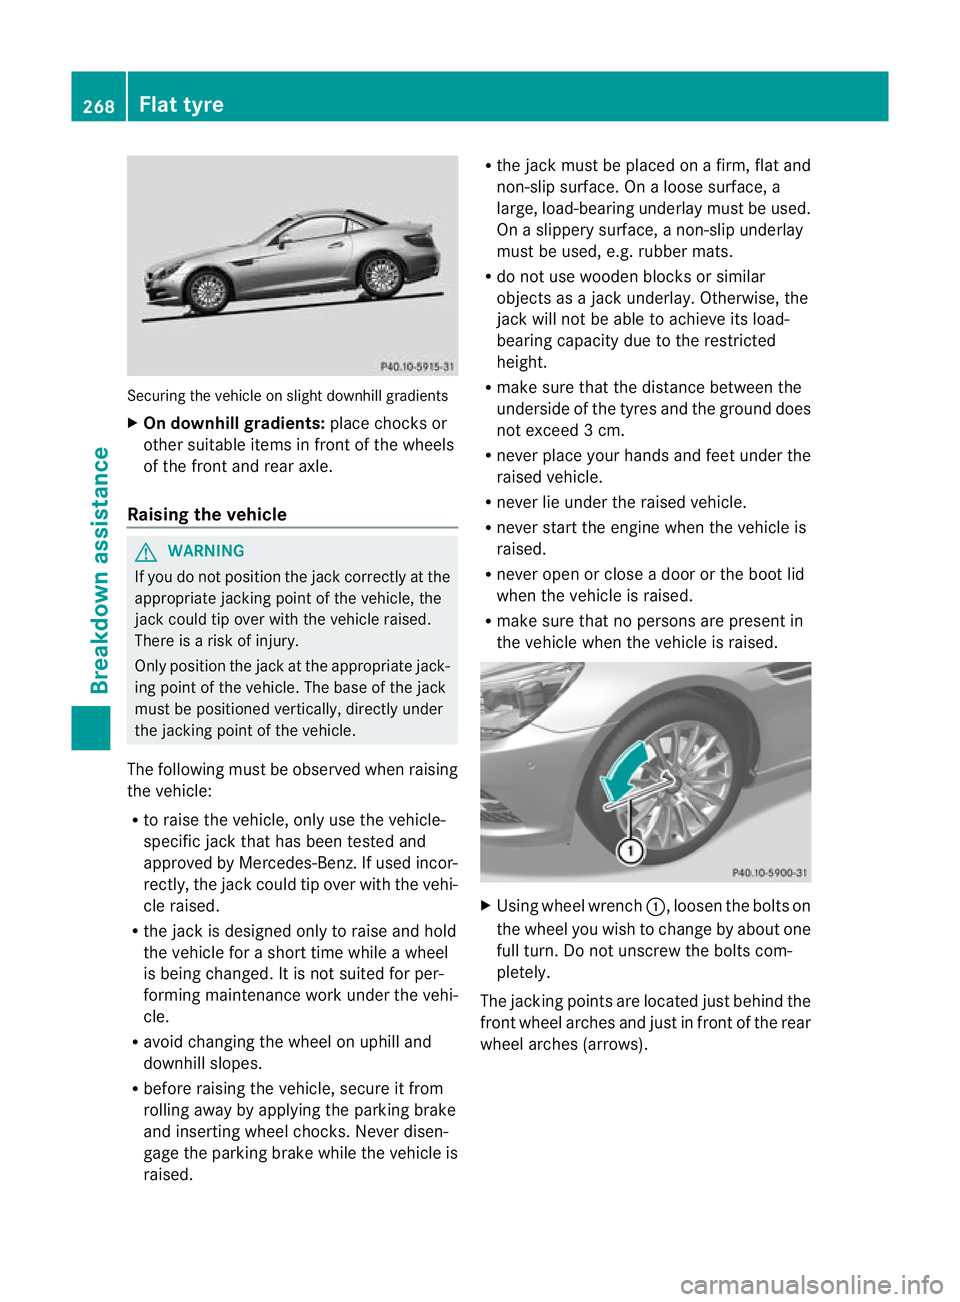
Using wheel wrench :, loosen the bolts on
the wheel you wish to change by about one
full turn. Do not unscrew the bolts com-
pletely.
The jacking points are located just behind the
front wheel arches and just in front of the rear
wheel arches (arrows). 268
Flat tyreBreakdown assistance