2012 MERCEDES-BENZ SLK ROADSTER door lock
[x] Cancel search: door lockPage 149 of 321
Parking
Important safety notes
G
WARNING
Only remove the key from the ignition lock
when the vehicle is stationary, as you cannot
steer the vehicle when the key is removed.
Never leave children unsupervised in the vehi-
cle. They might release the electric parking
brake. This could lead to aserious or fatal
accident. G
WARNING
Under no circumstances should the exhaust
system come into contact with flammable
materials such as dry grass or petrol, for
example. Do not park the vehicle on dry grass-
land or harvested grain fields. The hot exhaust
system could otherwise ignite the flammable
material and set the vehicle on fire.
To ensure that the vehicle is secured against
rolling away unintentionally:
R the electric parking brake must be applied.
R on vehicles with manual transmission,
engage first gear or reverse gear.
R on vehicles with automatic transmission,
the transmission must be in park position
Pand the transmission position display in
the multifunction display must show P.
R the key must be removed from the ignition
lock.
R on uphill or downhill gradients, turn the
fron twheels towards the kerb. Switching off the engine
Important safety notes G
WARNING
If the engine is not running, there is no power
assistance for the steering and brakes. Steer-
ing and braking then requires significantly
greater effort. As a result, you might lose control of the vehi-
cle, cause an accident and injure yourself and
others.
Therefore, do not switch off the engine while
you are driving.
Vehicles with manual transmission X
Shift to either first gear or reverse gear R.
X Turn the key to position 0in the ignition
lock and remove it.
The immobiliser is activated.
X Apply the electric parking brake.
Vehicles with automatic transmission X
Apply the electric parking brake.
X Shift the transmission to position P.
Using the key
X Turn the key to position 0in the ignition
lock and remove it.
The immobiliser is activated.
i The key can only be removed if the trans-
mission is in position P.
Using KEYLESS-GO
X Press the Start/Stop button (Y page 127).
The engine stops and all the indicator
lamps in the instrumentc luster go out.
i When the driver's door is closed, this cor-
responds to key position 1. When the driv-
er's door is open, this corresponds to key
position 0, i.e. key removed.
i The engine can be turned off while the
vehicle is in motion by pressing and holding
the Start/Stop button for three seconds.
This function operates independently of the
ECO start/stop automatic engine switch-
off function. 146
ParkingDriving and parking
Page 150 of 321
Electric parking brake
General notes i
The electric parking brake carries out a
function check at regular intervals when
the engine is switched off .Noises that
occur are normal. Engaging/releasing manually
X
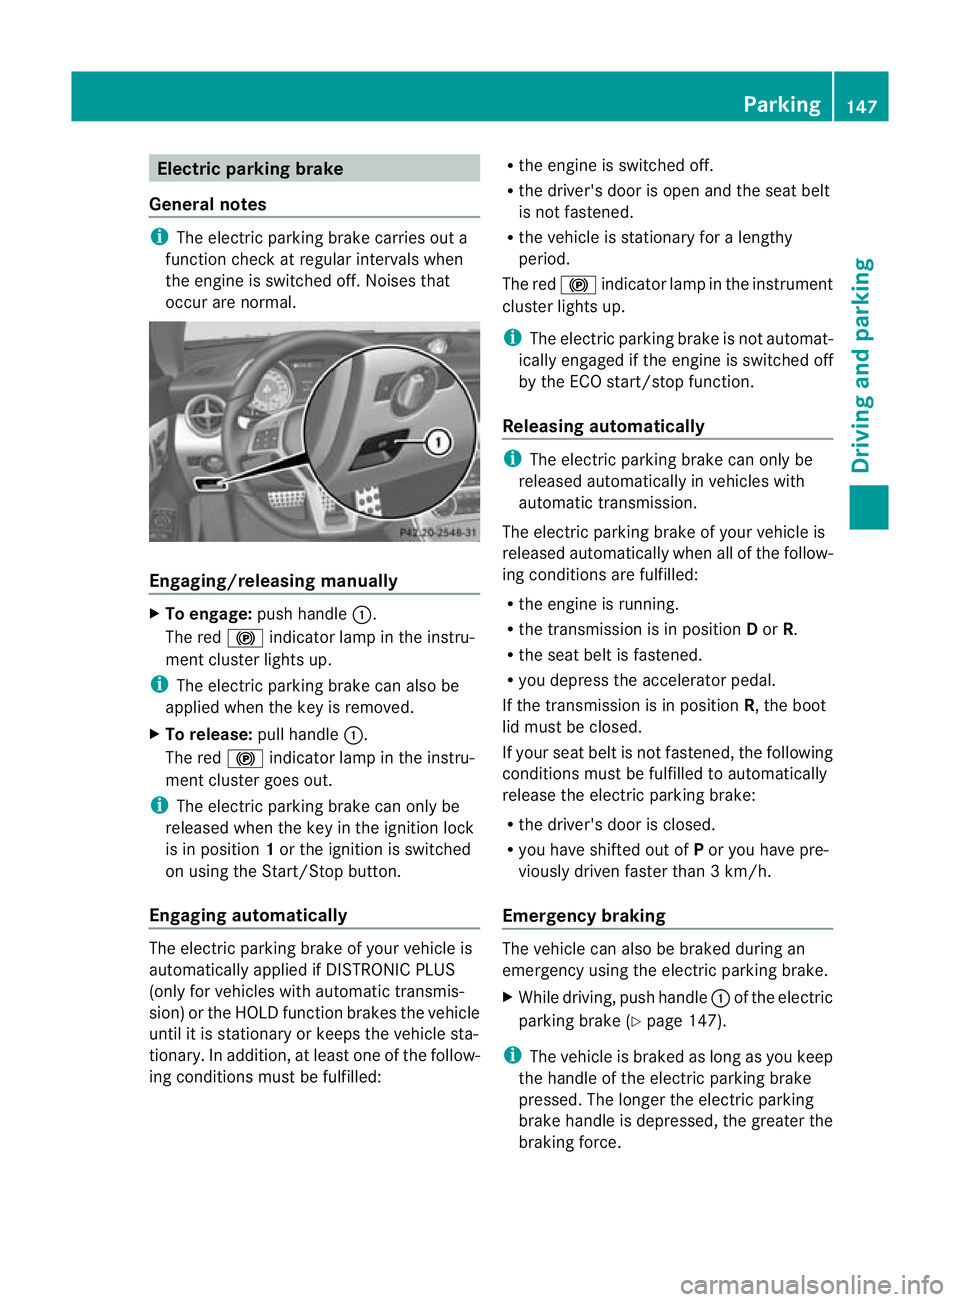
To engage: push handle :.
The red !indicator lamp in the instru-
ment cluster lights up.
i The electric parking brake can also be
applied when the key is removed.
X To release: pull handle:.
The red !indicator lamp in the instru-
ment cluster goes out.
i The electric parking brake can only be
released when the key in the ignition lock
is in position 1or the ignition is switched
on using the Start/Stop button.
Engaging automatically The electric parking brake of your vehicle is
automatically applied if DISTRONIC PLUS
(only for vehicles with automatic transmis-
sion) or the HOLD function brakes the vehicle
until it is stationary or keeps the vehicle sta-
tionary. In addition, at least one of the follow-
ing conditions must be fulfilled: R
the engine is switched off.
R the driver's door is open and the seat belt
is not fastened.
R the vehicle is stationary for a lengthy
period.
The red !indicator lamp in the instrument
cluster lights up.
i The electric parking brake is not automat-
ically engaged if the engine is switched off
by the ECO start/stop function.
Releasing automatically i
The electric parking brake can only be
released automatically in vehicles with
automatic transmission.
The electric parking brake of your vehicle is
released automatically when all of the follow-
ing conditions are fulfilled:
R the engine is running.
R the transmission is in position Dor R.
R the seat belt is fastened.
R you depress the accelerator pedal.
If the transmission is in position R, the boot
lid must be closed.
If your seat belt is not fastened, the following
conditions must be fulfilled to automatically
release the electric parking brake:
R the driver's door is closed.
R you have shifted out of Por you have pre-
viously driven faster than 3 km/h.
Emergency braking The vehicle can also be braked during an
emergency using the electric parking brake.
X
While driving, push handle :of the electric
parking brake (Y page 147).
i The vehicle is braked as long as you keep
the handle of the electric parking brake
pressed. The longer the electric parking
brake handle is depressed, the greater the
braking force. Parking
147Driving and parking Z
Page 163 of 321
DISTRONIC PLUS must also never be oper-
ated, activated or deactivated by a passenger
or fro
moutside the vehicle.
DISTRONIC PLUS does not replace the elec-
tric parking brake and must not be used for
parking.
The DISTRONIC PLUS braking effect is can-
celled and the vehicle can start moving if:
R DISTRONIC PLUS is deactivated using the
cruise control lever.
R you accelerate.
R there is a malfunction in the system or an
interruption in the power supply, e.g .bat-
tery failure.
R the electrical system in the engine com-
partment, the battery or the fuses are tam-
pered with.
R the battery is disconnected.
If you wish to leave th evehicle or park it,
deactivate DISTRONIC PLUS and secure the
vehicle against rolling away.
If DISTRONIC PLUS detects that the vehicle
in fron tis stopping, it brakes your vehicle until
it is stationary.
Once your vehicle is stationary, it remains
stationary and you do not need to depress the
brake.
i After a time, the electric parking brake
secures the vehicle and relieves the service
brake.
i Depending on the specified minimum dis-
tance, your vehicle will come to a standstill
at a sufficient distance behind the vehicle
in front.T he specified minimum distance is
set using the control on the cruise control
lever. The electric parking brake secures the vehicle
automatically if DISTRONIC PLUS is activated
and:
R
the driver's door is open and the driver's
seat belt is unfastened.
R the engine is switched off, unless it is auto-
matically switched off by the ECO start/
stop function.
R the bonnet is opened.
R a system fault occurs.
R the power supply is not sufficient.
If the vehicle electronics are malfunctioning,
the multifunction display may also show a
warning message.
Brake immediately X
Immediately depress the brake pedal firmly
until the warning message in the multifunc-
tion display goes out. DISTRONIC PLUS is
deactivated.
Select Park (P) X
Shift the transmission to position Pto pre-
vent the vehicle from rolling away.
DISTRONIC PLUS is deactivated. The warn-
ing message in the multifunction display
disappears.
The horn will also sound at regular intervals if
DISTRONIC PLUS is activated and you:
R switch the engine off, open the driver's
door and take off your seat belt
R open the bonnet
The sounding of the horn alerts you to the fact
that the vehicle has been parked while DIS-
TRONIC PLUS is still activated. The sound
becomes louder if you attempt to lock the
vehicle. The vehicle is not locked until DIS-
TRONIC PLUS is deactivated.
i If the engine has been switched off, it
cannot be started again until DISTRONIC
PLUS has been deactivated. 160
Driving systemsDriving and parking
Page 168 of 321
stored even if you remove the key from the
ignition lock.
Sports tuning
The firmer setting of the suspension tuning in
sports mode ensures even better contact
with the road. Select this mode if you want to
experience direct contact with the road sur-
face, when employing a sporty driving style,
e.g. on winding country roads.
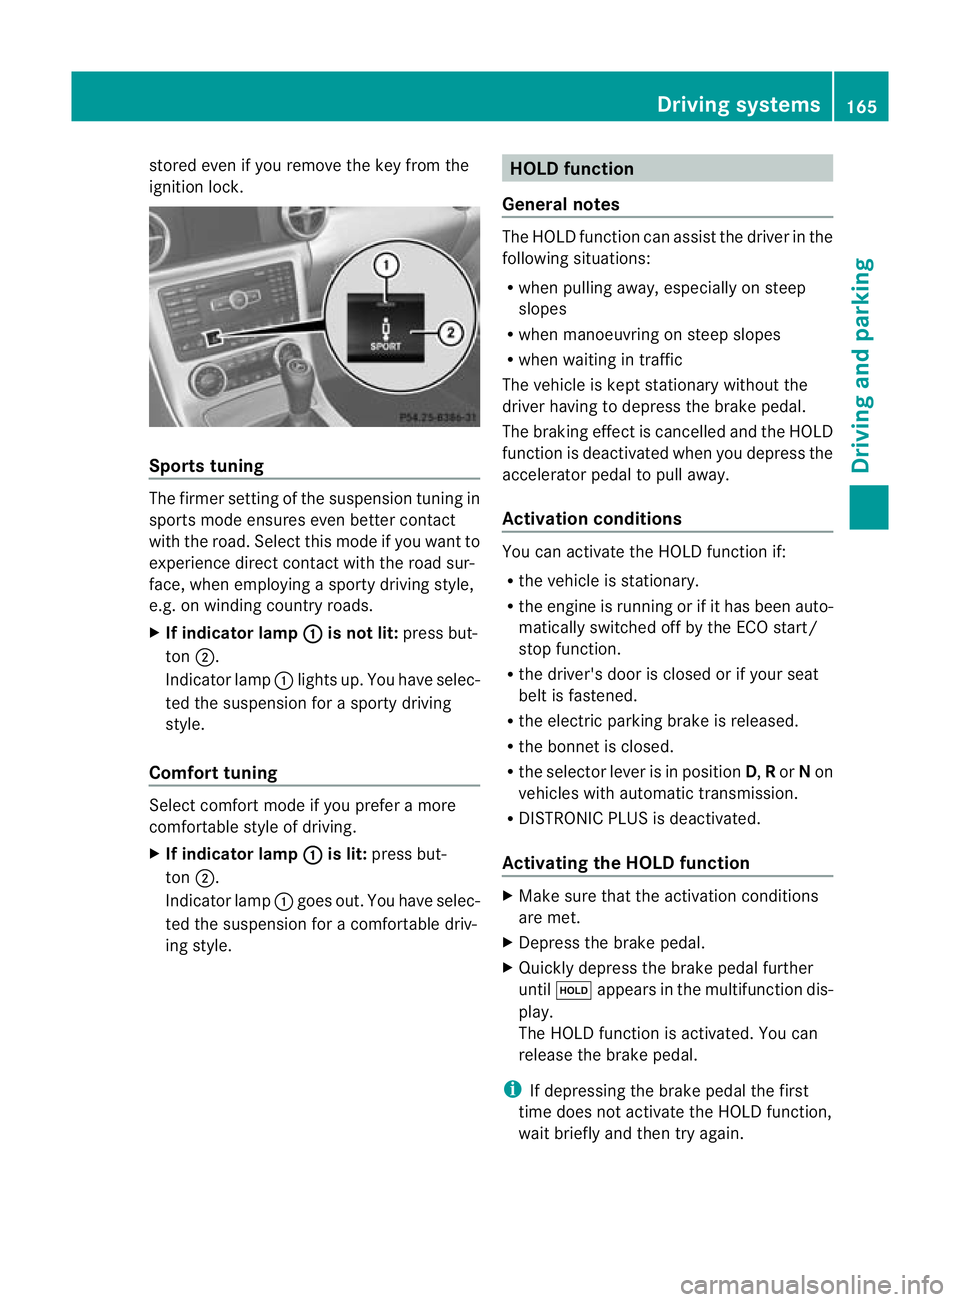
X If indicator lamp : is not lit:
press but-
ton ;.
Indicator lamp :lights up. You have selec-
ted the suspension for a sporty driving
style.
Comfort tuning Select comfort mode if you prefer a more
comfortable style of driving.
X
If indicator lamp : is lit:
press but-
ton ;.
Indicator lamp :goes out. You have selec-
ted the suspension for a comfortable driv-
ing style. HOLD function
General notes The HOLD function can assist the driver in the
following situations:
R
when pulling away, especially on steep
slopes
R when manoeuvring on steep slopes
R when waiting in traffic
The vehicle is kept stationary without the
driver having to depress the brake pedal.
The braking effect is cancelled and the HOLD
function is deactivated when you depress the
accelerator pedal to pull away.
Activation conditions You can activate the HOLD function if:
R
the vehicle is stationary.
R the engine is running or if it has been auto-
matically switched off by the ECO start/
stop function.
R the driver's door is closed or if your seat
belt is fastened.
R the electric parking brake is released.
R the bonnet is closed.
R the selector lever is in position D,Ror Non
vehicles with automatic transmission.
R DISTRONIC PLUS is deactivated.
Activating the HOLD function X
Make sure that the activation conditions
are met.
X Depress the brake pedal.
X Quickly depress the brake pedal further
until ë appears in the multifunction dis-
play.
The HOLD function is activated. You can
release the brake pedal.
i If depressing the brake pedal the first
time does not activate the HOLD function,
wait briefly and then try again. Driving systems
165Driving and parking Z
Page 169 of 321
G
WARNING
The vehicle's brakes are applied when the
HOLD function is activated. For this reason,
deactivate the HOLD function if the vehicle is
to be set in motion by other means (e.g. in a
car wash or by towing).
Deactivating the HOLD function The HOLD function is deactivated automati-
cally if:
R you accelerate. On vehicles with automatic
transmission: only when the transmission
is in position Dor R.
R you shift the transmission to position Pon
vehicles with automatic transmission.
R you apply the brakes again with a certain
amount of pressure until ëdisappears
from the multifunction display.
R you secure the vehicle using the electric
parking brake.
R you activate DISTRONIC PLUS.
i After a time, the electric parking brake
secures the vehicle and relieves the service
brake. G
WARNING
Never get out of the vehicle when the HOLD
function is activated.
The HOLD function must never be operated
or deactivated by a passenger or from outside
the vehicle.
The HOLD function does not replace the elec-
tric parking brake and must not be used for
parking.
The braking effect of the HOLD function is
cancelled and the vehicle could roll away if:
R the HOLD function is deactivated by
depressing the accelerator peda lorthe
brake pedal.
R there is a malfunction in the system or an
interruption in the power supply, e.g. bat-
tery failure. R
the electrical system in the engine com-
partment, the battery or the fuses are tam-
pered with.
R the battery is disconnected.
If you leave the vehicle or park it, deactivate
the HOLD function and secure the vehicle
against rolling away.
The electric parking brake secures the vehicle
automatically if the HOLD function is activa-
ted and:
R the driver's door is open and the driver's
seat belt is unfastened.
R the engine is switched off, unless it is auto-
matically switched off by the ECO start/
stop function.
R the bonnet is opened.
R a system fault occurs.
R the power supply is not sufficient.
If the vehicle electronics are malfunctioning,
the multifunction display may also show a
warning message.
Brake immediately X
Immediately depress the brake pedal firmly
until the warning message in the multifunc-
tion display goes out. This deactivates the
HOLD function.
In vehicles with automatic transmission:
Select Park (P) .
X Move the selector lever to Pto prevent the
vehicle from rolling away.
The HOLD function is deactivated. The
warning message in the multifunction dis-
play disappears.
Ah orn will also sound at regular intervals if
the HOLD function is activated and you:
R switch the engine off, open the driver's
door and take off your seat belt
R open the bonnet
The sounding of the horn alerts you to the fact
that the vehicle has been parked while the
HOLD function is still activated. If you attempt
to lock the vehicle, the tone becomes louder. 166
Driving systemsDriving and parking
Page 195 of 321
X
Press the :or9 button to select the
Intell. Light System: function.
You will see the selected setting: on or
off .
X Press the abutton to save the setting.
If you set the dipped-beam headlamps for
driving on the right/left (Y page 192), the
multifunction display shows the Intell.Light System: System inoperative
Inactive for left-side traffic or
Intell. Light System: System inoper‐
ative Inactive for right-side traf‐
fic display message instead of the
Intell.Light System function in the
Light sub-
menu.
Setting the dipped-beam headlamps for
driving on the left/right
This function is only available on vehicles with
the Intelligent Light System.
You can use this function to switch between
symmetrical beam and asymmetrical dipped
beam (Y page 100).
If you set the dipped-beam headlamps for
driving on the right/left, then motorway
mode and the extended range foglamps are
not available.
X Press the =or; button on the steer-
ing wheel to select the Settings menu.
X Press the :or9 button to select the
Light submenu.
X Press the abutton to confirm.
X Press :or9 to select the Dipped beams Setting for function.
You will see the selected setting: Right-side traffic or
Left-side traffic .
X Press the abutton to save the setting.
When you change the setting, conversion
does not take place until the next time the
vehicle is stationary.
You can also have the dipped-beam head-
lamps set for driving on the right or left at a
qualified specialist workshop. Setting the brightness of the ambient
lighting
X
Press the =or; button on the steer-
ing wheel to select the Settings menu.
X Press the :or9 button to select the
Light submenu.
X Press the abutton to confirm.
X Press the :or9 button to select
Ambient light .
You will see the selected setting.
X Press the abutton to confirm.
X Press the :or9 button to adjust the
brightness to any level from Off to
Level 5 (bright).
X Press the aor% button to save the
setting.
Activating/deactivating the surround
lighting and exterior lighting delayed
switch-off
If you have activated the Surround light‐ ing function and the light switch is set to
Ã, the following functions are activated
when it is dark:
R Surround lighting: the exterior lighting
remains lit for 40 secondsafter unlocking
with the key. The exterior lighting switches
off when you open the driver's door.
R Exterior lighting delayed switch-off: the
exterior lighting remains lit for 60seconds
after the engine is switched off. If you close
all the doors, the exterior lighting goes off
after 15 seconds.
If you activate the Surround lighting: function, the following light up depending on
the vehicle's equipment:
R
side lamps
R foglamps
R dipped-beam headlamps
R daytime driving lights
X Press the =or; button on the steer-
ing wheel to select the Settings menu.
X Press the :or9 button to select the
Light submenu.192
Menus and submenusOn-board computer and displays
Page 196 of 321
X
Press the abutton to confirm.
X Press the :or9 button to select the
Surround lighting function.
You will see the selected setting: on or
off .
X Press the abutton to save the setting.
Deactivating delayed switch-off of the exte-
rior lighting temporarily:
X Before leaving the vehicle, turn the key to
position 0in the ignition lock.
X Turn the key to position 2in the ignition
lock and back to position 0.
The exterior lighting delayed switch-off is
deactivated.
Delayed switch-off of the exterior lighting is
reactivated the next time you start the
engine.
Activating/deactivating the interior light-
ing delayed switch-off
If you activate the Interior lighting delay sw. off function, the interior lighting
remains on for 20seconds after you remove
the key from the ignition lock.
X Press the =or; button on the steer-
ing wheel to select the Settings menu.
X Press the :or9 button to select the
Light submenu.
X Press the abutton to confirm.
X Press the :or9 button to select the
Interior lighting delay sw. off: function.
You will see the selected setting:
on or
off .
X Press the abutton to save the setting.
Vehicle Setting permanent SPEEDTRONIC
You can set permanent SPEEDTRONIC
(Y
page 156) using the Limit speed (win‐ter tyres) function. X
Press the =or; button on the steer-
ing wheel to select the Settings menu.
X Press the :or9 button to select the
Vehicle submenu.
X Press the abutton to confirm.
X Press the :or9 button to select the
Limit speed (winter tyres): function.
You will see the curren tsetting.
X Press the abutton to confirm.
X Press :or9 to adjust permanent
SPEEDTRONIC in increments of 10 km/h
(240 km/h to
160 km/h ). The
Off setting
switches permanent SPEEDTRONIC off.
X Press the abutton to store the entry.
Switching the automatic locking feature
on/off
If you select the Automatic door locks: function, the vehicle is centrally locked above
a speed of around 15 km/h.
i
For further information on the automatic
locking feature, see (Y page 72).
X Press the =or; button on the steer-
ing wheel to select the Settings menu.
X Press the :or9 button to select the
Vehicle submenu.
X Press the abutton to confirm.
X Press the :or9 button to select the
Automatic door locks function.
You will see the selected setting: on or
off .
X Press the abutton to save the setting.
Activating/deactivating the acoustic
locking confirmation
If you switch on the Acoustic Lock feed‐ back: function, an acoustic signal sounds
when you lock the vehicle.
X Press the =or; button on the steer-
ing wheel to select the Settings menu.
X Press the :or9 button to select the
Vehicle submenu.
X Press the abutton to confirm. Menus and submenus
193On-board computer and displays Z
Page 197 of 321
X
Press the :or9 button to select the
Acoustic Lock feedback: function.
You will see the selected setting: Activa‐ted or
Deactivated .
X Press the abutton to save the setting.
Activating/deactivating the radar sensor
system
i You must deactivate the radar sensor sys-
tem in certain countries and near radio
telescope facilities. For further informa-
tion, see (Y page 312).
When you are close to radio telescope facili-
ties, the radar sensor system will be deacti-
vated automatically.
The following systems are switched off when
the radar sensor system is deactivated:
R DISTRONIC PLUS (Y page 156)
R BAS PLUS (Y page 54)
R PRE-SAFE ®
Brake (Y page 59)
X Press the =or; button on the steer-
ing wheel to select the Settings menu.
X Press the :or9 button to select the
Vehicle submenu.
X Press the abutton to confirm.
X Press the 9or: button to select
Radar sensor (See Owner's Man.): .
You will see the selected setting: on or
off .
X Press the abutton to save the setting.
Convenience Activating/deactivating the EASY-
ENTRY/EXIT feature
You can use the
Easy Entry/Exit: function
to activate or deactivate the EASY ENTRY/
EXIT feature (Y page 93). G
WARNING
The steering wheel moves when the EASY-
ENTRY/EXIT feature is active. There is a risk
of occupants becoming trapped. Before acti- vating the EASY-ENTRY/EXIT feature, make
sure that nobody can become trapped.
Do not leave children unsupervised in the
vehicle, even if they are secured in a child
restraint system. The children could open the
driver's door and thereby unintentionally acti-
vate the EASY-ENTRY/EXIT feature and
become trapped.
X Press the =or; button on the steer-
ing wheel to select the Settings menu.
X Press the :or9 button to select the
Convenience submenu.
X Press the abutton to confirm.
X Press the :or9 button to select the
Easy Entry/Exit: function.
You will see the selected setting: on or
off .
X Press the abutton to save the setting.
Switching the belt adjustment on/off
For further information on belt adjustment,
see (Y page 46).
X Press the =or; button on the steer-
ing wheel to select the Settings menu.
X Press the :or9 button to select the
Convenience submenu.
X Press ato confirm.
X Press the :or9 button to select the
Belt adjustment function.
You will see the selected setting: on or
off .
X Press the abutton to save the setting.
Switching the belt adjustment on/off
For further information on belt adjustment,
see (Y page 46).
X Press the =or; button on the steer-
ing wheel to select the Settings menu.
X Press the :or9 button to select the
Convenience submenu.
X Press ato confirm. 194
Menus and submenusOn-board computer and displays