2012 MERCEDES-BENZ SLK ROADSTER window
[x] Cancel search: windowPage 120 of 321
partment as well. The indicator lamp in the
á button goes out.
R Use the residual heat function if you want
to heat or ventilate the vehicle interior
when the ignition is switched off. The resid-
ual heat function can only be activated or
deactivated with the ignition switched off. Operating the climate control system
Switching climate control on/off
Important information i
When climate control is switched off, the
air supply and air circulation are also
switched off. Only select this setting
briefly. Otherwise, the windows may mist
up.
i Switch on climate control primarily using
the à button (Y page 118).
Activating/deactivating Air-conditioning system
X
To activate: turn airflow control
C(Y page 115) clockwise to the desired
position (except position 0).
X To deactivate: turn airflow control
C(Y page 115) anti-clockwise to position
0. THERMOTRONIC automatic climate con-
trol
X
Turn the key to position 2in the ignition
lock.
X To activate: press theÃbutton.
The indicator lamp in the Ãbutton lights
up. Airflow and air distribution are set to
automatic mode.
or
X Press the ^button.
The indicator lamp in the ^button goes
out. The previously selected settings come
into effect again.
X To switch off: press the^button.
The indicator lamp in the ^button lights
up. Activating/deactivating the cooling
with air dehumidification function
Important information The cooling with air dehumidification function
is only available when the engine is running.
The air inside the vehicle is cooled and dehu-
midified according to the temperature selec-
ted.
G
WARNING
If the "cooling with air dehumidification" func-
tion is deactivated, the air inside the vehicle
will not be cooled (during warm weather) or
dehumidified. The windows could mist up
more quickly. This may preven tyou from
observing the traffic conditions, thereby caus-
ing an accident.
Condensation may drip from the underside of
the vehicle when THERMOTRONIC is in cool-
ing mode. This is normal and not a sign that
there is a malfunction.
Depending on the equipment level, the con-
trol panel has either the Ábutton or the
¿ button.
i The cooling with air dehumidification
function uses refrigerant R134a. This cool- Operating the climate control system
117Climate control Z
Page 123 of 321
When the buttons or controls for tempera-
ture, airflow or air distribution are activated,
the temperature setting for the driver's side
is not adopted for the other climate control
zones.
X To switch off: press theábutton.
The indicato rlamp in the ábuttongoes
out.
The temperature setting for the driver's
side is adopted for the front-passenger
side. Defrosting the windscreen
You can use this function to defrost the wind-
screen or to demist the inside of the wind-
screen and the side windows.
i You should only select the demisting
function until the windscreen is clear again.
X Turn the key to position 2in the ignition
lock.
X To activate: press the¬button.
The indicator lamp in the ¬button lights
up.
The climate control system switches to the
following functions:
R cooling with air dehumidification on
R high airflow 9
R high temperature 9
R air distribution to the windscreen and
front side windows
R air-recirculation mode off
X To switch off: press the¬button.
The indicator lamp in the ¬button goes
out. The previously selected settings come
into effect again. The cooling with air dehu- midification function remains on. Air-recir-
culation mode remains deactivated.
or
X Press the Ãbutton 10
The indicator lamp in the ¬button goes
out. Airflow and air distribution are set to
automatic mode. Demisting the windows
Windows misted up on the inside X
Activate the "cooling with air dehumidifica-
tion" function ¿11
/Á 12
.
X Activate automatic mode Ã.12
X If the windows continue to mist up, activate
the demisting function (Y page 120).
i You should only select this setting until
the windscreen is clear again.
Windows misted up on the outside X
Activate the windscreen wipers.
X Set the air distribution to OorP.
i You should only select this setting until
the windscreen is clear again. Rear window heating
Switching on/off G
WARNING
Clear all windows of ice or snow before setting
off. Otherwise, impaired visibility could
endanger you and others.
The rear window heating has ahigh current
draw. You should therefore switch it off as
soon as the window is clear .Itotherwise
switches off automatically after several
minutes.
9 Depending on the outside temperature.
10 THERMOTRONIC automatic climate control.
11 Air-conditioning system.
12 THERMOTRONIC automatic climate control. 120
Operating the climate control systemClimate control
Page 124 of 321
If the battery voltage is too low, the rear win-
dow heating may switch off.
X Turn the key to position 2in the ignition
lock.
X Press the ¤button.
The indicator lamp in the ¤button lights
up or goes out.
Problems with the rear window heating If the indicator lamp in the
¤rear window
heating button flashes, the on-board voltage
is too low or the roof is open. The rear window
heating has switched off prematurely or can-
not be activated.
X Switch off any consumers that are not
required, e.g. reading lamps or interior
lighting.
When the battery is sufficiently charged,
the rear window heating is activated again
automatically.
or
X Close the roof.
The rear window heating can be activated
again. Activating/deactivating air-recircula-
tion mode
You can deactivate the flow of fresh air if
unpleasant odours are entering the vehicle
from outside. The air already inside the vehi-
cle will then be recirculated. G
WARNING
Only switch over to air-recirculationm ode
briefly at low outside temperatures. Other-
wise, the windows could mist up, thus impair-
ing visibility and endangering yourself and
others. This may prevent you from observing
the traffic conditions, thereby causing an
accident. X
Turn the key to position 2in the ignition
lock.
X To activate: press thegbutton.
The indicator lamp in the gbutton lights
up.
i Air-recirculation mode is activated auto-
matically at high outside temperatures.
When air-recirculation mode is activated
automatically, the indicator lamp in the
g button is not lit.
Outside air is added after about
30 minutes.
X To switch off: press thegbutton.
The indicator lamp in the gbutton goes
out.
i Air-recirculation mode deactivates auto-
matically:
R after approximately five minutes at out-
side temperatures below about 5†
R after approximately five minutes if cool-
ing with air dehumidification is deactiva-
ted
R after approximately 30 minutes at out-
side temperatures above about 5† Convenience opening/closing using
the air-recirculation button
G
WARNING
Make sure that nobody can become trapped
between the side window and the door frame
as the side windows are opened and closed.
Make sure that all object sand body parts are
clear of the side windows when they are being
opened or closed .You or the objects could be
drawn in or become trapped between the side
window and the door frame as the window
moves. If there is arisk of entrapment, oper-
ate the Wswitch to move the side window
in the opposite direction. Operating the climate control system
121Climate control Z
Page 125 of 321
X
Convenience closing feature: press and
hold the gbutton until the side win-
dows are closed.
The indicator lamp in the gbutton lights
up. Air-recirculation mode is activated.
X Convenience opening feature: press and
hold the gbutton until the side win-
dows are opened. The side windows move
back to their original positions.
The indicator lamp in the gbutton goes
out .Air-recirculation mode is deactivated.
i If you open the side windows manually
after closing them with the convenience
closing feature, they will remain in this posi-
tion when opened using the convenience
opening feature. Activating/deactivating the residual
heat function
It is possible to make use of the residual heat
of the engine to continue heating the station-
ary vehicle for up to 30 minutes after the
engine has been switched off .The heating
time depends on the temperature that has
been set.
Depending on the equipment level, the con-
trol panel has either the Ìbutton or the
Á button.
i The blower will run at a low speed regard-
less of the airflow setting.
i If you activate the residual heat function
at high temperatures, only the ventilation
will be activated. The blower runs at
medium speed.
X Turn the key to position 0in the ignition
lock or remove it.
X To switch on: press theÌorÁ but-
ton.
The indicator lamp in the ÌorÁ
button lights up. X
To deactivate: press theÌorÁ
button.
The indicator lamp in the ÌorÁ
button goes out.
i Residual heat is deactivated automati-
cally:
R after about 30 minutes
R when the ignition is switched on
R if the battery voltage drops
R if the coolant temperature is too low Adjusting the air vents
Important safety notes
G
WARNING
Very hot or very cold air can flow from the air
vents.T his could cause burns or frostbite to
bare skin in the immediate vicinity of the
vents.K eep bare skin away from these air
outlets. If necessary, direct the airflow away
to a different area of the vehicle interior.
In order to ensure the direct flow of fresh air
through the air vents into the vehicle interior,
please observe the following notes:
R keep the air inlet grille on the bonnet and
in the engine compartment on the front-
passenger side free of blockages, such as
ice, snow or leaves.
R never cover the vents or ventilation grilles
in the vehicle interior.
i You can move the adjuster sfor the air
vents vertically or horizontally, to set the
direction of the airflow.
i Optimal climate control function is ach-
ieved by opening the air vents fully and set-
ting the adjusters to the middle position. 122
Adjusting the air ventsClimate control
Page 126 of 321
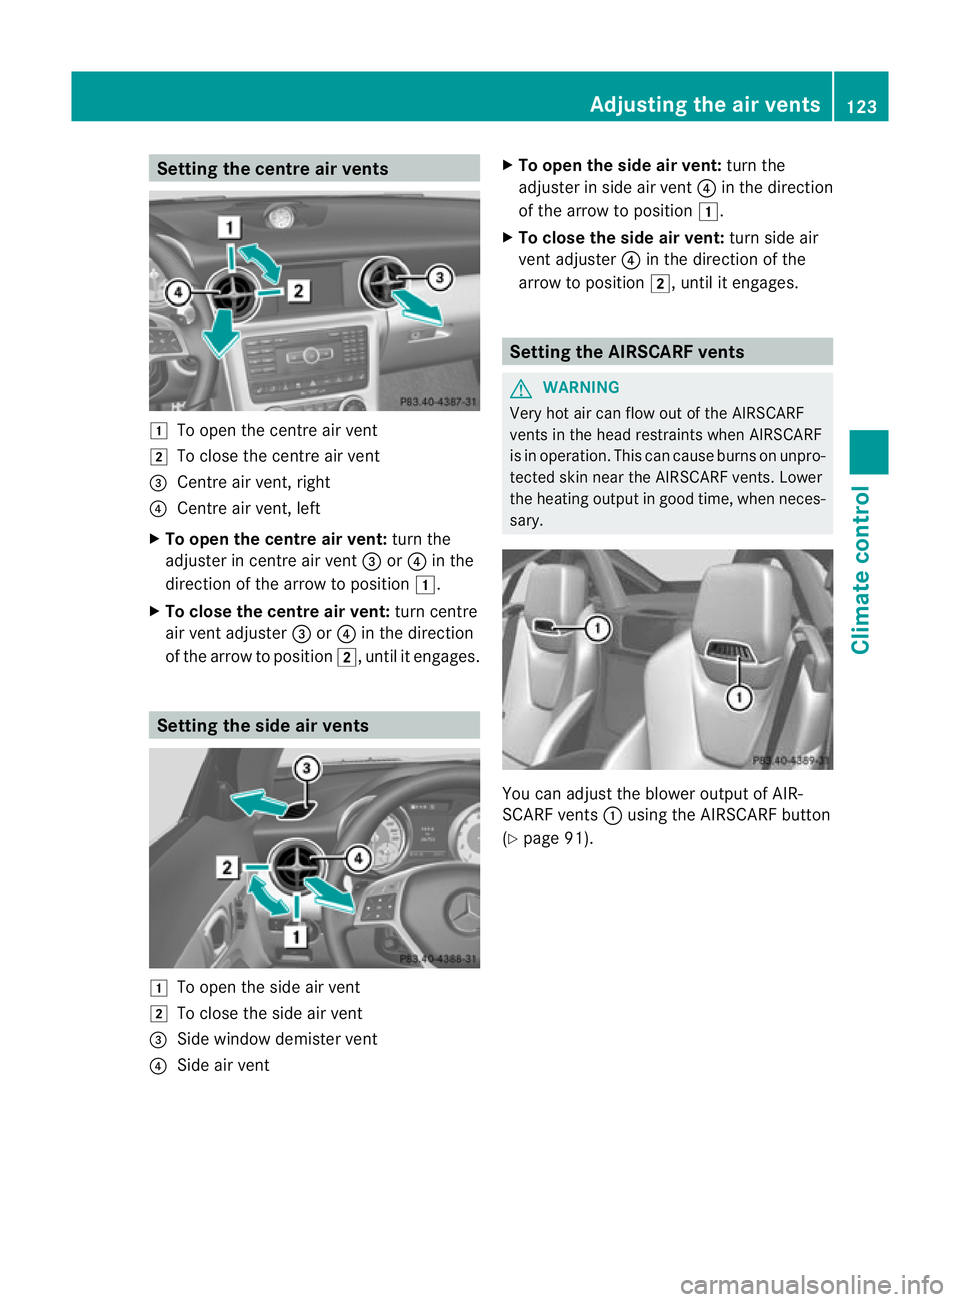
Setting the centre air vents
1
To open the centre air vent
2 To close the centre air vent
= Centre air vent, right
? Centre air vent, left
X To open the centre air vent: turn the
adjuster in centre air vent =or? in the
direction of the arrow to position 1.
X To close the centre air vent: turn centre
air vent adjuster =or? in the direction
of the arrow to position 2, until it engages.Setting the side air vents
1
To open the side air vent
2 To close the side air vent
= Side window demister vent
? Side air vent X
To open the side air vent: turn the
adjuster in side air vent ?in the direction
of the arrow to position 1.
X To close the side air vent: turn side air
vent adjuster ?in the direction of the
arrow to position 2, until it engages. Setting the AIRSCARF vents
G
WARNING
Very hot air can flow out of the AIRSCARF
vents in the head restraints when AIRSCARF
is in operation. This can cause burns on unpro-
tected skin near the AIRSCARF vents. Lower
the heating output in good time, when neces-
sary. You can adjust the blower output of AIR-
SCARF vents
:using the AIRSCARF button
(Y page 91). Adjusting the air vents
123Climate control Z
Page 153 of 321
or brake discs, depends on the individual driv-
ing style and operating conditions.
For this reason, it is impossible to state a
mileage that will be valid under all circum-
stances. An aggressive driving style will lead
to high wear. You can obtain further informa-
tion about this from your Mercedes-Benz
Service Centre. Tyre traction
G
WARNING
Whereas the vehicle can be fully controlled at
a certain speed on dry roads, you must reduce
your speed on wet or icy roads to achieve the
same road safety. You could otherwise cause
an accident.
Pay particular attention to the road conditions
at temperatures around freezing point.
If ice has formed on the road surface (e.g.
from fog), a thin film of water rapidly forms on
the ice when you brake, considerably reduc-
ing tyre traction. Drive with particular care in
such weather conditions. Driving on wet roads
Aquaplaning If water has accumulated to a certain depth
on the road surface, there is a danger of aqua-
planing occurring, even if:
R
you are driving at low speeds.
R the tyres have adequate tread depth.
For this reason, do not drive in tyre ruts, and
brake carefully. Driving on flooded roads If you have to drive on stretches of road on
which water has collected, please bear in
mind that:
R
the maximum permissible still water depth
is 12 cm.
R you should drive no faster than at walking
pace.
! Bear in mind that vehicles travelling in
front or in the opposite direction create
waves. This may cause the maximum per-
missible water depth to be exceeded.
These notes must be observed under all
circumstances. You could otherwise dam-
age the engine, the electronics or the trans-
mission. Winter driving
Important safety notes G
WARNING
If the vehicle becomes trapped in snow,
ensure that snow is kept away from the
exhaust pipe and from around the vehicle as
long as the engine is running. Otherwise, poi-
sonous carbon monoxide (CO) may enter the
vehicle, resulting in loss of consciousness and
even death.
To assure sufficient fresh air ventilation, open
a window slightly on the side of the vehicle
not facing the wind.
Have your vehicle winterproofed at a qualified
specialist workshop at the onset of winter.
Observe the notes in the "Winter operation"
section (Y page 288).
Driving with summer tyres Observe the notes in the "Winter operation"
section (Y
page 288). 150
Driving tipsDriving and parking
Page 211 of 321
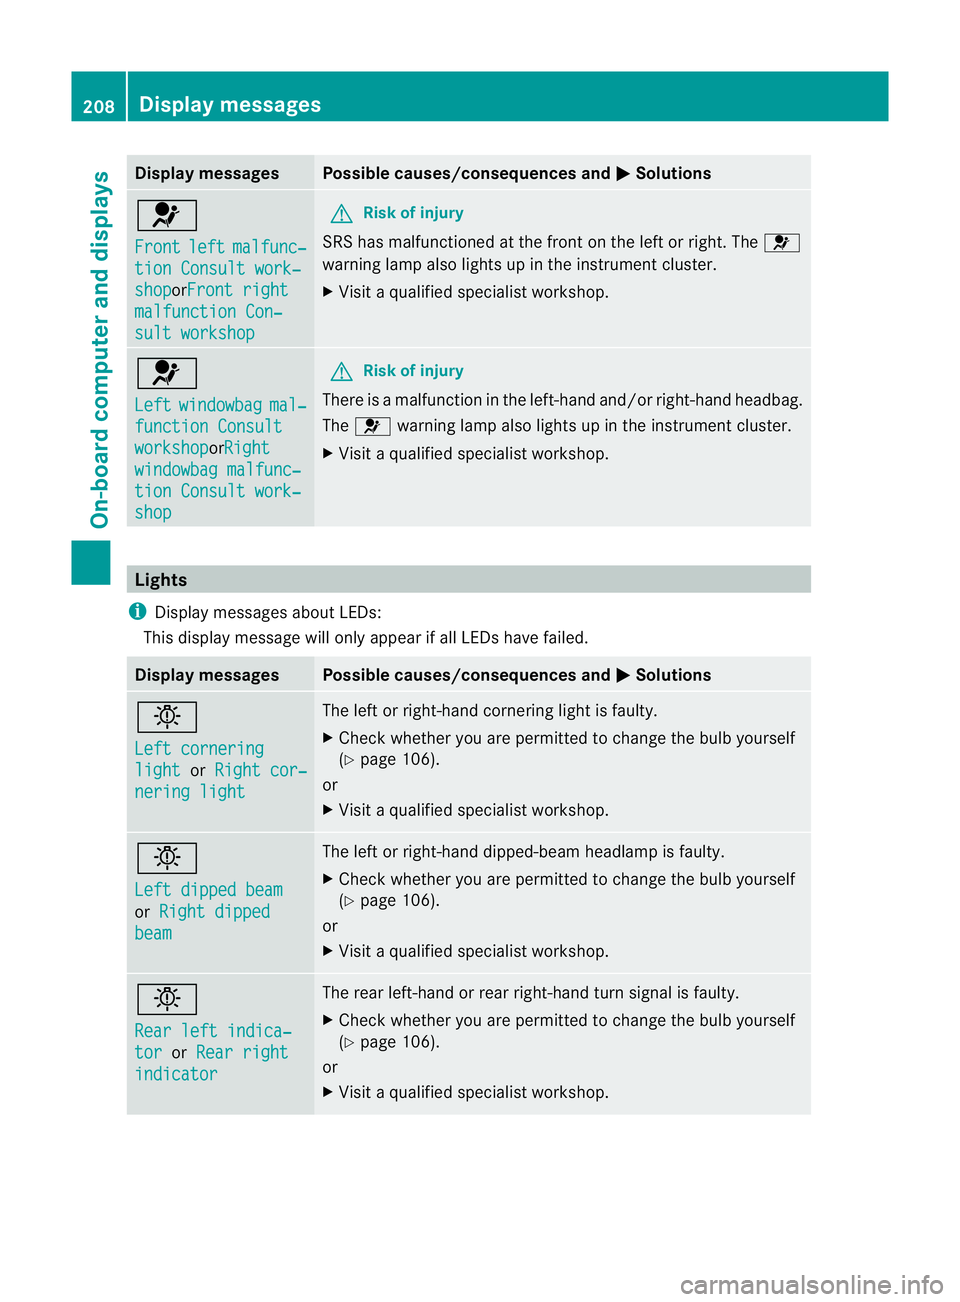
Display messages Possible causes/consequences and
M Solutions
6
Front
left malfunc‐
tion Consult work‐
shop orFront right
malfunction Con‐
sult workshop G
Risk of injury
SRS has malfunctioned at the front on the left or right. The 6
warning lamp also lights up in the instrumen tcluster.
X Visit a qualified specialist workshop. 6
Left
windowbag mal‐
function Consult
workshop orRight
windowbag malfunc‐
tion Consult work‐
shop G
Risk of injury
There is a malfunction in the left-hand and/or right-hand headbag.
The 6 warning lamp also lights up in the instrumen tcluster.
X Visit a qualified specialist workshop. Lights
i Display messages about LEDs:
This display message will only appear if all LEDs have failed. Displa
ymessages Possible causes/consequences and
M Solutions
b
Left cornering
light or
Right cor‐ nering light The left or right-hand cornering light is faulty.
X
Chec kwhether you are permitted to change the bulb yourself
(Y page 106).
or
X Visit a qualified specialist workshop. b
Left dipped beam
or
Right dipped beam The left or right-hand dipped-beamh
eadlamp is faulty.
X Check whether you are permitted to change the bulb yourself
(Y page 106).
or
X Visit a qualified specialist workshop. b
Rear left indica‐
tor or
Rear right indicator The rear left-hand or rear right-hand turn signal is faulty.
X
Check whether you are permitted to change the bulb yourself
(Y page 106).
or
X Visit a qualified specialist workshop. 208
Display messagesOn-board computer and displays
Page 243 of 321
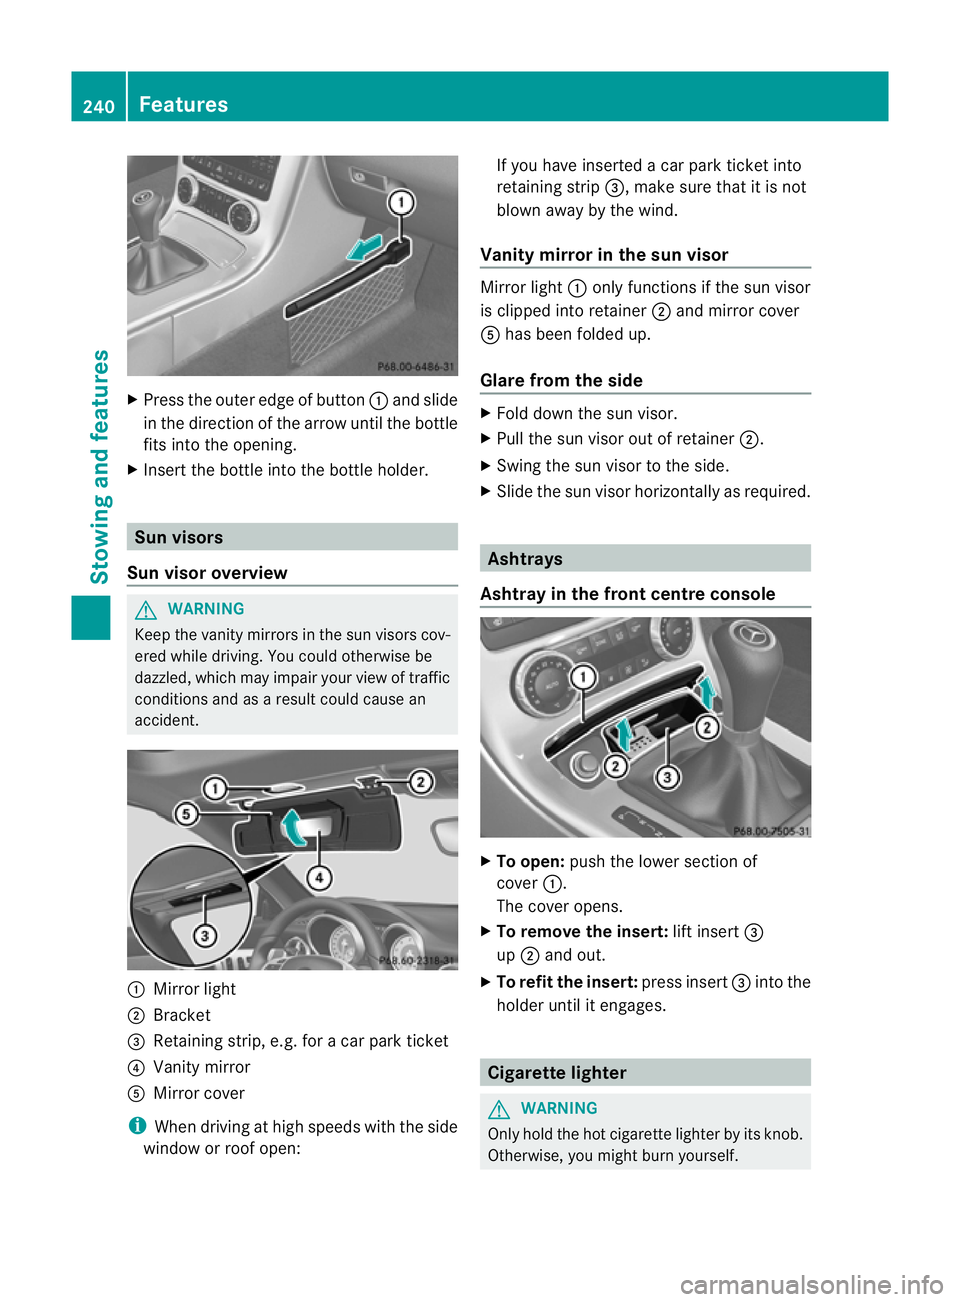
X
Press the outer edge of button :and slide
in the direction of the arrow until the bottle
fits into the opening.
X Inser tthe bottle into the bottle holder. Sun visors
Sun visor overview G
WARNING
Keep the vanity mirrors in the sun visors cov-
ered while driving. You could otherwise be
dazzled, which may impair your view of traffic
conditions and as a result could cause an
accident. :
Mirror light
; Bracket
= Retaining strip, e.g. for a car park ticket
? Vanity mirror
A Mirror cover
i When driving at high speeds with the side
window or roof open: If you have inserted a car park ticket into
retaining strip
=, make sure that it is not
blown away by the wind.
Vanity mirror in the sun visor Mirror light
:only functions if the sun visor
is clipped into retainer ;and mirror cover
A has been folded up.
Glare from the side X
Fold down the sun visor.
X Pull the sun visor out of retainer ;.
X Swing the sun visor to the side.
X Slide the sun visor horizontally as required. Ashtrays
Ashtray in the front centre console X
To open: push the lower section of
cover :.
The cover opens.
X To remove the insert: lift insert=
up ; and out.
X To refit the insert: press insert=into the
holder until it engages. Cigarette lighter
G
WARNING
Only hold the hot cigarette lighter by its knob.
Otherwise, you might burn yourself. 240
FeaturesStowing and features