2012 MERCEDES-BENZ SLK ROADSTER window
[x] Cancel search: windowPage 82 of 321
!
Never sit on the rear shelf or store heavy
objects there. You will otherwise damage
the roof and the rear shelf of your vehicle.
! Do not forget that the weather can
change abruptly. Make certain that the roof
is closed when you leave the vehicle. The
vehicle electronics can be damaged if
water enters the vehicle interior.
! When opening and closing the roof, make
sure that:
R there is sufficient upward clearance, as
the roof swings upwards.
R there is sufficient clearance behind the
vehicle, as the boot lid swings backwards
beyond the bumper.
R the boot is only loaded to below the boot
separator.
R the boot separator is not pushed up by
the load.
R the boot separator is closed.
R the boot lid is closed.
R the outside temperature is above
−15 †.
You could otherwise damage the roof, boot
and other parts of the vehicle.
i Make sure that the roof and rear window
are dry and clean before opening the roof.
Otherwise, water or dirt could enter the
vehicle interior or boot. Opening and closing using the roof
switch
Important safety notes G
WARNING
When opening or closing the roof, make sure
that nobody is trapped or injured by moving
parts such as the boot lid, the hinged roof or
the roof linkage.
If there is a risk of entrapment, release the
roof switch immediately.T he roof folding
mechanism stops immediately. Opening and closing
X
Close the boot separator (Y page 81).
X Close the boot lid.
X Turn the key to position 2in the ignition
lock.
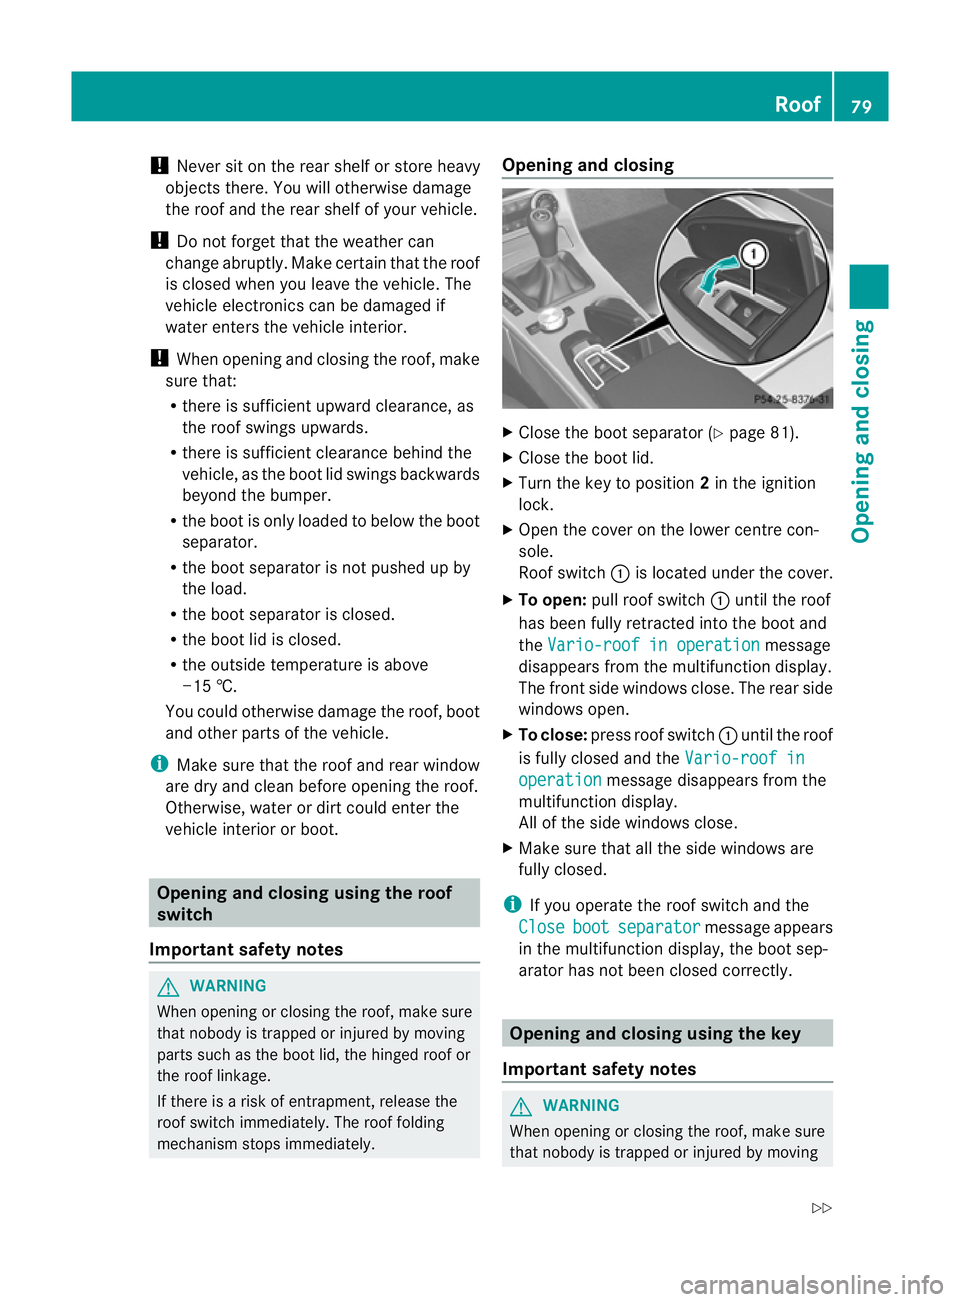
X Open the cover on the lower centre con-
sole.
Roof switch :is located under the cover.
X To open: pull roof switch :until the roof
has been fully retracted into the boot and
the Vario-roof in operation message
disappears from the multifunction display.
The front side windows close. The rear side
windows open.
X To close: press roof switch :until the roof
is fully closed and the Vario-roof in operation message disappears from the
multifunction display.
All of the side windows close.
X Make sure that all the side windows are
fully closed.
i If you operate the roof switch and the
Close boot separator message appears
in the multifunction display, the boot sep-
arator has not been closed correctly. Opening and closing using the key
Important safety notes G
WARNING
When opening or closing the roof, make sure
that nobody is trapped or injured by moving Roof
79Opening and closing
Z
Page 83 of 321
parts such as the boot lid, the hinged roof or
the roof linkage.
If there is a risk of entrapment, immediately
release the %or& button on the key.
The roof folding mechanism stops immedi-
ately.
Opening and closing i
The key must be close to the driver's door
handle.
X Close the boot separator (Y page 81).
X Close the boot lid.
X Point the tip of the key at the driver's door
handle.
X To open: press and hold the %button
on the key until the roof is fully opened.
The roof and the rear side windows open.
The fron tside windows close.
X To interrupt the opening procedure:
release the %button.
X To open the front side windows: press
and hold the %button on the key again.
X To close: press and hold the &button
on the key until the roof is fully closed.
The roof and the side windows close.
X To interrupt the closing procedure:
release the &button.
i The key cannot be used to open the roof
if the roof is closed and the boot separator
is open .Instead, all of the side windows
open or close simultaneously (Y page 76).
Additionally, the Close boot separator message appears in the multifunctio
ndis-
play. Locking the roof again
The roof is not locked if:
R the K symbol and Vario-roof in operation message appear in the multi-
function display
R the K symbol and Open/close vario-
roof completely message appear and
you hear a warning tone
R you hear a warning tone for up to ten sec-
onds when pulling away or while driving.
You can lock the roof again if it is not locked
fully.
X Stop the vehicle immediately, paying atten-
tion to road and traffic conditions.
X Make sure that the key is in position 2in
the ignition lock.
X Press the roof switch (Y page 79). Boot separator
General notes The boot separator can be used to cover lug-
gage and loads in the boot.
!
To avoid damaging the roof or luggage
when folding back the roof, you should:
R only load the boot to below the boot sep-
arator
R not place any objects on or in front of the
boot separator
R not place any objects on the cover
behind the roll bars
R not allow the load to push up the boot
separator 80
RoofOpening and closing
Page 94 of 321
temperature sensitivity or a limited ability to
react to excessively high temperatures may
be affected or the ymay even suffer burn-like
injuries .Therefore, do not use seat heating
level 3repeatedly.
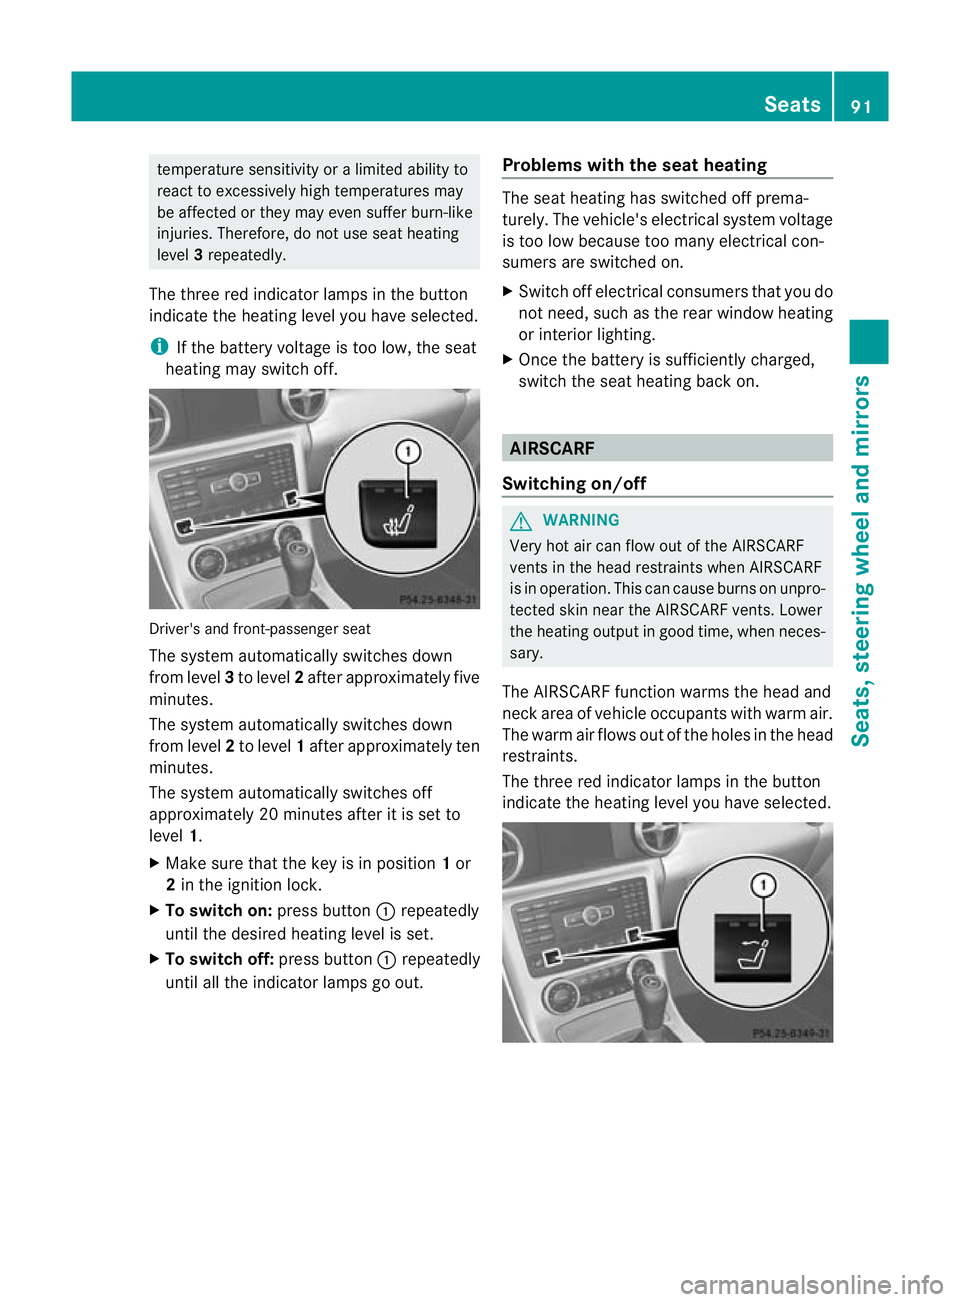
The three red indicator lamps in the button
indicate the heating level you have selected.
i If the battery voltage is too low, the seat
heating may switch off. Driver's and front-passenger seat
The system automatically switches down
from level
3to level 2after approximately five
minutes.
The system automatically switches down
from level 2to level 1after approximately ten
minutes.
The system automatically switches off
approximately 20 minutes after it is set to
level 1.
X Make sure that the key is in position 1or
2 in the ignition lock.
X To switch on: press button:repeatedly
until the desired heating level is set.
X To switch off: press button:repeatedly
until all the indicator lamps go out. Problems with the seat heating The seat heating has switched off prema-
turely. The vehicle's electrical system voltage
is too low because too many electrical con-
sumers are switched on.
X
Switch off electrical consumers that you do
not need, such as the rear window heating
or interior lighting.
X Once the battery is sufficiently charged,
switch the seat heating back on. AIRSCARF
Switching on/off G
WARNING
Very hot air can flow out of the AIRSCARF
vents in the head restraints when AIRSCARF
is in operation. This can cause burns on unpro-
tected skin near the AIRSCARF vents. Lower
the heating output in good time, when neces-
sary.
The AIRSCARF function warms the head and
neck area of vehicle occupants with warm air.
The warm air flows out of the holes in the head
restraints.
The three red indicator lamps in the button
indicate the heating level you have selected. Seats
91Seats, steering wheel and mirrors Z
Page 95 of 321
X
Make sure that the key is in position 2in
the ignition lock.
X To activate: press button :.
Three red indicator lamps in the button light
up. The blower starts up after a preheating
phase of seven seconds.
X Press button :repeatedly until the
desired heating level is set.
X To switch off: press button:repeatedly
until all the indicator lamps go out.
i The blower continues running for seven
seconds to cool down the heating ele-
ments.
i If the battery voltage is too low, AIRSCARF
may switch off.
Problems with AIRSCARF AIRSCARF has switched off prematurely or
will not switch on. The vehicle's electrical sys-
tem voltage is too low because too many
electrical consumers are switched on.
X Switch off electrical consumers which you
do not need, such as the rear window heat-
ing or interior lighting.
X Switch on AIRSCARF again. Steering wheel
Important safety notes
G
WARNING
The electrically adjustable steering wheel can
still be adjusted when there is no key in the
ignition lock. Therefore, do not leave children
unsupervised in the vehicle, as they could
become trapped if the steering wheel is adjus-
ted. G
WARNING
Only adjust the steering wheel when the vehi-
cle is stationary and do not pull away until the
steering wheel adjustment mechanism is
locked in position. You might otherwise drive
without the steering wheel adjustment mech- anism being locked in position. As a result,
you could be distracted from road and traffic
conditions by an unintentional movement of
the steering wheel and thereby cause an acci-
dent.
However, the steerability of the vehicle is not
affected.
Adjusting the steering wheel man-
ually
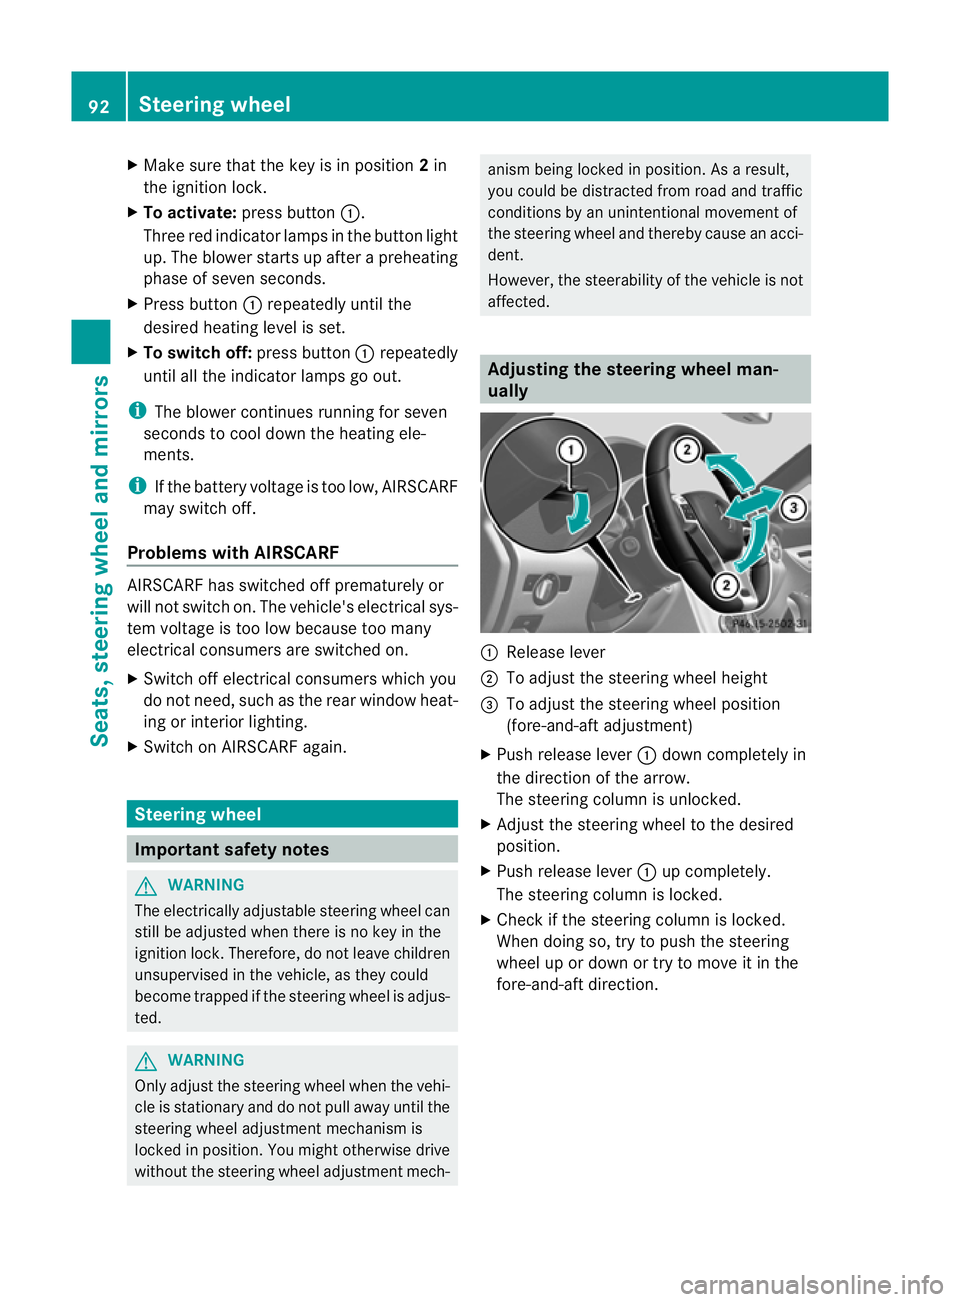
:
Release lever
; To adjust the steering wheel height
= To adjust the steering wheel position
(fore-and-aft adjustment)
X Push release lever :down completely in
the direction of the arrow.
The steering column is unlocked.
X Adjust the steering wheel to the desired
position.
X Push release lever :up completely.
The steering column is locked.
X Check if the steering column is locked.
When doing so, try to push the steering
wheel up or down or try to move it in the
fore-and-aft direction. 92
Steering wheelSeats, steering wheel and mirrors
Page 97 of 321
it easier to exit the vehicle and rescue the
occupants.
The crash-responsive EASY-EXIT feature is
only operational after an accident if the EASY-
EXIT/ENTRY feature is activated in the on-
board computer. Mirrors
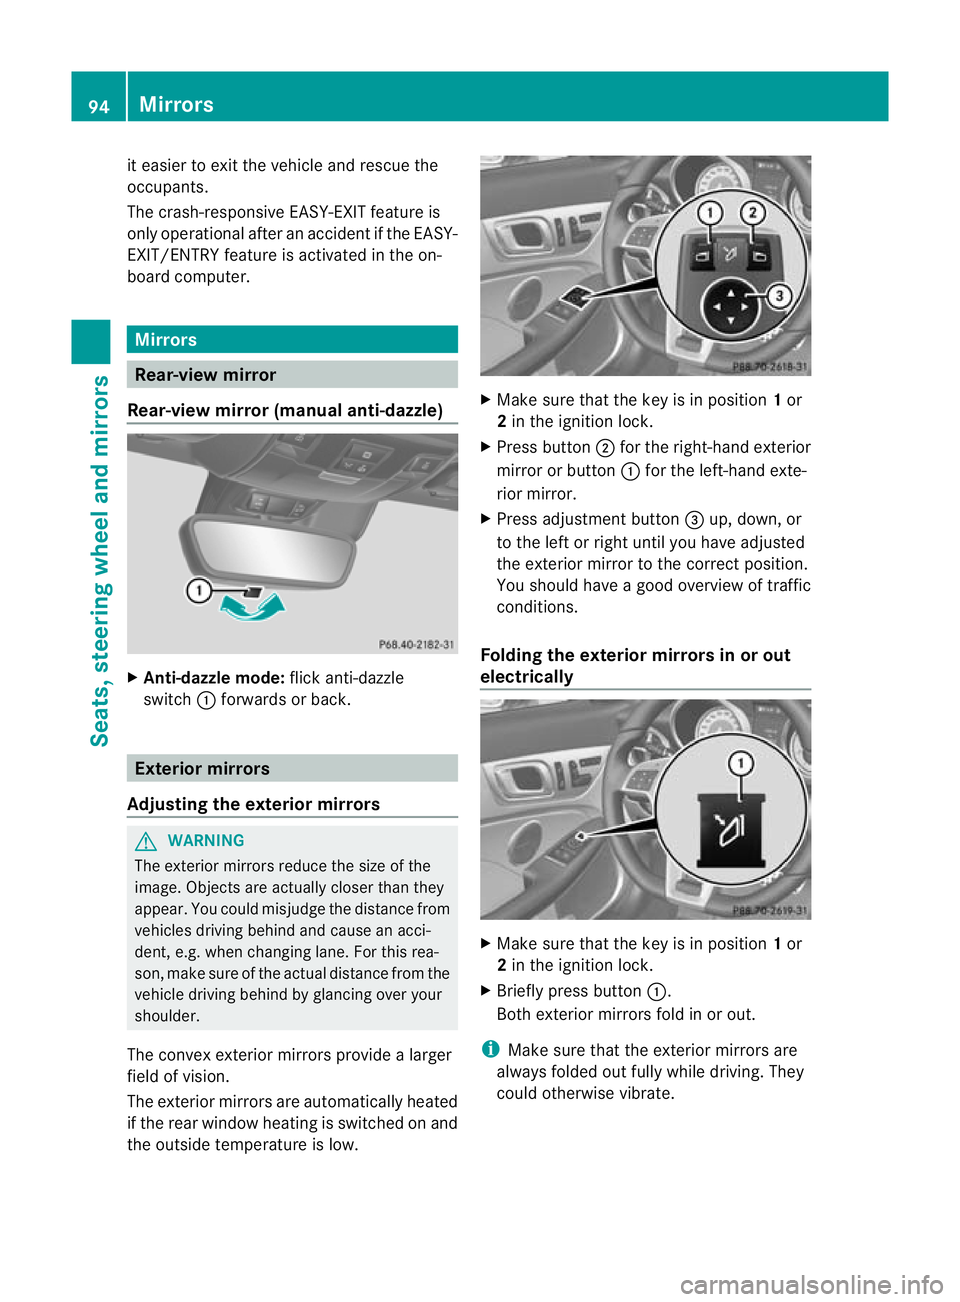
Rear-view mirror
Rear-view mirror (manual anti-dazzle) X
Anti-dazzle mode: flick anti-dazzle
switch :forwards or back. Exterior mirrors
Adjusting the exterior mirrors G
WARNING
The exterior mirrors reduce the size of the
image. Objects are actually closer than they
appear. You could misjudge the distance from
vehicles driving behind and cause an acci-
dent, e.g. when changing lane. For this rea-
son, make sure of the actual distance fro mthe
vehicle driving behind by glancing over your
shoulder.
The convex exterior mirrors provide a larger
field of vision.
The exterior mirrors are automatically heated
if the rear window heating is switched on and
the outside temperature is low. X
Make sure that the key is in position 1or
2 in the ignition lock.
X Press button ;for the right-hand exterior
mirror or button :for the left-hand exte-
rior mirror.
X Press adjustment button =up, down, or
to the left or right until you have adjusted
the exterior mirror to the correct position.
You should have a good overview of traffic
conditions.
Folding the exterior mirrors in or out
electrically X
Make sure that the key is in position 1or
2 in the ignition lock.
X Briefly press button :.
Both exterior mirrors fold in or out.
i Make sure that the exterior mirrors are
always folded out fully while driving. They
could otherwise vibrate. 94
MirrorsSeats, steering wheel and mirrors
Page 117 of 321
Useful information
i This Owner's Manual describes all models
and all standard and optional equipment
available to your vehicle at the time of pub-
lication of the Owner's Manual. Country-
specific deviations are possible. Please
note that your vehicle may not be equipped
with all features described. This also
applies to safety-relevan tsystems and
functions.
i Please read the information on qualified
specialist workshops (Y page 22).Overview of climate control systems
Important safety notes
G
WARNING
Observe the settings recommended on the
following pages. Otherwise, th ewindows
could mist up. This may obstruct your view of
the traffic situation and, as a result, you may
cause an accident.
The air-conditioning system/
THERMOTRONIC automatic climate control
controls the temperature and the humidity of
the vehicle interior and filters undesirable
substances fro mthe air.
The air-conditioning system/
THERMOTRONIC automatic climate control is
only operational when the engine is run-
ning. 8
The function only works optimally when
the side windows and the roof are closed.
i Ventilate the vehicle for a brief period
during warm weather. This will speed up the
cooling process and the desired vehicle
interior temperature will be reached more
quickly.
i The integrated filter can filter out most
particles of dust and completely filters out
pollen. Aclogged filter reduces the amount
of air supplied to the vehicle interior .For this reason, you should always observe the
interval for replacing the filter, which is
specified in the Service Booklet
.As it
depends on environmental conditions, e.g.
heavy air pollution, the interval may be
shorter than stated in the Service Booklet.
8 The residual heat function can only be activated/deactivated when the ignition is switched off. 114
Overview of climate control systemsClimate control
Page 118 of 321
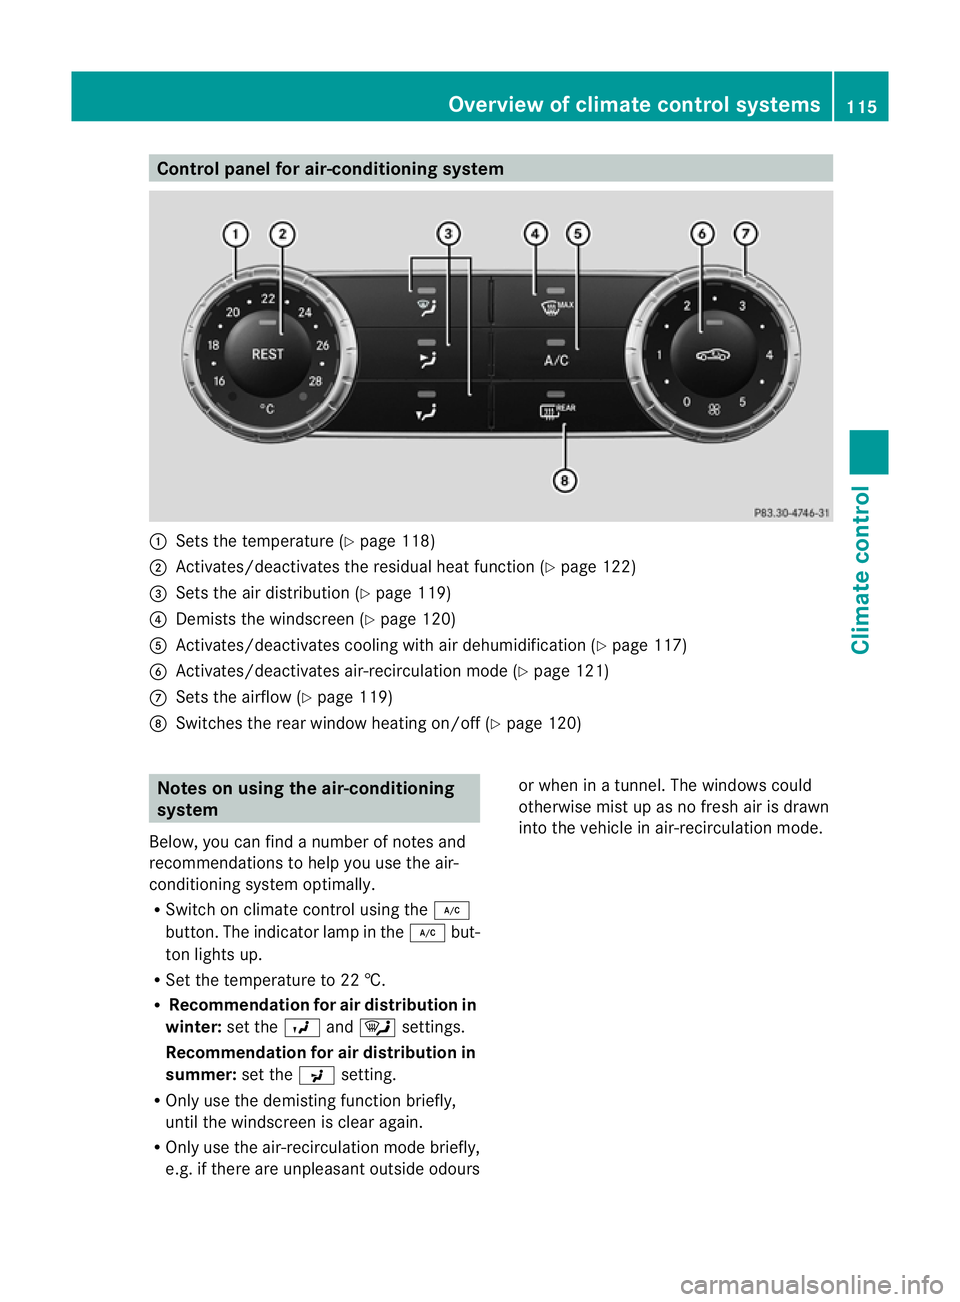
Control panel for air-conditioning system
:
Sets the temperature (Y page 118)
; Activates/deactivates the residual heat function (Y page 122)
= Sets the air distribution (Y page 119)
? Demists the windscreen (Y page 120)
A Activates/deactivates coolin gwith air dehumidification ( Ypage 117)
B Activates/deactivates air-recirculation mode (Y page 121)
C Sets the airflow (Y page 119)
D Switches the rear window heating on/off (Y page 120)Notes on using the air-conditioning
system
Below, you can find a number of notes and
recommendations to help you use the air-
conditioning system optimally.
R Switch on climate control using the ¿
button. The indicator lamp in the ¿but-
ton lights up.
R Set the temperature to 22 †.
R Recommendation for air distribution in
winter: set theOand¯ settings.
Recommendation for air distribution in
summer: set thePsetting.
R Only use the demisting function briefly,
until the windscreen is clear again.
R Only use the air-recirculation mode briefly,
e.g. if there are unpleasan toutside odours or when in a tunnel. The windows could
otherwise mis
tup as no fresh air is drawn
into the vehicle in air-recirculation mode. Overview of climate control systems
115Climate control Z
Page 119 of 321
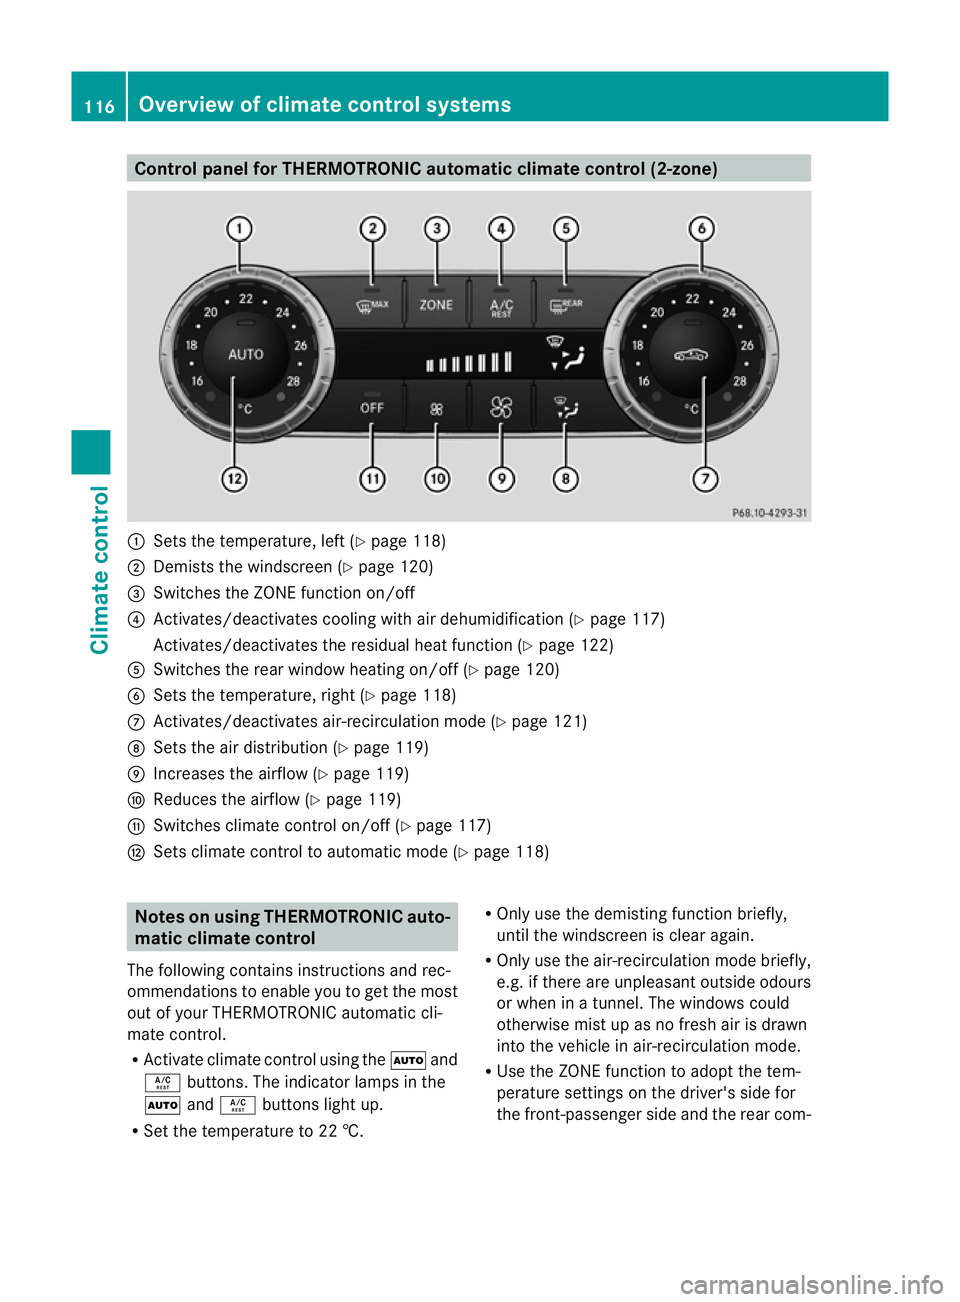
Control panel for THERMOTRONIC automatic climate control (2-zone)
:
Sets the temperature, left (Y page 118)
; Demists the windscreen (Y page 120)
= Switches the ZONE function on/off
? Activates/deactivates coolin gwith air dehumidification ( Ypage 117)
Activates/deactivates the residual heat function (Y page 122)
A Switches the rear window heating on/off (Y page 120)
B Sets the temperature, right (Y page 118)
C Activates/deactivates air-recirculation mode (Y page 121)
D Sets the air distribution (Y page 119)
E Increases the airflow (Y page 119)
F Reduces the airflow ( Ypage 119)
G Switches climate control on/off (Y page 117)
H Sets climate control to automatic mode (Y page 118)Notes on using THERMOTRONIC auto-
matic climate control
The following contains instructions and rec-
ommendations to enable you to get the most
out of your THERMOTRONIC automatic cli-
mate control.
R Activate climate control using the Ãand
Á buttons .The indicator lamps in the
à andÁ buttons light up.
R Set the temperature to 22 †. R
Only use the demisting function briefly,
until the windscreen is clear again.
R Only use the air-recirculation mode briefly,
e.g. if there are unpleasant outside odours
or when in a tunnel. The windows could
otherwise mist up as no fresh air is drawn
into the vehicle in air-recirculation mode.
R Use the ZONE function to adopt the tem-
perature settings on the driver's side for
the front-passenger side and the rear com- 116
Overview of climate control systemsClimate control