2012 MERCEDES-BENZ SLK ROADSTER ESP
[x] Cancel search: ESPPage 270 of 321
and the wheel to be replaced may differ. Fit-
ting a spare wheel/emergency spare wheel
may severely impair the driving characteris-
tics. There is a risk of accident.
To prevent hazardous situations:
R Adap tyour driving style accordingly and
drive carefully.
R Never fit more than one spare wheel/emer-
gency spare wheel if the dimesions are dif-
ferent to those of the wheel being replaced.
R Only use a spare wheel/emergency spare
wheel briefly if the dimesions are different
to those of the wheel being replaced.
R Do not switch off ESP ®
.
R Have the spare wheel/emergency spare
wheel in question replaced at the nearest
qualified specialist workshop. Make sure
that the wheel/tyre dimensions and tyre
type are correct.
i Vehicles without an emergency spare
wheel/spare wheel are not equipped with
wheel-changing tools at the factory. For
more information on which tools are
required to perform a wheel change on your
vehicle, e.g. wheel chock, wheel wrench or
centring pin, consult a Mercedes-Benz
Service Centre.
X Prepare the vehicle as described
(Y page 263).
X Remove the following items (depending on
the vehicle's equipment) from the stowage
well under the boot floor:
R the emergency spare wheel
R the wheel wrench
R the folding wheel chock
R the jack
R the centring pin
R the tyre inflation compressor
X Secure the vehicle to prevent it from rolling
away. Securing the vehicle to prevent it from
rolling away If your vehicle is equipped with a wheel chock,
it can be found in the vehicle tool kit
(Y
page 261).
The folding wheel chock is an additional
securing measure to prevent the vehicle from
rolling away, for example when changing a
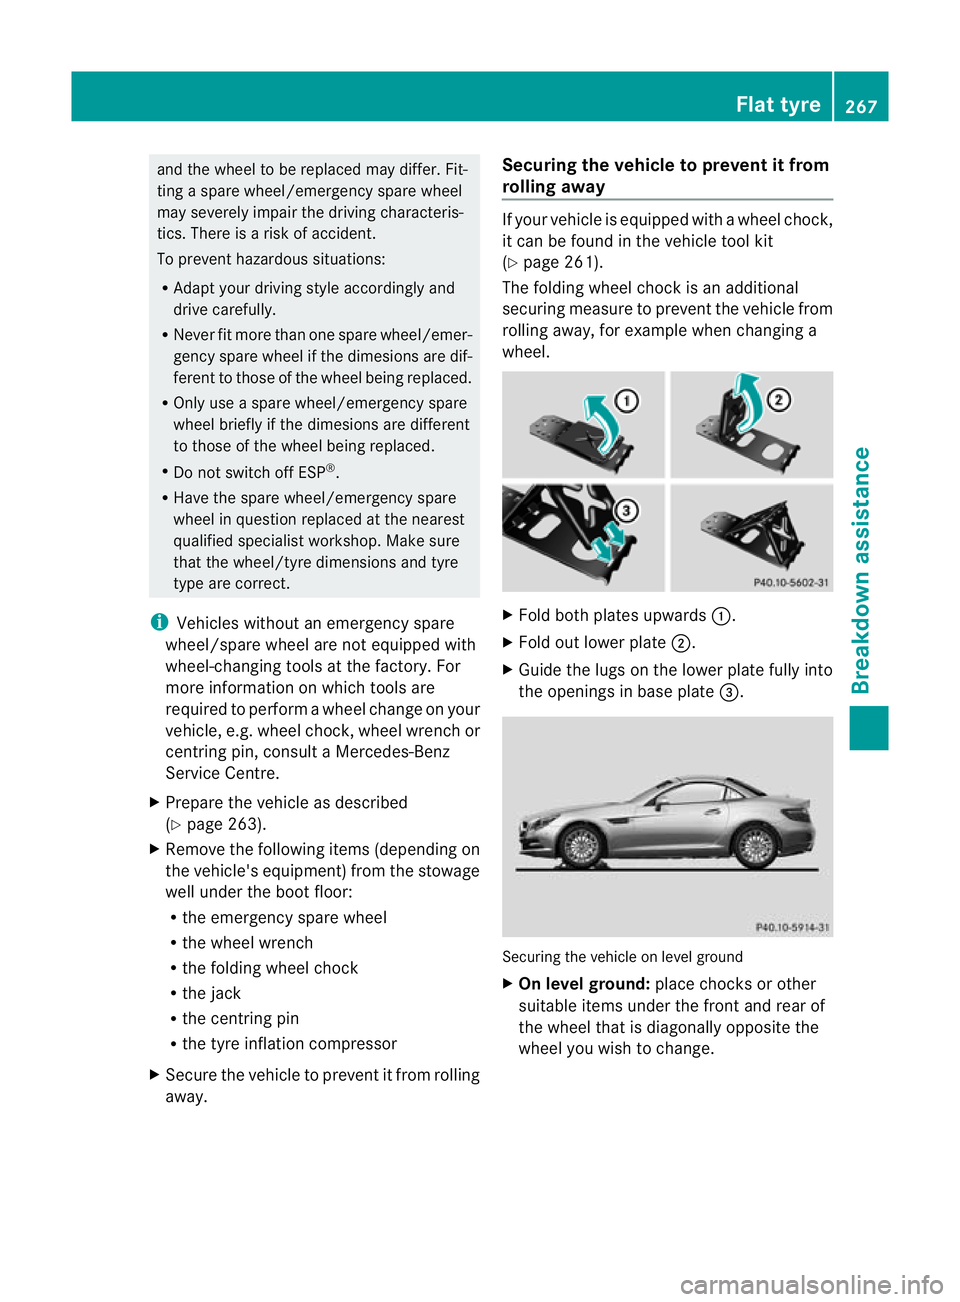
wheel. X
Fold both plates upwards :.
X Fold out lower plate ;.
X Guide the lugs on the lower plate fully into
the openings in base plate =. Securing the vehicle on level ground
X
On level ground: place chocks or other
suitable items under the front and rear of
the wheel that is diagonally opposite the
wheel you wish to change. Flat tyre
267Breakdown assistance Z
Page 273 of 321
Fitting
anew wheel G
WARNING
Oiled or greased wheel bolts or damaged
wheel bolts/hub threads can cause the wheel
bolts to come loose .As a result, you could
lose a wheel while driving. There is a risk of
accident.
Never oil or grease wheel bolts. In the event
of damage to the threads, contact a qualified
specialist workshop immediately.H ave the
damaged wheel bolts or hub threads
replaced/renewed. Do no tcontinue driving. G
WARNING
If you tighten the wheel bolts or wheel nuts
when the vehicle is raised, the jack could tip
over. There is a risk of injury.
Only tighten the wheel bolts or wheel nuts
when the vehicle is on the ground.
Always pay attention to the instructions and
safety notices in "Changing a wheel"
(Y page 294).
Only use wheel bolts that have been designed
for the wheel and the vehicle. For safety rea-
sons, Mercedes-Benz recommends that you
only use wheel bolts which have been
approved for Mercedes-Benz vehicles and the
respective wheel.
Be sure to use the original-length wheel bolts
when refitting the original wheel after it has
been repaired.
X Clean the wheel and wheel hub contact
surfaces. X
Slide the emergency spare wheel onto the
centring pin and push it on.
X Tighten the wheel bolts until they are fin-
ger-tight.
X Unscrew the centring pin.
X Tighten the last wheel bolt until it is finger-
tight.
X Inflate the collapsible emergency spare
wheel (Y page 270).
Inflating the collapsible emergency
spare wheel !
Inflate the collapsible emergency spare
wheel using the tyre inflation compressor
before lowering the vehicle. The wheel rim
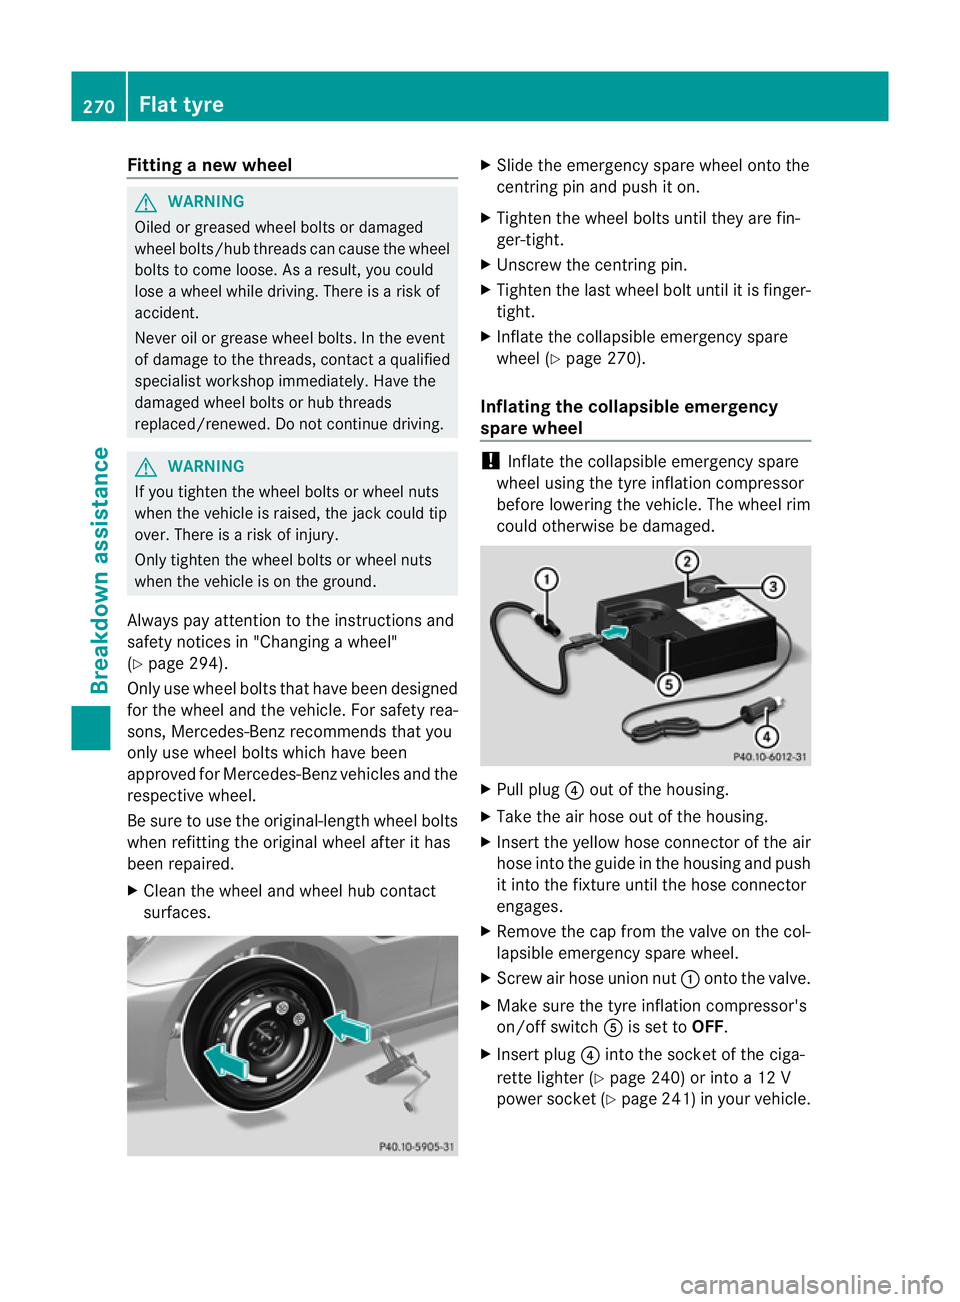
could otherwise be damaged. X
Pull plug ?out of the housing.
X Take the air hose out of the housing.
X Insert the yellow hose connector of the air
hose into the guide in the housing and push
it into the fixture until the hose connector
engages.
X Remove the cap from the valve on the col-
lapsible emergency spare wheel.
X Screw air hose union nut :onto the valve.
X Make sure the tyre inflation compressor's
on/off switch Ais set to OFF.
X Insert plug ?into the socket of the ciga-
rette lighter (Y page 240) or into a 12 V
power socket (Y page 241) in your vehicle.270
Flat tyreBreakdown assistance
Page 276 of 321
R
ESP ®
is intervening constantly.
R there are tears in the sidewalls of the tyre.
After driving in emergency mode, have the
wheel rims checked at a qualified specialist
workshop with regard to their furthe ruse. The
faulty tyre must be replaced.
i When replacing one or all tyres, make
sure that you only use tyres marked
MOExtended. Also ensure that they are of
the specified size for the vehicle.
i Vehicles with MOExtended tyres are not
equipped with a TIREFIT kit at the factory.
It is therefore recommended that you addi-
tionally equip your vehicle with a TIREFIT kit
if you fit tyres that do not feature run-flat
characteristics, e.g. winter tyres. A TIREFIT
kit can be obtained from a qualified spe-
cialist workshop. Battery
Important safety notes
In order for the battery to achieve the maxi-
mum possible service life, it must always be
sufficiently charged.
Have the battery charge checked more fre-
quently if you use the vehicle mainly for short
trips or if you leave it standing idle for a
lengthy period.
Only replace a battery with a battery that has
been recommended by Mercedes-Benz.
Consult a qualified specialist workshop if you
wish to leave your vehicle parked up for a long
period of time. G
WARNING
Comply with safety precautions and take pro-
tective measures when handling batteries. Risk of explosion
Fire, naked flames and
smoking are prohibited
when handling the battery.
Avoid creating sparks.
Battery acid is caustic.
Avoid contact with the skin,
eyes or clothing.
Wear suitable protective
clothing, in particular
gloves, an apron and a face
mask.
Immediately rinse acid
splashes off with clean
water. Consult a doctor if
necessary.
Wear eye protection.
Keep children away.
Observe this Owner's Man-
ual.
H
Environmental note Batteries contain pollutants.
It is illegal to dispose of them
with the household rubbish.
They must be collected sep-
arately and disposed of in an
environmentally responsible
recycling system.
Dispose of batteries in an
environmentally responsible
manner. Take discharged
batteries to a qualified spe-
cialist workshop or to a col-
lection point for used batter-
ies. Battery
273Breakdown assistance Z
Page 283 of 321
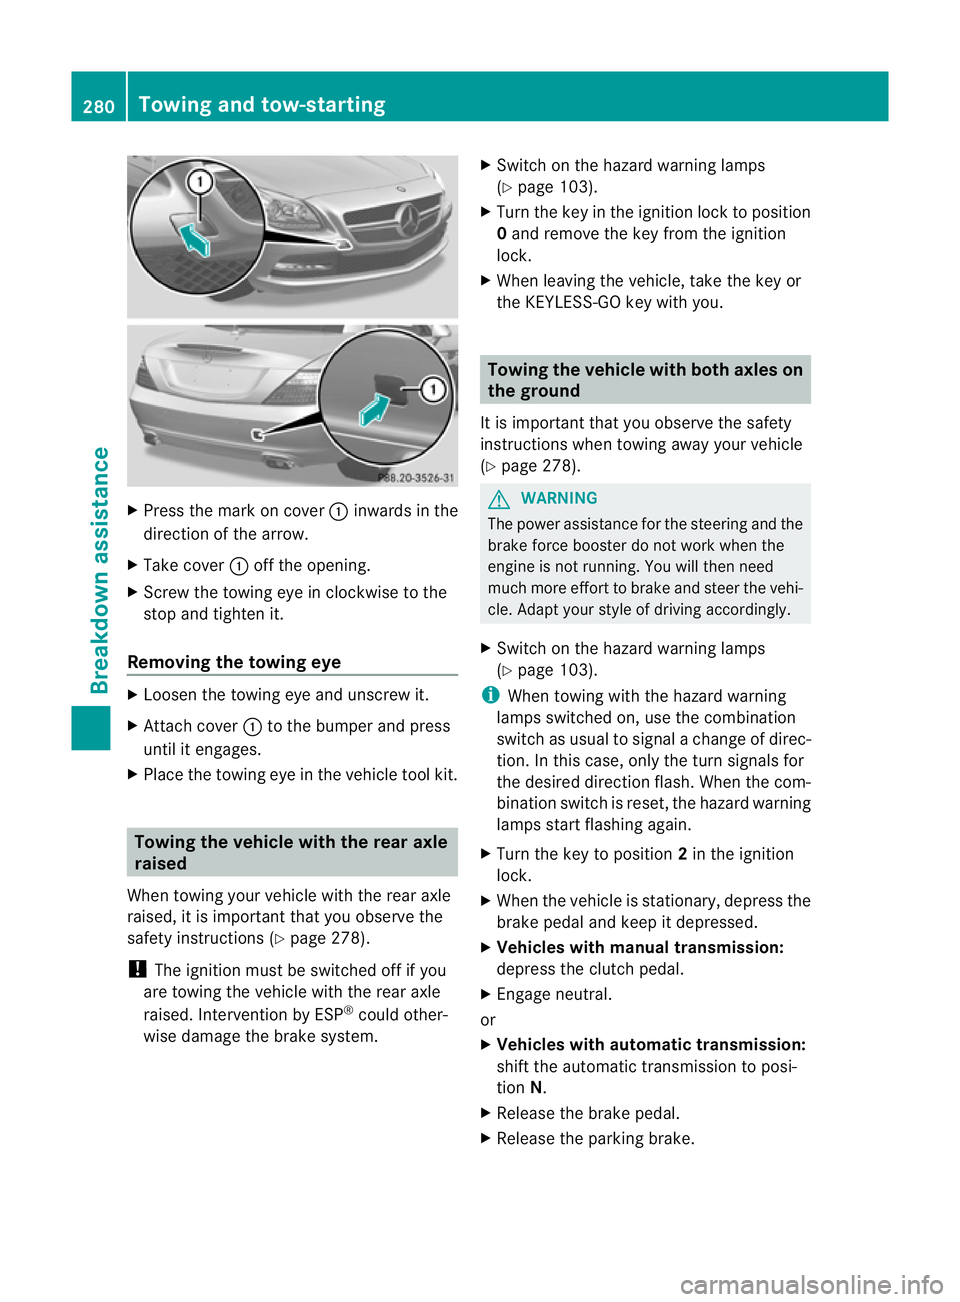
X
Press the mark on cover :inwards in the
direction of the arrow.
X Take cover :off the opening.
X Screw the towing eye in clockwise to the
stop and tighten it.
Removing the towing eye X
Loosen the towing eye and unscrew it.
X Attach cover :to the bumper and press
until it engages.
X Place the towing eye in the vehicle tool kit. Towing the vehicle with the rear axle
raised
When towing your vehicle with the rear axle
raised, it is importan tthat you observe the
safety instructions (Y page 278).
! The ignition must be switched off if you
are towing the vehicle with the rear axle
raised. Intervention by ESP ®
could other-
wise damage the brake system. X
Switch on the hazard warning lamps
(Y page 103).
X Turn the key in the ignition lock to position
0and remove the key from the ignition
lock.
X When leaving the vehicle, take the key or
the KEYLESS-GO key with you. Towing the vehicle with both axles on
the ground
It is important that you observe the safety
instructions when towing away your vehicle
(Y page 278). G
WARNING
The power assistance for the steering and the
brake force booster do not work when the
engine is not running. You will then need
much more effort to brake and steer the vehi-
cle. Adapt your style of driving accordingly.
X Switch on the hazard warning lamps
(Y page 103).
i When towing with the hazard warning
lamps switched on, use the combination
switch as usual to signal achange of direc-
tion. In this case, only the turn signals for
the desired direction flash. When the com-
bination switch is reset, the hazard warning
lamps start flashing again.
X Turn the key to position 2in the ignition
lock.
X When the vehicle is stationary, depress the
brake pedal and keep it depressed.
X Vehicles with manual transmission:
depress the clutch pedal.
X Engage neutral.
or
X Vehicles with automatic transmission:
shift the automatic transmission to posi-
tion N.
X Release the brake pedal.
X Release the parking brake. 280
Towing and tow-startingBreakdown assistance
Page 284 of 321
Transporting the vehicle
The towing eye can be used to pull the vehicle
onto a trailer or transporter for transporting
purposes.
X Vehicles with manual transmission:
shift to neutral.
X Vehicles with automatic transmission:
tur nthe key to position 2in the ignition
lock.
X Move the selector lever to N.
As soon as the vehicle is loaded:
X Prevent the vehicle from rolling away by
applying the parking brake.
X Vehicles with manual transmission:
shift to first gear or reverse gear.
X Vehicles with automatic transmission:
move the selector lever to P.
X Turn the key in the ignition lock to position
0 and remove the key from the ignition
lock.
X Secure the vehicle.
! Only lash the vehicle down by the wheels
or wheel rims, not by parts of the vehicle
such as axle or steering components. Oth-
erwise, the vehicle could be damaged. Tow-starting (emergency engine
starting)
When tow-starting, it is important that you
observe the safety instructions (Y page 278)
and the legal requirements in each respective
country.
! Vehicles with automatic transmission
must not be tow-started. The transmission
may otherwise be damaged.
You can find information on "Jump-starting"
at (Y page 277). Before tow-starting the following conditions
must be fulfilled:
R
the battery is connected.
R the engine has cooled down.
R the catalytic converters have cooled down.
X Switch on the hazard warning lamps
(Y page 103).
X Fit the towing eye (Y page 279).
X Secure the rigid towing bar or the towing
rope.
X Depress and hold the brake pedal.
X Turn the key to position 2in the ignition
lock.
X Depress the clutch pedal and keep it
depressed.
X Engage neutral.
X Release the brake pedal.
X Tow-start the vehicle.
X Engage second gear.
X Release the clutch pedal slowly;d o not
depress the accelerator pedal while doing
so.
The engine is started.
X Depress the clutch pedal and shift to neu-
tral.
X Stop at a suitable place.
X Depress the parking brake.
X Remove the rigid towing bar or towing rope.
X Remove the towing eye (Y page 280).
X Switch off the hazard warning lamps. Electrical fuses
Important safety notes
G
WARNING
Only use fuses that have been approved for
Mercedes-Benz vehicles and which have the
correct fuse rating for the systems con-
cerned. Do not attempt to repair or bridge
faulty fuses. Using fuses which have not been
approved or attempting to repair or bridge
faulty fuses could cause the fuse to be over- Electrical fuses
281Breakdown assistance
Z
Page 291 of 321
The service life of tyres depends on various
factors, including the following:
R
driving style
R tyre pressure
R mileage MOExtended tyres (tyres with run-flat
characteristics)
MOExtended tyres (tyres with run-flat char-
acteristics) allow you to continue driving the
vehicle even if one or more tyres lose all air
pressure.
MOExtended tyres may only be used in con-
junction with an activated tyre pressure loss
warning system or with an activated tyre pres-
sure monitor and on wheels specifically tes-
ted by Mercedes-Benz.
i Vehicles with MOExtended tyres are not
equipped with a TIREFIT kit at the factory.
It is therefore recommended that you addi-
tionally equip your vehicle with the TIREFIT
kit if you fit tyres that do not feature run-
flat characteristics, e.g. winter tyres. A
TIREFIT kit can be obtained from a qualified
specialist workshop.
Notes on driving with MOExtended tyres in
the event of a flat tyre can be found in the
"Breakdown assistance" section
(Y page 272). Winter operation
Points to remember
Have your vehicle winterproofed at a qualified
specialist workshop at the onset of winter.
Observe the notes in the "Changing a wheel"
section (Y page 294). Driving with summer tyres
At temperatures below +7 †, summer tyres
lose elasticity and therefore traction and
braking power; change the tyres on your vehi- cle to M+S tyres. Using summer tyres at very
cold temperatures could cause tears to form,
thereby damaging the tyres permanently.
Mercedes-Benz cannot accept responsibility
for this type of damage.
M+S tyres
At temperatures below +7 †, use winter tyres
or all-season tyres. Both types of tyre are
identified by the M+S marking.
Only winter tyres bearing the isnowflake
symbol in addition to the M+S marking pro-
vide the best possible grip in wintry road con-
ditions. Only these tyres will allow driving
safety systems such as ABS and ESP ®
to
function optimally in winter. These tyres have
been developed specifically for driving in
snow.
Use M+S tyres of the same make and tread
on all wheels to maintain safe handling char-
acteristics. G
WARNING
M+S tyres with a tyre tread depth of less than
4mma re not suitable for use in winter as they
do not provide sufficient traction. There is a
risk of accident.
M+S tyres with a tread depth of less than
4 mm must be replaced.
Always observe the maximu mpermissible
speed specified for the M+S tyres you have
fitted.
If you fit M+S tyres that have a lower maxi-
mum permissible speed than that of the vehi-
cle, affix an appropriate warning sign in the
driver's field of vision. This can be obtained in
a qualified specialist workshop.
Under these circumstances, you should also
restrict the maximum speed of the vehicle
using permanent SPEEDTRONIC so that it
does not exceed the maximum permissible
speed for the M+S tyres (Y page 156).288
Winter operationWheels and tyres
Page 292 of 321
When you have fitted M+S tyres:
X
Check the tyre pressures (Y page 289).
X Restart the tyre pressure loss warning sys-
tem (Y page 291).
After fitting a spare wheel or an emergency
spare wheel, do not drive faster than
80 km/h. G
WARNING
The wheel/tyre dimensions and the tyre type
of the spare wheel/emergency spare wheel
and the wheel to be replaced may differ. Fit-
ting a spare wheel/emergency spare wheel
may severely impair the driving characteris-
tics. There is a risk of accident.
To preven thazardous situations:
R Adap tyour driving style accordingly and
drive carefully.
R Never fit more than one spare wheel/emer-
gency spare wheel if the dimesions are dif-
ferent to those of the wheel being replaced.
R Only use a spare wheel/emergency spare
wheel briefly if the dimesions are different
to those of the wheel being replaced.
R Do not switch off ESP ®
.
R Have the spare wheel/emergency spare
wheel in question replaced at the nearest
qualified specialist workshop. Make sure
that the wheel/tyre dimensions and tyre
type are correct. Snow chains
For safety reasons, Mercedes-Benz recom-
mends that you only use snow chains that
have been specially approved for your vehicle
by Mercedes-Benz, or that are of a corre-
sponding standard of quality. If you intend to fit snow chains, please bear
the following points in mind:
R
snow chains cannot be fitted to all wheel-
tyre combinations. Permissible wheel-tyre
combinations (Y page 295).
R snow chains must not be fitted to the emer-
gency spare wheel, e.g. a collapsible emer-
gency spare wheel.
R fit snow chains only in pairs and only to the
rear wheels. Observe the manufacturer's
installation instructions.
! Vehicles with steel wheels: if you wish
to fit snow chains to steel wheels, make
sure that you remove the respective
wheels' hubcaps first. The hubcaps may
otherwise be damaged.
Do not exceed the maximum permissible
speed of 50 km/h.
i You may wish to deactivate
ESP ®
(Y page 56) when pulling away with
snow chains fitted. This way you can allow
the wheels to spin in a controlled manner,
achieving an increased driving force (cut-
ting action). Tyre pressure
Tyre pressure specifications
G
WARNING
Tyres with too low or too high tyre pressure
contain the following hazards:
R they can burst, in particular if the vehicle is
heavily laden or when driven at high
speeds.
R the tyres can wear excessively and/or
unevenly, which can severely impair tyre
traction.
R the driving, steering and braking character-
istics may be severely impaired.
There is a risk of accident. Tyre pressure
289Wheels and tyres
Z
Page 294 of 321
warm tyres and only correct it if it is too low
for the current operating conditions.
Driving with tyre pressure that is too high or
too low can:
R shorten the service life of the tyres
R cause increased tyre damage
R have a negative effect on handling charac-
teristics and thus the driving safety (e.g .by
causing aquaplaning)
i The tyre pressure values given for low
loads are minimum values which offe ryou
good ride comfor tcharacteristics.
However, you can also use the values given
for higher loads. These are permissible and
will not adversely affect the running of the
vehicle. H
Environmental note
Check the tyre pressure regularly, at least
every 14 days.
For speeds up to 210 km/h the values given
on the tyre pressure information label (fuel
filler flap) may be reduced by 30 kPa (0.3 bar,
4p si) without a reduction in safety.
This improves the ride comfort of your vehi-
cle; however, the fuel consumption may
increase slightly. Tyre pressure loss warning system
Important safety notes While the vehicle is in motion, the tyre pres-
sure loss warning system monitors the set
tyre pressure using the rotational speed of
the wheels. This enables the system to detect
significant pressure loss in a tyre. If the speed
of rotation of a wheel changes as a result of
a loss of pressure, a corresponding warning
message will appearint he multifunction dis-
play.
The tyre pressure warning system does not
warn you of an incorrectly set tyre pressure.
Observe the notes on the recommended tyre
pressure (Y page 289). The tyre pressure loss warning system does
not replace the need to regularly check your
vehicle's tyre pressures, since an even loss of
pressure on several tyres at the same time
cannot be detected by the tyre pressure loss
warning system.
The tyre pressure monitor is not able to warn
you of a sudden loss of pressure, e.g. if the
tyre is penetrated by a foreign object. In the
event of a sudden loss of pressure, bring the
vehicle to a halt by braking carefully. Avoid
abrupt steering manoeuvres.
The function of the tyre pressure loss warning
system is limited or delayed if:
R
snow chains are fitted to your vehicle's
tyres.
R road conditions are wintry.
R you are driving on sand or gravel.
R you adopt a very sporty driving style (cor-
nering at high speeds or driving with high
rates of acceleration).
R you are driving with a heavy load (in the
vehicle or on the roof).
Restarting the tyre pressure loss warn-
ing system Restart the tyre pressure loss warning system
if you have:
R
changed the tyre pressure
R changed the wheels or tyres
R fitted new wheels or tyres
X Before restarting, consult the table of tyre
pressures on the inside of the fuel filler flap
to ensure that the tyre pressure in all four
tyres is set correctly for the respective
operating conditions.
The tyre pressure loss warning system can
only give reliable warnings if you have set
the correct tyre pressure. If an incorrect
tyre pressure is set, these incorrectv alues
will be monitored.
X Observe the notes in the section on tyre
pressures ( Ypage 289). Tyre pressure
291Wheels and tyres Z