2012 MERCEDES-BENZ SLK-CLASS ROADSTER turn signal
[x] Cancel search: turn signalPage 109 of 336
XPress the R button.
The yellow R indicator lamp in the
instrument cluster lights up.XTo switch off the rear fog lamp: press the
R button.
The yellow R indicator lamp in the
instrument cluster goes out.
i If you switch the engine off (SmartKey in
position 1 in the ignition lock) and then
restart it, the previous rear fog lamp
settings are restored.
Headlamp cleaning system
If the "Wipe with washer fluid" function is
operated five times ( Y page 113) while the
lights are on and the engine is running, the
headlamps are cleaned automatically. When
you switch off the ignition, the automatic
headlamp cleaning system is reset and
counting is resumed from 0.
Combination switch
Turn signals
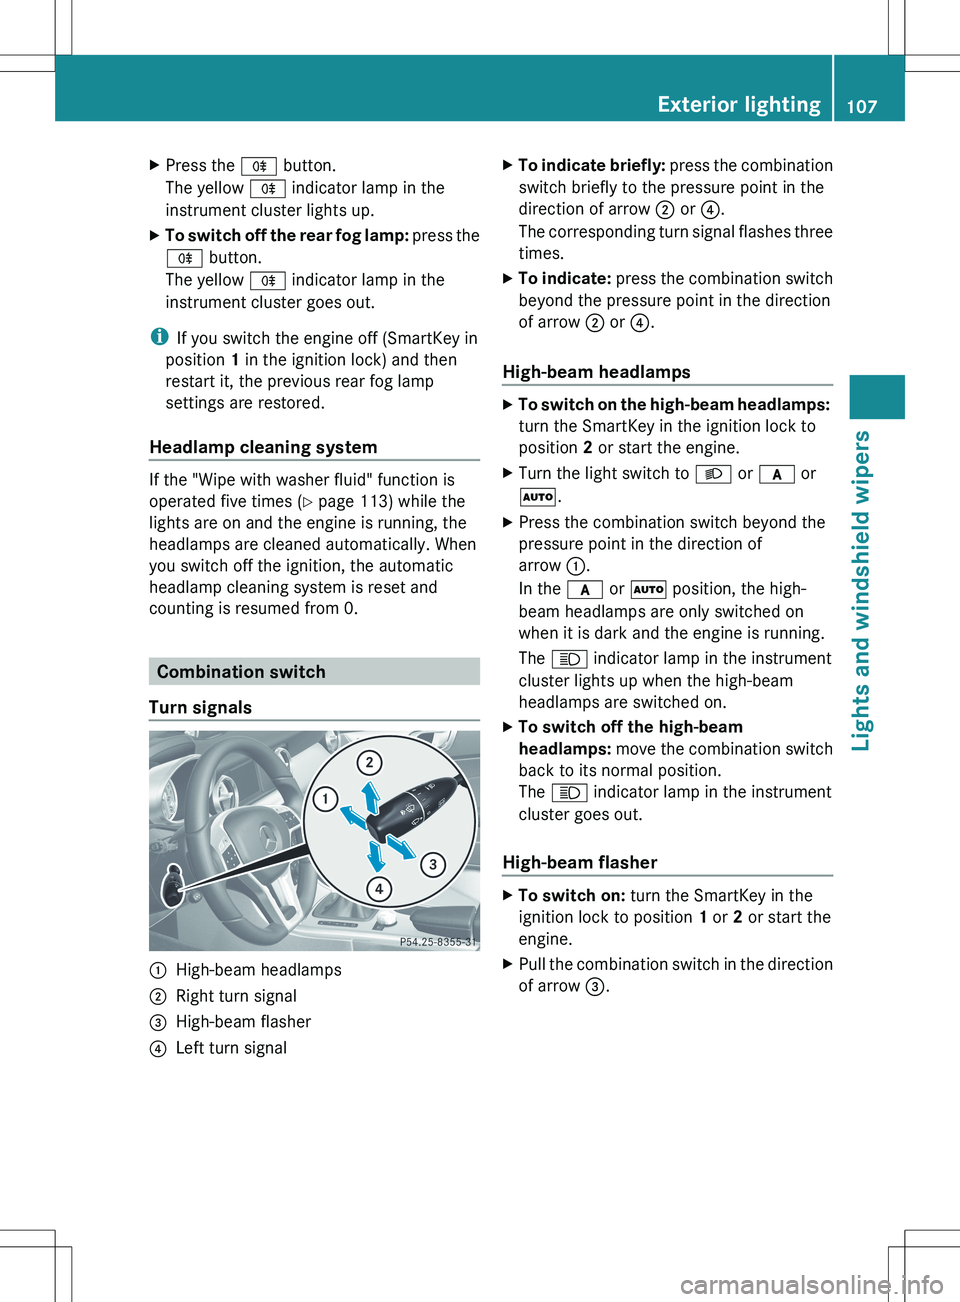
:High-beam headlamps;Right turn signal=High-beam flasher?Left turn signalXTo indicate briefly: press the combination
switch briefly to the pressure point in the
direction of arrow ; or ?.
The corresponding turn signal flashes three
times.XTo indicate: press the combination switch
beyond the pressure point in the direction
of arrow ; or ?.
High-beam headlamps
XTo switch on the high-beam headlamps:
turn the SmartKey in the ignition lock to
position 2 or start the engine.XTurn the light switch to L or c or
à .XPress the combination switch beyond the
pressure point in the direction of
arrow :.
In the c or à position, the high-
beam headlamps are only switched on
when it is dark and the engine is running.
The K indicator lamp in the instrument
cluster lights up when the high-beam
headlamps are switched on.XTo switch off the high-beam
headlamps: move the combination switch
back to its normal position.
The K indicator lamp in the instrument
cluster goes out.
High-beam flasher
XTo switch on: turn the SmartKey in the
ignition lock to position 1 or 2 or start the
engine.XPull the combination switch in the direction
of arrow =.Exterior lighting107Lights and windshield wipersZ
Page 110 of 336
Hazard warning lamps
The hazard warning lamps automatically
switch on if:
R an air bag is deployed.
R the vehicle is slowed down rapidly from a
speed of over 45 mph (70 km/h) and
comes to a halt.
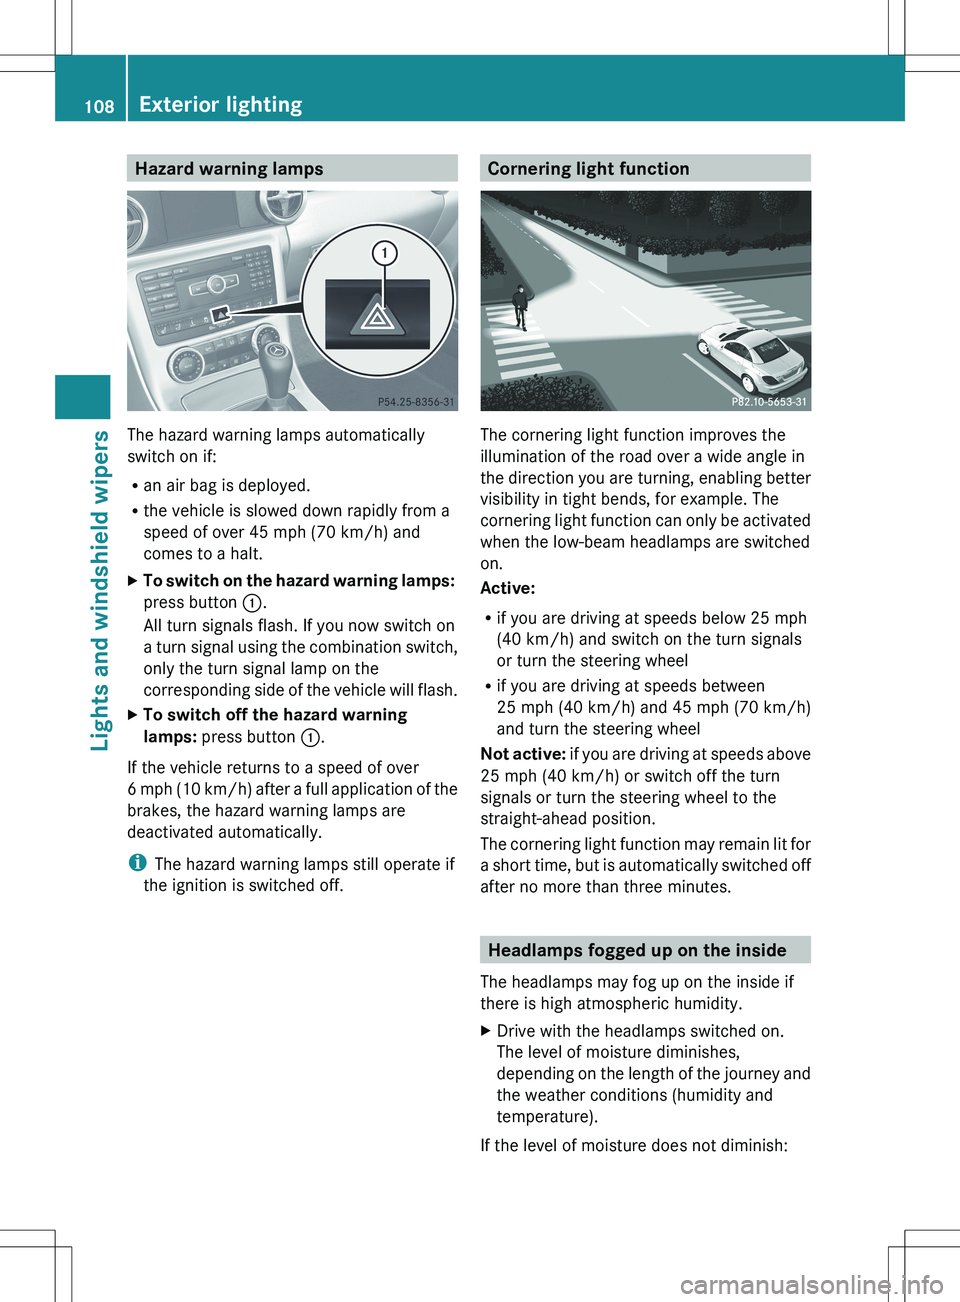
XTo switch on the hazard warning lamps:
press button :.
All turn signals flash. If you now switch on
a turn signal using the combination switch,
only the turn signal lamp on the
corresponding side of the vehicle will flash.XTo switch off the hazard warning
lamps: press button :.
If the vehicle returns to a speed of over
6 mph (10 km/h) after a full application of the
brakes, the hazard warning lamps are
deactivated automatically.
i The hazard warning lamps still operate if
the ignition is switched off.
Cornering light function
The cornering light function improves the
illumination of the road over a wide angle in
the direction you are turning, enabling better
visibility in tight bends, for example. The
cornering light function can only be activated
when the low-beam headlamps are switched
on.
Active:
R if you are driving at speeds below 25 mph
(40 km/h) and switch on the turn signals
or turn the steering wheel
R if you are driving at speeds between
25 mph (40 km/h) and 45 mph (70 km/h)
and turn the steering wheel
Not active: if you are driving at speeds above
25 mph (40 km/h) or switch off the turn
signals or turn the steering wheel to the
straight-ahead position.
The cornering light function may remain lit for
a short time, but is automatically switched off
after no more than three minutes.
Headlamps fogged up on the inside
The headlamps may fog up on the inside if
there is high atmospheric humidity.
XDrive with the headlamps switched on.
The level of moisture diminishes,
depending on the length of the journey and
the weather conditions (humidity and
temperature).
If the level of moisture does not diminish:
108Exterior lightingLights and windshield wipers
Page 112 of 336
If your vehicle is equipped with Xenon bulbs,
you can recognize this by the following: the
cone of light from the Xenon bulbs moves
from the top to the bottom and back again
when you start the engine. For this to be
observed, the lights must be switched on
before starting the engine.
Bulbs and lamps are an important aspect of
vehicle safety. You must therefore make sure
that these function correctly at all times.
Have the headlamp setting checked regularly.
Other bulbs
There are bulbs other than the Xenon bulbs
that you cannot replace. Replace only the
bulbs listed (Y page 110). Have the bulbs that
you cannot replace yourself changed at a
qualified specialist workshop.
If you require assistance changing bulbs,
consult a qualified specialist workshop.
Do not touch the glass tube of new bulbs with
your bare hands. Even minor contamination
can burn into the glass surface and reduce
the service life of the bulbs. Always use a lint-
free cloth or only touch the base of the bulb
when installing.
Only use bulbs of the correct type.
If the new bulb still does not light up, consult
a qualified specialist workshop.
Bulbs and lamps are an important aspect of
vehicle safety. You must therefore make sure
that these function correctly at all times.
Have the headlamp setting checked regularly.
GWARNING
Bulbs and lamps can become very hot. For
this reason, allow them to cool down before
changing them. Otherwise, you could burn
yourself when you touch them.
Keep bulbs out of the reach of children.
Otherwise, they could, for example, damage
the bulbs and injure themselves.
Never use a bulb which has been dropped.
Such a bulb may explode and injure you.
Halogen bulbs are pressurized and could
explode when you change them, especially if
they are very hot. You should therefore wear
eye protection and gloves when you are
changing them.
Overview: changing bulbs/bulb types
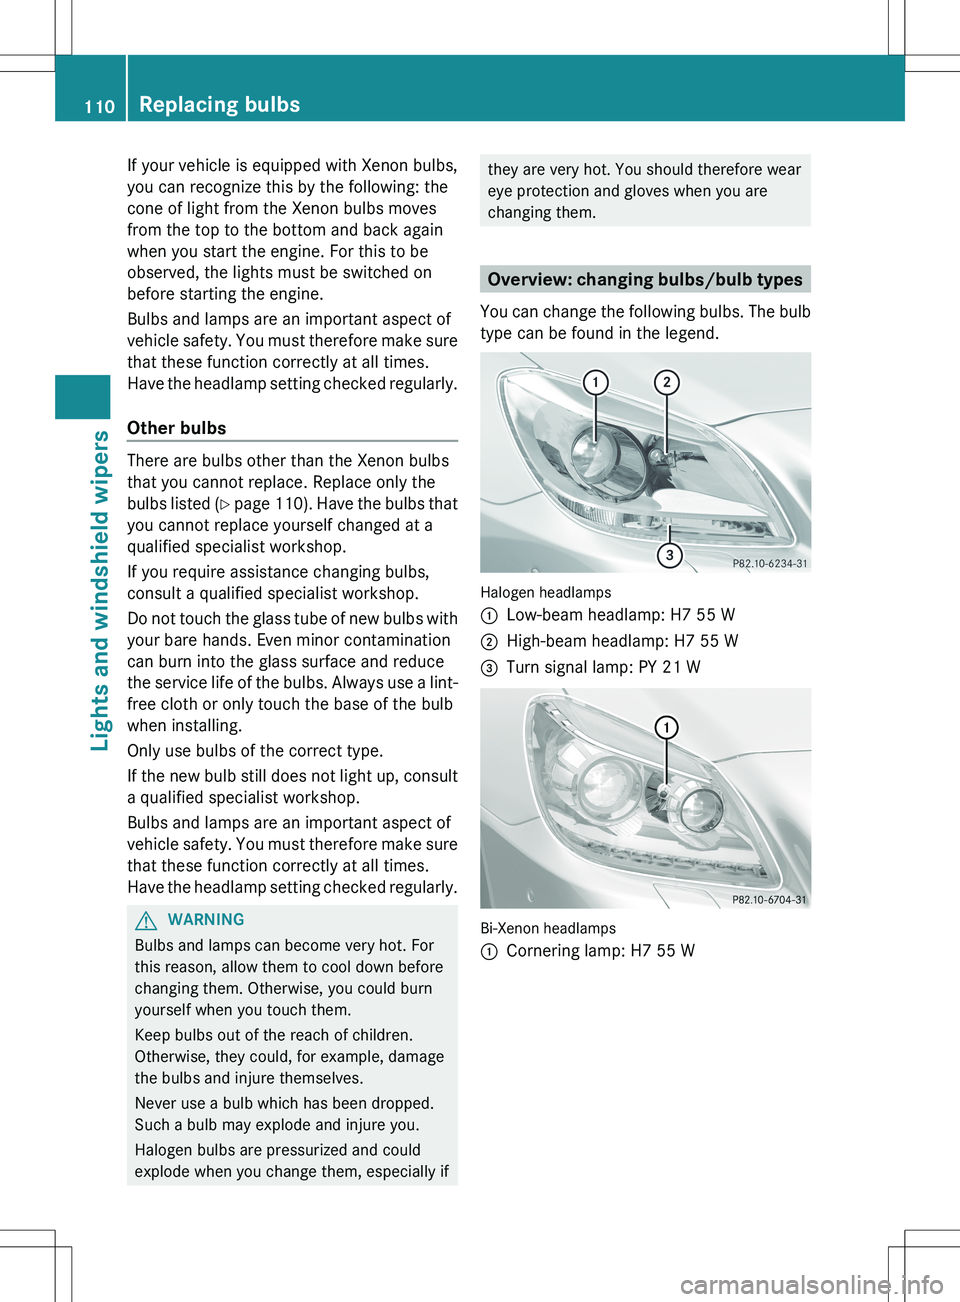
You can change the following bulbs. The bulb
type can be found in the legend.
Halogen headlamps
:Low-beam headlamp: H7 55 W;High-beam headlamp: H7 55 W=Turn signal lamp: PY 21 W
Bi-Xenon headlamps
:Cornering lamp: H7 55 W110Replacing bulbsLights and windshield wipers
Page 114 of 336
XSwitch off the lights.XOpen the hood.XTurn housing cover : counter-clockwise
and pull it out.XPush the bulb upwards by the holder,
disconnect it and pull it out of bulb
holder ;.XInsert the new bulb into bulb holder ;,
push it down and secure it in place.XAttach housing cover : and turn it
clockwise until it engages.
Parking lamps/standing lamps
(halogen headlamps)
Due to their location, have the bulbs in the
side marker lamp changed at a qualified
specialist workshop.
Turn signal lamp (halogen headlamps)
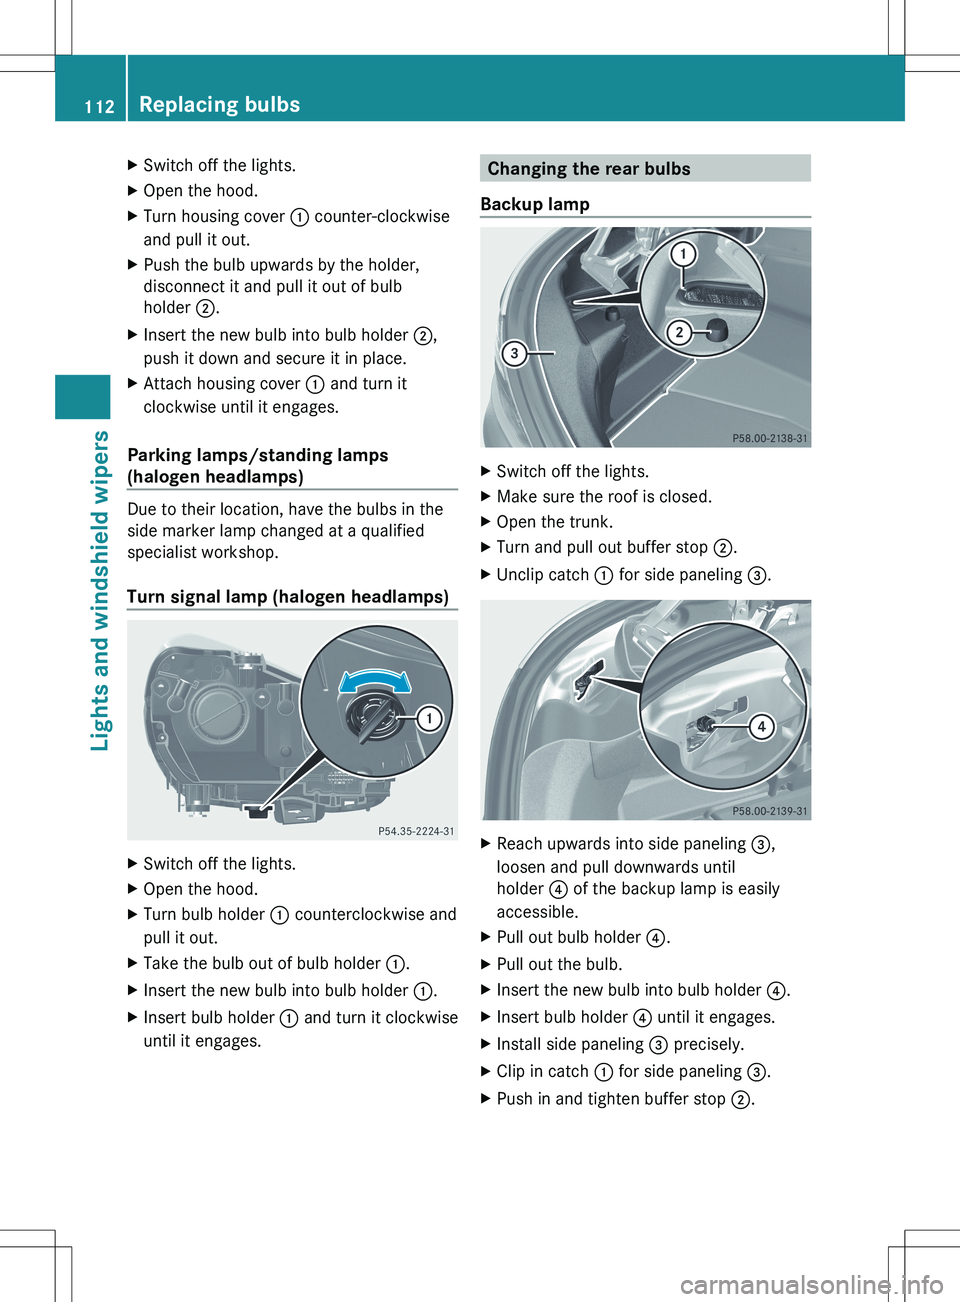
XSwitch off the lights.XOpen the hood.XTurn bulb holder : counterclockwise and
pull it out.XTake the bulb out of bulb holder :.XInsert the new bulb into bulb holder :.XInsert bulb holder : and turn it clockwise
until it engages.Changing the rear bulbs
Backup lampXSwitch off the lights.XMake sure the roof is closed.XOpen the trunk.XTurn and pull out buffer stop ;.XUnclip catch : for side paneling =.XReach upwards into side paneling =,
loosen and pull downwards until
holder ? of the backup lamp is easily
accessible.XPull out bulb holder ?.XPull out the bulb.XInsert the new bulb into bulb holder ?.XInsert bulb holder ? until it engages.XInstall side paneling = precisely.XClip in catch : for side paneling =.XPush in and tighten buffer stop ;.112Replacing bulbsLights and windshield wipers
Page 164 of 336
XPress the cruise control lever repeatedly
up : or down ; until the desired speed
is set.
i You can use the cruise control lever to set
the stored speed and the control on the
cruise control lever to set the specified
minimum distance ( Y page 164).
Pulling away
XIf the vehicle in front pulls away: remove
your foot from the brake pedal.XBriefly pull the cruise control lever towards
you ?.
or
XAccelerate briefly.
Your vehicle pulls away and adapts its
speed to that of the vehicle in front.
Driving
If there is no vehicle in front, DISTRONIC
PLUS operates in the same way as cruise
control.
If DISTRONIC PLUS detects that the vehicle
in front has slowed down, it brakes your
vehicle. In this way, the distance you have
selected is maintained.
If DISTRONIC PLUS detects that the vehicle
in front is driving faster, it accelerates your
vehicle, but only up to the speed you have
stored.
GWARNING
If you depress the brake, DISTRONIC PLUS is
deactivated unless your vehicle is stationary.
DISTRONIC PLUS then no longer brakes your
vehicle. In such cases, control the distance
from vehicles travelling in front with the brake
alone. You could otherwise cause an accident
and thereby injure yourself and others. The
driver remains fully responsible for the
vehicle's distance from other vehicles, the
speed being driven and for braking in good
time.
Changing lanes
If you change to the passing lane, DISTRONIC
PLUS supports you when:
R you are driving faster than 40mph
(60 km/h).
R DISTRONIC PLUS is maintaining the
distance to a vehicle in front.
R you switch on the appropriate turn signal.
R DISTRONIC PLUS does not detect a danger
of collision.
If these conditions are fulfilled, your vehicle
is accelerated. Acceleration will be
interrupted if changing lanes takes too long
or if the distance between your vehicle and
the vehicle in front becomes too small.
i When changing lanes, DISTRONIC PLUS
monitors the left lane on left-hand drive
vehicles and the right lane on right-hand
drive vehicles.GWARNING
DISTRONIC PLUS is only an aid designed to
assist driving.
It is not a substitute for attentive driving. The
driver remains fully responsible for the
vehicle's distance from other vehicles, the
vehicle's speed and for braking in good time.
Always pay attention to traffic conditions and
your surroundings. Otherwise, you may fail to
recognize dangers in time, cause an accident
and injure yourself and others.
Stopping
GWARNING
Never get out of the vehicle when DISTRONIC
PLUS is activated.
DISTRONIC PLUS must also never be
operated, activated or deactivated by a
passenger or from outside the vehicle.
DISTRONIC PLUS does not replace the
electric parking brake and must not be used
for parking.
162Driving systemsDriving and parking
Page 177 of 336
parking spaces on both sides of the vehicle.
When driving at speeds below 19 mph
(30 km/h), you will see parking symbol ; as
a status indicator in the instrument cluster.
When a parking space has been detected, an
arrow towards the right = or the left : also
appears. Parking Guidance only displays
parking spaces on the front-passenger side
as standard. Parking spaces on the driver's
side are displayed as soon as the turn signal
on the driver's side is activated. To park on
the driver's side, you must leave the driver's
side turn signal switched on until you have
engaged reverse gear.
Parking Guidance will only detect parking
spaces:
R that are parallel to the direction of travel
R that are at least 5 ft (1.5 m) wide
R that are at least 4.3 ft (1.3 m) longer than
your vehicle
A parking space is displayed while you are
driving past it, and until you are
approximately 50 ft (15 m) away from it.
ParkingGWARNING
The Parking Guidance is only an aid and may
not detect all obstacles. The Parking
Guidance does not relieve you of the
responsibility to pay attention. You are always
responsible for safety and must continue to
pay attention to your immediate surroundings
when parking and maneuvering. Otherwise,
you could endanger yourself and others.
XStop the vehicle when the parking space
symbol shows the desired parking space in
the instrument cluster.XVehicles with manual transmission: shift to
reverse gear.Vehicles with automatic transmission: shift
into position R.
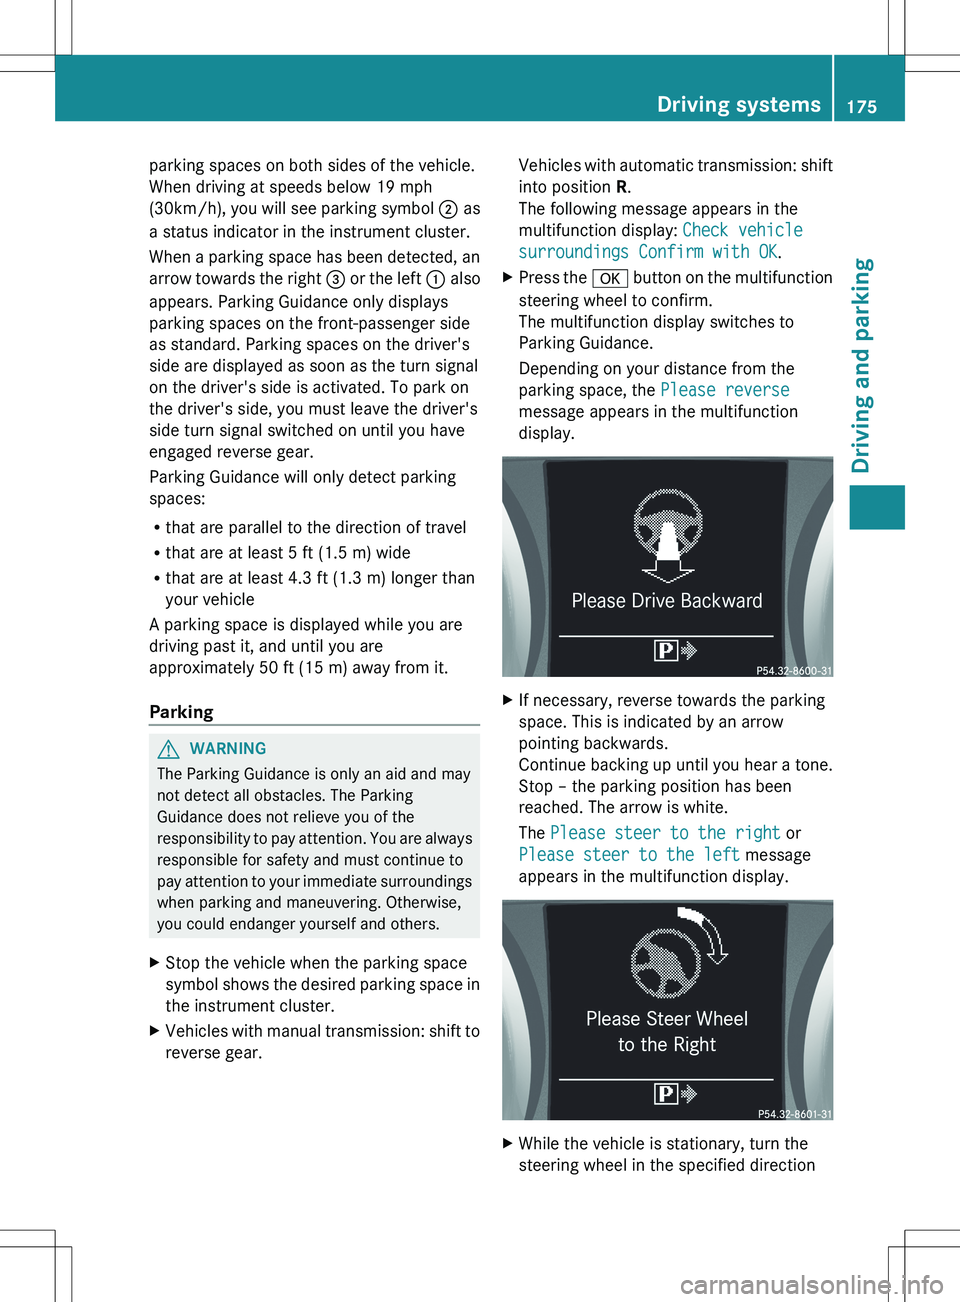
The following message appears in the
multifunction display: Check vehicle
surroundings Confirm with OK .XPress the a button on the multifunction
steering wheel to confirm.
The multifunction display switches to
Parking Guidance.
Depending on your distance from the
parking space, the Please reverse
message appears in the multifunction
display.XIf necessary, reverse towards the parking
space. This is indicated by an arrow
pointing backwards.
Continue backing up until you hear a tone.
Stop – the parking position has been
reached. The arrow is white.
The Please steer to the right or
Please steer to the left message
appears in the multifunction display.XWhile the vehicle is stationary, turn the
steering wheel in the specified directionDriving systems175Driving and parkingZ
Page 215 of 336
Lights
i Display messages about LEDs:
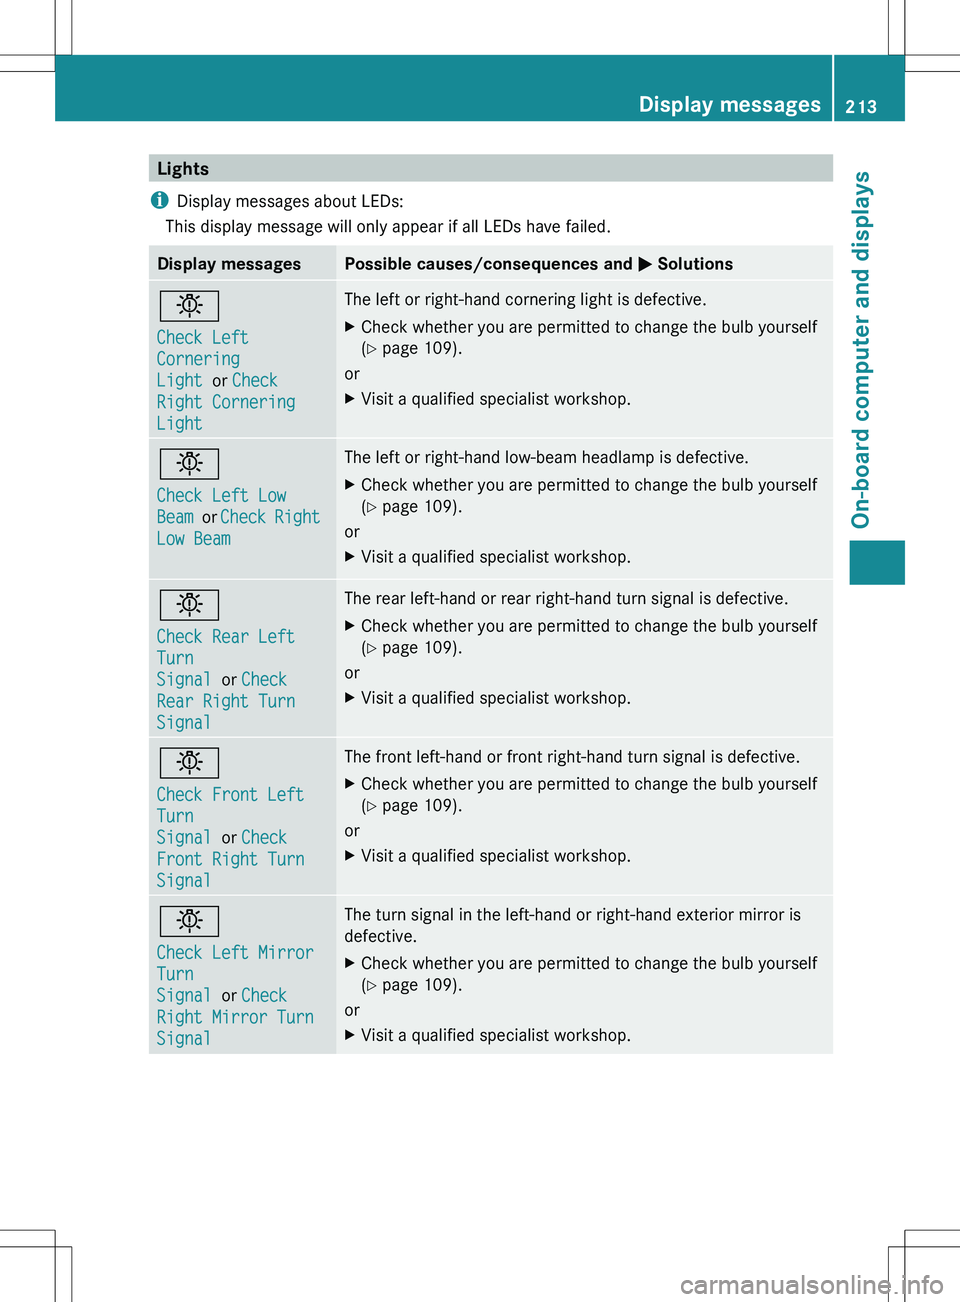
This display message will only appear if all LEDs have failed.Display messagesPossible causes/consequences and M Solutionsb
Check Left
Cornering
Light or Check
Right Cornering
LightThe left or right-hand cornering light is defective.XCheck whether you are permitted to change the bulb yourself
( Y page 109).
or
XVisit a qualified specialist workshop.b
Check Left Low
Beam or Check Right
Low BeamThe left or right-hand low-beam headlamp is defective.XCheck whether you are permitted to change the bulb yourself
( Y page 109).
or
XVisit a qualified specialist workshop.b
Check Rear Left
Turn
Signal or Check
Rear Right Turn
SignalThe rear left-hand or rear right-hand turn signal is defective.XCheck whether you are permitted to change the bulb yourself
( Y page 109).
or
XVisit a qualified specialist workshop.b
Check Front Left
Turn
Signal or Check
Front Right Turn
SignalThe front left-hand or front right-hand turn signal is defective.XCheck whether you are permitted to change the bulb yourself
( Y page 109).
or
XVisit a qualified specialist workshop.b
Check Left Mirror
Turn
Signal or Check
Right Mirror Turn
SignalThe turn signal in the left-hand or right-hand exterior mirror is
defective.XCheck whether you are permitted to change the bulb yourself
( Y page 109).
or
XVisit a qualified specialist workshop.Display messages213On-board computer and displaysZ
Page 257 of 336
before April 1, 1982). A garage door that
cannot detect an object - signaling the door
to stop and reverse - does not meet current
U.S. federal safety standards.
When programming a garage door opener,
park vehicle outside the garage.
Do not run the engine while programming the
integrated remote control. Inhalation of
exhaust gas is hazardous to your health. All
exhaust gas contains carbon monoxide (CO),
and inhaling it can cause unconsciousness
and possible death. All exhaust gas contains
carbon monoxide (CO), and inhaling it can
cause unconsciousness and possible death.
i USA only:
This device complies with Part 15 of the
FCC Rules. Operation is subject to the
following two conditions:
1. This device may not cause harmful
interference, and
2. this device must accept any interference
received, including interference that may
cause undesired operation.
Any unauthorized modification to this
device could void the user's authority to
operate the equipment.
FCC ID: CB2HMIHL4
i Canada only:
This device complies with RSS-210 of
Industry Canada. Operation is subject to
the following two conditions:
1. This device may not cause interference,
and
2. this device must accept any interference
received, including interference that may
cause undesired operation of the device.
Any unauthorized modification to this
device could void the user's authority to
operate the equipment.
IC: 279B-HMIHL4Programming the integrated garage
door opener on the rear-view mirror
Programming
GWARNING
Only press the button on the integrated
garage door opener if there are no persons or
objects present within the sweep of the
garage door. Persons could otherwise be
injured as the door moves.
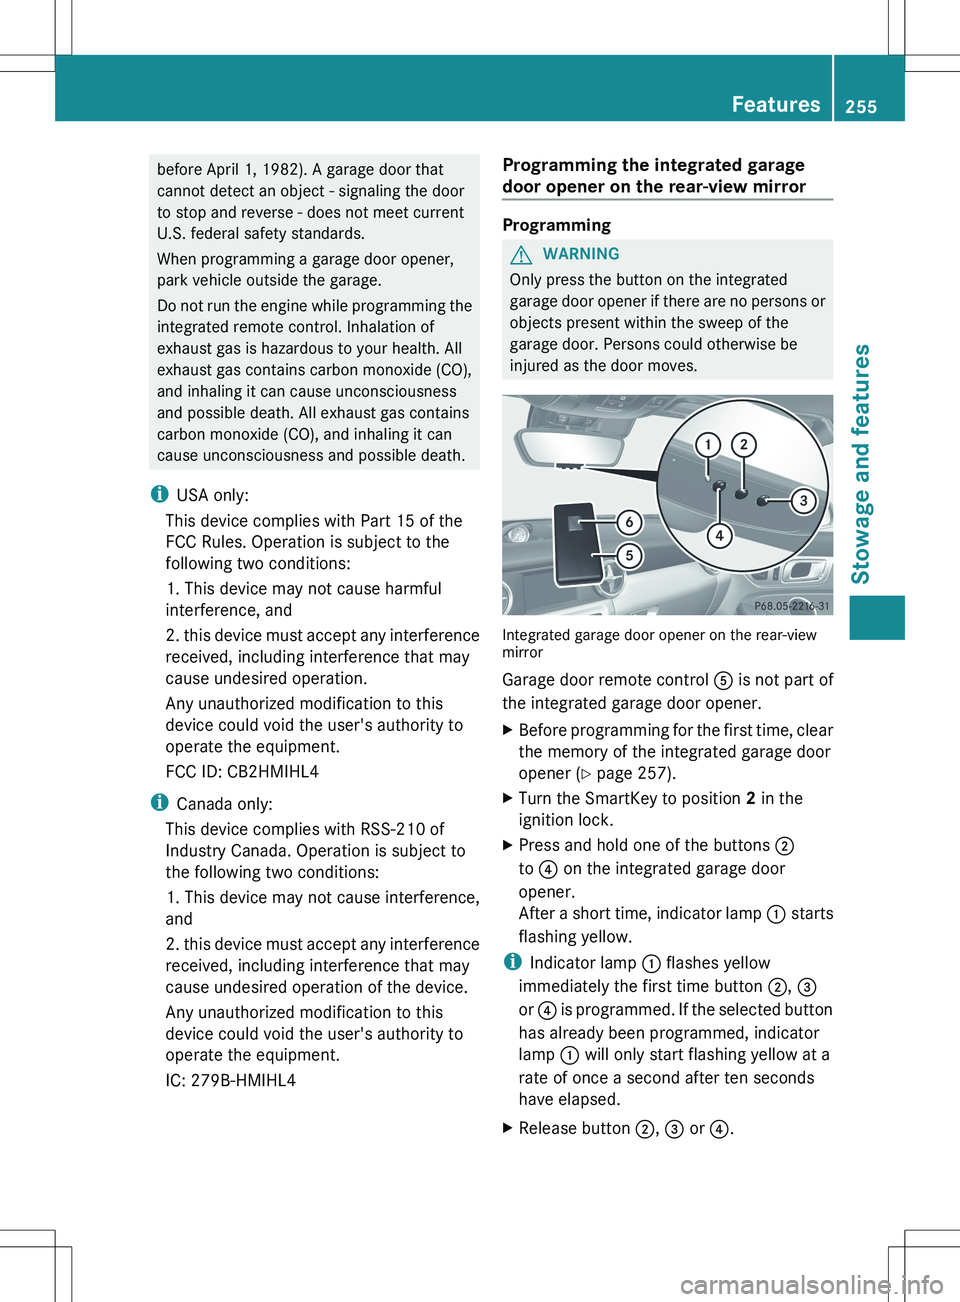
Integrated garage door opener on the rear-view
mirror
Garage door remote control A is not part of
the integrated garage door opener.
XBefore programming for the first time, clear
the memory of the integrated garage door
opener ( Y page 257).XTurn the SmartKey to position 2 in the
ignition lock.XPress and hold one of the buttons ;
to ? on the integrated garage door
opener.
After a short time, indicator lamp : starts
flashing yellow.
i Indicator lamp : flashes yellow
immediately the first time button ;, =
or ? is programmed. If the selected button
has already been programmed, indicator
lamp : will only start flashing yellow at a
rate of once a second after ten seconds
have elapsed.
XRelease button ;, = or ?.Features255Stowage and featuresZ