2012 MERCEDES-BENZ SLK-CLASS ROADSTER air condition
[x] Cancel search: air conditionPage 88 of 336
Problems with the roofProblemPossible causes/consequences and M SolutionsThe roof will not open or
close.The trunk partition is not closed and not properly engaged.XClose the trunk partition ( Y page 85).The trunk lid is open.XClose the trunk lid ( Y page 77).The on-board voltage is too low.XLeave the engine running.The roof has been opened and closed several times in a row. The
roof drive has been automatically deactivated.
You can open and close the roof again after approximately ten
minutes.XSwitch off the ignition and turn it back on.XRepeat the opening or closing procedure.The automatic roof mechanism is faulty.XConsult a qualified specialist workshop.Wind screen
General notes
The wind screen offers protection from the
wind when driving with the roof down.
GWARNING
You could lose control of the vehicle and
injure yourself or others if you operate the
wind screen while driving.
Install or remove the wind screen only when
the vehicle is stationary.
GWARNING
If you use the wind screen in darkness or in
other conditions offering poor visibility, your
view to the rear is further impaired. As a result
of the visibility impairment, you could cause
an accident and injure yourself or others.
For this reason, remove the wind screen as
soon as it is dark or if your vision is otherwise
restricted.
GWARNING
If the wind screen is not correctly engaged, it
may break free and thus obstruct traffic
behind you or lead to an accident.
Each time before driving with the roof down,
check that the wind screen is properly
engaged.
! Install or remove the wind screen only
when the roof is open. You could otherwise
damage the wind screen or the vehicle
interior.
The wind screen can be installed or removed
from the driver's side or passenger side.
Perform operations involving the wind screen
preferably on the side facing away from
traffic, after you have stopped the vehicle,
paying attention to road and traffic
conditions.
86RoofOpening/closing
Page 90 of 336
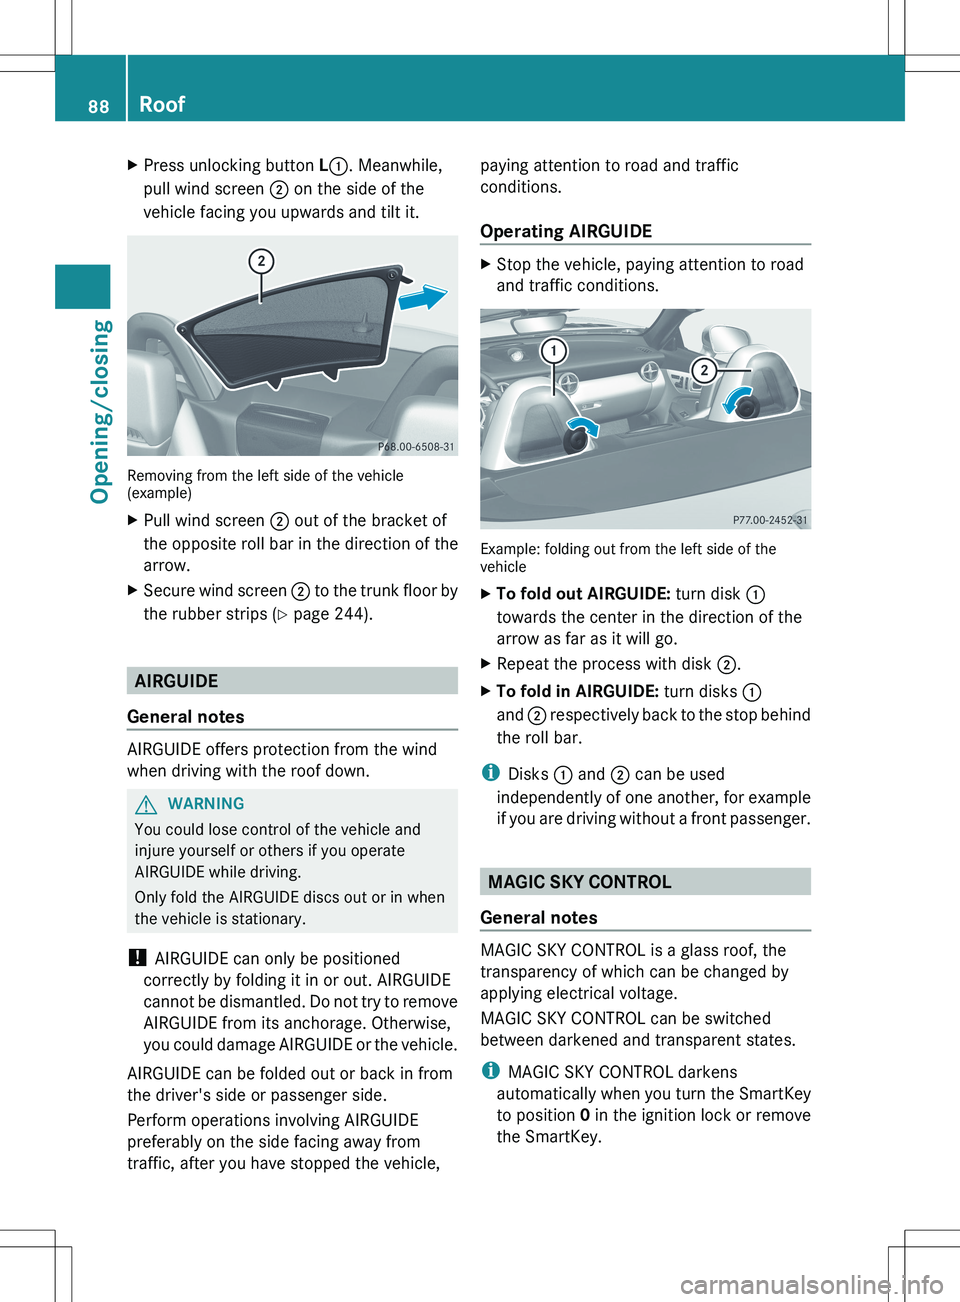
XPress unlocking button L: . Meanwhile,
pull wind screen ; on the side of the
vehicle facing you upwards and tilt it.
Removing from the left side of the vehicle
(example)
XPull wind screen ; out of the bracket of
the opposite roll bar in the direction of the
arrow.XSecure wind screen ; to the trunk floor by
the rubber strips ( Y page 244).
AIRGUIDE
General notes
AIRGUIDE offers protection from the wind
when driving with the roof down.
GWARNING
You could lose control of the vehicle and
injure yourself or others if you operate
AIRGUIDE while driving.
Only fold the AIRGUIDE discs out or in when
the vehicle is stationary.
! AIRGUIDE can only be positioned
correctly by folding it in or out. AIRGUIDE
cannot be dismantled. Do not try to remove
AIRGUIDE from its anchorage. Otherwise,
you could damage AIRGUIDE or the vehicle.
AIRGUIDE can be folded out or back in from
the driver's side or passenger side.
Perform operations involving AIRGUIDE
preferably on the side facing away from
traffic, after you have stopped the vehicle,
paying attention to road and traffic
conditions.
Operating AIRGUIDEXStop the vehicle, paying attention to road
and traffic conditions.
Example: folding out from the left side of the
vehicle
XTo fold out AIRGUIDE: turn disk :
towards the center in the direction of the
arrow as far as it will go.XRepeat the process with disk ;.XTo fold in AIRGUIDE: turn disks :
and ; respectively back to the stop behind
the roll bar.
i Disks : and ; can be used
independently of one another, for example
if you are driving without a front passenger.
MAGIC SKY CONTROL
General notes
MAGIC SKY CONTROL is a glass roof, the
transparency of which can be changed by
applying electrical voltage.
MAGIC SKY CONTROL can be switched
between darkened and transparent states.
i MAGIC SKY CONTROL darkens
automatically when you turn the SmartKey
to position 0 in the ignition lock or remove
the SmartKey.
88RoofOpening/closing
Page 94 of 336
Useful information
i This Operator's Manual describes all
models and all standard and optional
equipment of your vehicle available at the
time of publication of the Operator's
Manual. Country-specific differences are
possible. Please note that your vehicle may
not be equipped with all features
described. This also applies to safety-
related systems and functions.
i Please read the information on qualified
specialist workshops ( Y page 23).
Correcting the driver's seat position
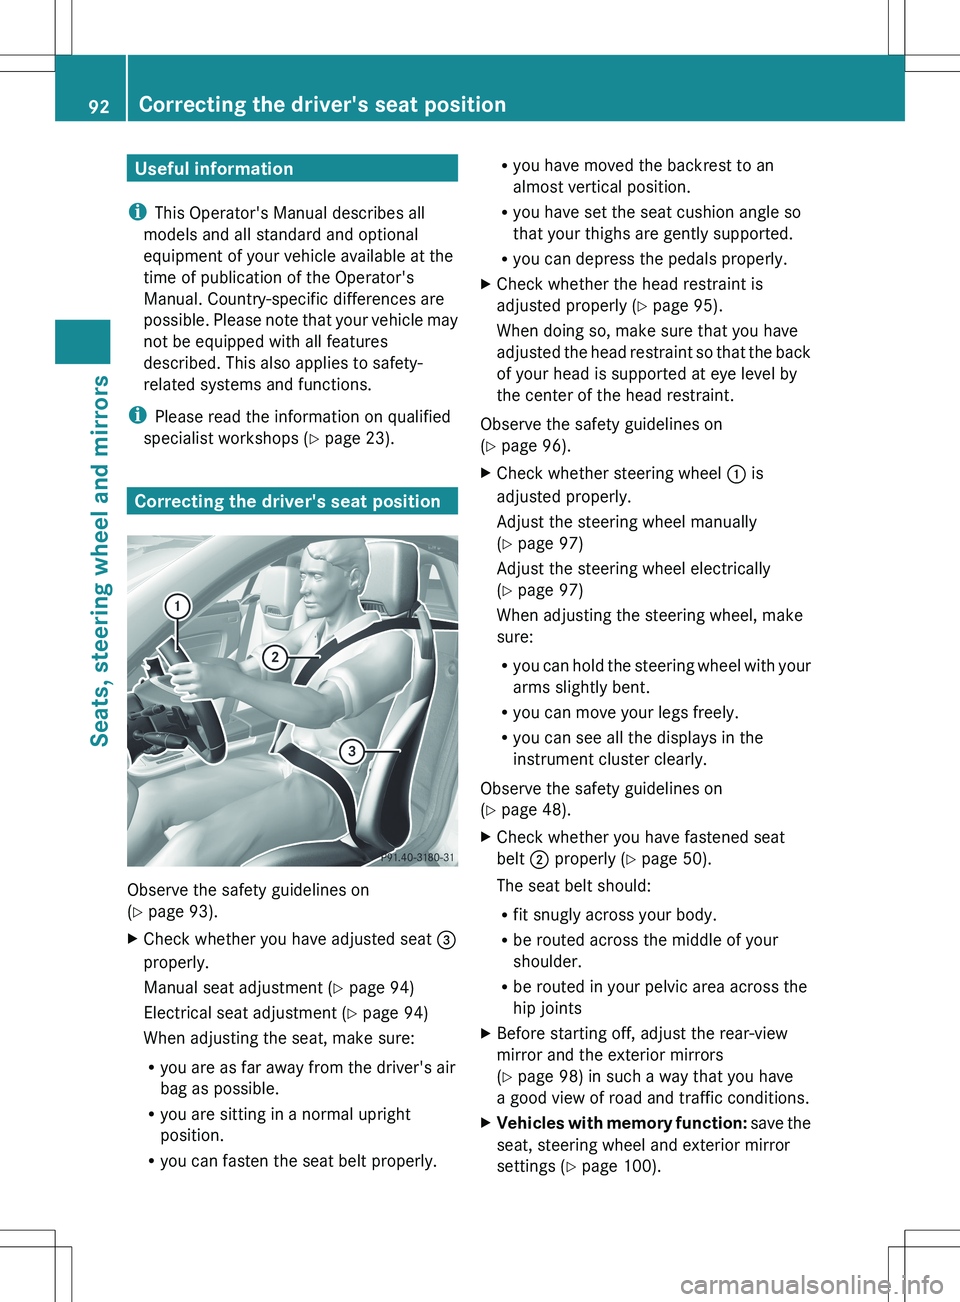
Observe the safety guidelines on
( Y page 93).
XCheck whether you have adjusted seat =
properly.
Manual seat adjustment ( Y page 94)
Electrical seat adjustment ( Y page 94)
When adjusting the seat, make sure:
R you are as far away from the driver's air
bag as possible.
R you are sitting in a normal upright
position.
R you can fasten the seat belt properly.Ryou have moved the backrest to an
almost vertical position.
R you have set the seat cushion angle so
that your thighs are gently supported.
R you can depress the pedals properly.XCheck whether the head restraint is
adjusted properly ( Y page 95).
When doing so, make sure that you have
adjusted the head restraint so that the back
of your head is supported at eye level by
the center of the head restraint.
Observe the safety guidelines on
( Y page 96).
XCheck whether steering wheel : is
adjusted properly.
Adjust the steering wheel manually
( Y page 97)
Adjust the steering wheel electrically
( Y page 97)
When adjusting the steering wheel, make
sure:
R you can hold the steering wheel with your
arms slightly bent.
R you can move your legs freely.
R you can see all the displays in the
instrument cluster clearly.
Observe the safety guidelines on
( Y page 48).
XCheck whether you have fastened seat
belt ; properly ( Y page 50).
The seat belt should:
R fit snugly across your body.
R be routed across the middle of your
shoulder.
R be routed in your pelvic area across the
hip jointsXBefore starting off, adjust the rear-view
mirror and the exterior mirrors
( Y page 98) in such a way that you have
a good view of road and traffic conditions.XVehicles with memory function: save the
seat, steering wheel and exterior mirror
settings ( Y page 100).92Correcting the driver's seat positionSeats, steering wheel and mirrors
Page 110 of 336
Hazard warning lamps
The hazard warning lamps automatically
switch on if:
R an air bag is deployed.
R the vehicle is slowed down rapidly from a
speed of over 45 mph (70 km/h) and
comes to a halt.
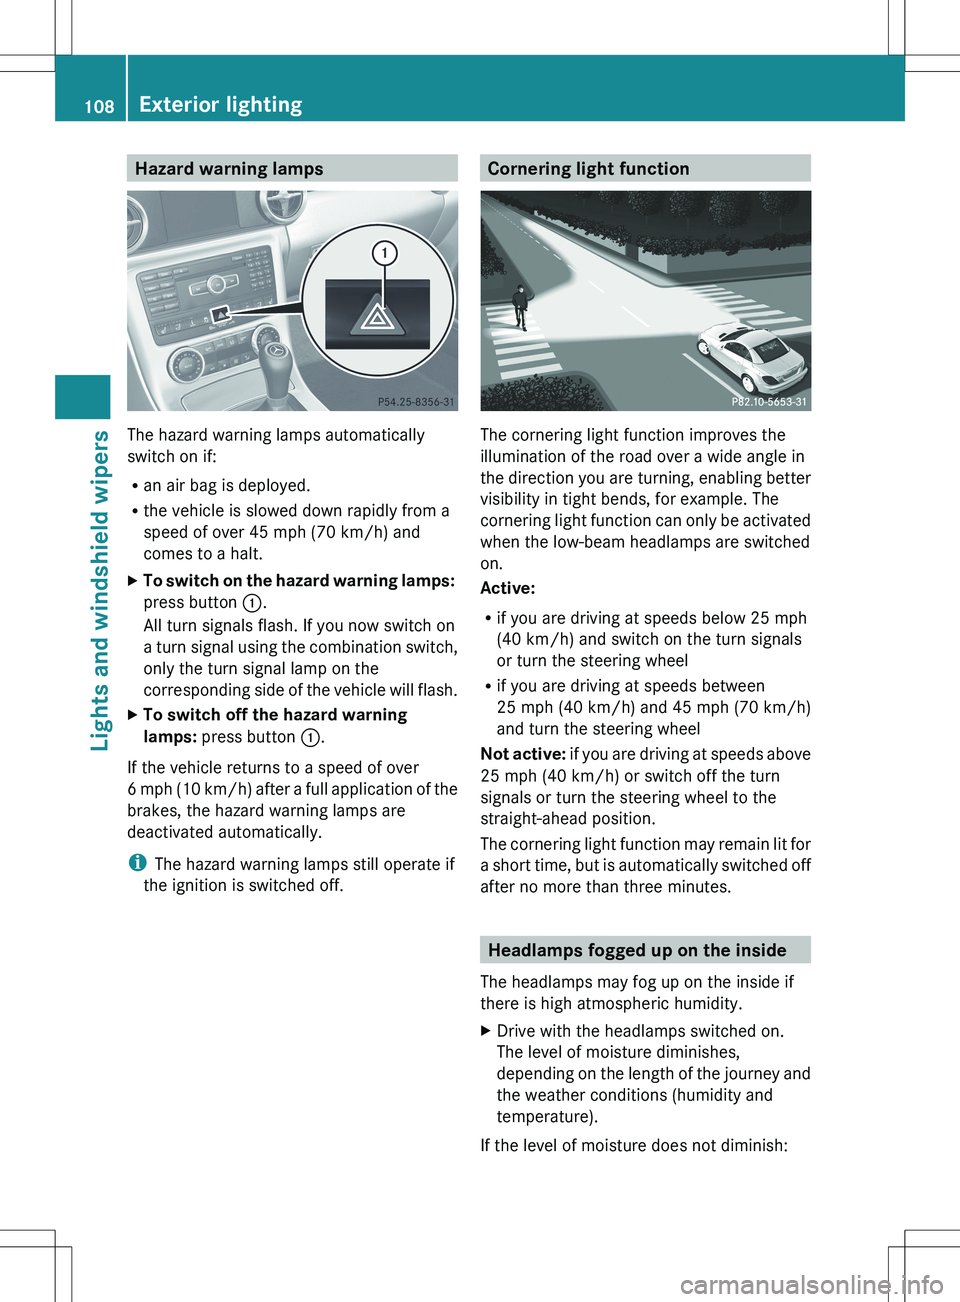
XTo switch on the hazard warning lamps:
press button :.
All turn signals flash. If you now switch on
a turn signal using the combination switch,
only the turn signal lamp on the
corresponding side of the vehicle will flash.XTo switch off the hazard warning
lamps: press button :.
If the vehicle returns to a speed of over
6 mph (10 km/h) after a full application of the
brakes, the hazard warning lamps are
deactivated automatically.
i The hazard warning lamps still operate if
the ignition is switched off.
Cornering light function
The cornering light function improves the
illumination of the road over a wide angle in
the direction you are turning, enabling better
visibility in tight bends, for example. The
cornering light function can only be activated
when the low-beam headlamps are switched
on.
Active:
R if you are driving at speeds below 25 mph
(40 km/h) and switch on the turn signals
or turn the steering wheel
R if you are driving at speeds between
25 mph (40 km/h) and 45 mph (70 km/h)
and turn the steering wheel
Not active: if you are driving at speeds above
25 mph (40 km/h) or switch off the turn
signals or turn the steering wheel to the
straight-ahead position.
The cornering light function may remain lit for
a short time, but is automatically switched off
after no more than three minutes.
Headlamps fogged up on the inside
The headlamps may fog up on the inside if
there is high atmospheric humidity.
XDrive with the headlamps switched on.
The level of moisture diminishes,
depending on the length of the journey and
the weather conditions (humidity and
temperature).
If the level of moisture does not diminish:
108Exterior lightingLights and windshield wipers
Page 118 of 336
Useful information
i This Operator's Manual describes all
models and all standard and optional
equipment of your vehicle available at the
time of publication of the Operator's
Manual. Country-specific differences are
possible. Please note that your vehicle may
not be equipped with all features
described. This also applies to safety-
related systems and functions.
i Please read the information on qualified
specialist workshops ( Y page 23).
Overview of climate control systems
Important safety notes
GWARNING
Severe conditions (e.g. strong air pollution)
may require replacement of the filter before
its scheduled replacement interval. A clogged
filter will reduce the air volume to the interior
and the windows could fog up, impairing
visibility and endangering you and others.
Have a blocked filter replaced at a Mercedes-
Benz Center as soon as possible.
GWARNING
Follow the recommended settings for heating
and cooling given on the following pages.
Otherwise, the windows could fog up,
impairing visibility and endangering you and
others.
The air-conditioning system/automatic
climate control controls the temperature and
the humidity of the vehicle interior and filters
undesirable substances from the air.
The air-conditioning system/automatic
climate control is only operational when the
engine is running. 7
The system only works
optimally when the side windows and the roof
are closed.
i Ventilate the vehicle for a brief period
during warm weather. This will speed up the
cooling process and the desired vehicle
interior temperature will be reached more
quickly.
i The integrated filter can filter out most
particles of dust and completely filters out
pollen. A clogged filter reduces the amount
of air supplied to the vehicle interior. For
this reason, you should always observe the
interval for replacing the filter, which is
specified in the Maintenance Booklet. As it
depends on environmental conditions, e.g.
heavy air pollution, the interval may be
shorter than stated in the Maintenance
Booklet.7 The residual heat function can only be activated/deactivated when the ignition is switched off.116Overview of climate control systemsClimate control
Page 119 of 336
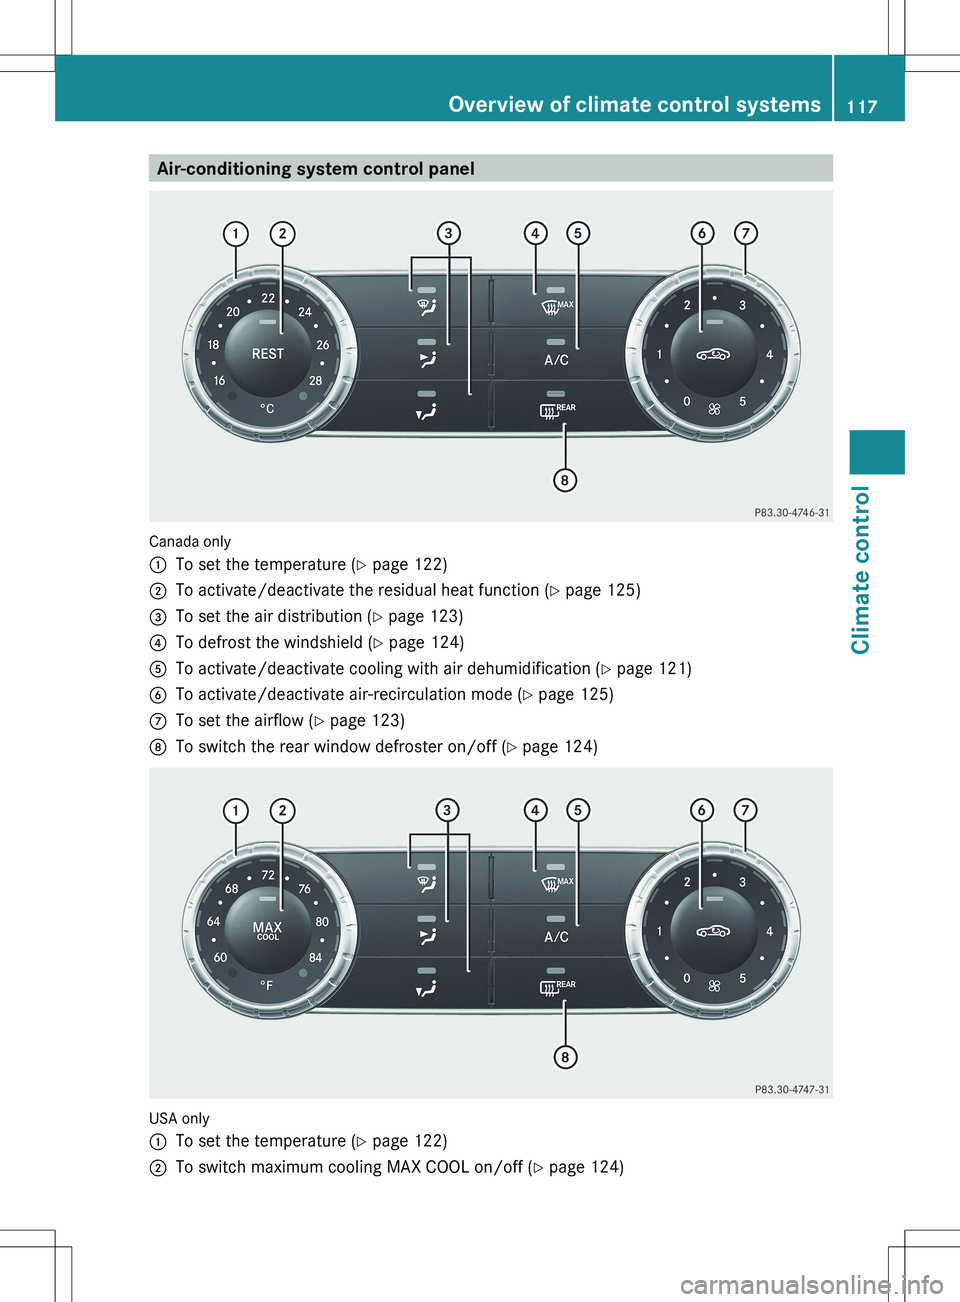
Air-conditioning system control panel
Canada only
:To set the temperature (Y page 122);To activate/deactivate the residual heat function ( Y page 125)=To set the air distribution ( Y page 123)?To defrost the windshield ( Y page 124)ATo activate/deactivate cooling with air dehumidification ( Y page 121)BTo activate/deactivate air-recirculation mode ( Y page 125)CTo set the airflow ( Y page 123)DTo switch the rear window defroster on/off ( Y page 124)
USA only
:To set the temperature ( Y page 122);To switch maximum cooling MAX COOL on/off ( Y page 124)Overview of climate control systems117Climate controlZ
Page 120 of 336
=To set the air distribution (Y page 123)?To defrost the windshield ( Y page 124)ATo activate/deactivate cooling with air dehumidification ( Y page 121)BTo activate/deactivate air-recirculation mode ( Y page 125)CTo set the airflow ( Y page 123)DTo switch the rear window defroster on/off ( Y page 124)Notes on using the air-conditioning
system
Below, you can find a number of notes and
recommendations to help you use the air-
conditioning system optimally.
R Switch on climate control using the ¿
button. The indicator lamp in the ¿
button lights up.
R Set the temperature to 72 ‡ (22 †).
R Recommendation for air distribution in
winter: set the O and ¯ settings.
Recommendation for air distribution in
summer: set the P setting.
R Only use the "defrosting" function briefly
until the windshield is clear again.
R Only use "air-recirculation" mode briefly,
e.g. if there are unpleasant outside odors
or when in a tunnel. The windows could
otherwise fog up as in air-recirculation
mode no fresh air is drawn into the vehicle.118Overview of climate control systemsClimate control
Page 123 of 336
compartment as well. The indicator lamp in
the á button goes out.
R Use the residual heat function if you want
to heat or ventilate the vehicle interior
when the ignition is switched off. The
"residual heat" function can only be
activated or deactivated with the ignition
switched off.
Operating the climate control
systems
Activating/deactivating climate
control
Important information
GWARNING
When the climate control system is switched
off, the outside air supply and circulation are
also switched off. Only choose this setting for
a short time when the retractable hardtop
(vario-roof) is closed. Otherwise, the windows
could fog up, impairing visibility and
endangering you and others.
i Activate climate control primarily using
the à button ( Y page 122).
Activating/deactivating
Air-conditioning system
XTo activate: turn airflow control C
( Y page 117) clockwise to the desired
position (except position 0).XTo deactivate: turn airflow control C
( Y page 117) counter-clockwise to position
0 .Dual-zone automatic climate controlXTurn the SmartKey to position 2 in the
ignition lock.X To activate: press the à button.
The indicator lamp in the à button lights
up. Airflow and air distribution are set to
automatic mode.
or
XPress the ^ button.
The indicator lamp in the ^ button goes
out. The previously selected settings come
into effect again.XTo deactivate: press the ^ button.
The indicator lamp in the ^ button lights
up.
Activating/deactivating cooling with
air dehumidification
Important information
The cooling with air dehumidification function
is only available when the engine is running.
The air inside the vehicle is cooled and
dehumidified according to the temperature
selected.
GWARNING
If you switch off the cooling function, the
vehicle will not be cooled when weather
conditions are warm. The windows can fog up
more quickly. Window fogging may impair
visibility and endanger you and others.
Condensation may drip from the underside of
the vehicle when it is in cooling mode. This is
normal and not a sign that there is a
malfunction.
Depending on the equipment level, the
control panel has either the Á button or
¿ button.
i The cooling with air dehumidification
function uses refrigerant R134a. This
coolant does not contain
chlorofluorocarbons, and therefore does
not damage the ozone layer.
Operating the climate control systems121Climate controlZ