2012 MERCEDES-BENZ SL ROADSTER maintenance
[x] Cancel search: maintenancePage 431 of 637
vehicle. There is a risk of an accident. Only
operate this equipment when the traffic sit-
uation permits. If you cannot be sure of this,
stop the vehicle paying attention to road and traffic conditions and operate the equipment
with the vehicle stationary.
You must observe the legal requirements for
the country in which you are currently driving when operating COMAND Online.
X Call up the COMAND phone book
(Y page 401).
X Select MB Contact
MB Contact by turningcVdthe
COMAND controller.
There are two ways to contact the Mercedes-
Benz Customer Centre:
X Press Wthe COMAND controller to con-
firm.
or X Press the 6button on COMAND Online.
This initiates a call. When the call is con-
nected, a voice message prompts you to
confirm the data transmission by pressing
the stated number on the COMAND Online keypad. After confirmation, COMAND
Online sends the required vehicle data.
i Alternatively, you can initiate a call using
the multifunction steering wheel (see the
vehicle Owner's Manual).
During data transmission, you will see a cor-
responding symbol in the display. This may
take a moment. Then, you can select the
desired service and be connected to a spe-
cialist from the Mercedes-Benz Service
Centre.
i Contact your Mercedes-Benz Service
Centre for further information on
Mercedes-Benz Contact, the range of serv- ices offered and on using the function.
Demand-actuated service message To attain the optimal level of support in main-
taining your vehicle, you can arrange a service
appointment directly with the Mercedes-Benz
Customer Centre. As well as a warning in the instrument cluster, a window appears in the COMAND display. Here, a message actively
indicates that a service is required and this
message enables you to contact the
Mercedes-Benz Customer Centre directly.
You will see the message:
is is due
due soon.
soon. Would
Wouldyou
youlike
like to
tomake
make
a workshop appointment?
a workshop appointment?
X To arrange a service appointment:
select Call Now Call Now by turning cVdthe
COMAND controller and press Wto con-
firm.
After your confirmation, the vehicle data is sent via Mercedes-Benz Contact, and a
Customer Centre employee personally
deals with your appointment. The informa-
tion is then sent to your desired service
outlet.
They will then contact with you within 24
hours to confirm the following details:
R scope of service
R length of stay
R price
X To arrange a service appointment later:
select Call Later
Call Later and confirm with W.
The window is hidden, then reappears after a certain amount of time.
X To not arrange a service appointment:
select No Noand confirm with W.
The window is hidden and does not show
this maintenance requirement again.
Mercedes-Benz Contact Accident Assis- tance Mercedes-Benz emergency call system
active
Mercedes-Benz Contact Accident Assistance
is a supplement to the Mercedes-Benz emer-
gency call system (Y page 429). If an emer-
gency call to the Mercedes-Benz emergency
call centre has been triggered following an
accident, a voice connection with an operator
is established. Depending on the accident sit-
uation, the operator may then suggest that
you forward the call to Mercedes-Benz Con-
tact Accident Assistance. This will enable you 428
TelephoneCOMAND Online
Page 471 of 637
audio signal from the currently activated
audio or video source.
i Telephone conversations and navigation
announcements are not interrupted.
A display message appears in the display in all
audio operating modes.
Interrupting a traffic announcement
During a traffic announcement:
X On COMAND Onlin eor on the multifunction
steering wheel, briefly press the 8but-
ton.
or
X Press the 9,:or9 button on the
multifunction steering wheel.
COMAND Online switches back to the
audio source that was selected before the
announcement. Any subsequent new
announcements will continue to interrupt
the audio source.
Radio text/radio text plus Messages in the display
The function is available in FM mode and in
DAB radio mode.
Radio text/radio text plus consists of addi-
tionally transmitted data, e.g. information on
the current programme, which is displayed in the COMAND display.
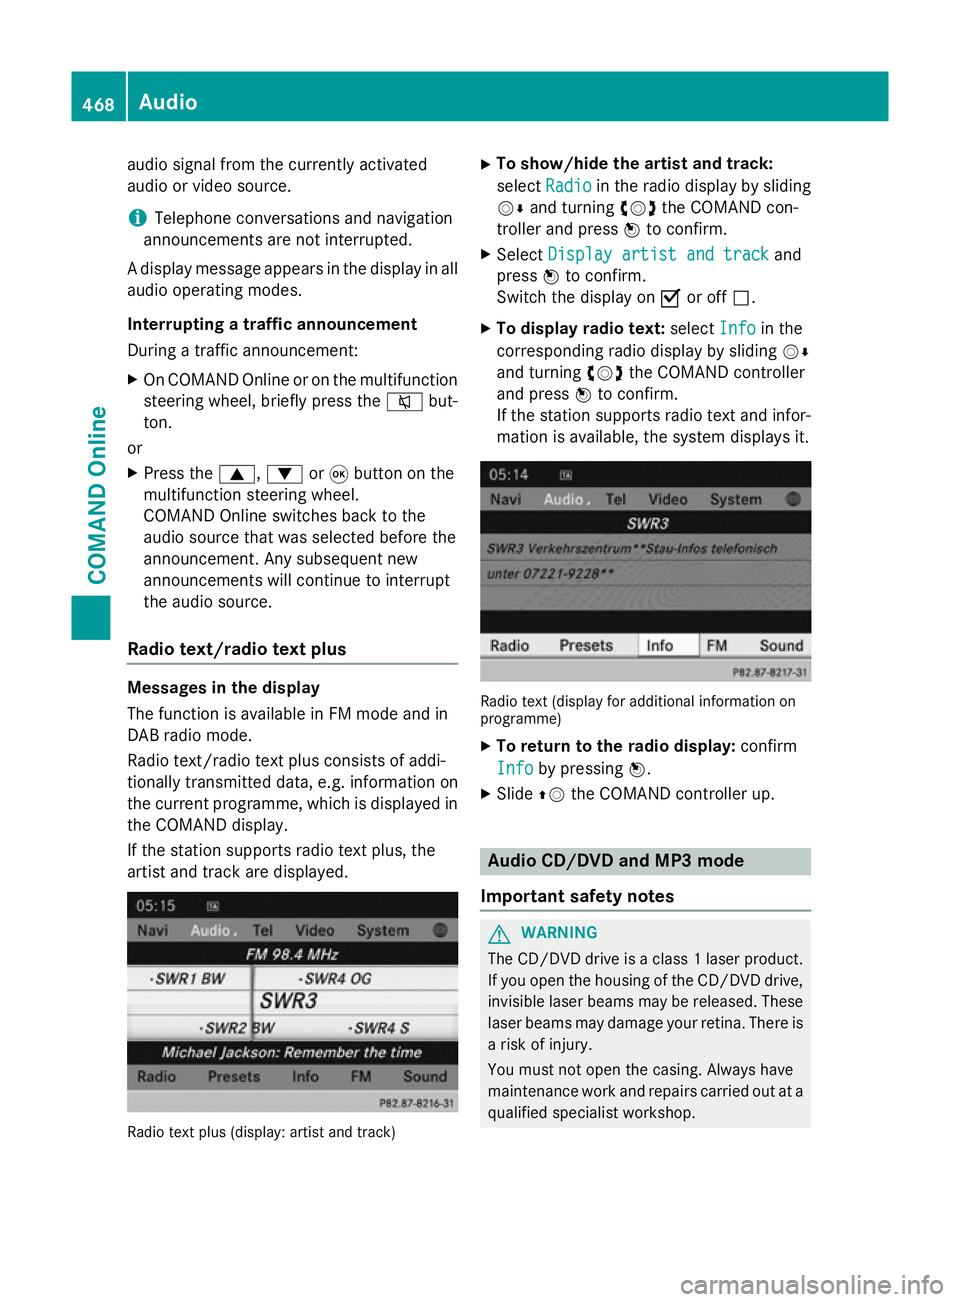
If the station supports radio text plus, the
artist and track are displayed. Radio text plus (display: artist and track) X
To show/hide the artist and track:
select Radio Radio in the radio display by sliding
VÆ and turning cVdthe COMAND con-
troller and press Wto confirm.
X Select Display artist and track
Display artist and track and
press Wto confirm.
Switch the display on Oor off ª.
X To display radio text: selectInfo
Info in the
corresponding radio display by sliding VÆ
and turning cVdthe COMAND controller
and press Wto confirm.
If the station supports radio text and infor- mation is available, the system displays it. Radio text (display for additional information on
programme)
X To return to the radio display: confirm
Info
Info by pressing W.
X Slide ZVthe COMAND controller up. Audio CD/DVD and MP3 mode
Important safety notes G
WARNING
The CD/DVD drive is a class 1 laser product. If you open the housing of the CD/DVD drive,
invisible laser beams may be released. These laser beams may damage your retina. There is
a risk of injury.
You must not open the casing. Always have
maintenance work and repairs carried out at a
qualified specialist workshop. 468
AudioCOMAND Online
Page 514 of 637
Video DVD mode
Important safety notes G
WARNING
The CD/DVD drive is a class 1 laser product. If you open the housing of the CD/DVD drive,
invisible laser beams may be released. These laser beams may damage your retina. There is
a risk of injury.
You must not open the casing. Always have
maintenance work and repairs carried out at a
qualified specialist workshop. G
WARNING
Handling discs while driving will distract you
from traffic conditions. You could then lose
control of the vehicle. There is a risk of an
accident.
Handle discs only when the vehicle is station- ary.
Bear in mind that, at a speed of only 50 km/h, your vehicle is already covering a distance of
14 m per second.
Notes on discs !
Do not affix stickers or labels to the discs.
They could peel off and damage
COMAND Online. Stickers can cause the
disc to bend, which can result in read errors
and disc recognition problems.
! COMAND Online is designed to play discs
which comply with the EN 60908 standard. Therefore, you can only use discs with a
maximum thickness of 1.3 mm.
If you insert thicker discs, e.g. those that
contain data on both sides (DVD on one
side and audio data on the other), they can-
not be ejected and can damage the device.
Only use round discs with a diameter of
12 cm. Do not use discs with a diameter of
8 cm, even with an adapter.
You may encounter playback problems when
playing copied discs. There are a large variety of discs, DVD authoring software, writing software and writers available. This variety
means that there is no guarantee that the
system will be able to play discs that you have
copied yourself.
DVD playback requirements There are video DVDs available on the market
that do not conform to the current standards. Such DVDs may have picture, sound or other playback problems.
COMAND Online is capable of playing back
video DVDs produced according to the fol-
lowing standards:
R Region code 2 (for Europe) or region code 0
(no region code)
R PAL or NTSC standard
You will generally find the relevant details
either on the DVD itself or on the DVD case.
i If you insert a video DVD with a different
region code, you will see a message to this
effect.
i COMAND Online is set to region code 2 at
the factory. This setting can be changed at
a Mercedes-Benz Service Centre. This will
allow you to play video DVDs with a differ-
ent region code, provided that they are pro-
duced in accordance with the PAL or NTSC standard. The region code can be changed
a maximum of five times.
Function restrictions Depending on the DVD, it is possible that cer-
tain functions or actions will be temporarily
blocked or may not function at all. As soon as
you try to activate these functions or actions, you will see the Ksymbol in the display.
Inserting and removing DVDs X
Proceed as described in the "Inserting and
ejecting CDs and DVDs" section
(Y page 469). Video
511COMAND Online Z
Page 522 of 637
Rear Seat Entertainment System
Features of your COMAND Online
This Supplement describes all the standard
and optional equipment for your COMAND
Online system, as available at the time of
going to print. Country-specific differences
are possible. Please note that your
COMAND Online system may not be equip-
ped with all the features described. Overview
Important safety notes G
WARNING
The CD/DVD drive is a class 1 laser product. If you open the housing of the CD/DVD drive,
invisible laser beams may be released. These laser beams may damage your retina. There is
a risk of injury.
You must not open the casing. Always have
maintenance work and repairs carried out at a
qualified specialist workshop. G
WARNING
If objects such as headphones/headsets or
external audio/video sources are not secured in the passenger compartment, they can be
flung around and hit vehicle occupants. There
is a risk of injury, for example in the event of
sudden braking or a sudden change in direc-
tion. Always stow these items or similar objects
carefully so that they cannot be flung around,
for example in a lockable vehicle stowage
compartment.
Components The Rear Seat Entertainment System
includes:
R two screens for the rear behind the front-
seat head restraints
R a remote control
R a CD/DVD drive
R AUX jacks on both screens (AUX display)
and on the CD/DVD drive (AUX drive)
R two sets of cordless headphones Rear Seat Entertainment System
519COMAND Online Z
Page 530 of 637
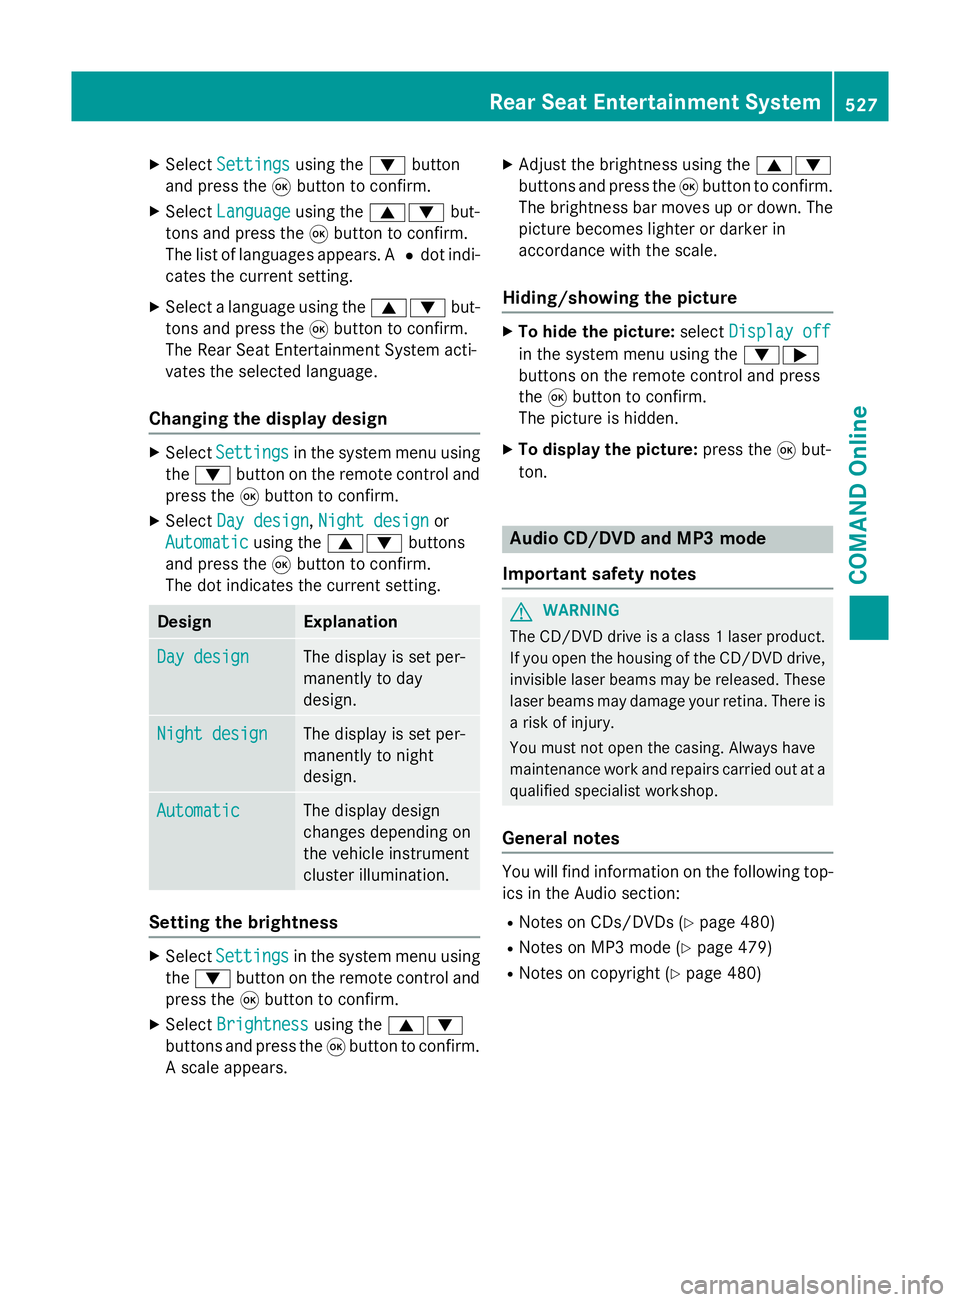
X
Select Settings
Settings using the:button
and press the 9button to confirm.
X Select Language
Language using the9: but-
tons and press the 9button to confirm.
The list of languages appears. A #dot indi-
cates the current setting.
X Select a language using the 9:but-
tons and press the 9button to confirm.
The Rear Seat Entertainment System acti-
vates the selected language.
Changing the display design X
Select Settings Settings in the system menu using
the : button on the remote control and
press the 9button to confirm.
X Select Day design
Day design ,Night design
Night design or
Automatic
Automatic using the9: buttons
and press the 9button to confirm.
The dot indicates the current setting. Design Explanation
Day design
Day design The display is set per-
manently to day
design.
Night design Night design The display is set per-
manently to night
design.
Automatic Automatic The display design
changes depending on
the vehicle instrument
cluster illumination.
Setting the brightness
X
Select Settings Settings in the system menu using
the : button on the remote control and
press the 9button to confirm.
X Select Brightness
Brightness using the9:
buttons and press the 9button to confirm.
A scale appears. X
Adjust the brightness using the 9:
buttons and press the 9button to confirm.
The brightness bar moves up or down. The picture becomes lighter or darker in
accordance with the scale.
Hiding/showing the picture X
To hide the picture: selectDisplay off Display off
in the system menu using the :;
buttons on the remote control and press
the 9button to confirm.
The picture is hidden.
X To display the picture: press the9but-
ton. Audio CD/DVD and MP3 mode
Important safety notes G
WARNING
The CD/DVD drive is a class 1 laser product. If you open the housing of the CD/DVD drive,
invisible laser beams may be released. These laser beams may damage your retina. There is
a risk of injury.
You must not open the casing. Always have
maintenance work and repairs carried out at a
qualified specialist workshop.
General notes You will find information on the following top-
ics in the Audio section:
R Notes on CDs/DVDs (Y page 480)
R Notes on MP3 mode (Y page 479)
R Notes on copyright (Y page 480) Rear Seat Entertainment System
527COMAND Online Z
Page 538 of 637
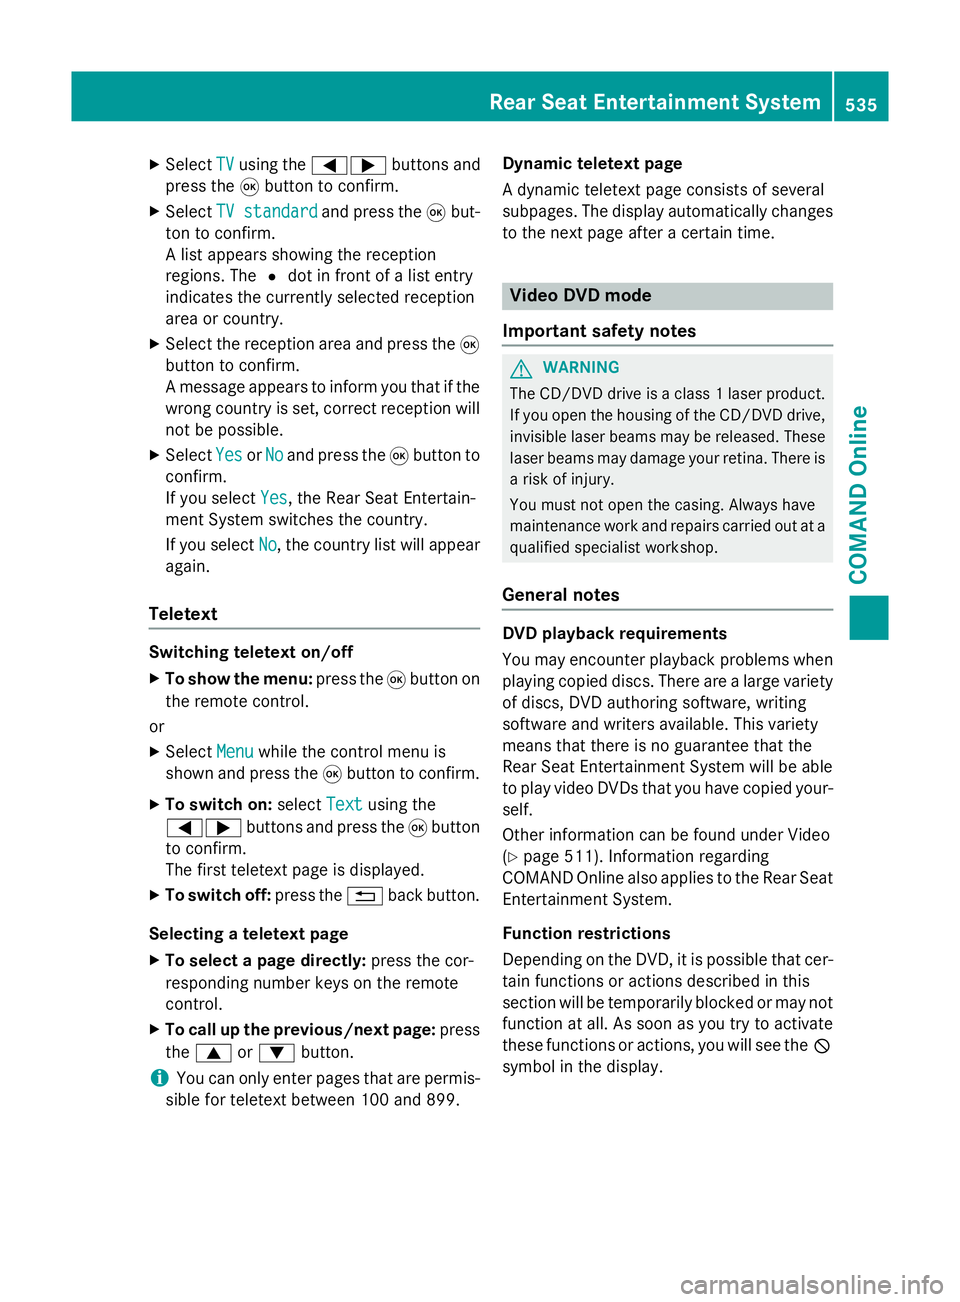
X
Select TV
TVusing the =; buttons and
press the 9button to confirm.
X Select TV standard
TV standard and press the9but-
ton to confirm.
A list appears showing the reception
regions. The #dot in front of a list entry
indicates the currently selected reception
area or country.
X Select the reception area and press the 9
button to confirm.
A message appears to inform you that if the
wrong country is set, correct reception will
not be possible.
X Select Yes YesorNo
No and press the 9button to
confirm.
If you select Yes
Yes , the Rear Seat Entertain-
ment System switches the country.
If you select No No, the country list will appear
again.
Teletext Switching teletext on/off
X To show the menu: press the9button on
the remote control.
or
X Select Menu
Menuwhile the control menu is
shown and press the 9button to confirm.
X To switch on: selectText
Text using the
=; buttons and press the 9button
to confirm.
The first teletext page is displayed.
X To switch off: press the%back button.
Selecting a teletext page
X To select a page directly: press the cor-
responding number keys on the remote
control.
X To call up the previous/next page: press
the 9 or: button.
i You can only enter pages that are permis-
sible for teletext between 100 and 899. Dynamic teletext page
A dynamic teletext page consists of several
subpages. The display automatically changes
to the next page after a certain time. Video DVD mode
Important safety notes G
WARNING
The CD/DVD drive is a class 1 laser product. If you open the housing of the CD/DVD drive,
invisible laser beams may be released. These laser beams may damage your retina. There is
a risk of injury.
You must not open the casing. Always have
maintenance work and repairs carried out at a
qualified specialist workshop.
General notes DVD playback requirements
You may encounter playback problems when
playing copied discs. There are a large variety
of discs, DVD authoring software, writing
software and writers available. This variety
means that there is no guarantee that the
Rear Seat Entertainment System will be able
to play video DVDs that you have copied your-
self.
Other information can be found under Video
(Y page 511). Information regarding
COMAND Online also applies to the Rear Seat
Entertainment System.
Function restrictions
Depending on the DVD, it is possible that cer-
tain functions or actions described in this
section will be temporarily blocked or may not function at all. As soon as you try to activate
these functions or actions, you will see the K
symbol in the display. Rear Seat Entertainment System
535COMAND Online Z
Page 555 of 637
More information on suitable mobile phones,
mobile phone brackets and on connecting
Bluetooth ®
-capable mobile phones with
COMAND Online can be obtained:
R at your Mercedes-Benz Service Centre
R on the Internet at http://www.mercedes-
benz.com/connect
i The functions and services available when
you use the phone depend on your mobile
phone model and service provider.
Using a mobile phone If the mobile phone is inserted in the mobile
phone bracket, the mobile phone will be
charged and connected with the exterior aer-
ial.
X Open the telephone compartment
(Y page 545).
X Place the mobile phone bracket into the
pre-installed fitting; see the separate instal-
lation instructions for the mobile phone fit-
ting.
X Insert the mobile phone into the mobile
phone bracket; see the separate installa-
tion instructions for the mobile phone fit-
ting.
Operating the mobile phone You can operate the telephone using the
6 and~ buttons on the multifunction
steering wheel. You can operate other mobile
phone functions via the on-board computer
(Y page 235).
When you remove the key from the ignition
lock, the mobile phone is disconnected from
the hands-free system. Active calls will first
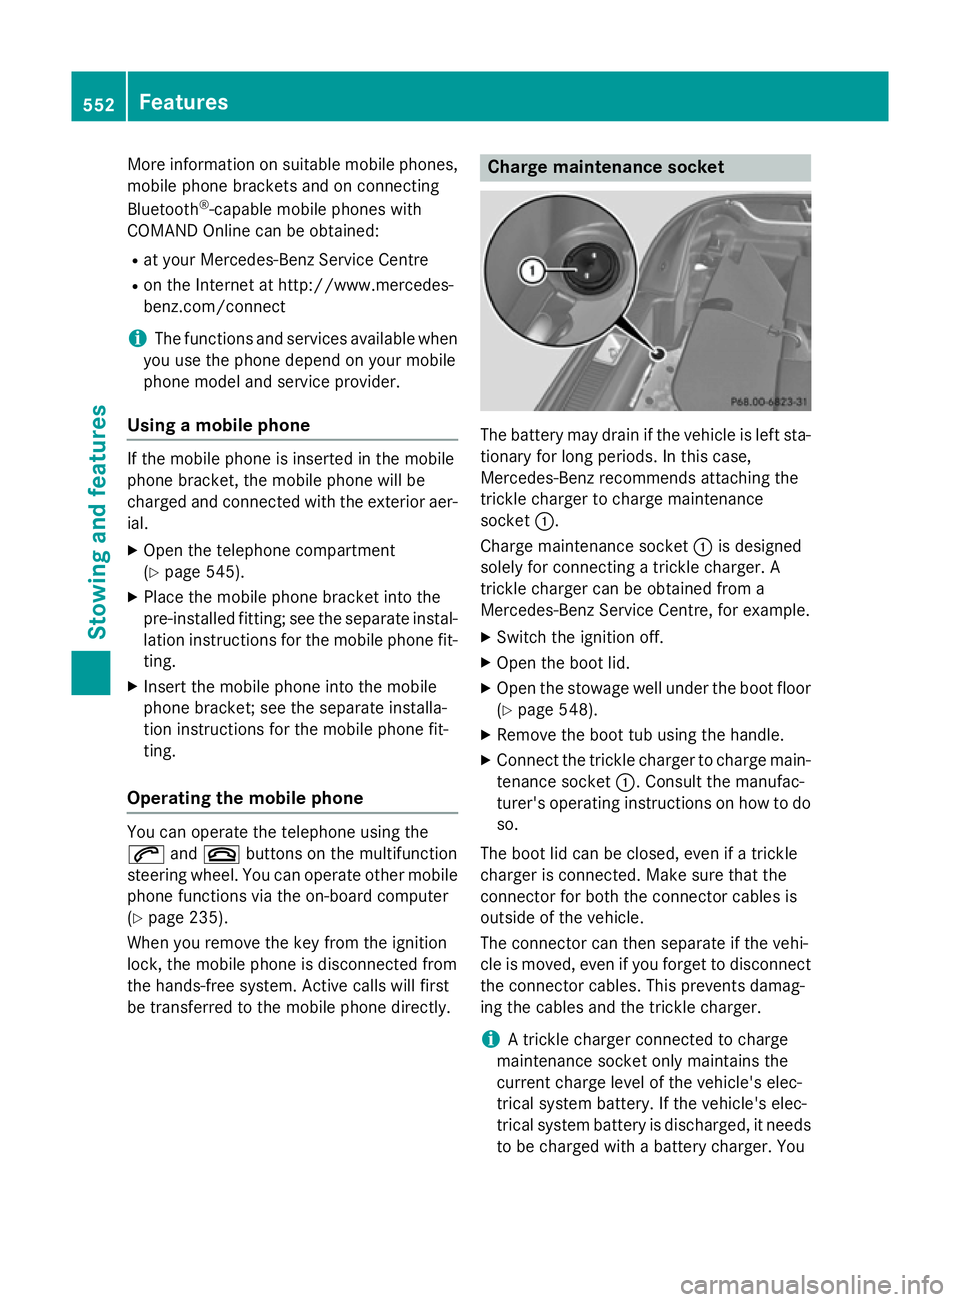
be transferred to the mobile phone directly. Charge maintenance socket
The battery may drain if the vehicle is left sta-
tionary for long periods. In this case,
Mercedes-Benz recommends attaching the
trickle charger to charge maintenance
socket :.
Charge maintenance socket :is designed
solely for connecting a trickle charger. A
trickle charger can be obtained from a
Mercedes-Benz Service Centre, for example.
X Switch the ignition off.
X Open the boot lid.
X Open the stowage well under the boot floor
(Y page 548).
X Remove the boot tub using the handle.
X Connect the trickle charger to charge main-
tenance socket :. Consult the manufac-
turer's operating instructions on how to do
so.
The boot lid can be closed, even if a trickle
charger is connected. Make sure that the
connector for both the connector cables is
outside of the vehicle.
The connector can then separate if the vehi-
cle is moved, even if you forget to disconnect
the connector cables. This prevents damag-
ing the cables and the trickle charger.
i A trickle charger connected to charge
maintenance socket only maintains the
current charge level of the vehicle's elec-
trical system battery. If the vehicle's elec-
trical system battery is discharged, it needs
to be charged with a battery charger. You 552
FeaturesStowing and features
Page 564 of 637
Useful information
............................562
Engine compartment ........................562
ASSYST PLUS .................................... 566
Care .................................................... 568 561Maintenance and care