2012 MERCEDES-BENZ SL-Class buttons
[x] Cancel search: buttonsPage 108 of 210
X
Enter character sand save the entry .
Pro cee das descri bedund er"Ente ring
cha racter s"inthe "Ente ring cha racter sin
the addre ssand phone books "se ctio n
(Y page 22) . Us
ingca lllists In
trodu ction
For telepho ny via the Blueto oth ®
inte rface,
CO MAND showsalist of cal lsrec eived
(i nclu ding misse dcal ls)or alist of cal lsdialed .
i Theres pectiv emenu itemc anonlybe
selec tedifcalls have alread ybeen receive d
or dialed onCOMA ND.
Dis playin gmis sed calls intheC OMAND
displa yis not supported byallmobile
phones.
These listsremain inCOMAND, evenafter
another mobilephonehasbeen connected. Opening
thecall listand selecting an
entry
X Press the% function button.
X Select CallLists in
the telephone basic
menu usingthe:=; buttons
and press the9button toconfirm.
Am enu appears.
X Select Calls Receive d or
Calls Dialed using
the9: buttonsand
press the9button tocon firm.
The correspondin glist appears. Ex
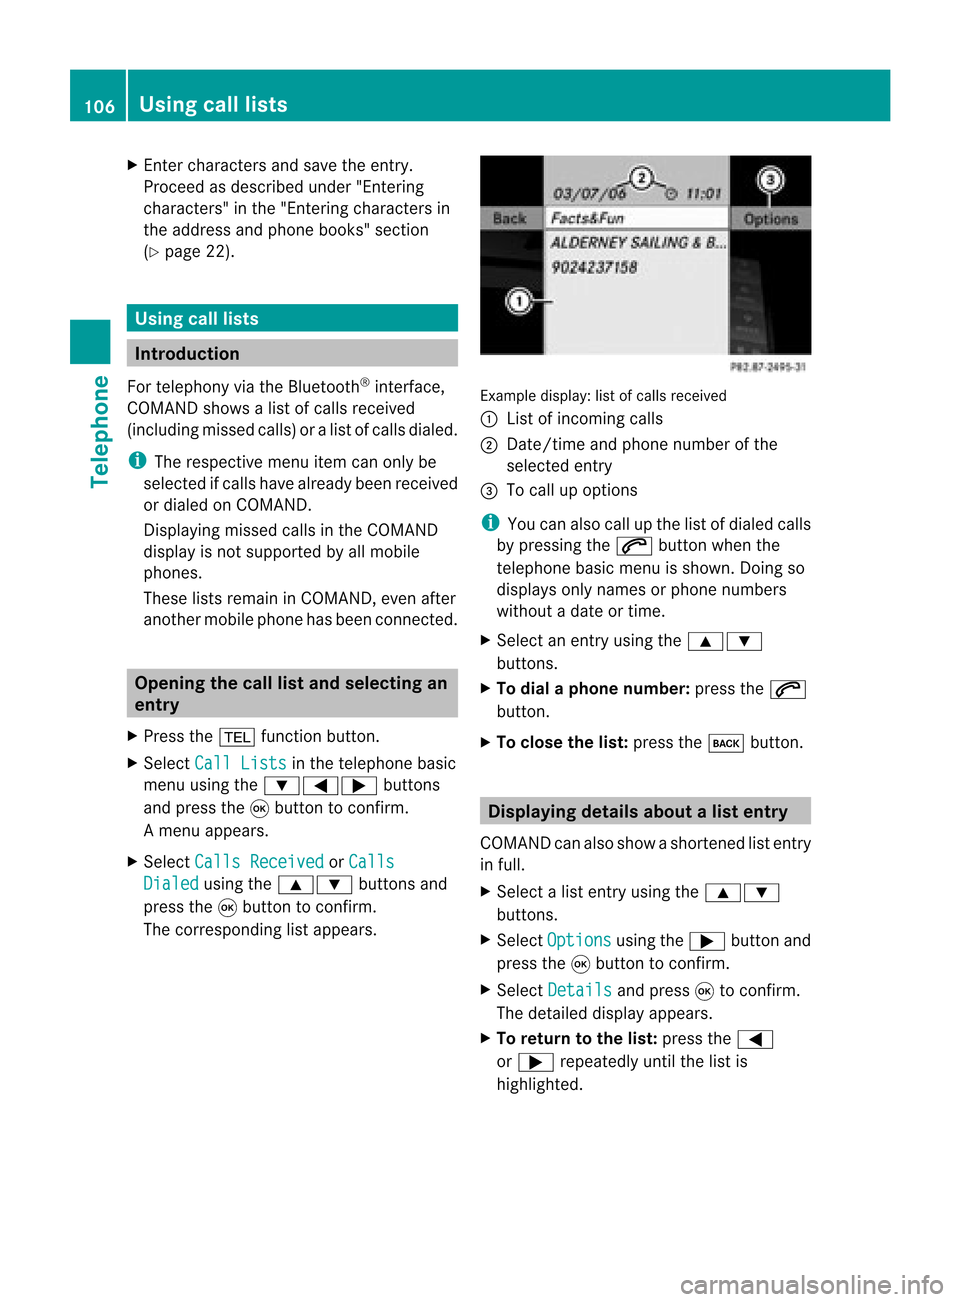
ample display: listofcalls received
: List ofincom ingcalls
; Date/ timeandphone number ofthe
select edent ry
= Tocall upoption s
i You canalso callupthe listofdialed calls
by pressing the6 button whenthe
telephon ebasic menu isshown. Doingso
displays onlynames orphone numbers
without adate ortime.
X Select anent ryusing the9:
button s.
X To dial aphone number :press the6
button .
X To close thelist: press thek button . Displaying
detailsabout alist entr y
COMAN Dcanalso showasho rten ed list entry
in full.
X Sel ect alist entry usin gth e9:
but tons .
X Sel ect Opt ions usin
gth e; buttona nd
pre ssthe 9button toconfi rm.
X Sel ect Details and
press9 toconfi rm.
The detai led displ ayappe ars.
X To return tothe list: pressthe =
or ; repeated lyunti lthe list is
hi ghl ighted . 10
6 Us
ingca lllistsTel epho ne
Page 110 of 210
i
Save entry is
shown ingray ifthe
selected listentry hasalrea dybeen saved.
X Select Add and
press the9button to
confirm.
X Select acategory forthe number, e.g.
Home ,
and press the9toconfirm.
X Select acategory forthe phone, e.g.
Mobile ,
and press the9toconfirm.
X Select Save .
The search menuforaddress bookentries
appea rs.
X Search forthe desired entry(Ypage 103).
X Press the9button whenyouhave finished
searching.
COMAND storesthedata ifthere arefewer
than fivenumbers assigned tothe entry you
are searching forinthe selected number
category.
You willsee amessage tothis effect.
If five numbers arestored forthe entry you
are searching for,aprompt willappea r
asking whether youwish tooverwrite one
of the existing numbers.
X Select Yes or
No and
press the9button
to confirm.
If you select Yes ,
a selection listwith the
five existing numbers isdispla yed.
If you select No ,
the process willbeaborted.
X Select thenumber tobe overwritten from
the listusing the9: buttonsand
press the9button toconfirm.
COMAND overwrites theselected number
with thenew data. Del
eting calllists
i The stored calllists remain inCOMAND,
even ifyou useCOMAND withanother
mobile phone. Forthis reason, youshould
delete anycalllists before handing overor
selli ngthe vehicle. X
Select Calllists in
the telephone basic
menu usingthe:=; buttons
and press the9button toconfirm.
X Select Delete calllists and
press the
9 button toconfirm.
Ap rompt appears asking whethe ryou wish
to delete allcall lists.
X Select Yes or
No and
press the9button
to conf irm.
If you select Yes ,
the call lists aredeleted.
If you select No ,
the process willbeaborted. Using
theaddress book Introdu
ction G
WARNIN
G
Please devote youratten tionfirst and
foremost tothe traffic situation youarein.
Before yourjourney, pleasefamiliarize
yourself withtheaddress bookfunctions.
Only usetheCOMAND whenroadandtraffic
condit ionspermit youtodo so. Otherwise you
could beinvolved inan accident inwhich you
or others couldbeinjured.
The address bookorganizes andstores
entr ieswhich areenter edfrom different
sources (mobilephone,SDmemory card,
COMAND telephone book,navigation
system).
You canusethese entriestomake telephone
calls andfornavigation.
i Each address bookentryconsist sof a
surname, firstname andcompany, andcan
cont ainuptofive telephone numbers,one
home address andone business address.
The address bookcanstore around 900
entr ies.
i Address bookentriesremain storedwhen
the mobile phoneisdisconn ected.
Therefore, youshould deleteyourpersonal
data using thereset functionbefore selling
your vehicle, forexample (Ypage 43). 108
Using
theaddress bookTelephone
Page 111 of 210
Callin
gup thead dress book
X Pre ssthe% function button.
You seethete lepho nebasic menuor the
addre ssbook ifit was open previously.
X Ifth ete lepho nebasic menuis sho wn, pres s
th e9=; buttons toselec t
Pho ne and
pres sth e9 buttonto confirm .
X Sel ect Addres sBoo k fr
om themen uand
pres sth e9 buttonto confirm . Add
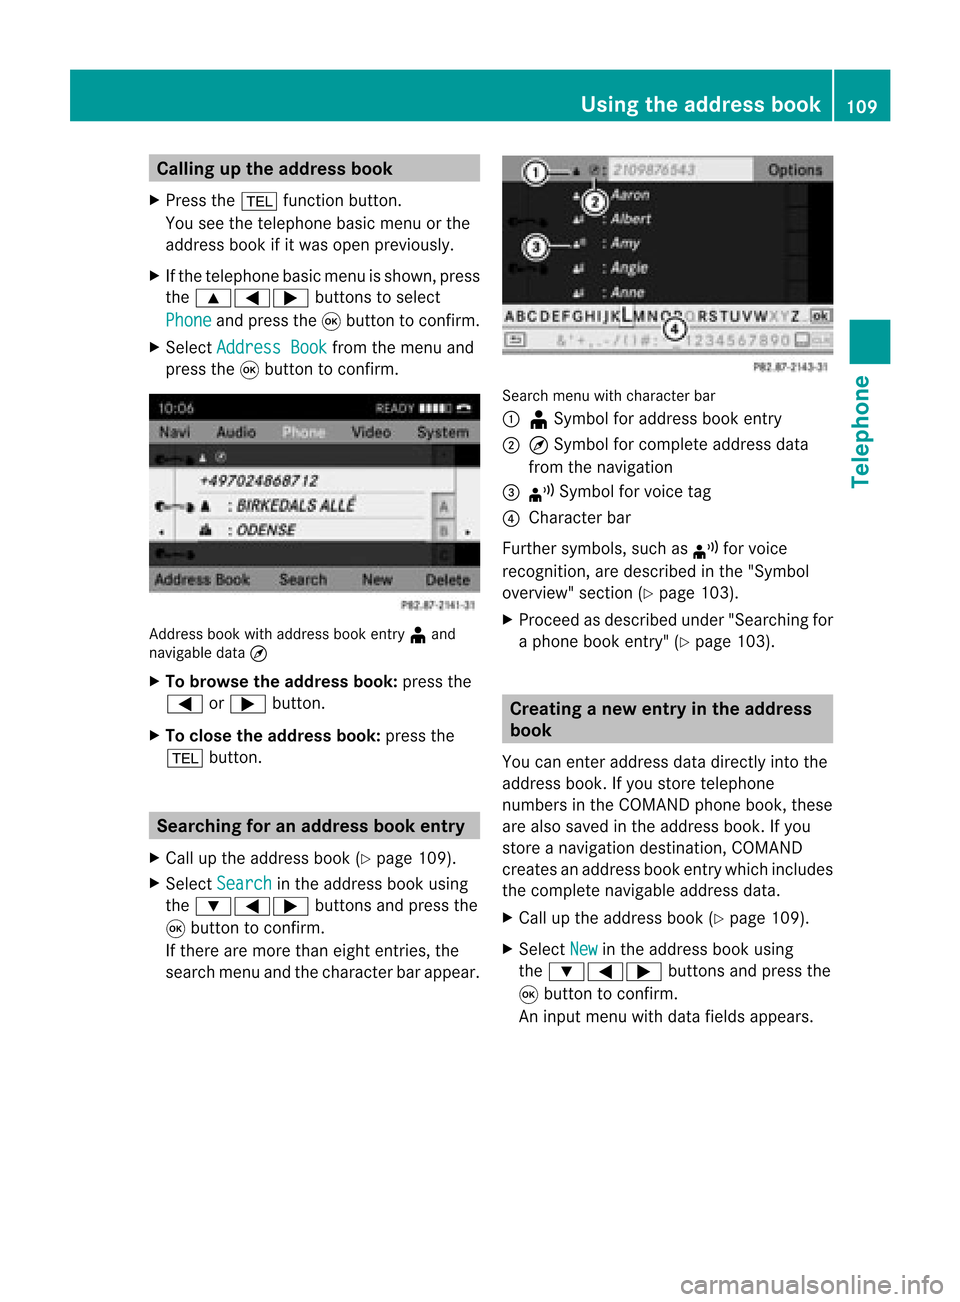
ressbook withaddr essbook entry ¥ and
nav igable data¤
X To browse thead dress book: pressth e
= or; button.
X To close thead dress book: pressth e
% button. Sear
ching foranaddress book entry
X Call uptheaddre ssbook (Ypage 109).
X Sel ect Search in
theaddre ssbook using
th e:=; buttons and pres sth e
9 buttonto confirm .
If th ere aremor eth an eight entries, the
sear chmen uand thech arac terb arappear . Sea
rchmen uwit hch arac terbar
: ¥Sym bolforaddre ssbook entry
; ¤Sym bolforcomple teaddre ssdat a
fr om thenav igat ion
= ¦ Sym bolforvoic etag
? Charac terb ar
Fur ther symb ols,suchas ¦ forvoic e
rec ogn ition ,are desc ribedin the"Sym bol
ove rview" section(Ypage 103).
X Procee das descr ibedunder "Search ingfor
a phone bookentry" (Ypage 103). Creat
inganew entryin the address
book
You canenteraddress datadirect lyint othe
address book.Ifyou storetelephon e
numbers inthe COMAND phonebook,these
are also saved inthe address book.Ifyou
stor eanavigat iondestin ation, COMAND
creat esan address bookentrywhich includes
the complet enavigable addressdata.
X Call upthe address book(Ypage 109).
X Select New in
the address bookusing
the :=; buttons and press the
9 butt ontocon firm.
An input menu withdata fields appears. Using
thead dress book
109Telephone Z
Page 112 of 210
Input
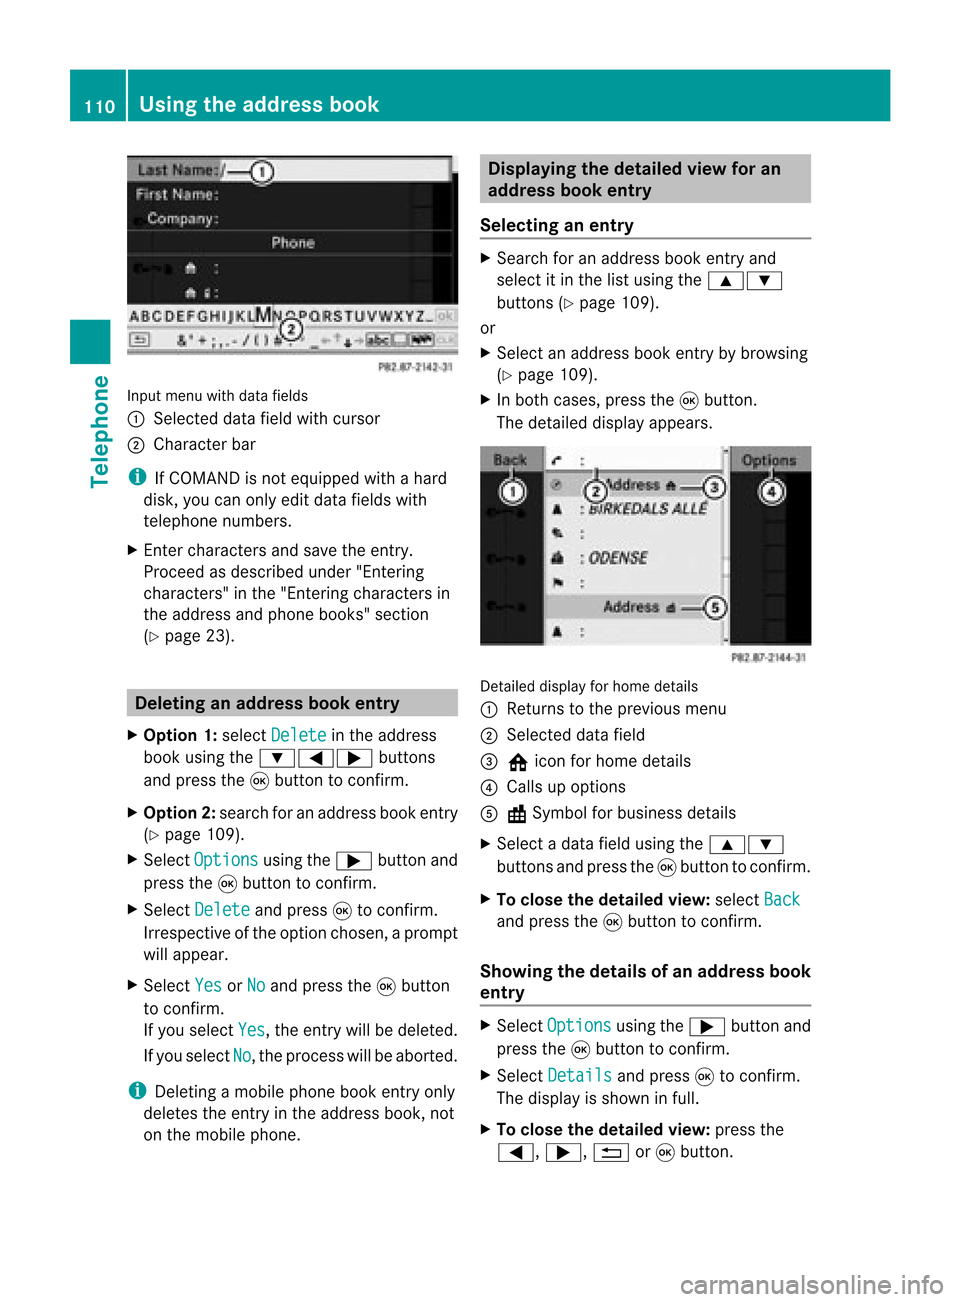
menu withdata fields
: Selected datafieldwithcursor
; Cha racter bar
i IfCOMAND isnot equi pped withahard
disk, youcan only editdata fieldswith
telepho nenumbers.
X Ent ercharacters andsave theentry.
Proceed asdescribe dunder "Entering
characters" inthe "Entering characters in
the addre ssand phone books" section
(Y page 23). De
leting anaddr essbookentry
X Opt ion 1:select Delete in
the address
book using the:=; buttons
and press the9button tocon firm.
X Opt ion2:search foranaddress bookentry
(Y page 109).
X Select Options using
the; button and
press the9button tocon firm.
X Select Delete and
press 9tocon firm.
Irrespec tiveofthe option chosen ,a prompt
will appear.
X Select Yes or
No and
press the9button
to con firm.
If you select Yes ,
the entrywill bedeleted.
If you select No ,
the process willbeaborted.
i Delet ingamobile phonebookentryonly
deletes theentryinthe address book,not
on the mobile phone. Displaying
thedeta iledview foran
add ress book entry
Selecting anentry X
Search foranaddress bookentryand
select itin the listusing the9:
button s(Y page 109).
or
X Select anaddress bookentryby browsing
(Y page 109).
X In both cases, pressthe9button .
The detailed displayappears. Det
ailed display forhome details
: Returns tothe previous menu
; Select eddata field
= @ icon forhome details
? Calls upoption s
A \Symbol forbusiness details
X Select adata fieldusing the9:
button sand press the9button tocon firm.
X To close thedeta iledview: select Back and
press the9button tocon firm.
Showing thedeta ilsofan add ress book
entry X
Select Options using
the; button and
press the9button tocon firm.
X Select Details and
press 9tocon firm.
The display isshown infull.
X To close thedeta iledview: pressthe
=, ;,%or9 button . 110
Using
theadd ress bookTelephone
Page 113 of 210

Cha
nging anaddress book entry
Cha nging anent ry X
Opt ion1:sear chfor anaddre ssbook entry
and selec titf rom thelistu sing the
9: buttons(Ypage 109).
X Select Options using
the; button and
press the9button toconfirm.
X Select Change and
press the9button to
confirm.
X Option 2:call upthe detailed viewforan
address bookentry (Ypage 110).
X Select Options using
the; button and
press the9button toconfirm.
X Select Change Entry and
press the9
button toconfirm.
Irrespective ofthe option, theinput menu
cont aining datafields appea rs.
X Proceed asdescribed under"Enterin g
characters" inthe "Enterin gcharacters in
the address andphone books" section
(Y page 23).
Changing thecategory ofatelephone
number datafield X
Display thedetailed viewforanaddress
book entry (Ypage 110)andhighlig htthe
telephone numberdatafield.
X Select Options using
the; button and
press the9button toconfirm.
X Select Change Category and
press the
9 button toconfirm.
X Select anumber category, e.g.Home .
X Select atelephone category,e.g.Mobile Phone .
X Select Preferred if
desired andpress the
9 button toconfirm.
Depending onthe previous state,switch
the option onO oroff ª.T hephone
number isdispla yedasthe first number inthe
phone bookandcanbediale d
immediately.
X Select Save and
press 9toconfirm .
The new category isstored. Calling
anumber storedinan entry
Co nditio ns The
mobi lephone mustbeconnected viathe
Blue tooth ®
interface .
Option 1 X
Displ aydetai lsfor anadd ress book entry
(Y pag e110).
X Select thetelep hone numbe rdata field
usin gth e9: buttons and pres sth e
9 buttonto confirm .
The telepho nemak esthecall. Thedispl ay
swit ches totelepho nemod e.
Opt ion 2 X
Dis play details foranaddre ssbook entry.
X Sel ect thete lepho nenum berdatafiel d
usin gth e9: buttons .
X Sel ect Opt ions usin
gth e; buttona nd
pre ssthe 9button toconfi rm.
X Sel ect Call and
pressthe 9button to
confi rm.
The telephone makes thecall.
Opti on3 X
Sel ect anaddre ssbook entry inthe list
us ing the 9: buttons.
X Pre ssthe 6 button.
The telephone makes thecall. Us
ingthe addres sbo ok
111Tel epho ne Z
Page 114 of 210
Star
ting route guidance toan entry
Option 1 X
Search foranaddress bookentry
(Y page 109)withthe¤symbol andselect
it from thelist.
X Display detailsforanaddress bookentry
(Y page 110).
X Select theaddress datafieldusing the
9: buttonsandpress the9button
to conf irm.
Option 2 X
Search foranaddress bookentry
(Y page 109)withthe¤symbol andselect
it from thelist.
X Select Options using
the; button and
press the9button toconf irm.
X Select Navigate and
press the9button
to conf irm.
If the address dataiscomplete andit
matches thedigital map,route guidance
starts.
Subsequent operationwilldepend onhow
complete theaddress dataitems areand
whether theycorrespon dwith thedata in
the digital mapinthe navigation system.
They donot correspon d,for example, if
they arenot written inthe same wayasthe
destination entry. Voice
tags
Adding orchanging avoice tag You
canentervoic etag svia theVoic eCont rol
Syst em(Ypage 191). Once you have
assign edavoic etag toan addre ssbook entry,
you can callupthis ent rywith avoic e
com man dand dialaphon enum ber, for
exam ple.You canadd onevoic etag per
addre ssbook entry. X
Sear chfor anaddre ssbook entrywith or
with outavoic etag (¦ symbo l)
(Y page 109).
X Sele ctOpt ions usin
gth e; buttonand
pres sth e9 butt ontocon firm.
X Sele ctVoi ceName and
pres sth e9
butt ontocon firm.
X Sele ctAdd or
Cha nge and
pres sth e9
butt ontocon firm.
Subs equen toperation isvoice- controlled.
The Voice ControlSyst emguides you
thr ough thedialogs.
Deleting avoice tag X
Sear chfor anaddre ssbook entrywith a
voic etag (Ypage 109).
X Sele ctOpt ions usin
gth e; buttonand
pres sth e9 butt ontocon firm.
X Sele ctVoi ceName and
pres sth e9
butt ontocon firm.
X Sele ctDel ete and
pres s9 tocon firm.
Ad eletion prompt appears.
X Select Yes or
No and
press the9button
to con firm.
If you select Yes ,
COMAND deletesthe
voice tag.
If you select No ,
the process willbeaborted.
Listening toav oice tag X
Sear chfor anaddre ssbook entrywith a
voic etag (Ypage 109).
X Sele ctOpt ions usin
gth e; buttonand
pres sth e9 butt ontocon firm.
X Sele ctVoi ceName and
pres sth e9
butt ontocon firm.
X Sele ctLis ten and
pres sth e9 butt onto
con firm.
You hear thevoic etag . 112
Using
thead dress bookTelep hone
Page 115 of 210

Imp
orting cont acts
Cond itions You
canimpo rtco ntact stothe address book
from anexter nalBluetooth ®
device oran SD
memory card.
The Bluetooth ®
device needstobe inside the
vehicle andhastobe switched on,activated,
and authorized. Itmust beable totrans mit
cont acts and/or vCardsviaBluetooth ®
.
i Around 900entriescan bestored inthe
address book.When themaximum number
has been reached, youcan delete existing
entr ies(Ypage 110),and then import new
ones.
Import ingcontacts X
Start thedata exchan geon the exter nal
device (seetheexter naldevice's operating
instr uctions).
or
X Insert anSD memory card.
X Select Address Book in
the address book
using the:=; buttonsand
press the9button toconf irm.
X Select Download Contacts and
press the
9 button toconf irm.
Am enu appears. X
Select FromMobile Phone ,
From The Memory
Card or
Receive Business Card(s) and
press 9tocon firm.
The contact sare import ed. Deleting
contacts X
With theaddress bookshown, select
Address Book and
press the9button to
con firm.
Am enu appears.
X Select Delete Contacts and
press the
9 button tocon firm.
X Select oneofthe following options:
R Interna lContact s R
From Mobile Phone R
From TheMemory Card R
Receive dBusines sCards R
Delete All Ap
rompt correspo ndingtoyou rselection
appears.
X Select Yes or
No and
press the9button
to con firm.
If you select Yes ,
the contact sare deleted
accor dingtoyour select ion.
If you select No ,
the process willbeaborted. Opera
tingthetelephone usingthe
mult ifunction steeringwheel Telephone
menu
Introd uction You
canoperate thetelephon eusing the
function sin the "Tele phone" menu,provided
you have connected itto the Mercedes-Benz
hands-free system.
The displa yin the "Tele phone" menudepends
on the status ofthe telephone.
X Switch onthe telephone andCOMAND.
X Press theV orU button toselect the
TEL displa
y.
Telephone isready toreceive calls Bluetooth
®
interface telephony: whetherthe
network provider's nameisdispla yed
depends onthe telephone connected. Operat
ingthe telephone usingthemult ifunction steeringwheel
113Telephone Z
Page 118 of 210

COMAN
Dfea tures
Thes eOper atingIn st ruc tions desc ribeall
st andar dand optionalequipm enta vail able
for you rCOMAND systematthe time of
purcha se.Cou ntry-specifi cdeviation sare
possible. Pleasenotethat your COMAND
system maynotbeequipped withallthe
features described. Rad
iomode General
information
i Portable electronicdevices inthe vehicle
may seriously impairradiorecept ion. Switching
onrad iomode
Opt ion 1 X
Press the$ function button .
The radio display appears.
Rad iomode: youwillhear thelast station
played onthe last waveband.
i Repeatedly pressingthe$ function
button switchesthrough thewavebands in
the order FM,AM, WB(Ypage 117)and
SatRadio. Pressingthe button againtakes
you back toFM radio mode.
Opt ion 2 X
Select Audio in
the main functionbarusing
the 9=; buttonsand press the
9 button tocon firm.
If radio mode wasthelast mode selected,
it will now beactive.
If anoth eraudio mode isswitch edon, you
can now switch toradio mode inthe audio
menu.
X Select Audio using
the9 button and
press the9button tocon firm.
The audio menu appears. :
Main function bar
; Current audiooperatin gmode
= Audio menu
X Select Radio (radio
mode) usingthe
9: buttonsand press the9button
to con firm. Radio
display
: Display window withstationselect ion
; Preset position ofthe select edstat ion
= Name ofthe select edstat ion
? Frequenc yof the select edstat ion
A Sound settings
B Waveband submenu(FM,AM,WB)
C Todisplay radiotext(FM and AMdigita l
only )
D Memo ryfuncti ons
E Radio functi ons 116
Radio
modeAudio