2012 MERCEDES-BENZ GLK SUV open bonnet
[x] Cancel search: open bonnetPage 9 of 381

Auxiliary heating
Activating/deactivating .................137
Activating/deactivating (on the
centre console) .............................. 137
Display message (12-button mul-
tifunction steering wheel) ..............280
Important safety notes ..................137
Problem (display message) ............141
Remote control .............................. 138
Setting (on-board computer, 12-
button multifunction steering
wheel) ............................................ 242
Setting the departure time ............. 139
Auxiliary ventilation
Activating/deactivating .................137
Activating/deactivating (on the
centre console) .............................. 137
Problem (display message) ............141
Remote control .............................. 138B
Bag hook ............................................ 300
Ball coupling Fitting ............................................ 217
Removing ....................................... 220
Storing ........................................... 220
BAS (Brake Assist System) .................66
BAS PLUS (Brake Assist System
PLUS) .................................................... 66
Battery (key) Checking .......................................... 79
Important safety notes ....................79
Replacing ......................................... 79
Battery (vehicle)
Charging ........................................ 339
Display message (12-button mul-
tifunction steering wheel) ..............268
Display message (4-button multi-
function steering wheel) ................265
Important safety notes ..................337
Jump starting ................................. 341
Belt
see Seat belt
Belt force limiters (activation) ...........43
Belt tensioner Activation ......................................... 43
Function .......................................... .53Blinds
see Roller sunblind
Blind Spot Assist
Activating/deactivating .................237
Notes/function .............................. 203
Trailer towing ................................. 205
see Active Blind Spot Assist
BlueTEC (AdBlue ®
) ............................. 368
Bonnet Closing .......................................... .315
Display message (12-button mul-
tifunction steering wheel) ..............280
Display message (4-button multi-
function steering wheel) ................278
Opening ......................................... 313
Brake Assist System
see BAS (Brake Assist System)
Brake fluid
Display message (12-button mul-
tifunction steering wheel) ..............254
Display message (4-button multi-
function steering wheel) ................249
Notes ............................................. 371
Brake lamp
Display message (12-button mul-
tifunction steering wheel) ..............261
Display message (4-button multi-
function steering wheel) ................258
Brake lamps
Adaptive .......................................... .67
Brakes
ABS .................................................. 65
BAS .................................................. 66
BAS PLUS ........................................ 66
Brake fluid (notes) .........................371
Display message (12-button mul-
tifunction steering wheel) ..............252
Display message (4-button multi-
function steering wheel) ................247
Driving tips .................................... 167
Important safety notes ..................167
Parking brake ........................ 165, 168
Warning lamp ................................. 286
Breakdown
see Flat tyre
see Towing away/tow-starting 6
Index
Page 33 of 381

Cockpit
Function Page
:
Automatic transmission:
steering wheel gearshift
paddles
159
;
Combination switch 113
=
Instrument cluster (4-but-
ton steering wheel)
31
Instrument cluster (12-but-
ton steering wheel) 33
?
Horn
A
PARKTRONIC warning dis-
play
188
B
Overhead control panel 39
C
To operate the climate con-
trol system
128 Function Page
D
Ignition lock 147
Start/Stop button 147
E
To adjust the steering
wheel manually
101
F
To adjust the steering
wheel electrically
101
G
Cruise control lever 174
H
Parking brake 165
I
Diagnostics connection 26
J
To open the bonnet 313
K
To release the parking
brake
165
L
Light switch 11130
CockpitAt a glance
Page 75 of 381

ATA (Anti-Theft Alarm system)
A visual and audible alarm is triggered if the
alarm system is primed and you open:
R a door
R the vehicle with the emergency key ele-
ment
R the tailgate
R the bonnet
The alarm is not switched off, even if you
close the open door that has triggered it, for
example. X
To prime: lock the vehicle with the key or
KEYLESS-GO.
Indicator lamp :flashes. The alarm sys-
tem is primed after approximately
15 seconds.
X To switch off: unlock the vehicle with the
key or KEYLESS-GO.
X To stop the alarm using the key: insert
the key into the ignition lock.
The alarm is switched off.
or
X Press the %or& button on the key.
The alarm is switched off.
X To stop the alarm using KEYLESS-GO:
grasp the outside door handle. The key
must be outside the vehicle.
The alarm is switched off.
or
X Press the Start/Stop button on the dash-
board. The key must be inside the vehicle.
The alarm is switched off. Tow-away protection
An audible and visual alarm is triggered if your
vehicle's angle of inclination is altered while
tow-away protection is primed. This occurs if
the vehicle is jacked up on one side, for exam-
ple.
X To prime: lock the vehicle with the key or
KEYLESS-GO.
Tow-away protection is primed after
approximately 30 seconds.
X To switch off: unlock the vehicle with the
key or KEYLESS-GO.
Tow-away protection is switched off auto-
matically.
To prevent a false alarm, deactivate tow-away
protection manually if your vehicle:
R it is being transported
R it is being loaded onto a ferry or car trans-
porter, for example
R is parked on a movable surface, e.g. in a
split-level garage
Deactivating:
X Remove the key from the ignition lock. X
Press button :.
Indicator lamp ;lights up briefly.
X Lock the vehicle with the key or KEYLESS-
GO.
Tow-away protection is deactivated. 72
Anti-theft systemsSafety
Page 123 of 381
Replacing the front bulbs
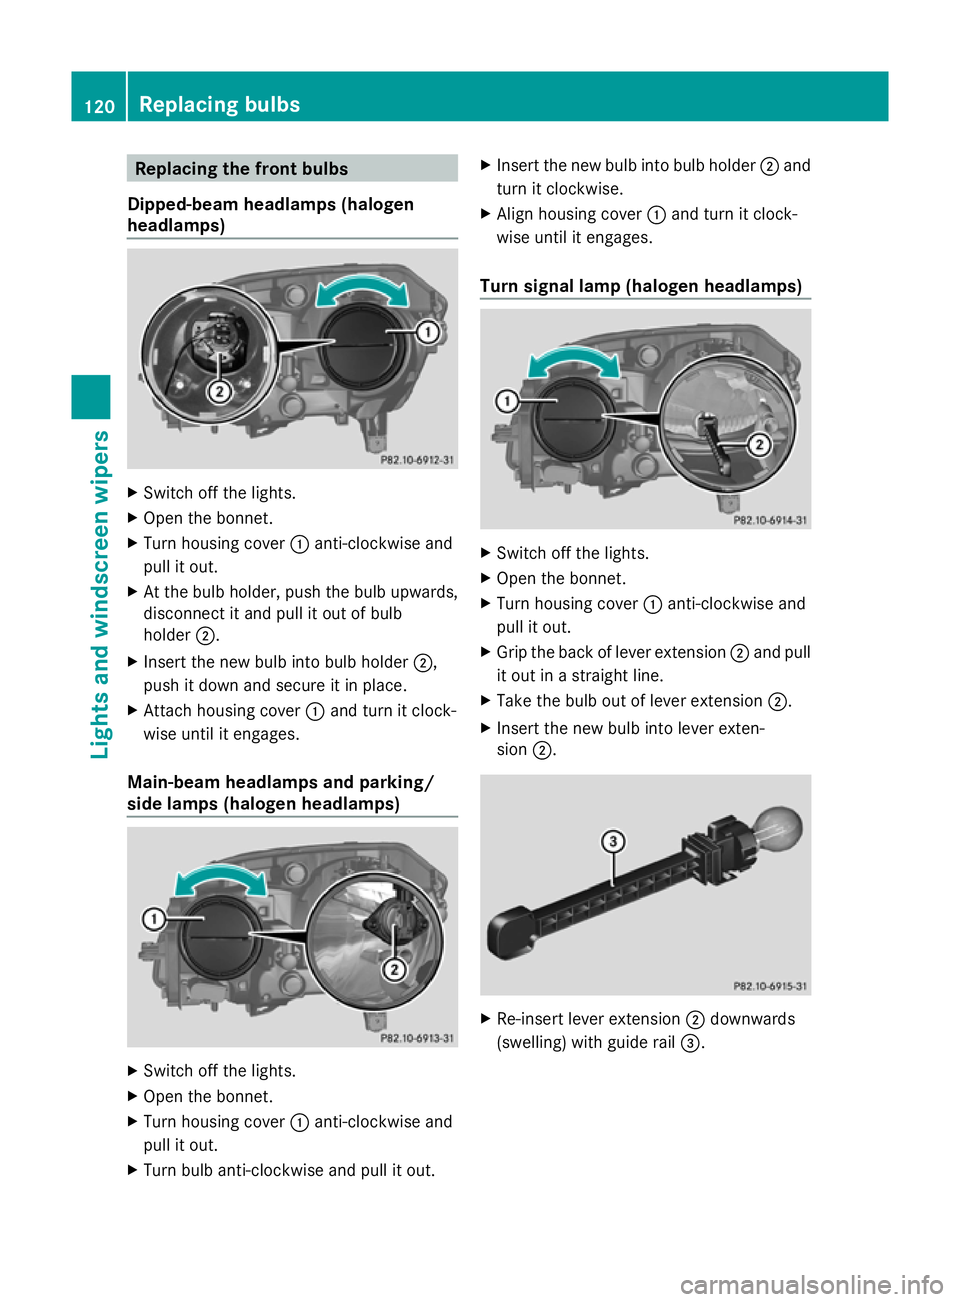
Dipped-beam headlamps (halogen
headlamps) X
Switch off the lights.
X Open the bonnet.
X Turn housing cover :anti-clockwise and
pull it out.
X At the bulb holder, push the bulb upwards,
disconnect it and pull it out of bulb
holder ;.
X Insert the new bulb into bulb holder ;,
push it down and secure it in place.
X Attach housing cover :and turn it clock-
wise until it engages.
Main-beam headlamps and parking/
side lamps (halogen headlamps) X
Switch off the lights.
X Open the bonnet.
X Turn housing cover :anti-clockwise and
pull it out.
X Turn bulb anti-clockwise and pull it out. X
Insert the new bulb into bulb holder ;and
turn it clockwise.
X Align housing cover :and turn it clock-
wise until it engages.
Turn signal lamp (halogen headlamps) X
Switch off the lights.
X Open the bonnet.
X Turn housing cover :anti-clockwise and
pull it out.
X Grip the back of lever extension ;and pull
it out in a straight line.
X Take the bulb out of lever extension ;.
X Insert the new bulb into lever exten-
sion ;. X
Re-insert lever extension ;downwards
(swelling) with guide rail =.120
Replacing bulbsLights and windscreen wipers
Page 124 of 381
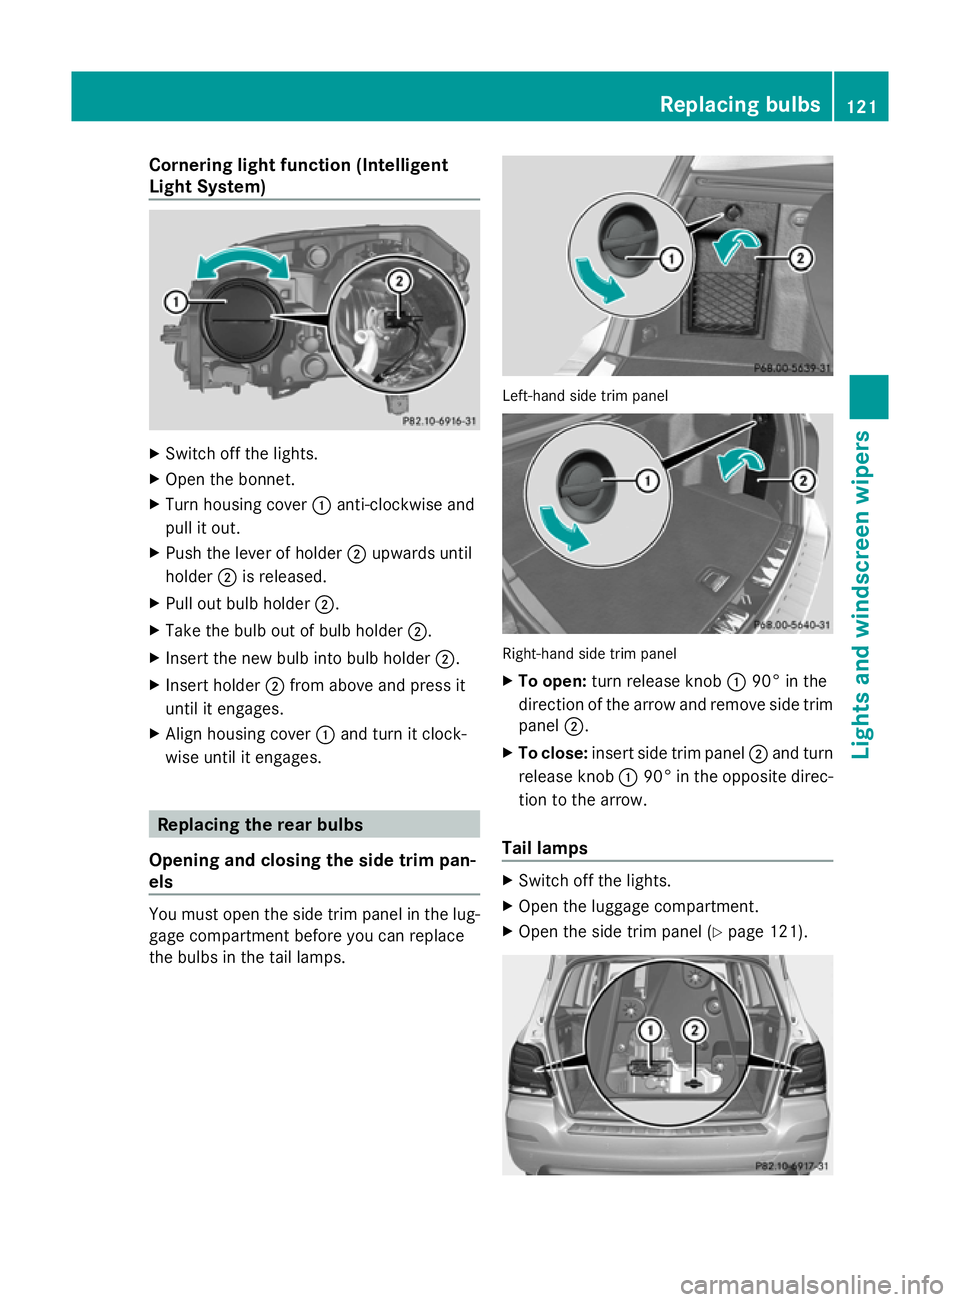
Cornering light function (Intelligent
Light System)
X
Switch off the lights.
X Open the bonnet.
X Turn housing cover :anti-clockwise and
pull it out.
X Push the lever of holder ;upwards until
holder ;is released.
X Pull out bulb holder ;.
X Take the bulb out of bulb holder ;.
X Insert the new bulb into bulb holder ;.
X Insert holder ;from above and press it
until it engages.
X Align housing cover :and turn it clock-
wise until it engages. Replacing the rear bulbs
Opening and closing the side trim pan-
els You must open the side trim panel in the lug-
gage compartment before you can replace
the bulbs in the tail lamps. Left-hand side trim panel
Right-hand side trim panel
X
To open: turn release knob :90° in the
direction of the arrow and remove side trim
panel ;.
X To close: insert side trim panel ;and turn
release knob :90°in the opposite direc-
tion to the arrow.
Tail lamps X
Switch off the lights.
X Open the luggage compartment.
X Open the side trim panel (Y page 121). Replacing bulbs
121Lights andwindscreen wipers Z
Page 126 of 381
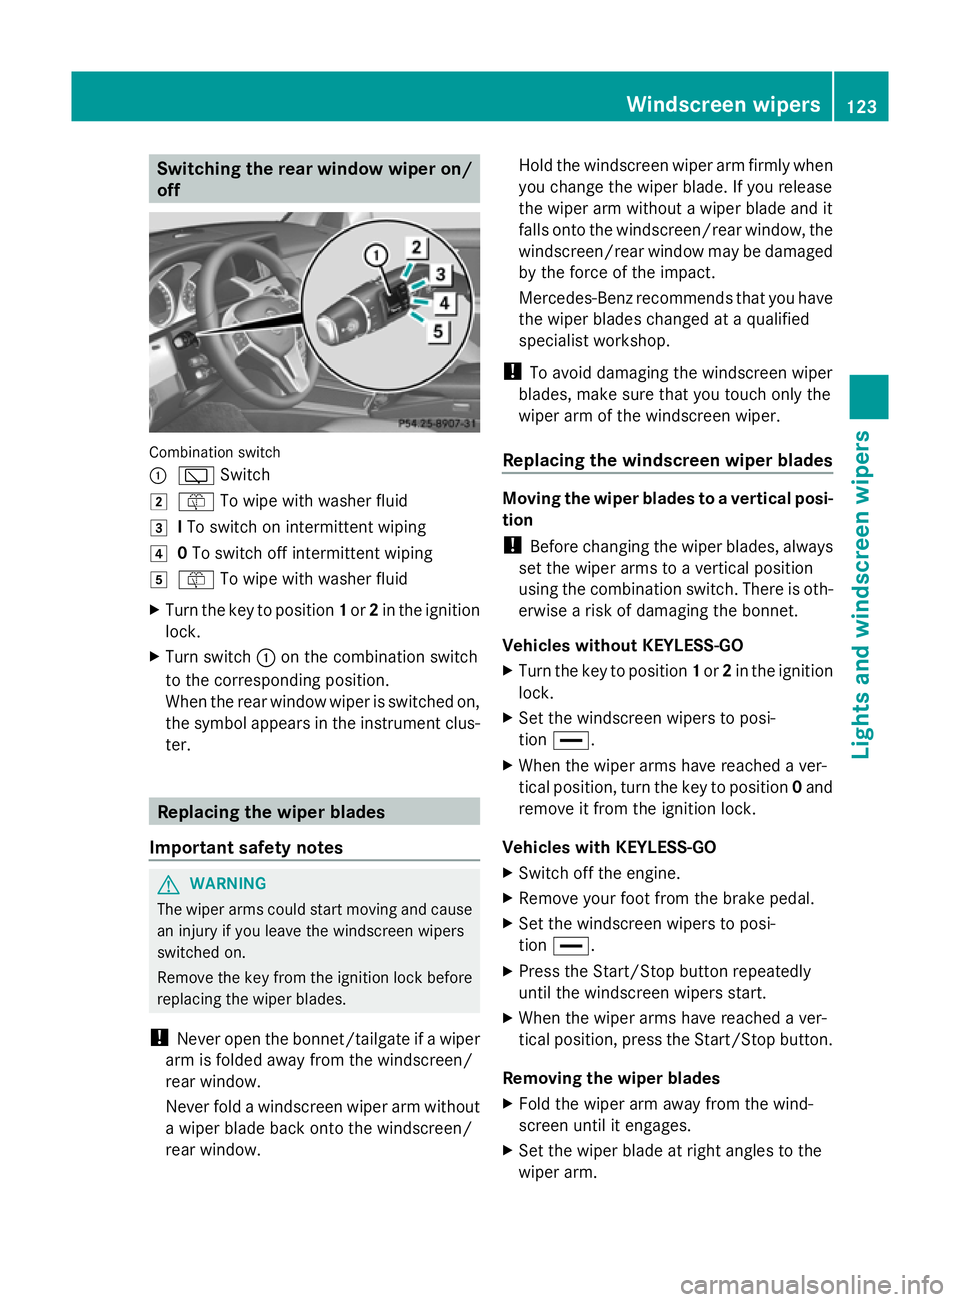
Switching the rear window wiper on/
off Combination switch
:
è Switch
2 ô To wipe with washer fluid
3 ITo switch on intermittent wiping
4 0To switch off intermittent wiping
5 ô To wipe with washer fluid
X Turn the key to position 1or 2in the ignition
lock.
X Turn switch :on the combination switch
to the corresponding position.
When the rear window wiper is switched on,
the symbol appears in the instrument clus-
ter. Replacing the wiper blades
Important safety notes G
WARNING
The wiper arms could start moving and cause
an injury if you leave the windscreen wipers
switched on.
Remove the key from the ignition lock before
replacing the wiper blades.
! Never open the bonnet/tailgate if a wiper
arm is folded away from the windscreen/
rear window.
Never fold a windscreen wiper arm without
a wiper blade back onto the windscreen/
rear window. Hold the windscreen wiper arm firmly when
you change the wiper blade. If you release
the wiper arm without a wiper blade and it
falls onto the windscreen/rear window, the
windscreen/rear window may be damaged
by the force of the impact.
Mercedes-Benz recommends that you have
the wiper blades changed at a qualified
specialist workshop.
! To avoid damaging the windscreen wiper
blades, make sure that you touch only the
wiper arm of the windscreen wiper.
Replacing the windscreen wiper blades Moving the wiper blades to a vertical posi-
tion
!
Before changing the wiper blades, always
set the wiper arms to a vertical position
using the combination switch. There is oth-
erwise a risk of damaging the bonnet.
Vehicles without KEYLESS-GO
X Turn the key to position 1or 2in the ignition
lock.
X Set the windscreen wipers to posi-
tion °.
X When the wiper arms have reached a ver-
tical position, turn the key to position 0and
remove it from the ignition lock.
Vehicles with KEYLESS-GO
X Switch off the engine.
X Remove your foot from the brake pedal.
X Set the windscreen wipers to posi-
tion °.
X Press the Start/Stop button repeatedly
until the windscreen wipers start.
X When the wiper arms have reached a ver-
tical position, press the Start/Stop button.
Removing the wiper blades
X Fold the wiper arm away from the wind-
screen until it engages.
X Set the wiper blade at right angles to the
wiper arm. Windscreen wipers
123Lights and windscreen wipers Z
Page 185 of 381
DISTRONIC PLUS must also never be oper-
ated, activated or deactivated by a passenger
or from outside the vehicle.
DISTRONIC PLUS does not replace the park-
ing brake and must not be used for parking.
The DISTRONIC PLUS braking effect is can-
celled and the vehicle can start moving if:
R DISTRONIC PLUS is deactivated using the
cruise control lever.
R you accelerate.
R there is a malfunction in the system or an
interruption in the power supply, e.g. bat-
tery failure.
R the electrical system in the engine com-
partment, the battery or the fuses are tam-
pered with.
R the battery is disconnected.
If you wish to leave the vehicle or park it,
deactivate DISTRONIC PLUS and secure the
vehicle against rolling away.
If DISTRONIC PLUS detects that the vehicle
in front is stopping, it brakes your vehicle until
it is stationary.
Once your vehicle is stationary, it remains
stationary and you do not need to depress the
brake.
i Depending on the specified minimum dis-
tance, your vehicle will come to a standstill
at a sufficient distance behind the vehicle
in front. The specified minimum distance is
set using the control on the cruise control
lever.
You will see a warning message in the multi-
function display if DISTRONIC PLUS is acti-
vated and:
R the driver's door is open and the driver's
seat belt is unfastened.
R the engine is switched off, unless it is auto-
matically switched off by the ECO start/
stop function.
R the bonnet is opened.
Select Park (P)
Select Park (P) X
Shift the transmission to position Pto pre-
vent the vehicle from rolling away.
DISTRONIC PLUS is deactivated. The warn-
ing message in the multifunction display
disappears.
The horn will also sound at regular intervals if
DISTRONIC PLUS is activated and you:
R switch the engine off, open the driver's
door and take off your seat belt
R open the bonnet
The sounding of the horn alerts you to the fact
that the vehicle has been parked while DIS-
TRONIC PLUS is still activated. The sound
becomes louder if you attempt to lock the
vehicle. The vehicle is not locked until DIS-
TRONIC PLUS is deactivated.
i If the engine has been switched off, it
cannot be started again until DISTRONIC
PLUS has been deactivated.
If DISTRONIC PLUS is activated and a fault
occurs in the system or if there is a disruption
in the power supply, the Brake immedi‐ Brake immedi‐
ately
ately message is shown in the multifunction
display. Immediately depress the brake firmly
until the warning message in the multifunc-
tion display goes out or shift the transmission
to position P. DISTRONIC PLUS is deactiva-
ted.
Setting a speed X
Press the cruise control lever up :for a
higher speed or down Afor a lower speed.
X Keep the cruise control lever pressed until
the desired speed is reached.
X Release the cruise control lever.
The new speed is stored. DISTRONIC PLUS
is activated and adjusts the vehicle's speed
to the new speed stored.
X To adjust the set speed in 1 km/h incre-
ments: briefly press the cruise control 182
Driving systemsDriving an
d parking
Page 190 of 381
Activation conditions
You can activate the HOLD function if:
R the vehicle is stationary
R the engine is running or if it has been auto-
matically switched off by the ECO start/
stop function.
R the driver's door is closed or if your seat
belt is fastened.
R the parking brake is released.
R the bonnet is closed
R the selector lever is in position D,Ror Non
vehicles with automatic transmission.
R DISTRONIC PLUS is deactivated.
Activating the HOLD function X
Make sure that the activation conditions
are met.
X Depress the brake pedal.
X Quickly depress the brake pedal further
until ë appears in the multifunction dis-
play.
The HOLD function is activated. You can
release the brake pedal.
i If depressing the brake pedal the first
time does not activate the HOLD function,
wait briefly and then try again. G
WARNING
The vehicle's brakes are applied when the
HOLD function is activated. For this reason,
deactivate the HOLD function if the vehicle is
to be set in motion by other means (e.g. in a
car wash or by towing).
Deactivating the HOLD function The HOLD function is deactivated automati-
cally if:
R
you accelerate. On vehicles with automatic
transmission: only when the transmission
is in position Dor R.
R the transmission is in position Pon vehicles
with automatic transmission. R
you depress the brake pedal again with a
certain amount of pressure until ëdis-
appears from the multifunction display.
R you activate DISTRONIC PLUS. G
WARNING
Never get out of the vehicle when the HOLD
function is activated.
The HOLD function must never be operated
or deactivated by a passenger or from outside
the vehicle.
The HOLD function does not replace the park-
ing brake and must not be used for parking.
The braking effect of the HOLD function is
cancelled and the vehicle could roll away if:
R the HOLD function is deactivated by
depressing the accelerator pedal or the
brake pedal.
R there is a malfunction in the system or an
interruption in the power supply, e.g. bat-
tery failure.
R the electrical system in the engine com-
partment, the battery or the fuses are tam-
pered with.
R the battery is disconnected.
If you leave the vehicle or park it, deactivate
the HOLD function and secure the vehicle
against rolling away.
R the driver's door is open and the driver's
seat belt is unfastened.
R the engine is switched off, unless it is auto-
matically switched off by the ECO start/
stop function.
R the bonnet is opened.
R a system fault occurs.
R the power supply is not sufficient.
In vehicles with manual transmission, you see
a warning message in the multifunction dis-
play if the HOLD function is activated and: Driving systems
187Driving and parking Z