2012 MERCEDES-BENZ GLK SUV ECU
[x] Cancel search: ECUPage 319 of 381
Adding engine oil
G
WARNING
If engine oil comes into contact with hot
engine parts, it may ignite and you could burn
yourself. Do not spill any engine oil on hot
engine parts. H
Environmental note
When topping up the oil, take care not to spill
any. If oil enters the soil or waterways, it is
harmful to the environment.
! Only use engine oils and oil filters that
have been approved for vehicles with a
service system. You can obtain a list of the
engine oils and oil filters tested and
approved in accordance with the
Mercedes-Benz Specifications for Service
Products at any Mercedes-Benz Service
Centre.
Damage to the engine or exhaust system is
caused by the following:
R using engine oils and oil filters that have
not been specifically approved for the
service system
R changing the engine oil and oil filter after
missing the change interval required by
the service system
R using engine oil additives
! Do not add too much oil. If the oil level is
above the "max" mark on the dipstick, too
much oil has been added. This can lead to
damage to the engine or the catalytic con-
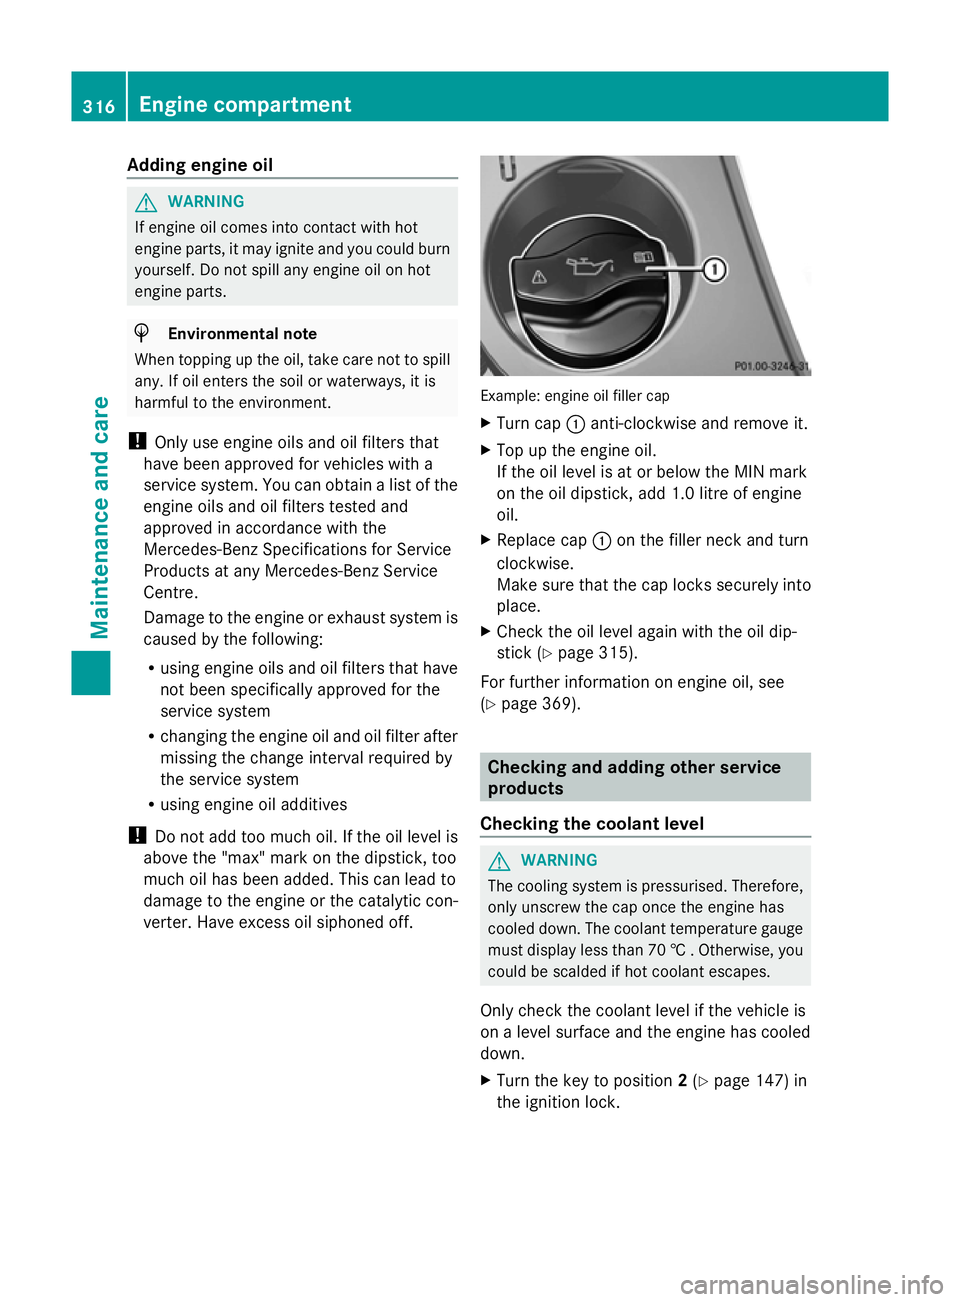
verter. Have excess oil siphoned off. Example: engine oil filler cap
X
Turn cap :anti-clockwise and remove it.
X Top up the engine oil.
If the oil level is at or below the MIN mark
on the oil dipstick, add 1.0 litre of engine
oil.
X Replace cap :on the filler neck and turn
clockwise.
Make sure that the cap locks securely into
place.
X Check the oil level again with the oil dip-
stick (Y page 315).
For further information on engine oil, see
(Y page 369). Checking and adding other service
products
Checking the coolant level G
WARNING
The cooling system is pressurised. Therefore,
only unscrew the cap once the engine has
cooled down. The coolant temperature gauge
must display less than 70 † . Otherwise, you
could be scalded if hot coolant escapes.
Only check the coolant level if the vehicle is
on a level surface and the engine has cooled
down.
X Turn the key to position 2(Y page 147) in
the ignition lock. 316
Engine compartmentMaintenance and care
Page 323 of 381
i
The vehicle should preferably be washed
by hand using a soft sponge, car shampoo
and plenty of water.
i Use only insect remover and car shampoo
from the range of recommended and
approved Mercedes-Benz care products.
Cleaning the windows G
WARNING
Switch off the windscreen wipers and remove
the key from the ignition lock before cleaning
the windscreen or the wiper blades. On vehi-
cles with KEYLESS-GO, press the Start/Stop
button repeatedly until all indicator lamps in
the instrument cluster have gone off. The
windscreen wipers could otherwise move and
injure you.
! Only fold the windscreen wipers away
from the windscreen when vertical. Other-
wise, you will damage the bonnet.
! Do not use dry cloths, abrasive products,
solvents or cleaning agents containing sol-
vents to clean the inside of the windows.
Do not touch the insides of the windows
with hard objects, e.g. an ice scraper or
ring. There is otherwise a risk of damaging
the windows.
! Clean the water drainage channels of the
windscreen and the rear window at regular
intervals. Deposits such as leaves, petals
and pollen may under certain circumstan-
ces prevent water from draining away. This
can lead to corrosion damage and damage
to electronic components.
X Clean the inside and outside of the win-
dows with a damp cloth and a cleaning
agent that is recommended and approved
by Mercedes-Benz.
Cleaning the wiper blades G
WARNING
Switch off the windscreen wipers and remove
the key from the ignition lock before cleaning the windscreen or the wiper blades. On vehi-
cles with KEYLESS-GO, press the Start/Stop
button repeatedly until all indicator lamps in
the instrument cluster have gone off. The
windscreen wipers could otherwise move and
injure you.
! Only fold the windscreen wipers away
from the windscreen when vertical. Other-
wise, you will damage the bonnet.
! Do not pull on the wiper blade. Otherwise,
the wiper blade could be damaged.
! Do not clean wiper blades too often and
do not rub them too hard. Otherwise, the
graphite coating could be damaged. This
could cause wiper noise.
! Hold the wiper arm securely when folding
back. The windscreen could be damaged if
the wiper arm hits against it suddenly.
X Fold the wiper arms away from the wind-
screen.
X Clean the wiper blades carefully using a
damp cloth.
X Fold the windscreen wipers back again
before switching on the ignition.
Cleaning the exterior lighting !
Only use cleaning agents or cleaning
cloths that are suitable for plastic lenses.
Unsuitable cleaning agents or cleaning
cloths could scratch or damage the plastic
lenses of the exterior lighting.
X Clean the plastic lenses of the exterior
lighting using a wet sponge and a mild
cleaning agent, e.g. Mercedes-Benz car
shampoo. Or clean the exterior lighting
with cleaning cloths.
Cleaning the mirror turn signal !
Only use cleaning agents or cleaning
cloths that are suitable for plastic lenses.
Unsuitable cleaning agents or cleaning 320
CareMaintenance and care
Page 336 of 381
R
the emergency spare wheel
R the wheel bolts for the emergency spare
wheel
R the tyre inflation compressor
R the wheel wrench
R the folding wheel chock
R the jack
R the ratchet ring spanner
X Secure the vehicle to prevent it from rolling
away.
Securing the vehicle against rolling
away If your vehicle is equipped with a wheel chock,
it can be found in the vehicle tool kit
(Y page 327).
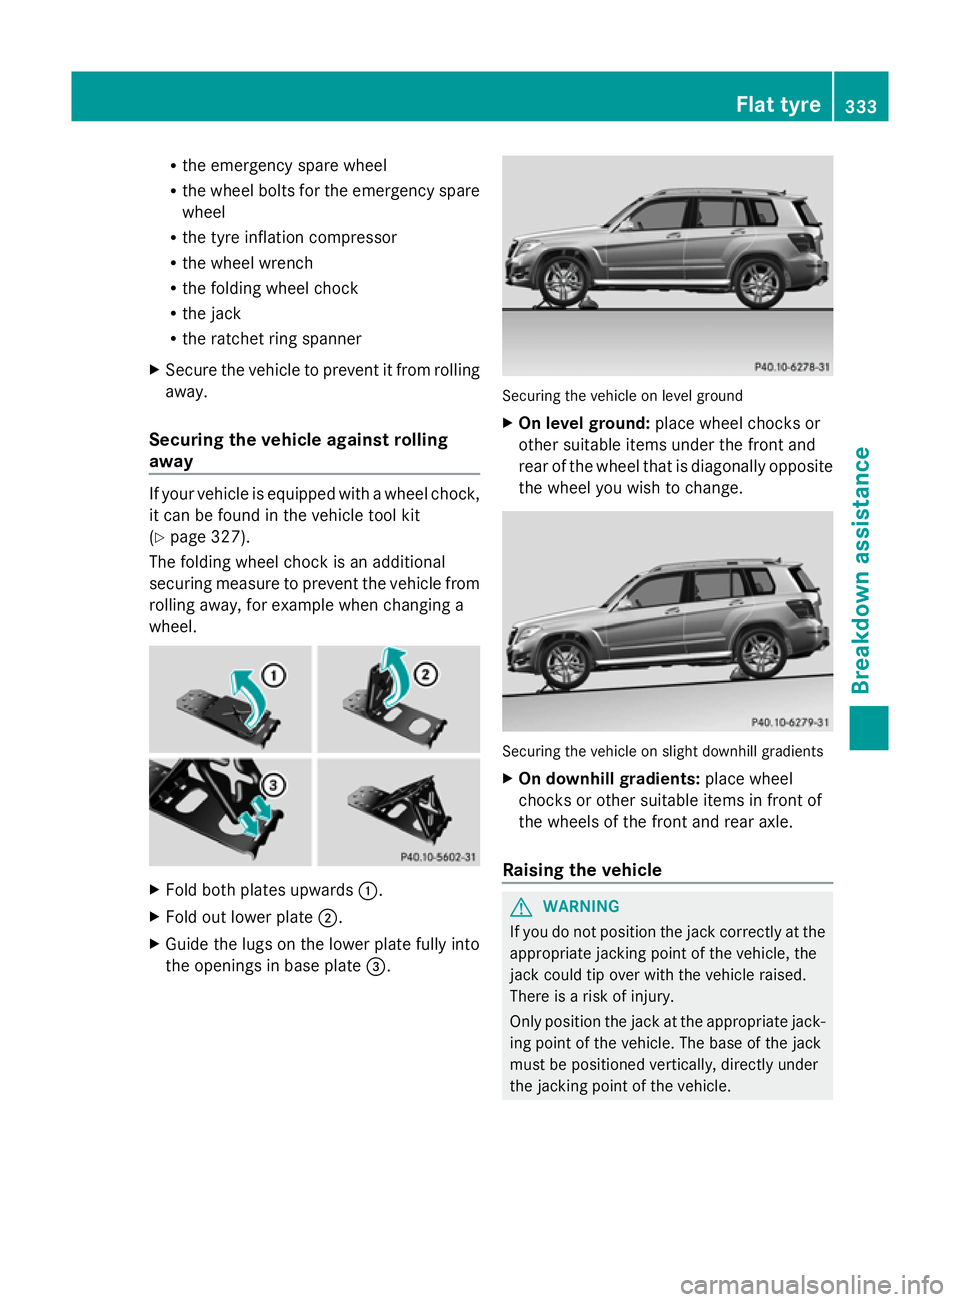
The folding wheel chock is an additional
securing measure to prevent the vehicle from
rolling away, for example when changing a
wheel. X
Fold both plates upwards :.
X Fold out lower plate ;.
X Guide the lugs on the lower plate fully into
the openings in base plate =. Securing the vehicle on level ground
X
On level ground: place wheel chocks or
other suitable items under the front and
rear of the wheel that is diagonally opposite
the wheel you wish to change. Securing the vehicle on slight downhill gradients
X
On downhill gradients: place wheel
chocks or other suitable items in front of
the wheels of the front and rear axle.
Raising the vehicle G
WARNING
If you do not position the jack correctly at the
appropriate jacking point of the vehicle, the
jack could tip over with the vehicle raised.
There is a risk of injury.
Only position the jack at the appropriate jack-
ing point of the vehicle. The base of the jack
must be positioned vertically, directly under
the jacking point of the vehicle. Flat tyre
333Breakdown assistance Z
Page 337 of 381
The following must be observed when raising
the vehicle:
R to raise the vehicle, only use the vehicle-
specific jack that has been tested and
approved by Mercedes-Benz. If the jack is
used incorrectly, it could tip over while the
vehicle is raised.
R the jack is designed only to raise and hold
the vehicle for a short time while a wheel
is being changed. It is not suited for per-
forming maintenance work under the vehi-
cle.
R avoid changing the wheel on uphill and
downhill slopes.
R before raising the vehicle, secure it from
rolling away by applying the parking brake
and inserting wheel chocks. Never disen-
gage the parking brake while the vehicle is
raised.
R the jack must be placed on a firm, flat and
non-slip surface. On a loose surface, a
large, load-bearing underlay must be used.
On a slippery surface, a non-slip underlay
must be used, e.g. rubber mats.
R do not use wooden blocks or similar
objects as a jack underlay. Otherwise, the
jack will not be able to achieve its load-
bearing capacity due to the restricted
height.
R make sure that the distance between the
underside of the tyres and the ground does
not exceed 3 cm.
R never place your hands or feet under the
raised vehicle.
R never lie under the raised vehicle.
R never start the engine when the vehicle is
raised.
R never open or close a door or the tailgate
when the vehicle is raised.
R make sure that no persons are present in
the vehicle when the vehicle is raised. X
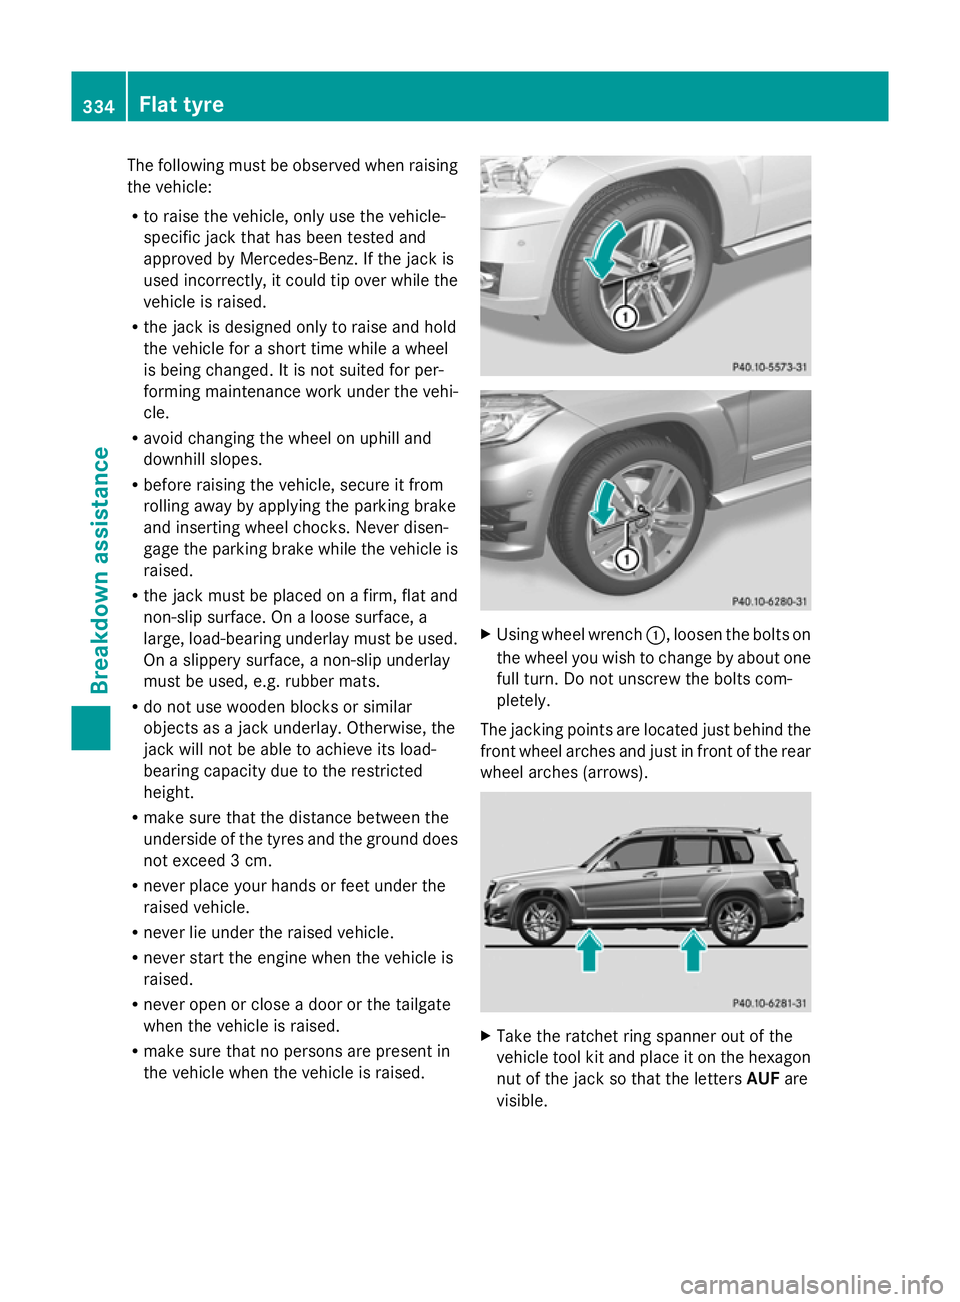
Using wheel wrench :, loosen the bolts on
the wheel you wish to change by about one
full turn. Do not unscrew the bolts com-
pletely.
The jacking points are located just behind the
front wheel arches and just in front of the rear
wheel arches (arrows). X
Take the ratchet ring spanner out of the
vehicle tool kit and place it on the hexagon
nut of the jack so that the letters AUFare
visible. 334
Flat tyreBreakdown assistance
Page 342 of 381

!
You should have all work involving the
battery carried out at a qualified specialist
workshop. In the exceptional case that it is
necessary for you to disconnect the battery
yourself, make sure that:
R you switch off the engine and remove the
key. On vehicles with KEYLESS-GO,
ensure that the ignition is switched off.
Check that all the indicator lamps in the
instrument cluster are off. Otherwise,
electronic components, such as the
alternator, may be damaged.
R you first remove the negative terminal
clamp and then the positive terminal
clamp. Never swap the terminal clamps.
Otherwise, the vehicle's electronic sys-
tem may be damaged.
R in vehicles with automatic transmission,
the transmission is locked in position P
after disconnecting the battery. The vehi-
cle is secured against rolling away. You
can then no longer move the vehicle.
The battery and the cover of the positive
terminal clamp must be fitted securely dur-
ing operation.
In order for the battery to achieve the maxi-
mum possible service life, it must always be
sufficiently charged.
Have the battery charge checked more fre-
quently if you use the vehicle mainly for short
trips or if you leave it standing idle for a
lengthy period. Consult a qualified specialist
workshop if you wish to leave your vehicle
parked up for a long period of time.
Like other batteries, the vehicle battery may
discharge over time if you do not use the
vehicle. In such cases, have the battery dis-
connected at a qualified specialist workshop.
You can also charge the battery with a
charger recommended by Mercedes-Benz.
For more information, please contact a quali-
fied specialist workshop.
i When you park the vehicle, remove the
key if you do not require any electrical con-
sumers. The vehicle will then use very little
energy, thus conserving battery power. i
If the power supply has been interrupted,
e.g. if the battery was discharged, you will
have to:
R set the clock; see the separate operating
instructions.
For vehicles with Audio 20 and a 4-button
multifunction steering wheel, see "Date/
Time" (Y page 227).
R reset the panorama sliding sunroof
(Y page 93).
R reset the function for automatically fold-
ing the exterior mirrors in/out by folding
the mirrors out once (Y page 104). Charging the battery
G
WARNING
Only charge the battery in a well-ventilated
area. As the battery is being charged, gases
can escape and generate minor explosions.
This could injure you and other persons or
cause damage to the paintwork or acid cor-
rosion on the vehicle.
You can obtain information on battery charg-
ers which allow the battery to be charged
while still installed from a qualified specialist
workshop. G
WARNING
There is a risk of acid burns during the charg-
ing process due to the gases which escape
from the battery. Do not lean over the battery
during the charging process. G
WARNING
Battery acid is caustic. Avoid contact with the
skin, eyes or clothing.
! Only charge the installed battery with a
battery charger which has been tested and
approved by Mercedes-Benz. These battery
chargers allow the battery to be charged
while still installed in the vehicle.
! Only use battery chargers with a maxi-
mum charging voltage of 14.8 V. Battery (vehicle)
339Breakdown assistance Z
Page 346 of 381
R
the engine is not running.
R there is a brake system malfunction.
R there is a malfunction in the power supply
or the vehicle's electrical system.
The power assistance for the steering and the
brake force booster do not work when the
engine is not running. You will need more
force to steer and brake, you may have to
depress the brake pedal with maximum force.
Before towing away, make sure that the steer-
ing can be moved and is not locked.
If you tow or tow-start another vehicle, its
weight must not exceed the maximum per-
missible gross vehicle weight of your vehicle. G
WARNING
The vehicle is braked when the HOLD function
or DISTRONIC PLUS is activated. Therefore,
deactivate HOLD and DISTRONIC PLUS if the
vehicle is to be towed.
It is better to have the vehicle transported
than to have it towed.
! You may tow the vehicle for a maximum
of 50km. A towing speed of 50 km/h must
not be exceeded.
For towing distances over 50 km, the entire
vehicle must be lifted up and transported.
! Only secure the tow rope or towing bar to
the towing eyes. The vehicle may otherwise
be damaged.
! Do not use the towing eye for recovery,
as this could damage the vehicle. If in
doubt, recover the vehicle with a crane.
! Pull away smoothly when towing away or
tow-starting a vehicle. If the tractive power
is too high, the vehicles could be damaged.
! On vehicles with KEYLESS-GO, use the
key instead of the Start/Stop button. Turn
the key to position 2in the ignition lock and
shift the automatic transmission to N.
Then, turn the key back to 0and leave it in
the ignition lock. When towing a vehicle with an automatic
transmission, the transmission must be in
position
N.
The battery must be connected and charged.
Otherwise, you:
R cannot turn the key in the ignition lock to
position 2
R cannot shift the transmission to position
N on vehicles with automatic transmission
i Deactivate the automatic locking feature
(Y page 83). You could otherwise be locked
out when pushing or towing the vehicle.
Deactivate tow-away protection
(Y page 72) before the vehicle is towed. Fitting/removing the towing eye
Fitting the towing eye Vehicles with a trailer tow hitch: if you intend
to use the vehicle for towing, fit the ball cou-
pling (Y
page 217) and connect the towbar to
it.
X Remove the towing eye from the vehicle
tool kit ( Ypage 327). G
WARNING
The exhaust tail pipe may be hot. You could
burn yourself if you touch the tail pipe. Be
particularly careful when removing the rear
cover.
The mountings for the removable towing eyes
are located in the bumpers. They are at the
front and at the rear, under the covers. Towing and tow-starting
343Breakdown assistance Z
Page 348 of 381
X
Release the brake pedal.
X Release the parking brake. Transporting the vehicle
The towing eyes or trailer tow hitch can be
used to pull the vehicle onto a trailer or trans-
porter if you wish to transport it.
X Vehicles with manual transmission:
shift to neutral.
X Vehicles with automatic transmission:
turn the key to position 2in the ignition
lock.
X Shift the automatic transmission to posi-
tion N.
As soon as the vehicle is loaded:
X Prevent the vehicle from rolling away by
applying the parking brake.
X Vehicles with manual transmission:
engage first or reverse gear.
X Vehicles with automatic transmission:
shift the automatic transmission to posi-
tion P.
X Turn the key in the ignition lock to position
0 and remove the key from the ignition
lock.
X Secure the vehicle.
! Only lash the vehicle down by the wheels
or wheel rims, not by parts of the vehicle
such as axle or steering components. Oth-
erwise, the vehicle could be damaged. Notes for 4MATIC vehicles
! Vehicles with 4MATIC must not be towed
with the front or rear axle raised; otherwise,
the transmission may be damaged.
If the vehicle has transmission damage or
damage to the front or rear axle, have it trans-
ported on a transporter or trailer.
In the event of damage to the electrical
system If the battery is defective, the automatic
transmission will be locked in position
P. To
shift the automatic transmission to position
N, you must provide power to the vehicle's
electrical system in the same way as when
jump-starting (Y page 341).
Have the vehicle transported on a transporter
or trailer. Recovering a vehicle that has become
stuck
! When recovering a trapped vehicle, do not
jerk the vehicle or pull it at an angle. If the
tractive power is too high, the vehicles
could be damaged.
If the drive wheels get trapped on loose or
muddy ground, recover the vehicle with the
utmost care, especially so if the vehicle is
laden.
Never attempt to recover a vehicle with a
trailer attached.
Pull out the vehicle backwards, if possible,
using the tracks it made when it became
stuck. Tow-starting (emergency engine
starting)
When tow-starting, it is important that you
observe the safety instructions (Y page 342)
and the legal requirements for the relevant
countries.
! Vehicles with automatic transmission
must not be tow-started. The transmission
may otherwise be damaged.
You can find information on "Jump-starting"
at (Y page 341).
Before tow-starting the following conditions
must be fulfilled:
R the battery is connected.
R the engine has cooled down.
R the exhaust system has cooled down. Towing and tow-starting
345Breakdown assistance Z
Page 349 of 381

X
Switch on the hazard warning lamps
(Y page 114).
X Fit the towing eye (Y page 343).
X Secure the rigid towing bar or the towing
rope.
X Depress and hold the brake pedal.
X Turn the key to position 2in the ignition
lock.
X Depress the clutch pedal and keep it
depressed.
X Engage neutral.
X Release the brake pedal.
X Tow-start the vehicle.
X Engage second gear.
X Release the clutch pedal slowly; do not
depress the accelerator pedal while doing
so.
The engine is started.
X Depress the clutch pedal and shift to neu-
tral.
X Stop at a suitable place.
X Depress the parking brake.
X Remove the rigid towing bar or towing rope.
X Remove the towing eye (Y page 344).
X Switch off the hazard warning lamps. Electrical fuses
Important safety notes
G
WARNING
Only use fuses that have been approved for
Mercedes-Benz vehicles and which have the
correct fuse rating for the systems con-
cerned. Do not attempt to repair or bridge
faulty fuses. Using fuses which have not been
approved or attempting to repair or bridge
faulty fuses could cause the fuse to be over-
loaded and result in a fire. Have the cause
traced and rectified at a qualified specialist
workshop.
! Only use fuses that have been approved
for Mercedes-Benz vehicles and which have the correct fuse rating for the system
concerned. Otherwise, components or sys-
tems could be damaged.
The fuses in your vehicle serve to disconnect
faulty circuits. If a fuse blows, all the compo-
nents on the circuit and their functions will
fail.
Blown fuses must be replaced with fuses of
the same rating, which you can recognise by
the colour and fuse rating. The fuse ratings
are listed in the fuse allocation chart.
If the newly inserted fuse also blows, have the
cause traced and rectified at a qualified spe-
cialist workshop, e.g. a Mercedes-Benz
Service Centre. Before replacing a fuse
X Secure the vehicle against rolling away
(Y page 164).
X Switch off all electrical consumers.
X Turn the key to position 0in the ignition
lock and remove it (Y page 147).
or
X On vehicles with KEYLESS-GO, make sure
the ignition is switched off (Y page 147).
All indicator lamps in the instrument cluster
must be off.
The fuses are located in various fuse boxes:
R fuse box on the driver's side of the dash-
board
R fuse box in the engine compartment on the
left-hand side of the vehicle, when viewed
in the direction of travel
R fuse box in the stowage well under the lug-
gage compartment floor on the right-hand
side of the vehicle, when viewed in the
direction of travel
The fuse allocation chart is located in the
vehicle tool kit in the stowage compartment
under the luggage compartment floor
(Y page 327). 346
Electrical fusesBreakdown assistance