2012 MERCEDES-BENZ GLK SUV ECU
[x] Cancel search: ECUPage 173 of 381
Slippery road surfaces
G
WARNING
If you shift down on a slippery road surface in
an attempt to increase the engine's braking
effect, the drive wheels could lose their grip.
This increases the risk of skidding and having
an accident.
Do not shift down for additional engine brak-
ing on a slippery road surface.
You should drive particularly carefully on slip-
pery road surfaces. Avoid sudden accelera-
tion, steering and braking manoeuvres.
If the vehicle threatens to skid or cannot be
stopped when moving at low speed:
X Move the transmission to position N.
X Try to bring the vehicle under control by
using corrective steering.
i For more information on driving with
snow chains, see (Y page 353).Off-road driving
Important safety notes G
WARNING
If you drive up a steep incline at an angle or
turn on a steep incline, the vehicle could slip
sideways, tip and overturn. There is a risk of
an accident.
When driving up an incline, drive into the line
of fall (upwards or downwards in a straight
line) and do not turn.
When driving off-road, substances such as
sand, mud and water or water mixed with oil
may get into the brakes. This may lead to a
reduction in braking performance or total
brake failure as a result of increased wear.
The braking characteristics will vary depend-
ing on the substances that get into the
brakes. Clean the brakes after driving off-
road. If you notice grinding noises or a reduc-
tion in braking performance, have the brake
system checked at a qualified specialist work- shop immediately. Adapt your driving style to
the altered braking characteristics.
Driving off-road increases the possibility of
damage to the vehicle, which may cause
assemblies or systems to fail. Adapt your
driving style to the conditions of the terrain.
Drive carefully. Have vehicle damage rectified
immediately at a qualified specialist work-
shop.
Do not shift into transmission position
N
when driving off-road. You could lose control
of the vehicle if you attempt to brake the
vehicle using the service brake. If the gradient
is too steep for your vehicle, back up in
reverse gear.
General notes H
Environmental note
Protection of the environment is of primary
importance. Treat nature with respect.
Observe all prohibiting signs.
Read this section before driving your vehicle
off-road. Practise by travelling over more gen-
tle off-road terrain first.
Off-road driving is only possible with the Off-
Road Engineering package (Y page 215).
The following driving systems are specially
adapted to off-road driving:
R Off-road drive program (Y page 215)
R Off-road ABS (Y page 65)
R Off-road 4ETS (Y page 68)
R Off-road ESP ®
(Y page 69)
R DSR (Downhill Speed Regulation)
(Y page 213)
Observe the following notes:
R Stop your vehicle and, if necessary, select
the off-road drive program (Y page 215)
before driving off-road.
R To avoid damaging the vehicle, make sure
there is always sufficient ground clearance.
R Check that items of luggage and loads are
stowed safely and are well secured
(Y page 299). 170
Driving tipsDriving and parking
Page 185 of 381
DISTRONIC PLUS must also never be oper-
ated, activated or deactivated by a passenger
or from outside the vehicle.
DISTRONIC PLUS does not replace the park-
ing brake and must not be used for parking.
The DISTRONIC PLUS braking effect is can-
celled and the vehicle can start moving if:
R DISTRONIC PLUS is deactivated using the
cruise control lever.
R you accelerate.
R there is a malfunction in the system or an
interruption in the power supply, e.g. bat-
tery failure.
R the electrical system in the engine com-
partment, the battery or the fuses are tam-
pered with.
R the battery is disconnected.
If you wish to leave the vehicle or park it,
deactivate DISTRONIC PLUS and secure the
vehicle against rolling away.
If DISTRONIC PLUS detects that the vehicle
in front is stopping, it brakes your vehicle until
it is stationary.
Once your vehicle is stationary, it remains
stationary and you do not need to depress the
brake.
i Depending on the specified minimum dis-
tance, your vehicle will come to a standstill
at a sufficient distance behind the vehicle
in front. The specified minimum distance is
set using the control on the cruise control
lever.
You will see a warning message in the multi-
function display if DISTRONIC PLUS is acti-
vated and:
R the driver's door is open and the driver's
seat belt is unfastened.
R the engine is switched off, unless it is auto-
matically switched off by the ECO start/
stop function.
R the bonnet is opened.
Select Park (P)
Select Park (P) X
Shift the transmission to position Pto pre-
vent the vehicle from rolling away.
DISTRONIC PLUS is deactivated. The warn-
ing message in the multifunction display
disappears.
The horn will also sound at regular intervals if
DISTRONIC PLUS is activated and you:
R switch the engine off, open the driver's
door and take off your seat belt
R open the bonnet
The sounding of the horn alerts you to the fact
that the vehicle has been parked while DIS-
TRONIC PLUS is still activated. The sound
becomes louder if you attempt to lock the
vehicle. The vehicle is not locked until DIS-
TRONIC PLUS is deactivated.
i If the engine has been switched off, it
cannot be started again until DISTRONIC
PLUS has been deactivated.
If DISTRONIC PLUS is activated and a fault
occurs in the system or if there is a disruption
in the power supply, the Brake immedi‐ Brake immedi‐
ately
ately message is shown in the multifunction
display. Immediately depress the brake firmly
until the warning message in the multifunc-
tion display goes out or shift the transmission
to position P. DISTRONIC PLUS is deactiva-
ted.
Setting a speed X
Press the cruise control lever up :for a
higher speed or down Afor a lower speed.
X Keep the cruise control lever pressed until
the desired speed is reached.
X Release the cruise control lever.
The new speed is stored. DISTRONIC PLUS
is activated and adjusts the vehicle's speed
to the new speed stored.
X To adjust the set speed in 1 km/h incre-
ments: briefly press the cruise control 182
Driving systemsDriving an
d parking
Page 190 of 381
Activation conditions
You can activate the HOLD function if:
R the vehicle is stationary
R the engine is running or if it has been auto-
matically switched off by the ECO start/
stop function.
R the driver's door is closed or if your seat
belt is fastened.
R the parking brake is released.
R the bonnet is closed
R the selector lever is in position D,Ror Non
vehicles with automatic transmission.
R DISTRONIC PLUS is deactivated.
Activating the HOLD function X
Make sure that the activation conditions
are met.
X Depress the brake pedal.
X Quickly depress the brake pedal further
until ë appears in the multifunction dis-
play.
The HOLD function is activated. You can
release the brake pedal.
i If depressing the brake pedal the first
time does not activate the HOLD function,
wait briefly and then try again. G
WARNING
The vehicle's brakes are applied when the
HOLD function is activated. For this reason,
deactivate the HOLD function if the vehicle is
to be set in motion by other means (e.g. in a
car wash or by towing).
Deactivating the HOLD function The HOLD function is deactivated automati-
cally if:
R
you accelerate. On vehicles with automatic
transmission: only when the transmission
is in position Dor R.
R the transmission is in position Pon vehicles
with automatic transmission. R
you depress the brake pedal again with a
certain amount of pressure until ëdis-
appears from the multifunction display.
R you activate DISTRONIC PLUS. G
WARNING
Never get out of the vehicle when the HOLD
function is activated.
The HOLD function must never be operated
or deactivated by a passenger or from outside
the vehicle.
The HOLD function does not replace the park-
ing brake and must not be used for parking.
The braking effect of the HOLD function is
cancelled and the vehicle could roll away if:
R the HOLD function is deactivated by
depressing the accelerator pedal or the
brake pedal.
R there is a malfunction in the system or an
interruption in the power supply, e.g. bat-
tery failure.
R the electrical system in the engine com-
partment, the battery or the fuses are tam-
pered with.
R the battery is disconnected.
If you leave the vehicle or park it, deactivate
the HOLD function and secure the vehicle
against rolling away.
R the driver's door is open and the driver's
seat belt is unfastened.
R the engine is switched off, unless it is auto-
matically switched off by the ECO start/
stop function.
R the bonnet is opened.
R a system fault occurs.
R the power supply is not sufficient.
In vehicles with manual transmission, you see
a warning message in the multifunction dis-
play if the HOLD function is activated and: Driving systems
187Driving and parking Z
Page 223 of 381
Coupling up a trailer
G
WARNING
If you uncouple a trailer with an engaged over-
run brake, you could trap your hand between
the vehicle and the trailer drawbar. This poses
a risk of injury.
Do not uncouple a trailer with an engaged
overrun brake.
X Make sure that the transmission is in posi-
tion P.
X Engage the parking brake.
X Position the trailer level behind the vehicle.
X Couple up the trailer.
X Establish the electric connection between
the vehicle and the trailer.
X Check that the trailer lighting system is
working. Uncoupling a trailer
G
WARNING
Vehicles with level control:
If you disconnect the trailer cable, the vehicle
is lowered. This can cause you or others to
become trapped between the vehicle body
and tyres, or underneath the vehicle. This
poses a risk of injury.
Make sure that no-one is in the immediate
vicinity of the wheel arch or underneath the
vehicle when disconnecting the trailer cable.
! Do not disconnect a trailer with an
engaged overrun brake. Otherwise, your
vehicle could be damaged by the rebound-
ing of the overrun brake.
X Make sure that the transmission is in posi-
tion P.
X Engage the parking brake.
X Secure the trailer against rolling away.
X Remove the trailer cable and decouple the
trailer. Removing the ball coupling
X Pull the protective cap off the lock in the
handwheel.
X Use the key to unlock the lock in the hand-
wheel.
X Hold the ball coupling. Pull the handwheel
away from the ball coupling and turn it
clockwise until it engages.
The green area on the ball coupling is
aligned with the red mark on the hand-
wheel.
X Pull the ball coupling downwards to
remove.
X Clean the ball coupling if it is dirty.
Information on cleaning and care of the trailer
tow hitch can be found under (Y page 321). Storing the ball coupling
G
WARNING
Never transport an unsecured ball coupling in
the interior of the vehicle.
Otherwise, vehicle occupants could be
injured by the ball coupling being thrown if
you:
R brake sharply
R change direction suddenly
R have an accident
X Open the stowage well under the luggage
compartment floor.
X Remove the cover from the ball coupling
recess.
X Remove the protective cap from the ball
coupling recess.
X Press the protective cap into the ball cou-
pling recess until it engages.
X Make sure that the protective cap is firmly
in place.
X Store the ball coupling with the key inser-
ted in the ball coupling recess. 220
Towing a trailerDriving and parking
Page 224 of 381
X
Replace the cover of the ball coupling
recess and engage it.
X Fold the trailer power socket upwards. Trailer power supply
When it leaves the factory, your vehicle's
trailer socket is equipped with a permanent
power supply and a power supply that is
switched on via the ignition lock.
The permanent power supply is supplied via
trailer socket pin 9.
The power supply that is switched on via the
ignition lock is supplied via trailer socket pin
10.
! You can connect accessories with a
power rating of up to 240 W to the perma-
nent power supply and with a power rating
of up to 180 W to the power supply that is
switched on via the ignition lock.
The trailer battery may not be charged from
the power supply.
The trailer's permanent power supply is
switched off in the event of low vehicle supply
voltage and after six hours at the latest.
You can find more information about fitting
the trailer electrics at a qualified specialist
workshop.
X To switch the connected power supply
on or off: turn the key in the ignition lock
to position 2or 0respectively. Trailer with 7-pin connector
General notes Trailer with 7-pin connector:
you can con-
nect to the 13-pin socket on the ball coupling
using an adapter or, if necessary, an adapter
cable. Both can be obtained at a qualified
specialist workshop. Fitting the adapter
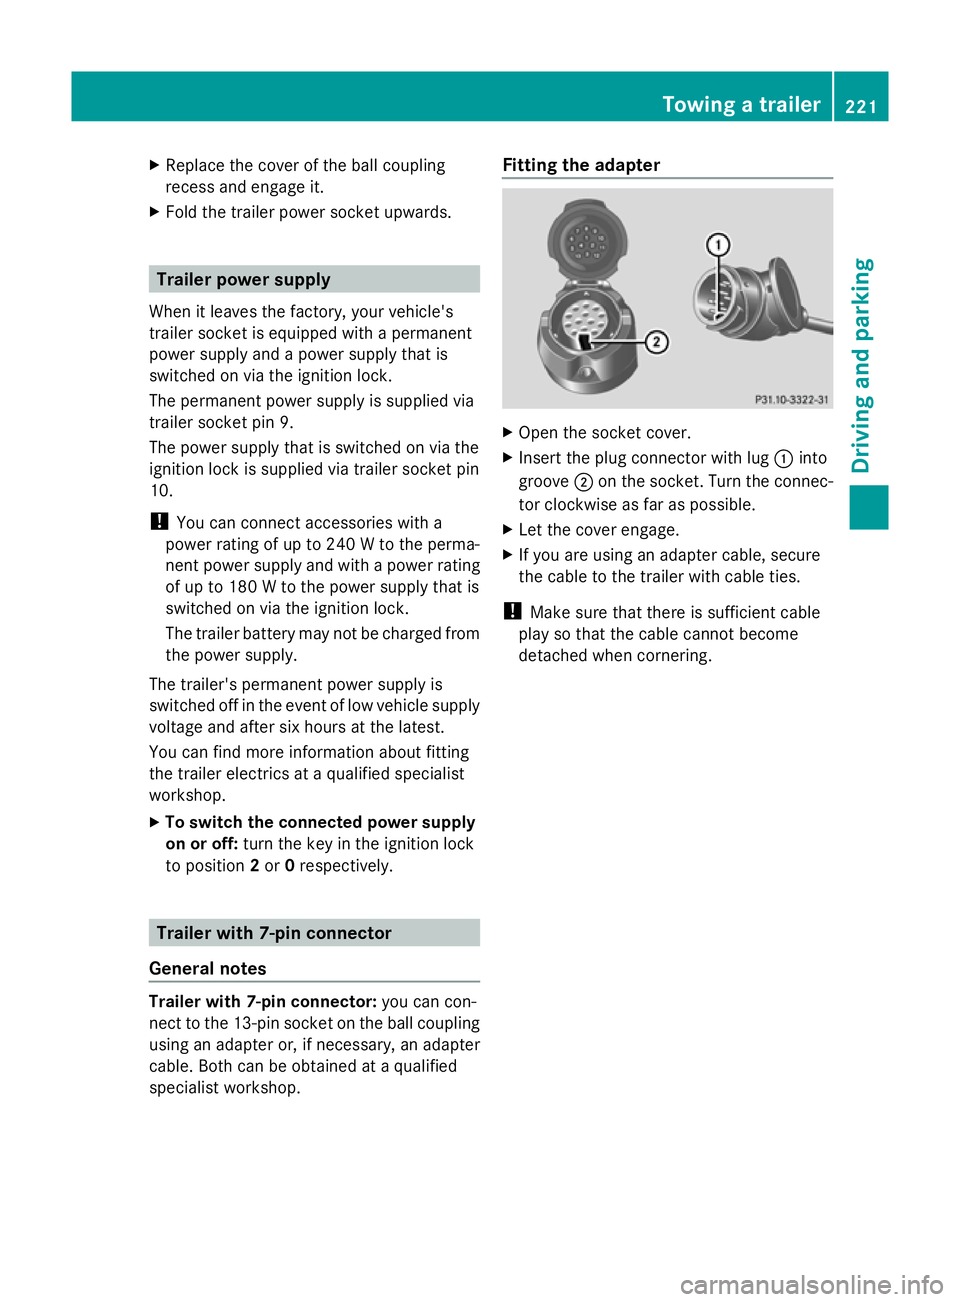
X
Open the socket cover.
X Insert the plug connector with lug :into
groove ;on the socket. Turn the connec-
tor clockwise as far as possible.
X Let the cover engage.
X If you are using an adapter cable, secure
the cable to the trailer with cable ties.
! Make sure that there is sufficient cable
play so that the cable cannot become
detached when cornering. Towing a trailer
221Driving and parking Z
Page 246 of 381
maximum of two times, drive for a longer
distance.
i Switch the auxiliary heating on regularly
once a month for about ten minutes.
Selecting the departure time or deactivat-
ing a selected departure time
X Press the =or; button on the steer-
ing wheel to select the Settings Settingsmenu.
X Press the :or9 button to select the
Heating
Heating submenu.
X Press ato confirm.
You will see the selected setting.
X Press ato confirm.
X Press the :or9 button to select
one of the three departure times or Timer
Timer
off
off (no timer active).
X Press ato confirm.
If a departure time is selected, the yellow
indicator lamp lights up on the auxiliary
heating button.
Changing the departure time
X Press the =or; button on the steer-
ing wheel to select the Settings
Settings menu.
X Press the :or9 button to select the
Heating
Heating submenu.
X Press ato confirm.
You will see the selected setting.
X Press ato confirm.
X Press the :or9 button to select A
A,
B B or Change C
Change C.
X Press ato confirm.
You can now change the departure time.
X Press the =or; button to select the
display to be changed: hours, minutes.
X Press the :or9 button to set the
selected display.
X Press the abutton to store the entry.
The yellow indicator lamp on the auxiliary
heating button lights up. Convenience Activating/deactivating the EASY-
ENTRY/EXIT feature
G
WARNING
The steering wheel moves when the EASY-
ENTRY/EXIT feature is active. There is a risk
of occupants becoming trapped. Before acti-
vating the EASY-ENTRY/EXIT feature, make
sure that nobody can become trapped.
Do not leave children unsupervised in the
vehicle, even if they are secured in a child
restraint system. The children could open the
driver's door and thereby unintentionally acti-
vate the EASY-ENTRY/EXIT feature and
become trapped.
X Press the =or; button on the steer-
ing wheel to select the Settings Settingsmenu.
X Press the :or9 button to select the
CONVENIENCE
CONVENIENCE submenu.
X Press ato confirm.
X Press the :or9 button to select the
Easy Entry/Exit:
Easy Entry/Exit: function.
If the Easy Entry/Exit
Easy Entry/Exit function is activa-
ted, the vehicle steering wheel is displayed
in red in the multifunction display.
X Press the abutton to save the setting.
Further information on the EASY-ENTRY/EXIT
feature (Y page 102).
Switching the belt adjustment on/off
X Press the =or; button on the steer-
ing wheel to select the Settings Settingsmenu.
X Press the :or9 button to select the
Convenience
Convenience submenu.
X Press ato confirm.
X Press the :or9 button to select the
Belt adjustment
Belt adjustment function.
When the Belt adjustment
Belt adjustment function is
activated, the vehicle seat belt is displayed
in red in the multifunction display.
X Press the abutton to save the setting.
For further information on belt adjustment,
see (Y page 51). Displays and operation (12-button multifunction steering wheel)
243On-board computer and displays Z
Page 252 of 381
Display messages Possible causes/consequences and
M
MSolutions J
Brake immediately Brake immediately With the Hold function activated, you have either:
R
opened the driver's door and released the seat belt or
R switched off the engine or
R opened the bonnet
A tone may also sound at regular intervals. If you attempt to lock
the vehicle, the tone becomes louder.
You cannot start the engine.
X Paying attention to the traffic situation, immediately depress the
brake pedal firmly and hold until the display message disap-
pears.
X Use the folding wheel chock (Y page 333), from the vehicle tool
kit to secure the vehicle against rolling away.
You can restart the engine. J
Check brake fluid Check brake fluid
level level There is insufficient brake fluid in the brake fluid reservoir.
In addition, the red
Jwarning lamp lights up in the instrument
cluster and a warning tone sounds.
G WARNING
The braking efficiency may be impaired.
There is a risk of an accident.
X Pull over and stop the vehicle safely as soon as possible, paying
attention to road and traffic conditions. Do not continue driving
under any circumstances.
X Secure the vehicle against rolling away ( Ypage 164).
X Consult a qualified specialist workshop.
X Do not top up the brake fluid. This does not correct the error. #
Check brake wear Check brake wear The brake pads/linings have reached their wear limit.
X
Visit a qualified specialist workshop. PRE-SAFE PRE-SAFE
inoperative inoperative
G
WARNING
Important functions of PRE-SAFE ®
have failed. All other occupant
safety systems, e.g. airbags, remain available.
This poses an increased risk of injury.
X Visit a qualified specialist workshop. ü If the symbol appears in the multifunction display, a seat belt
tongue has been inserted into a rear seat belt buckle.
Further information on the status indicator for the rear seat belts
(Y
page 53). Display
messages
249On-board computer and displays Z
Page 257 of 381
Display messages Possible causes/consequences and
M
MSolutions J
Brake immediately Brake immediately A malfunction has occurred while the HOLD function or DIS-
TRONIC PLUS is active.
or
Vehicles with manual transmission: with the HOLD function acti-
vated, you have either:
R
opened the driver's door and released the seat belt or
R switched off the engine or
R opened the bonnet.
A tone may also sound at regular intervals. If you attempt to lock
the vehicle, the tone becomes louder.
You cannot start the engine.
X Paying attention to the traffic situation, immediately depress the
brake pedal firmly and hold until the display message disap-
pears.
X Use the folding wheel chock (Y page 333), from the vehicle tool
kit to secure the vehicle against rolling away.
You can restart the engine. J
Check brake fluid Check brake fluid
level level There is insufficient brake fluid in the brake fluid reservoir.
In addition, the red
Jwarning lamp lights up in the instrument
cluster and a warning tone sounds.
G WARNING
The braking efficiency may be impaired.
There is a risk of an accident.
X Pull over and stop the vehicle safely as soon as possible, paying
attention to road and traffic conditions. Do not continue driving
under any circumstances.
X Secure the vehicle against rolling away ( Ypage 164).
X Consult a qualified specialist workshop.
X Do not top up the brake fluid. This does not correct the error. #
Check brake wear Check brake wear The brake pads/linings have reached their wear limit.
X
Visit a qualified specialist workshop. PRE-SAFE PRE-SAFE
inoperative See inoperative See
Owner's Manual Owner's Manual
Important functions of PRE-SAFE
®
have failed. All other occupant
safety systems, e.g. airbags, remain available.
X Visit a qualified specialist workshop immediately. 254
Display
messagesOn-board computer and displays