2012 MERCEDES-BENZ GLK SUV fuel
[x] Cancel search: fuelPage 35 of 381
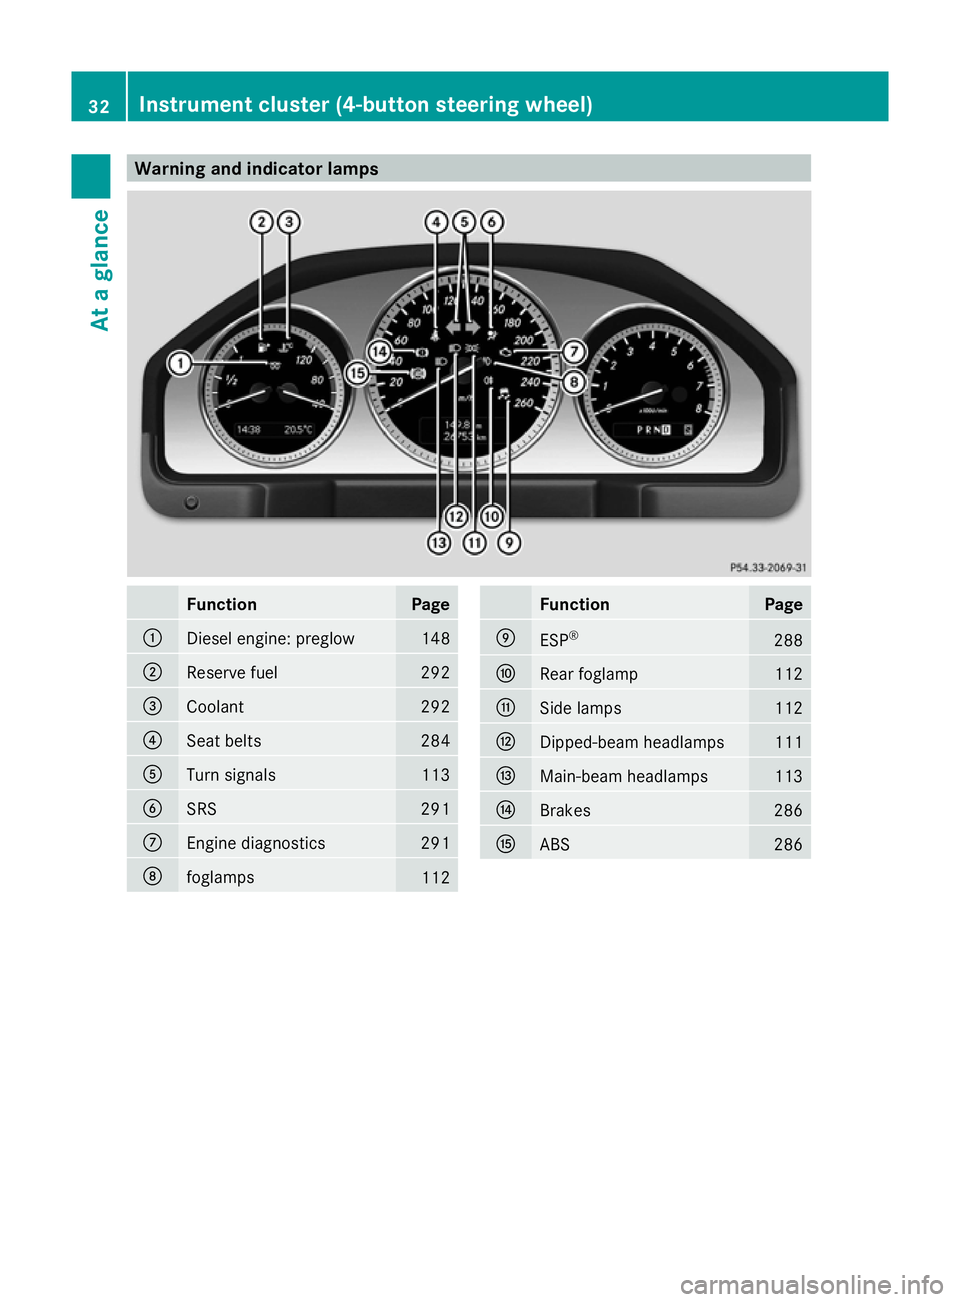
Warning and indicator lamps
Function Page
:
Diesel engine: preglow 148
;
Reserve fuel 292
=
Coolant 292
?
Seat belts 284
A
Turn signals 113
B
SRS 291
C
Engine diagnostics 291
D
foglamps
112 Function Page
E
ESP
® 288
F
Rear foglamp 112
G
Side lamps 112
H
Dipped-beam headlamps 111
I
Main-beam headlamps 113
J
Brakes 286
K
ABS 28632
Instrument cluster (4-button steering wheel)At a glance
Page 36 of 381
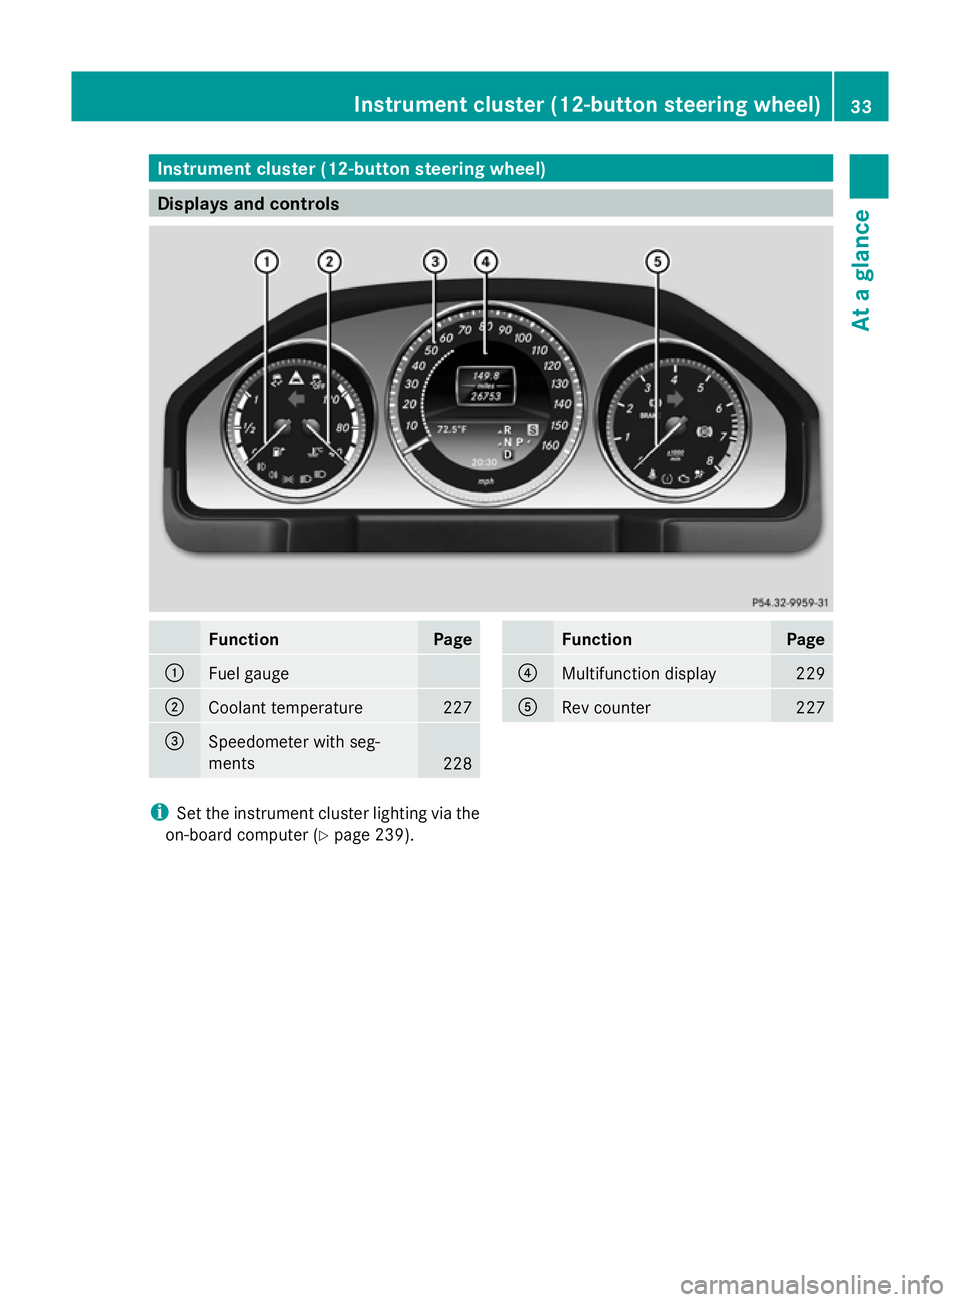
Instrument cluster (12-button steering wheel)
Displays and controls
Function Page
:
Fuel gauge
;
Coolant temperature 227
=
Speedometer with seg-
ments
228 Function Page
?
Multifunction display 229
A
Rev counter 227
i
Set the instrument cluster lighting via the
on-board computer (Y page 239). Instrument cluster (12-button steering wheel)
33At a glance
Page 37 of 381

Warning and indicator lamps
Function Page
:
÷
ESP® 288
;
·
Distance warning 294
=
å
ESP®
OFF 288
?
J
Brakes 286
A
#!
Turn signals 113
B
!
ABS 286
C
6
SRS 291
D
;
Engine diagnostics 291
E
ü
Seat belt 284 Function Page
F
%
Diesel engine: pre-
glow 148
G
?
Coolant 292
H
K
Main-beam headlamp 113
I
L
Dipped-beam head-
lamps 111
J
T
Side lamps 112
K
R
Rear foglamp 112
L
N
Front foglamps 112
M
8
Reserve fuel 29234
Instrument cluster (12-button steering wheel)At a glance
Page 79 of 381

Useful information
i This Owner's Manual describes all mod-
els, series and optional equipment for your
vehicle that were available at the time of
going to press. National variations are pos-
sible. Note that your vehicle may not be
equipped with all of the functions descri-
bed. This is also the case for systems and
functions relevant to safety.
i Read the information on qualified special-
ist workshops: (Y page 27). Key
Important safety notes
G
WARNING
Only for the United Kingdom: if the vehicle
has been locked with the key, the double lock
function is activated as standard. It is then not
possible to open the doors from inside the
vehicle.
Therefore, do not leave any people behind in
the vehicle, particularly children, elderly peo-
ple or people in need of special assistance if
the vehicle has been locked with the key. As
a result, they may not be able to free them-
selves in the event of an emergency. As a
result, they could be seriously or even fatally
injured by prolonged exposure to extremely
high or low temperatures, for example. In this
case, rescuing people from outside the vehi-
cle is difficult.
Deactivate the interior motion sensor before
you lock the vehicle with the key. The doors
can then be opened from the inside after the
vehicle has been locked from the outside with
the key. G
WARNING
If children are left unsupervised in the vehicle,
they could: R
open a door from inside the vehicle at any
time, even if it has been locked
R start the vehicle using a key which has been
left in the vehicle
R release the parking brake
They could thereby endanger themselves and
others. Never leave children unsupervised in
the vehicle. Always take the key with you
when leaving the vehicle, even if you are only
leaving it for a short time. G
WARNING
If a key ring is too heavy or too large, the
weight acting on the key could cause it to turn
in the ignition lock or catch on the steering
wheel. This could cause the engine to be
switched off suddenly. You may lose control
of the vehicle and cause an accident. Do not
attach any heavy or large key rings to the key
that is inserted in the ignition.
R Do not keep the KEYLESS-GO key:
-with electronic devices, e.g. a mobile
phone or another key
- with metallic objects, e.g. coins or metal
film
- with metallic objects, e.g. a metal case
This can affect the key's functionality.
Keep the key away from strong magnetic
fields. Otherwise, the remote control function
could be affected. Key functions
The key centrally locks/unlocks:
R the doors
R the tailgate
R the fuel filler flap 76
KeyOpening and closing
Page 81 of 381

Changing the settings of the locking
system
You can change the settings of the locking
system. This means that only the driver's door
and the fuel filler flap are unlocked when the
vehicle is unlocked. This is useful if you fre-
quently travel on your own.
X To change the setting: press and hold
down the %and& buttons simulta-
neously for approximately six seconds until
the battery check lamp (Y page 79)
flashes twice.
i If the setting of the locking system is
changed within the signal range of the vehi-
cle, pressing the &or% button:
R locks or
R unlocks the vehicle
The key now functions as follows:
X To unlock the driver's door: press the
% button once.
X To unlock centrally: press the%but-
ton twice.
X To lock centrally: press the&button.
The KEYLESS-GO function is changed as fol-
lows:
X To unlock the driver's door: touch the
inner surface of the door handle on the
driver's door.
X To unlock centrally: touch the inner sur-
face of the door handle on the front-
passenger door or the rear door.
X To lock centrally: touch the outer sensor
surface on one of the door handles
(Y page 77).
X To restore the factory settings: press
and hold down the %and& buttons
simultaneously for approximately six sec-
onds until the battery check lamp flashes
twice. Emergency key element
General notes If the vehicle can no longer be locked or
unlocked with the key, use the emergency
key element.
If you use the emergency key element to
unlock and open the driver's door, the anti-
theft alarm system will be triggered
(Y
page 72).
There are several ways to turn off the alarm:
X To turn the alarm off with the key: press
the % or& button on the key.
or
X Insert the key into the ignition lock.
or
X To deactivate the alarm with KEYLESS-
GO: press the Start/Stop button in the igni-
tion lock. The key must be in the vehicle.
or
X Lock or unlock the vehicle using KEYLESS-
GO. The key must be outside the vehicle.
If you unlock the vehicle using the emergency
key element, the fuel filler flap will not be
unlocked automatically.
Removing the emergency key element X
Push release catch :in the direction of
the arrow and at the same time, remove
emergency key element ;from the key. 78
KeyOpening and closing
Page 86 of 381
Unlocking and opening the doors
from the inside
For all countries except the United King-
dom: you can open a door from inside the
vehicle even if it has been locked.
Only for the United Kingdom: if the vehicle
has been locked with the key, the double lock
function is activated as standard. It is then
not possible to open the doors from inside the
vehicle. Deactivate the interior motion sensor
(Y page 73) before you lock the vehicle with
the key. The doors can then be opened from
the inside after the vehicle has been locked
from the outside with the key.
You can only open the rear doors from inside
the vehicle if they are not secured by the
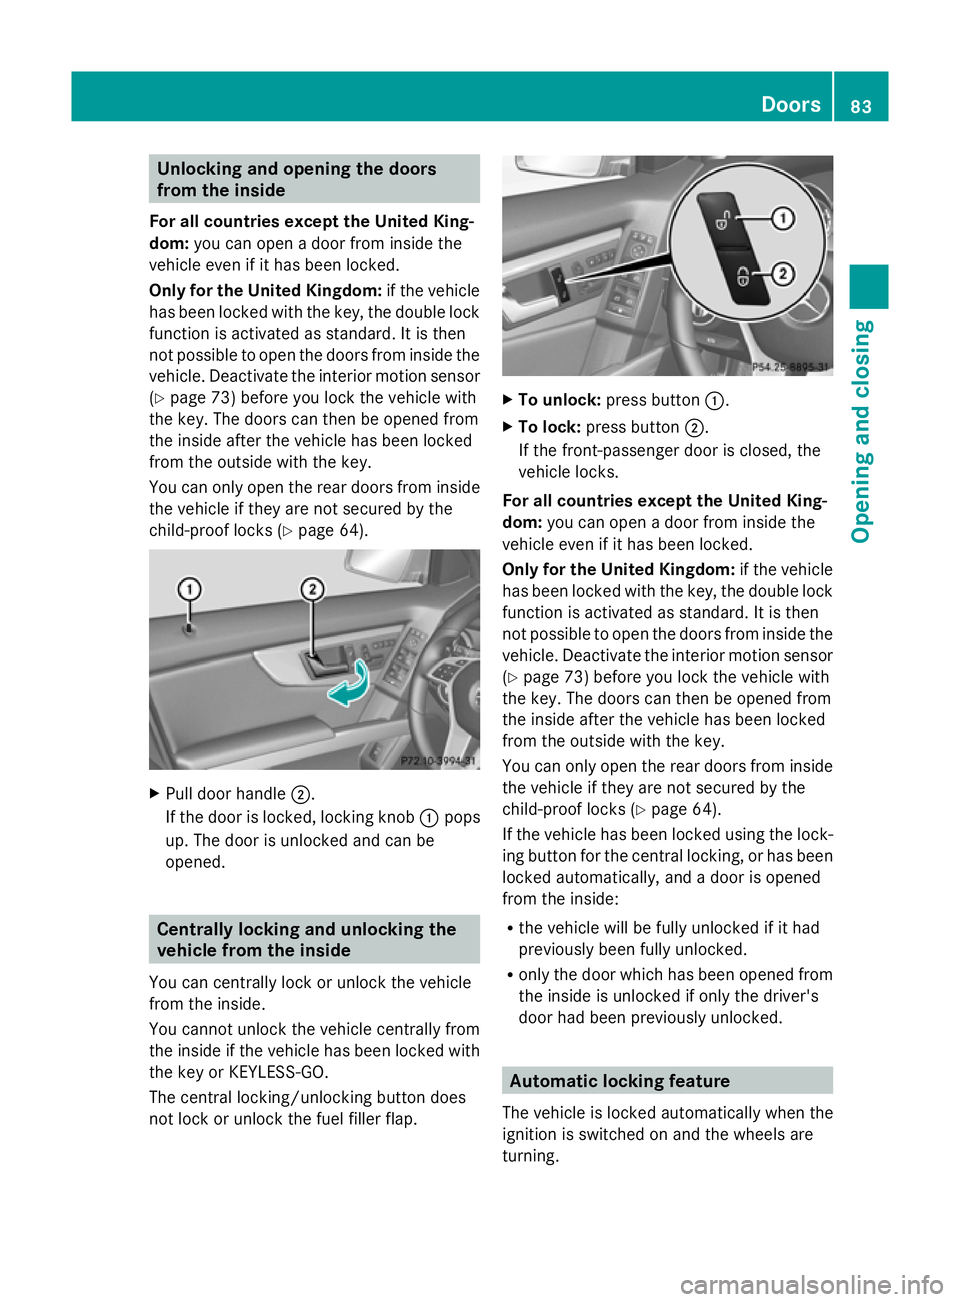
child-proof locks (Y page 64).X
Pull door handle ;.
If the door is locked, locking knob :pops
up. The door is unlocked and can be
opened. Centrally locking and unlocking the
vehicle from the inside
You can centrally lock or unlock the vehicle
from the inside.
You cannot unlock the vehicle centrally from
the inside if the vehicle has been locked with
the key or KEYLESS-GO.
The central locking/unlocking button does
not lock or unlock the fuel filler flap. X
To unlock: press button :.
X To lock: press button ;.
If the front-passenger door is closed, the
vehicle locks.
For all countries except the United King-
dom: you can open a door from inside the
vehicle even if it has been locked.
Only for the United Kingdom: if the vehicle
has been locked with the key, the double lock
function is activated as standard. It is then
not possible to open the doors from inside the
vehicle. Deactivate the interior motion sensor
(Y page 73) before you lock the vehicle with
the key. The doors can then be opened from
the inside after the vehicle has been locked
from the outside with the key.
You can only open the rear doors from inside
the vehicle if they are not secured by the
child-proof locks (Y page 64).
If the vehicle has been locked using the lock-
ing button for the central locking, or has been
locked automatically, and a door is opened
from the inside:
R the vehicle will be fully unlocked if it had
previously been fully unlocked.
R only the door which has been opened from
the inside is unlocked if only the driver's
door had been previously unlocked. Automatic locking feature
The vehicle is locked automatically when the
ignition is switched on and the wheels are
turning. Doors
83Opening and closing Z
Page 88 of 381
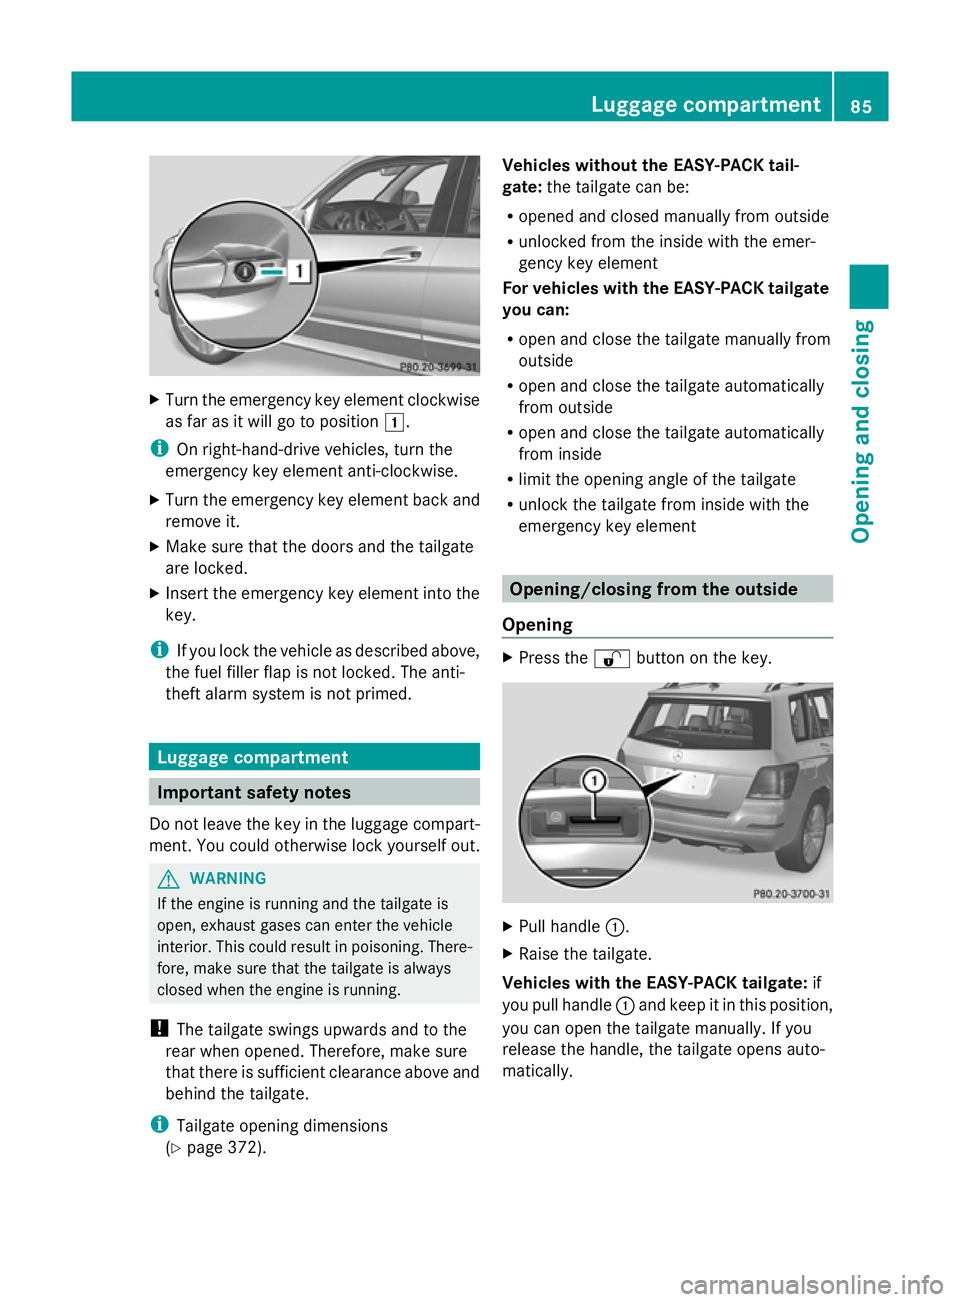
X
Turn the emergency key element clockwise
as far as it will go to position 1.
i On right-hand-drive vehicles, turn the
emergency key element anti-clockwise.
X Turn the emergency key element back and
remove it.
X Make sure that the doors and the tailgate
are locked.
X Insert the emergency key element into the
key.
i If you lock the vehicle as described above,
the fuel filler flap is not locked. The anti-
theft alarm system is not primed. Luggage compartment
Important safety notes
Do not leave the key in the luggage compart-
ment. You could otherwise lock yourself out. G
WARNING
If the engine is running and the tailgate is
open, exhaust gases can enter the vehicle
interior. This could result in poisoning. There-
fore, make sure that the tailgate is always
closed when the engine is running.
! The tailgate swings upwards and to the
rear when opened. Therefore, make sure
that there is sufficient clearance above and
behind the tailgate.
i Tailgate opening dimensions
(Y page 372). Vehicles without the EASY-PACK tail-
gate:
the tailgate can be:
R opened and closed manually from outside
R unlocked from the inside with the emer-
gency key element
For vehicles with the EASY-PACK tailgate
you can:
R open and close the tailgate manually from
outside
R open and close the tailgate automatically
from outside
R open and close the tailgate automatically
from inside
R limit the opening angle of the tailgate
R unlock the tailgate from inside with the
emergency key element Opening/closing from the outside
Opening X
Press the %button on the key. X
Pull handle :.
X Raise the tailgate.
Vehicles with the EASY-PACK tailgate: if
you pull handle :and keep it in this position,
you can open the tailgate manually. If you
release the handle, the tailgate opens auto-
matically. Luggage compartment
85Opening and closing Z
Page 140 of 381
Auxiliary heating
Important safety notes G
WARNING
Exhaust fumes are produced when the auxili-
ary heating is in operation. Inhaling these
exhaust fumes can be poisonous. You should
therefore switch off the auxiliary heating in
confined spaces without an extraction sys-
tem, e.g. a garage. G
WARNING
When operating the auxiliary heating parts of
the vehicle can get very hot. Make sure that
the exhaust system does not under any cir-
cumstances come into contact with easily
ignitable material such as dry grass or fuels.
The material could otherwise ignite and set
the vehicle alight. Choose your parking spot
accordingly.
Operating the auxiliary heating is thus pro-
hibited at filling stations or when your vehicle
is being refuelled. You must therefore switch
off the auxiliary heating at filling stations.
! Operating the auxiliary heating/ventila-
tion draws on the vehicle battery. After you
have heated or ventilated the vehicle a
maximum of two times, drive for a longer
distance.
i Switch the auxiliary heating on regularly
once a month for about ten minutes.
The auxiliary heating heats the air in the
passenger compartment to the selected tem-
perature. It does not use the heat of the run-
ning engine to do this. The auxiliary heating
is operated directly using the vehicle's fuel.
For this reason, the tank content must be at
least at reserve fuel level to ensure that the
auxiliary heating functions.
The auxiliary heating/ventilation automati-
cally adjusts to changes in temperature and
weather conditions. For this reason, the aux-
iliary heating could switch from ventilation
mode to heating mode or from heating mode
to ventilation mode. The auxiliary heating switches off automati-
cally after 50 minutes. This time limit can be
altered. To do this, visit a qualified specialist
workshop.
You cannot use the auxiliary ventilation to
cool the vehicle interior to a temperature
lower than the outside temperature.
Before switching on
X
Turn the key to position 2in the ignition
lock.
X Set the temperature.
The auxiliary heating/ventilation can be acti-
vated even when climate control is set to
manual. Optimum comfort can be attained
when the system is set to automatic mode.
Set the temperature to 22 †.
The auxiliary heating/ventilation can be acti-
vated or deactivated using the remote control
or the button on the centre console.
The on-board computer can be used to spec-
ify up to three departure times, one of which
may be preselected (Y page 242).
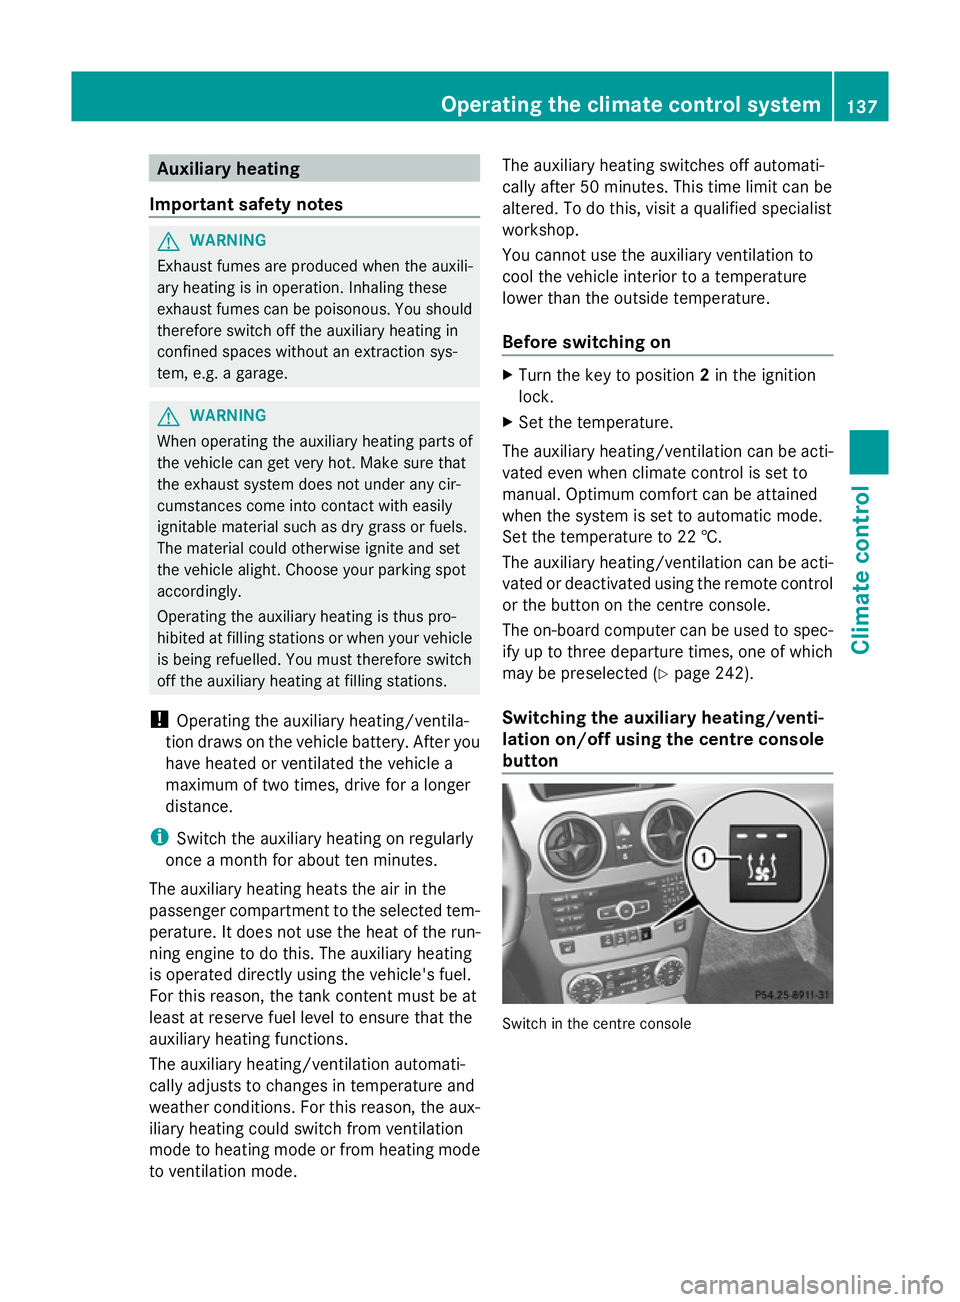
Switching the auxiliary heating/venti-
lation on/off using the centre console
button Switch in the centre consoleOperating the climate control system
137Climate control Z