2012 MERCEDES-BENZ GL SUV light
[x] Cancel search: lightPage 133 of 441

X
Align housing cover :and turn it clock-
wise unti litengages.
X Replace the cove rinthe front wheel arch
(Y page 129).
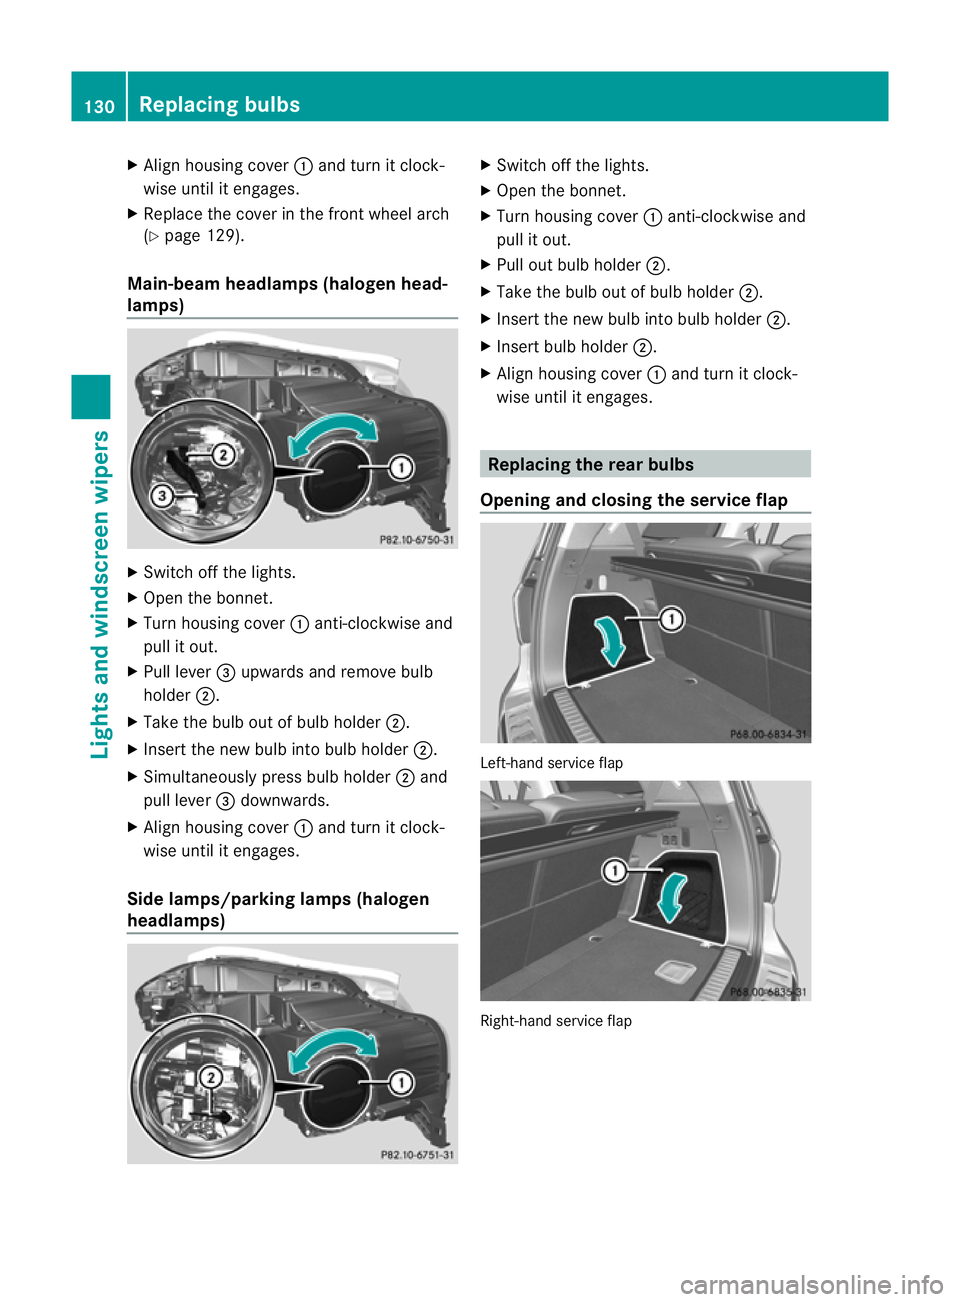
Main-beam headla mps(halogen head-
lamps) X
Switch off the lights.
X Open the bonnet.
X Turn housing cover :anti-clockwise and
pull it out.
X Pull lever =upwards and remov ebulb
holder ;.
X Take the bulb out of bulb holder ;.
X Insert the new bulb into bulb holder ;.
X Simultaneously press bulb holder ;and
pull lever =downwards.
X Align housing cover :and turn it clock-
wise until it engages.
Side lamps/parking lamps (halogen
headlamps) X
Switch off the lights.
X Open the bonnet.
X Turn housing cover :anti-clockwise and
pull it out.
X Pull out bulb holder ;.
X Take the bulb out of bulb holder ;.
X Insert the new bulb into bulb holder ;.
X Insert bulb holder ;.
X Align housing cover :and turn it clock-
wise until it engages. Replacing the rear bulbs
Openin gand closing th eservice flap Left
-hand service flap Right-hand service flap130
Replacin
gbulbsLight sand windscreen wipers
Page 134 of 441

You must open the service flap in the luggage
compartmen
tbefor eyou can replac ethe
bulbs in the bra kelamp.
X To open: release service flap :at the top,
e.g. with ascrewdriver, and swing it down-
ward in the dire ction of the arrow.
X Right side: remove the first -aid kit before-
hand and pull the luggage net down.
X To close: reinsert service flap :.
Brake lamp X
Switch off the lights.
X Open the luggage compartment.
X Open the service flap (Y page 130).
X Turn bulb holder :anti-clockwise and
remove it.
X Take bulb out of bulb holder :.
X Insert the new bulb int obulb holder :.
X Insert bulb holder :intothe lamp and turn
it clockwise.
X Close th eservic eflap (Y page 130). Windscree
nwipers Switchin
gthe windscreen wiper son/
off G
WA
RNING
The windscree nwill not longer be wiped prop-
erly if the wiper blades are worn .This could
prevent you from observing the traffic condi-
tions, thereby causing an accident .Replace the wiper blades twic
eayear, ideally in spring
and autumn.
! Do not operate the windscreen wipers
when the windscreen is dry, as this could
damage the wiper blades. Moreover ,dust
that has collected on the windscreen can
scratc hthe glass if wipin gtakes place when
the windscreen is dry.
If it is necessary to switch on the wind-
screen wipers in dry weather conditions,
always operate them using washe rfluid.
! If the windscreen wipers leave smears on
the windscreen after the vehicle has been
washed in an automatic car wash, this may
be due to wax or other residue. Clean the
windscreen with washer fluid after an auto-
matic car wash.
! Intermit tentwiping with rain sensor: due
to optical influences and the windscreen
becoming dirty in dry weather conditions,
the windscreen wipers may be activated
inadvertently. This could damage the wind-
screen wiper blades or scratc hthe wind-
screen.
For this reason, you should always switch
off the windscreen wiper sind ry weather. Combinatio
nswitch
1 $ Windscreen wipers off
2 Ä Intermittent wipe, low (rain sensor
set to low sensitivity)
3 Å Intermittent wipe, high (rain sensor
set to high sensitivity)
4 ° Continuous wipe, slow Windscreen wipers
131Lights and windscreen wipers Z
Page 135 of 441

5
¯ Continuous wipe, fast
B í Single wipe
C î To wipe with washer fluid
X Turn the key to position 1or 2in the ignition
lock (Y page 159).
X Turn the combination switc htothe corre-
sponding position.
In the ÄorÅ position, the appropriate
wipin gfrequency is se tautomatically accord-
ing to the intensity of the rain. In the Å
posi tion, the rain sensor is mor esensitive
than in the Äposition, causin gthe wind-
screen wiper stowipe mor efrequently. Switc
hing th erearw indow wiper on/
off Combi
nation switch
: è Rear windo wwiper switch
2 b To wipe with washer fluid
3 ITo switc honintermitten twiping
4 0To switc hoff intermittent wiping
5 ô To wip ewith washer fluid
X Turn the key to position 1or 2in the ignition
lock (Y page 159).
X Turn switch :on the combination switch
to the correspondin gposition.
When the rea rwindow wiper is switched on,
the icon appears in the instrumen tcluster. Replacing th
ewiper blades
Important safety notes G
WAR
NING
The wipe rarms could start moving and cause
an injury if you leave the windscreen wipers
switche don.
Remove the key from the ignition lock before
replacing the wipe rblades.
! Never open the bonnet if awindscreen
wiper arm has been folded away from the
windscreen.
Never fold awindscreen wiper arm without
aw iper blade back ont othe windscreen/
rea rwindow.
Hold the windscreen wiper arm firmly when
you change the wiper blade. If you release
the windscreen wiper arm without awiper
blade and it falls ont othe windscreen, the
windscreen ma ybedamaged by the force
of the impact.
Mercedes-Benz recommends that you have
the wiper blades changed at aqualified
specialist workshop.
! To avoid damaging the windscreen wiper
blades, mak esure that you touc honly the
wipe rarm of th ewindsc reen wiper.
Replacing th ewindscreen wiper blades Removing th
ewiper blades
X Remov ethe key fr om theignition lock.
X Fold the wiper ar maway fro mthe wind-
screen. 132
Windscreen wipersLights and windscreen wipers
Page 136 of 441

X
Firml ypress release knob :and pull the
wipe rblade upwards from the wiper arm in
the directio nofthe arrow.
Fitting th ewiper blades X
Position the new wiper blade in the retainer
on the wiper arm and slide it into place in
the opposite direction to the arrow.
The wiper blade audibly engages.
X Make sure that wiper blade is seated cor-
rectly.
X Fold the wiper arm back onto the wind-
screen.
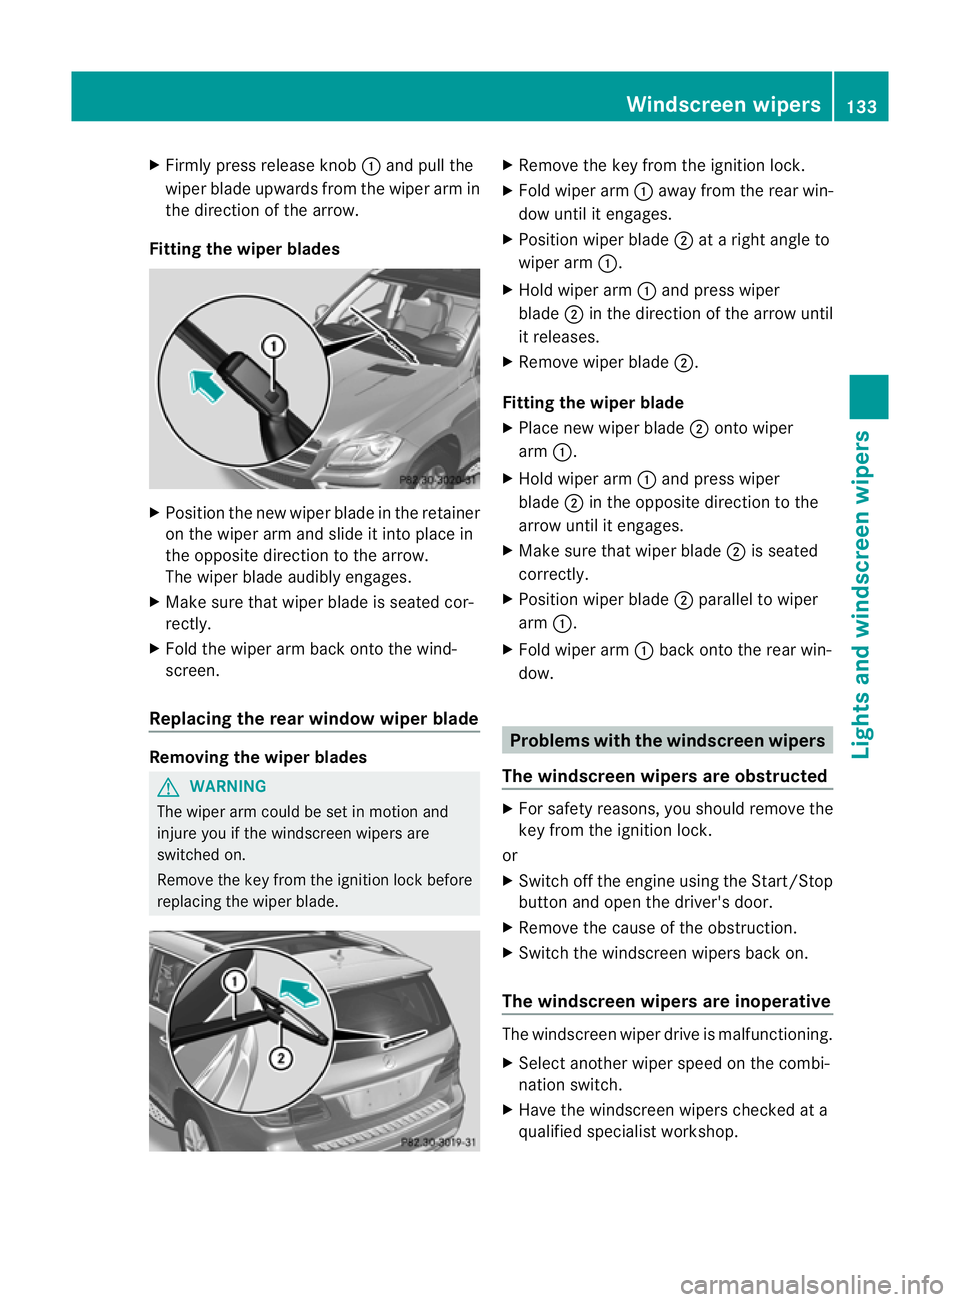
Replacing the rear window wiper blade Removing the wiper blades
G
WARNING
The wiper arm could be set in motion and
injur eyou if the windscreen wiper sare
switched on.
Remove th ekey from the ignition lock before
replacing the wiper blade. X
Remov ethe key from the ignition lock.
X Fold wiper arm :away from the rea rwin-
dow until it engages.
X Position wiper blade ;atar ight angle to
wiper arm :.
X Hold wiper arm :and press wiper
blade ;in the direction of the arrow until
it releases.
X Remove wiper blade ;.
Fitting the wiper blade
X Place new wiper blade ;onto wiper
arm :.
X Hold wiper arm :and press wiper
blade ;in the opposite direction to the
arrow until it engages.
X Make sure that wiper blade ;is seated
correctly.
X Position wiper blade ;parallel to wiper
arm :.
X Fold wiper arm :back onto the rear win-
dow. Problems with the windscreen wipers
The windscreen wipers are obstructed X
For safety reasons, you should remov ethe
key from the ignition lock.
or
X Switc hoff th eengine using the Start/Stop
butto nand ope nthe driver's door.
X Remove the cause of the obstruction.
X Switc hthe windscreen wiper sback on.
The windscreen wipers are inoperative The windscreen wiper drive is malfunctioning.
X
Select another wiper spee donthe combi-
nation switch.
X Hav ethe windscreen wiper schecked at a
qualified specialist workshop. Windscreen wipers
133Lights and windscreen wipers Z
Page 141 of 441

=
Directs the airflo wthroug hthe rear air vents
? Directs the airflow thr oughthe footwell vents Informatio
nabout using THERMATIC
automatic climate control
The following contains notes and recommen-
dation sonoptimum use of THERMATIC auto-
matic climate control.
R Activat eclimate control using the Ãand
Á buttons. The indicator lamps in the
à andÁ buttons light up.
R Set the temperature to 22 †.
R Only use the demisting func tion briefly until
the windscreen is clea ragain.
R Only use the air-recirculation mode briefly,
e.g. if ther eare unpleas anto utside odours
or when in atunnel. The windows could
otherwis emist up as no fresh air is drawn
into the vehicle in air-recirculation mode.
R Use the ZONE func tion to adopt the tem-
peratur esettings on the driver' sside for
the front-passenger side as well. The indi-
cator lamp above the ábutton goes
out. 138
Overview of climate control systemsClimat
econtrol
Page 144 of 441

Q
Switche srear-com partment climate contro lon/of f(Y page 141)
R Reduces the airflow (Y page 144)Informat
iona bout using
THERMOTRONIC automatic climate
control
The following contains instructions and rec-
omm endations to enabl eyou to get the most
ou tofy our THERMOTRONIC automatic cli-
mate con trol.
R Activate climate con trol using the Ãand
¿ buttons. The indicator lamps above
the à and¿ button slight up.
R In automatic mode, you can also use the
ñ button to set aclimate mode
(FOCUS/MEDIUM/DIFFUSE). The
MEDIU Mlevel is recommended.
R Set the temperature to 22 †.
R Only use the demisting function briefly until
the windscreen is clear again.
R Only use the air-recir culation mode briefly,
e.g. if there are unpleasant outside odours
or when in atunnel. The windows could
otherwis emist up as no fresh air is drawn
into the vehicle in air-recirculation mode.
R Use the ZONE func tion to adopt the tem-
peratur esettings on the driver' sside for
the front-passenger side and the rear com-
partmen taswell. The indicator lamp above
the á button goes out.
R Use the residual heat function if you want
to heat or ventilate the vehicl einterior
whe nthe ignition is switched off .The resid-
ual heat func tion can only be activated or
deactivated with the ignition switched off. Operating th
eclimat econtrol system Switching climate control on/off
Points to observe before use i
If climat econtrol is switched off ,the air
supply and air circulation ar ealso switched off. Only select this settin
gbriefly. Other-
wise ,the windows ma ymist up.
i Switch on climate control primarily using
the à button (Y page 142).
In the rear compartment, you can also switch
climate control on and off using the Ãand
^ buttons.
Switching on/off X
Turn the key to position 2in the ignition
lock.
X To switch on: press buttonÃ.
The indicator lamp in the Ãbutton lights
up. Airflow and air distribution are set to
automatic mode.
or
X Press the ^button.
The indicator lamp in the ^button goes
out. The previous settings are reactivated.
X To switch off: press the^button.
The indicator lamp in the ^button lights
up. Activating/deactivating the cooling
with air dehu
midification function
Points to observe before use G
WARNING
If the "cooling with air dehumidification" func-
tion is deactivated, the air inside the vehicle
will not be cooled (during warm weather) or
dehumidified. The windows could mist up
more quickly. This may prevent you from
observing the traffic conditions, thereby caus-
ing an accident.
The cooling with air dehumidification function
is only available when the engine is running.
The air inside the vehicle is cooled and dehu- Operating the climate control system
141Climatecontrol Z
Page 145 of 441

mid
ified according to the temperature selec-
ted.
Condensation may drip from the undersid eof
the vehicl ewhen cooling mode is active .This
is norma land not asign that there is amal-
function.
i The cooling with air dehumidification
function uses refrigerant R134a. This
refrigerant does not contain chlorofluoro-
carbons, and therefore does not damage
the ozone layer.
Switching on/off ¿
button (example)
X To activate: press the¿/Á button.
The indicator lamp in the ¿/Ábut-
ton lights up.
X To deactivate: press the¿/Á but-
ton.
The indicator lamp in the ¿/Ábut-
ton goes out. The cooling with air dehumid-
ificatio nfunction has adelayed switch-off
feature.
Problems with the cooling with air
dehumidification function When you press the
¿button ,the indica-
tor lam pint he button fla shes three times or
remains off .You can no longer switch on the
cooling with air dehumidification function.
X Visit aquali fieds pecialist workshop. Setting clima
tecontrol to automatic
mode
Points to observe before use In automatic mode, the set temperature is
maintained automatically at
aconstan tlevel.
The system automatically regulates the tem-
perature of the dispensed air ,the airflo wand
the air distribution.
Automatic mode will achieve optimal opera-
tion if cooling with air dehumidification is also
activated. If desired, cooling with air dehu-
midification can be deactivated.
In the rear compartment ,you can also switch
climate control for the rea rseats to automatic
mode using the Ãbutton.
Switching on/off X
Turn the key to position 2in the ignition
lock.
X Set the desired temperature.
X To activate: press theÃbutton.
The indicator lam pintheà button lights
up. Automati cair distribution and airflow
are activated.
i THERMOTRONIC automatic climat econ-
trol: when automatic mode is activated, you
can select aclimate mode (Y page 143).
X To select manually: press the_but-
ton.
or
X Press the IorK button.
The indicator lamp in the Ãbutton goes
out. 142
Operating th
eclimat econtrol systemClimat econtrol
Page 146 of 441

Setting th
eclimat emode
In automatic mode you can select the follow-
ing climat emodes:
FOCU Shigh airflow that is set slightly
cooler
MEDIU Mmedium airflow, standard setting
DIFFUS Elow airflow that is set slightly
warmer and with less of adraught ñ
button (example)
X Turn th ekey to position 2in the igniti on
lock.
X Press the Ãbutton.
X Press the ñbutton repeatedly until the
desired climate mode appears in the dis-
play. Setting the temperature
THERMATIC automatic climate control Different temperatures can be set for the
driver's and front-passenge rsides.
X Turn the key to position 2in the ignition
lock.
X To increase/reduce: turnc ontrol :or
B clockwise or anti-clockwise
(Y page 13 7).
Only cha nget he temperatur esettin gin
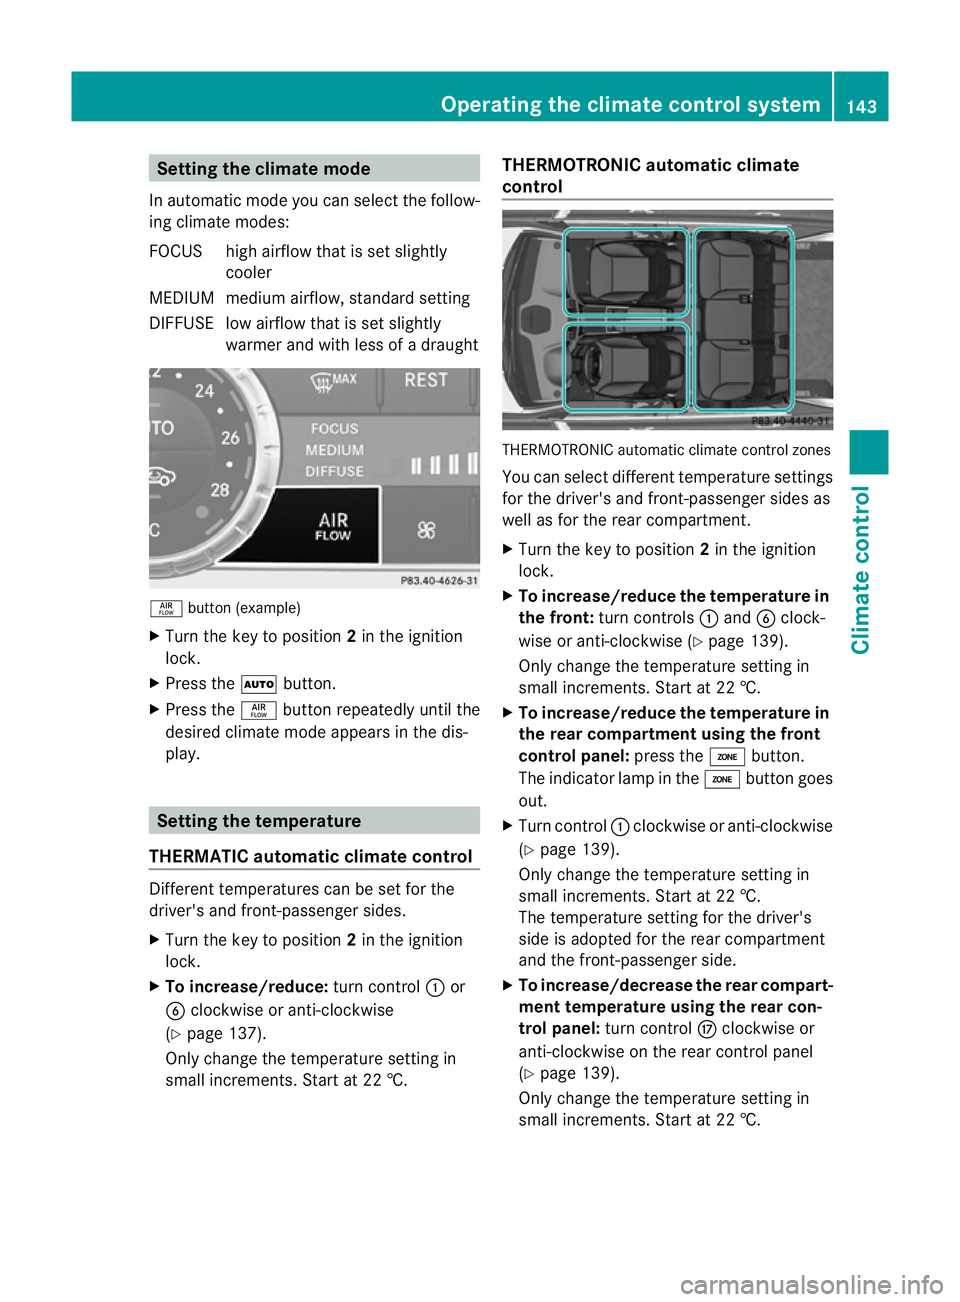
small increm ents.Start at 22 †. THERMOTRONIC automatic climate
control
THERMOTRO
NICa utomatic climate control zones
You can sele ctdifferen ttemperatur esettings
for the driver' sand front-passenger sides as
well as for the rear compartment.
X Turn the key to position 2in the ignition
lock.
X To increase/reduce the temperature in
the front: turn controls :and Bclock-
wis eoranti-clockwise (Y page139).
Onl ychange the temperature setting in
small inc rements. Start at 22 †.
X To increase/reduce the tem perature in
the rear compartment using the front
control panel: press theábutton.
The indicator lamp in the ábutton goes
out.
X Turn control :clockwise or anti-clockwise
(Y page 139).
Only change the temperature setting in
small increments. Start at 22 †.
The temperature setting for the driver's
sid eisa dopted for the rear compartment
and the front-passenger side.
X To increase/decrease the rea rcompart-
ment temperature using the rear con-
trol panel: turn control Mclockwise or
anti-clockwise on the rear control panel
(Y page 139).
Only change the temperature setting in
small increments. Start at 22 †. Operating th
eclimat econtrol system
143Climatecontrol Z