2012 MERCEDES-BENZ GL SUV ESP
[x] Cancel search: ESPPage 131 of 441

A
p To switc hthe right-hand fron tread-
ing lam pon/off
B To switch the automati cinterior lighting
control on
X To switch on the front interior lighting:
set the switch to the cpositio n.
X To switch off the interior lighting: set the
switch to the |positio nor(if the door
is closed) to the centre position.
X To switch the rear interior lighting on/
off: press the ubutton.
X To switch the reading lamp son/off:
press the pbutton. Crash-responsive emergency lighting
The interior lightin gisa ctivated automatically
if the vehicle is involved in an accident.
X To switch off the crash-responsive
emergenc ylighting: press the hazard
warning lamp button.
or
X Lock and then unlock the vehicle using the
key. Replacing bulbs
Important safet
ynotes
Xenon bulbs G
DANGER
Xenon bulbs are under high voltage. If you
touch the electrical contact sofaxenon bulb,
you could suffer an electric shock and be seri-
ously or even fatally inju red. For this reason,
do not remove the cover of xenon bulbs.
Do not change the xenon bulbs yourself, but
have them replaced at aqualified workshop.
If your vehicle is equipped with xenon bulbs,
you can recognise this by the following :the
con eoflight from the xenon bulbs moves
from the top to the bottom and back again
when you start the engine. For this to be observed, the lights must be switched on
before starting the engine.
Bulbs and lamps are an important aspect of
vehicle safety. You must therefore make sure
that these function correctly at all times.
Hav
ethe headlamp setting checked regularly.
Other bulbs G
WARNING
Bulbs and lamps can be ver yhot. You should
therefore allow them to cool down befor eyou
change them .Otherwise, you could be burned
if you touch them.
Keep bulbs out of the reach of children .Oth-
erwise, the ycould damage the bulbs, for
example, and inj uret hemselves.
Never use abulbw hich ha sbeend ropped.
Suc hab ulbm ay break or even explode and
injure you.
Haloge nbulbs are pressurised and can
explode when you change them ,particularly
if they are ver yhot.Y ou should therefor ewear
eye protec tion and gloves when you are
changing them.
There are bulbs other than the xenon bulbs
that you can notreplace. Replace only the
bulbs listed (Y page 129). Hav ethe bulbs that
you can notreplace yourself changed at a
qualified specialist workshop.
If you require assistanc echanging bulbs, con-
sult aqualified specialist workshop.
Do not touch the glass tube of new bulbs with
your bare hands. Even minor contamination
can burn into the glass surface and reduce
the service life of the bulbs .Always use alint-
free cloth or only touch the base of the bulb
when fitting.
Only use bulbs of the correc ttype.
If the new bulb still does not light up, consult
aq ualified specialist workshop.
Bulbs and lamps are an importan taspect of
vehicle safety .You must therefor emake sure
that these function correctly at all times.
Have the headlamp setting checked regularly. 128
Replacing bulbsLights and windscree
nwipers
Page 135 of 441

5
¯ Continuous wipe, fast
B í Single wipe
C î To wipe with washer fluid
X Turn the key to position 1or 2in the ignition
lock (Y page 159).
X Turn the combination switc htothe corre-
sponding position.
In the ÄorÅ position, the appropriate
wipin gfrequency is se tautomatically accord-
ing to the intensity of the rain. In the Å
posi tion, the rain sensor is mor esensitive
than in the Äposition, causin gthe wind-
screen wiper stowipe mor efrequently. Switc
hing th erearw indow wiper on/
off Combi
nation switch
: è Rear windo wwiper switch
2 b To wipe with washer fluid
3 ITo switc honintermitten twiping
4 0To switc hoff intermittent wiping
5 ô To wip ewith washer fluid
X Turn the key to position 1or 2in the ignition
lock (Y page 159).
X Turn switch :on the combination switch
to the correspondin gposition.
When the rea rwindow wiper is switched on,
the icon appears in the instrumen tcluster. Replacing th
ewiper blades
Important safety notes G
WAR
NING
The wipe rarms could start moving and cause
an injury if you leave the windscreen wipers
switche don.
Remove the key from the ignition lock before
replacing the wipe rblades.
! Never open the bonnet if awindscreen
wiper arm has been folded away from the
windscreen.
Never fold awindscreen wiper arm without
aw iper blade back ont othe windscreen/
rea rwindow.
Hold the windscreen wiper arm firmly when
you change the wiper blade. If you release
the windscreen wiper arm without awiper
blade and it falls ont othe windscreen, the
windscreen ma ybedamaged by the force
of the impact.
Mercedes-Benz recommends that you have
the wiper blades changed at aqualified
specialist workshop.
! To avoid damaging the windscreen wiper
blades, mak esure that you touc honly the
wipe rarm of th ewindsc reen wiper.
Replacing th ewindscreen wiper blades Removing th
ewiper blades
X Remov ethe key fr om theignition lock.
X Fold the wiper ar maway fro mthe wind-
screen. 132
Windscreen wipersLights and windscreen wipers
Page 155 of 441

Alway
skeepb atteries away from children. If
ab attery is swallowed, see kimmediate med-
ica lattention. H
Environmental note Batteries contain pollutants.
It is illegal to dispose of them
with the househo
ldrubbish.
They mus tbecollected sep-
arately and disposed of in an
environmentally responsible
recycl ings ystem. Dispose of batterie
sinan
environmental lyresponsible
manner. Take disch arged
batteries to aqualified spe-
cialist workshop or to acol-
lection point for used batter-
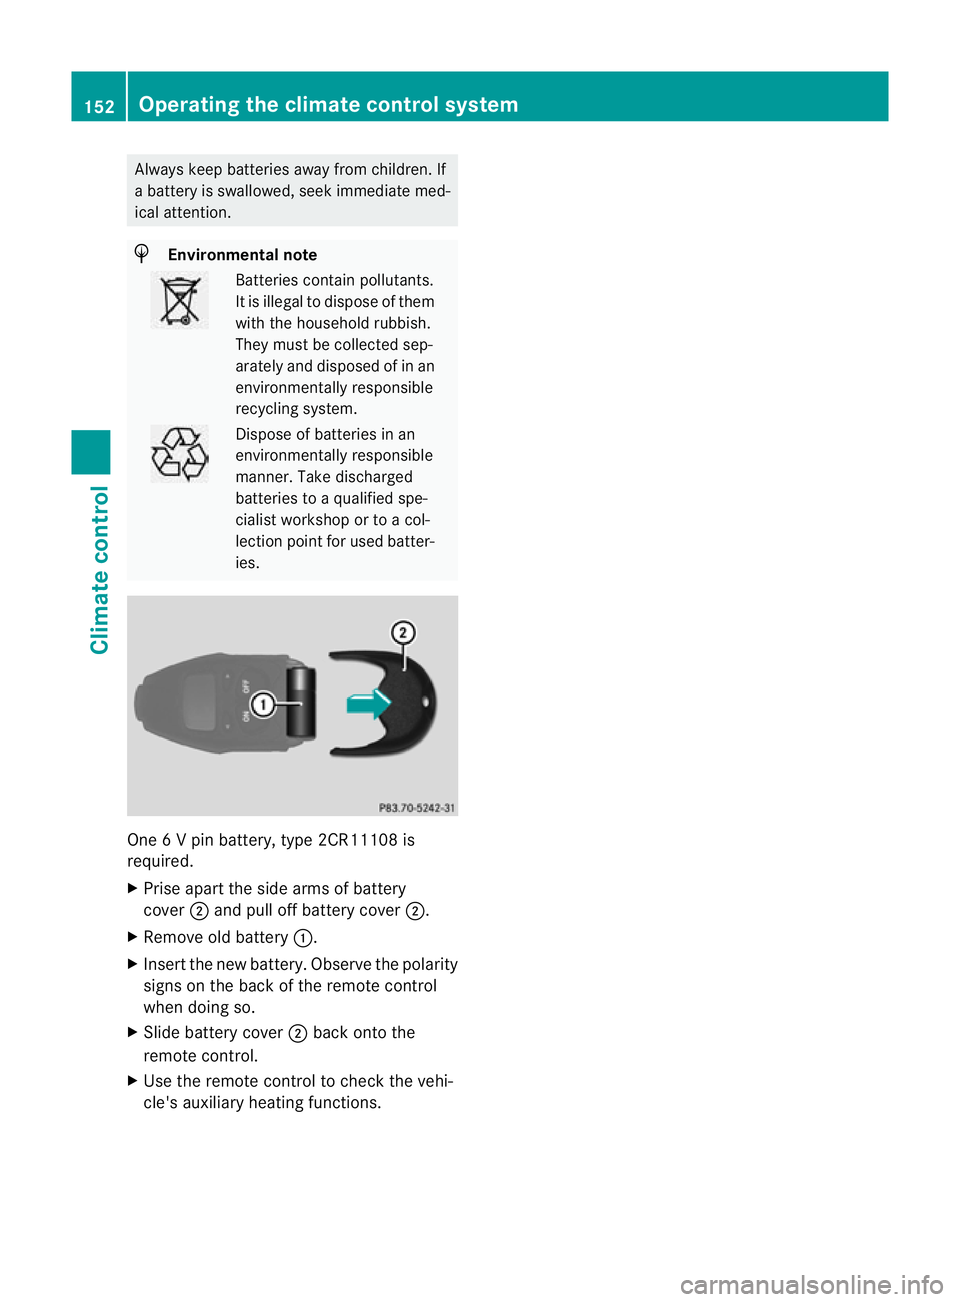
ies. One
6Vp in battery, type 2CR11108 is
required.
X Prise apart the side arm sofbattery
cover ;and pul loff battery cover ;.
X Remove ol dbattery :.
X Insert the new battery. Observe the polarity
signs on the back of the remote control
when doing so.
X Slid ebattery cover ;back ont othe
remot econtr ol.
X Us ethe remot econtr ol to chec kthe vehi-
cle' sauxiliary heating functions. 152
Operating the climate contro
lsystemClimate co ntrol
Page 162 of 441

boostin
geffect. Yo uwill require considerably
more effor ttosteer and brake. There is arisk
of an accident.
Do not switch off the ignition while driving. G
WARNING
If the parking brake has not been fully
released when driving, the parking brake can:
R overheat and cause afire
R lose its hold func tion.
There is arisk of fire and an accident .Release
the parking brak efully before driving off.
! Warm up the engine quickly. Do not use
the engine's full performance until it has
reached operating temperature.
Only set the automatic transmission to the
respective drive positions when the vehicle
is stationary.
Where possible, avoid spinning the drive
wheels when pulling away on slippery
roads. Othe rwise, you could damage the
drive train.
! AMG vehicles: at low engine oil temper-
atures (below +20 †), the maximum
engine speed is restricted in order to pro-
tec tthe engine. To protec tthe engin eand
maintain smoo thengine operation ,avoid
driving at full throttle when th eengine is
cold. Key positions
Key g
To remove the key
1 Power supply for some consumers, such
as the windscreen wipers
2 Ignition (power supply for all consumers)
and drive position
3 To start the engine
i If the key doe snot belong to the vehicle,
it can still be tur nedint he ignition lock.
However ,the ignition will not be switched
on. The engin ecannot be started.
KEYLESS-GO General notes
R
Do not keep the KEYLESS-GO key together
with:
- electronic devices, e.g. amobile phone
or anothe rkey
- metallic objects, e.g. coins or metal film
- metallic objects, e.g. ametal case
This can affect the fun ction of the key with
KEYL ESS-GO.
Do not keep the KEYLESS-GO key in the tem-
perature-controlled cup holder
(Y pag e347). Othe rwise, the KEYL ESS-GO
key will not be dete cted.
Vehicles with KEYLESS-GO are equipped with
ak ey featuri ngan integrated KEYLESS-GO
function and adetachable Start /Stopbutton. Driving
159Drivingand parking Z
Page 163 of 441

The Start/Stop button must be inser
tedint he
ignition lock and the key with the integrated
KEYL ESS-GO function must be in the vehicle.
Pressing the Start/Stop butto nseveral times
in succession corresponds to the different
key positions in the ignition lock. This is only
the case if you are not depressing the brake
pedal.
If you depress the brak epedal and press the
Start/Stop button ,the engin estart simmedi-
ately.
i Thee ngine can be switched off whil ethe
vehicle is in motion by pressing and holding
the Start/ Stop button for three seconds.
This func tion operates independently of the
ECO star t/stop automatic engine switch-
off func tion.
Key positions with KEYLESS-GO Switching on th
epower supply
X If Start/ Stop button :has not yet been
pressed, this corresponds to the key being
removed from the ignition.
X Press Start/Stop button :once.
The power supply is switched on. You can
now activa tethe windscreen wipers, for
example.
i The powe rsupply is switched off again if:
R the driver' sdoor is opened and
R you press Start/Stop button :twice
when in this position Switching on th
eignition
X Press Start/Stop button :twice.
The ignition is switched on.
i The power supply is switched off again if:
R the driver' sdoor is opened and
R you press Start/Stop button :once
when in this position
Removing th eStart/Stop button You can remove the Start/Stop butto
nfrom
th ei gnition lock and star tthe vehicle as nor-
ma lusing the key.
X Remove Start/ Stop button :from ignition
lock ;.
i You do not have to remove the Start/Stop
button from the ignition lock when you
leav ethe vehicle.
i It is only possible to switc hbetween KEY-
LE SS -GO mode and key operation whe nthe
transmission is in position P.
i When you inser tStart/St op button :
int oignition lock ;,the system needs
approximatel ytwo seconds' recognition
time. You can then use Start/ Stop but-
ton :. 160
DrivingDriving and pa
rking
Page 165 of 441

X
Release the brak epedal.
X Carefully depress th eaccele rator pedal.
The electric parkin gbrake (Y page 182) is
automaticall yreleased.
The red !indicator lam pinthe instru-
men tcluster goes out.
i It is only possible to shift the transmission
from position Pto the desired position if
you depress the brake pedal. Only then is
the parkin glock released. If the brake
pedal is not depressed, the DIRECT SELECT
leve rcan still be moved but the parkin glock
remains engaged.
i The vehicle lock scentrally onc eyou have
pulled away .The lockin gknobs in the doors
drop down.
You can open the doors from the inside at
any time.
You can also deactivat ethe automatic lock-
ing featur e(Ypage 28 3).
i Upshif tstake place at higher engine
speeds after acold star t.This helps the
catalytic converter to reach its operating
temperature mor equickly.
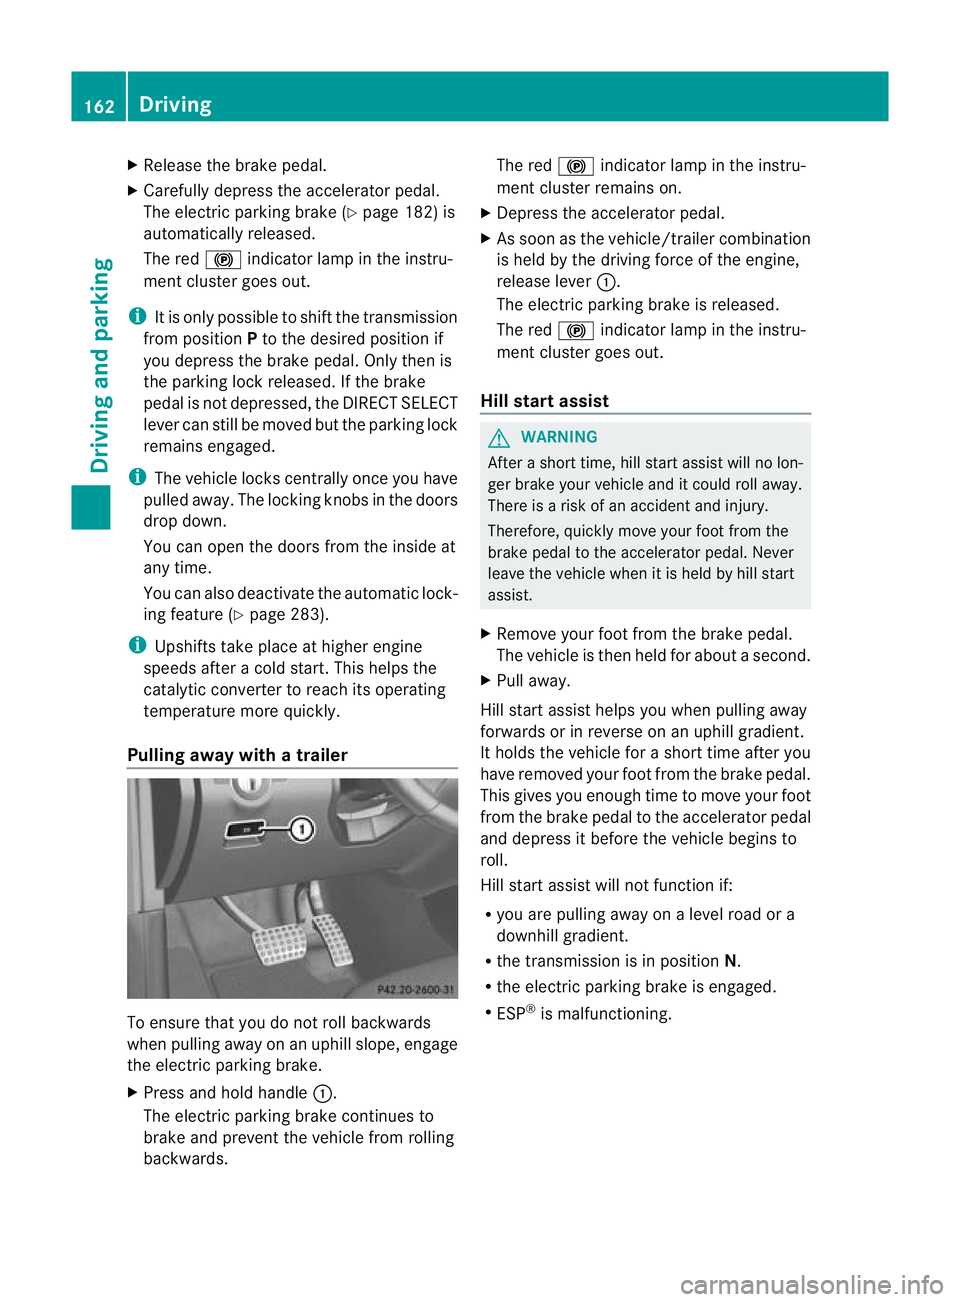
Pullin gaway with atrailer To ensure that you do not roll backwards
when pulling away on an uphill slope, engage
the electric parking brake.
X
Press and hol dhandle :.
The electric parking brake continues to
brake and prevent the vehicle from rolling
backwards. The red
!indicator lamp in the instru-
ment cluster remains on.
X Depress the accelerator pedal.
X As soon as the vehicle/trailer combination
is held by the driving force of the engine,
release lever :.
The electric parking brake is released.
The red !indicator lamp in the instru-
ment cluster goes out.
Hill star tassist G
WARNING
Af teras hort time, hill star tassist will no lon-
ger brake your vehicle and it could rol laway.
There is arisk of an accident and injury.
Therefore, quickly move your foot from the
brake pedal to the accelerator pedal. Never
leave the vehicle when it is held by hill start
assist.
X Remove your foot from the brake pedal.
The vehicle is then held for about asecond.
X Pull away.
Hill star tassist helps you when pulling away
forwards or in reverse on an uphil lgradient.
It hold sthe vehicle for ashort tim eafter you
have removed you rfoot from the brake pedal.
This gives you enough tim etomove your foot
from the brake pedal to the accelerator pedal
and depress it befor ethe vehicle begin sto
roll.
Hil lstart assist will not function if:
R you are pulling away on alevel road or a
downhill gradien t.
R the transmission is in position N.
R the electric parking brake is engaged.
R ESP ®
is malfunctioning. 162
DrivingDrivin
gand pa rking
Page 169 of 441

Problems wit
hthe engine Problem Possible causes/consequences and
M Solutions
Th
ee ngine doe snot
start. The starter motor
can be heard. R
There is amalfunction in the engine electronics.
R There is amalfunction in the fuel supply.
X Before attempting to start the engine again, turn the key in the
ignition back to position 0or press the Start/Stop button
repeatedly until all indicator lamps in the instrumen tcluster go
out.
X Try to start the engin eagain (Y page 16 1).A void excessively
long and frequen tattempt stostartthe engine, as this will drain
the battery.
If the engine doe snot star tafter several attempts:
X Consult aqualified specialist workshop. The engine does not
star
t.The starter motor
can be heard. The
reserve fuel warning
lam pisl it and the fuel
gauge displa yshows 0. The fuel tan
kise mpty.
X Refue lthe vehicle. The engin
edoes not
start. You cannot hear
the starter motor. The on-boar
dvoltage is too low because the battery is too weak
or discharged.
X Jump-start the vehicle (Y page 386).
If the engin edoes not star tdespite attempt stojump-start it:
X Consult aqualified specialist workshop. The starter motor was exposed to
athermal load that was too high.
X Allo wthe starter motor to cool down for approximatel ytwo
minutes.
X Try to start the engine again.
If the engine still does not start:
X Consult aqualified specialist workshop. Vehicles with
apetrol
engine:
The engine is not run-
ning smoothly and is
misfiring. There is
amalfunction in the engine electronics or in amechanical
componen tofthe engin emanagement system.
X Only depress the accelerator pedal slightly.
Otherwise, non-combusted fuel may get into the catalytic con-
verter and damage it.
X Have the cause rectified immediately at aqualified specialist
workshop. 166
DrivingDrivin
gand pa rking
Page 172 of 441

vehicl
euntil it is stationary and at least one
of the following conditions is fulfilled:
- there is asystem malfunction
- the vehicl eisonasteep uphill or downhill
gradient. The electric parking brake is
then als oengaged.
Engaging reverse gear R !
Only shift the automatic transmission to
R whe nthe vehicle is stationary.
X Push the DIREC TSELECT leve ruppast the
first point of resistance.
Neutra lNwithE CO start/stop function
activated The EC
Ostart/stop functio nswitches the
engin eoffautomatically if:
R the vehicle is braked until stationary while
in neut ralNand
R you continue to depress th ebrake pedal
For further information on th eECO start/stop
function ( Ypag e163).
Shiftin gton eutra l(N) X
Push the DIRECT SELECT leve rupordown
to the first point of resistance.
Drive position Dwith ECO start/stop
function activated The ECO start/stop fun
ction switches the
engin eoff automatically if:
R thev ehicle is braked until stationar ywhile
in transmission position Dand
R you continue to depress the brake pedal
For further information on the ECO star t/stop
function (Y page 163).
Engaging drive position D X
Push the DIRECT SELECT lever down past
the first point of resistance. Transmission positions
B
Par
kposition
This prevent sthe ve hicle fr om roll-
in ga way when stopped .Donot
shift the transmission int oposition
P (Y page 181) unless the vehicle
is stationary.
The automatic transmission shifts
to Pautomatically if you:
R remove the key
R switc hoff th eengine whe ninR
or Dand open one of the front
doors C
Reverse gear
Only shift the transmission to
R
when the vehicle is stationary. A
Neu
tral
Do not shift the transmission to N
whil edriving. Otherwise, th eauto-
matic transmissio ncould be dam-
aged.
No power is transmit tedf rom the
engine to th edrive wheels.
Releas ingt he brakes will allow you
to mov ethe vehicle freely, e.g. to
push it or tow it.
If ESP ®
is deactivated or faulty:
only shift the transmission to posi-
tion Nif the vehicle is in danger of
skidding, e.g. on icy roads.
If you switc hoff th eengine using
the key or the Start/Stop butto n,
the automatic transmission shifts
to neutral Nautomatically.
! Rolling in neutral Ncan lead to
damage to the transmission. 7
Drive
The automatic transmission
change sgear automatically. All
forwar dgears are available. Automatic transmission
169Driving and parking Z