2012 MERCEDES-BENZ GL SUV engine
[x] Cancel search: enginePage 122 of 441

Light switch
Operation
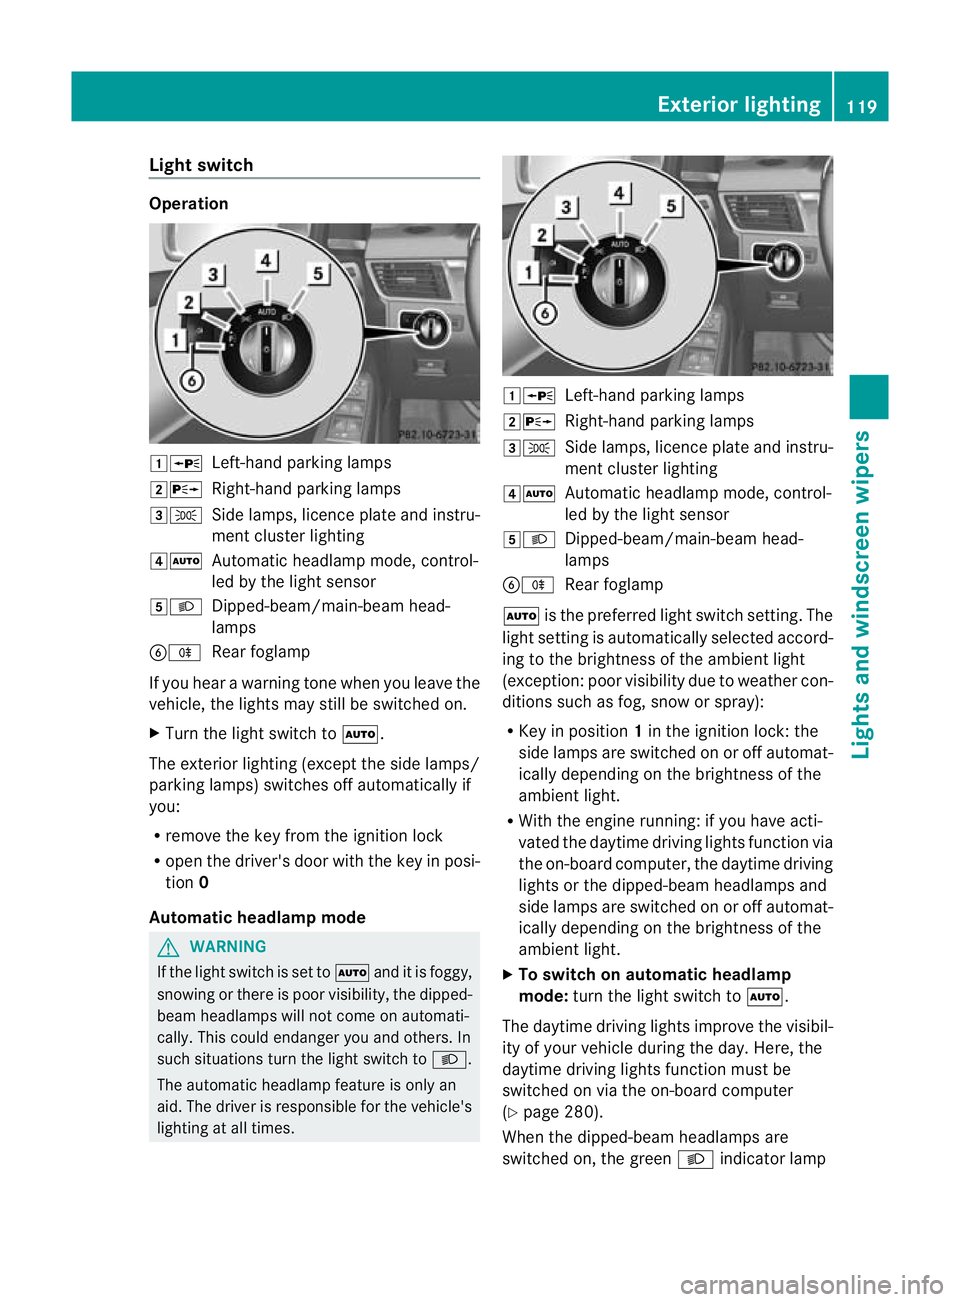
1W
Left-handparking lamps
2X Right-hand parking lamps
3T Side lamps, licenc eplatea nd instru-
men tcluster lighting
4Ã Automatic headlamp mode, control-
led by the light sensor
5L Dipped-beam/main-beam head-
lamps
BR Rear foglamp
If you hear awarnin gton ew hen you leav ethe
vehi cle, the light smay still be switched on.
X Turn the light switc htoÃ.
The exterior lighting (except the side lamps/
par king lamps )switches off automatically if
you:
R remove the key fro mthe igni tion lock
R open the driv er'sdoor with the key in posi-
tion 0
Automatic hea dlamp mode G
WARNING
If the light switch is se ttoÃand it is foggy,
snowing or ther eispoor visibility, the dipped-
beam headlamps will not com eonautomati-
cally. This could endanger you and others. In
such situations tur nthe light switc htoL .
The automatic headlamp feature is only an
aid. The driver is responsible for the vehicle's
lightin gatall times. 1W
Left-hand parking lamps
2X Right-hand parking lamps
3T Side lamps, licence plate and instru-
ment cluster lighting
4Ã Automatic headlamp mode, control-
led by the light sensor
5L Dipped-beam/main-beam head-
lamps
BR Rear foglamp
à is the preferred light switch setting. The
light setting is automatically selected accord-
ing to the brightness of the ambient light
(exception: poor visibility due to weather con-
ditions such as fog, snow or spray):
R Key in position 1in the ignition lock: the
side lamps are switched on or off automat-
ically depending on the brightness of the
ambient light.
R With the engine running: if you have acti-
vated the daytime driving lights function via
the on-board computer, the daytime driving
lights or the dipped-bea mheadlamps and
side lamps are switched on or off automat-
icall ydepending on the brightness of the
ambient light.
X To switc honautomatic headl amp
mode: turn the ligh tswitch to Ã.
The daytime driving lights improve the visibil-
ity of your vehicle during the day. Here, the
daytime driving lights function must be
switched on via the on-board computer
(Y page 280).
When the dipped-beam headlamps are
switched on, the green Lindicator lamp Exterio
rlighting
119Lights and windscreen wipers Z
Page 123 of 441

in the instrumen
tcluster lights up and the
daytime drivin glights go out or are dimmed.
Dipped-beam hea dlamps G
WARNING
If the light switch is se ttoÃand it is foggy,
snowing or ther eispoor visibility, the dipped-
beam headlamps will not com eonautomati-
cally. This could endanger you and others. In
such situations tur nthe light switc htoL .
The automatic headlamp feature is only an
aid. The driver is responsible for the vehicle's
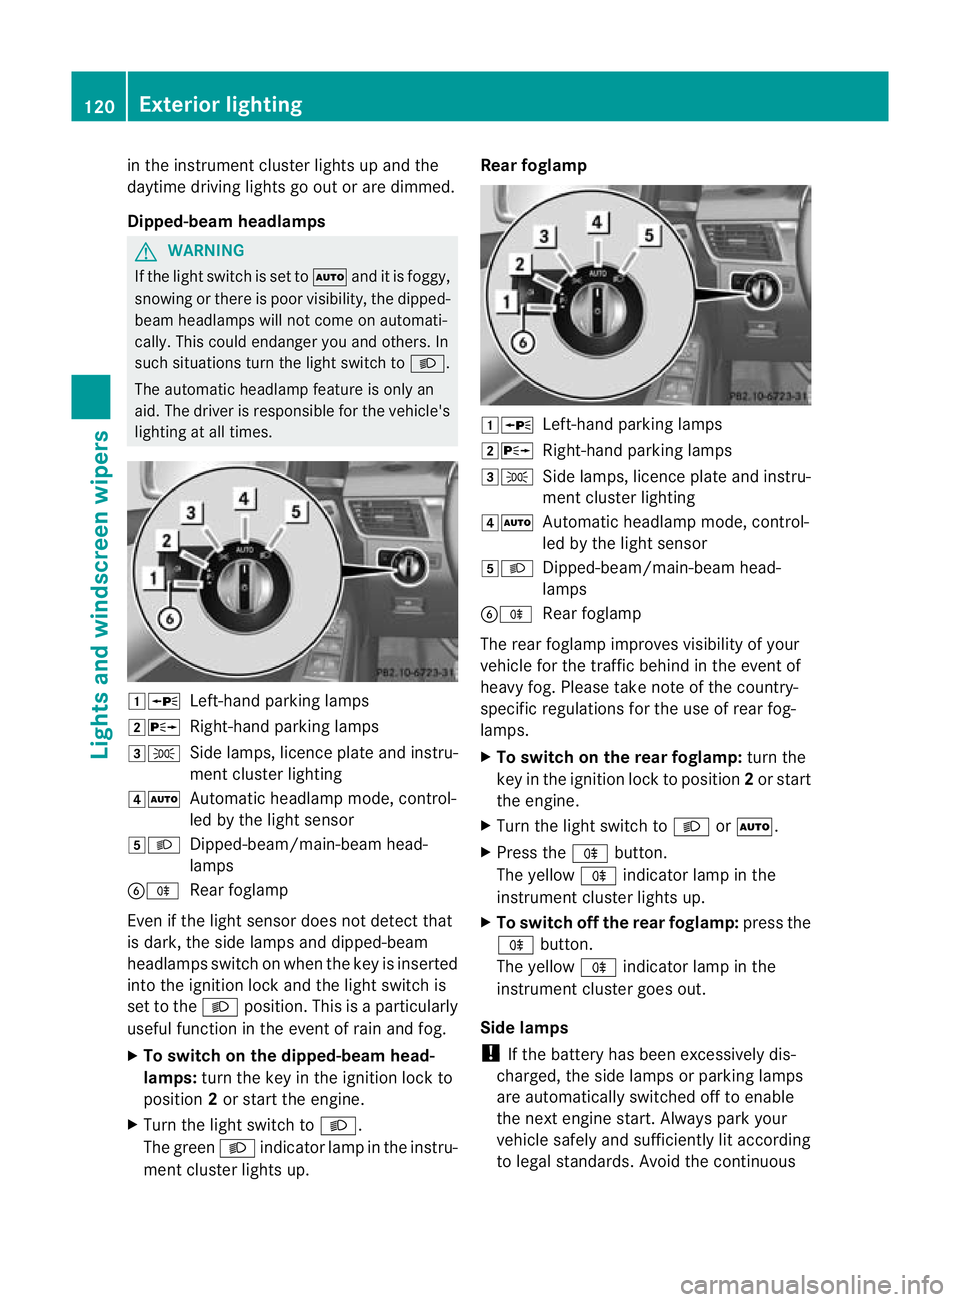
lightin gatall times. 1W
Left-hand parking lamps
2X Right-hand parking lamps
3T Side lamps, licence plate and instru-
ment cluster lighting
4Ã Automatic headlamp mode, control-
led by the light sensor
5L Dipped-beam/main-beam head-
lamps
BR Rear foglamp
Even if the light senso rdoes not detec tthat
is dark, the side lamps and dipped-beam
headlamps switc honwhen the key is inserted
int ot he ignition lock and the light switc his
set to the Lposition. This is aparticularly
useful function in the event of rain and fog.
X To switch on the dipped-beam head-
lamps: turn the key in the ignition lock to
position 2or start the engine.
X Turn the light switch to L.
The green Lindicator lamp in the instru-
ment cluster lights up. Rear foglamp
1W
Left-hand parking lamps
2X Right-hand parking lamps
3T Side lamps, licence plate and instru-
ment cluster lighting
4Ã Automatic headlamp mode, control-
led by the light sensor
5L Dipped-beam/main-beam head-
lamps
BR Rear foglamp
The rear foglamp improves visibility of your
vehicle for the traffic behind in the event of
heavy fog. Pleas etake note of the country-
specific regulations for the use of rear fog-
lamps.
X To switch on the rear foglamp: turn the
key in the ignition lock to position 2or start
the engine.
X Turn the light switch to LorÃ.
X Press the Rbutton.
The yellow Rindicator lamp in the
instrumen tcluster lights up.
X To switch off th erear foglamp: press the
R button.
The yellow Rindicator lamp in the
inst rument cluster goes out.
Side lamps
! If the bat tery ha sbeen excessively dis-
charged, the side lamps or parking lamps
are automatically switched off to enable
the nex tengine start. Alway sparky our
vehicl esafely and sufficiently li taccording
to lega lstandards. Avoi dthe contin uous 120
Exterio
rlightingLight sand windscreen wipers
Page 125 of 441

Main-beam headlamps
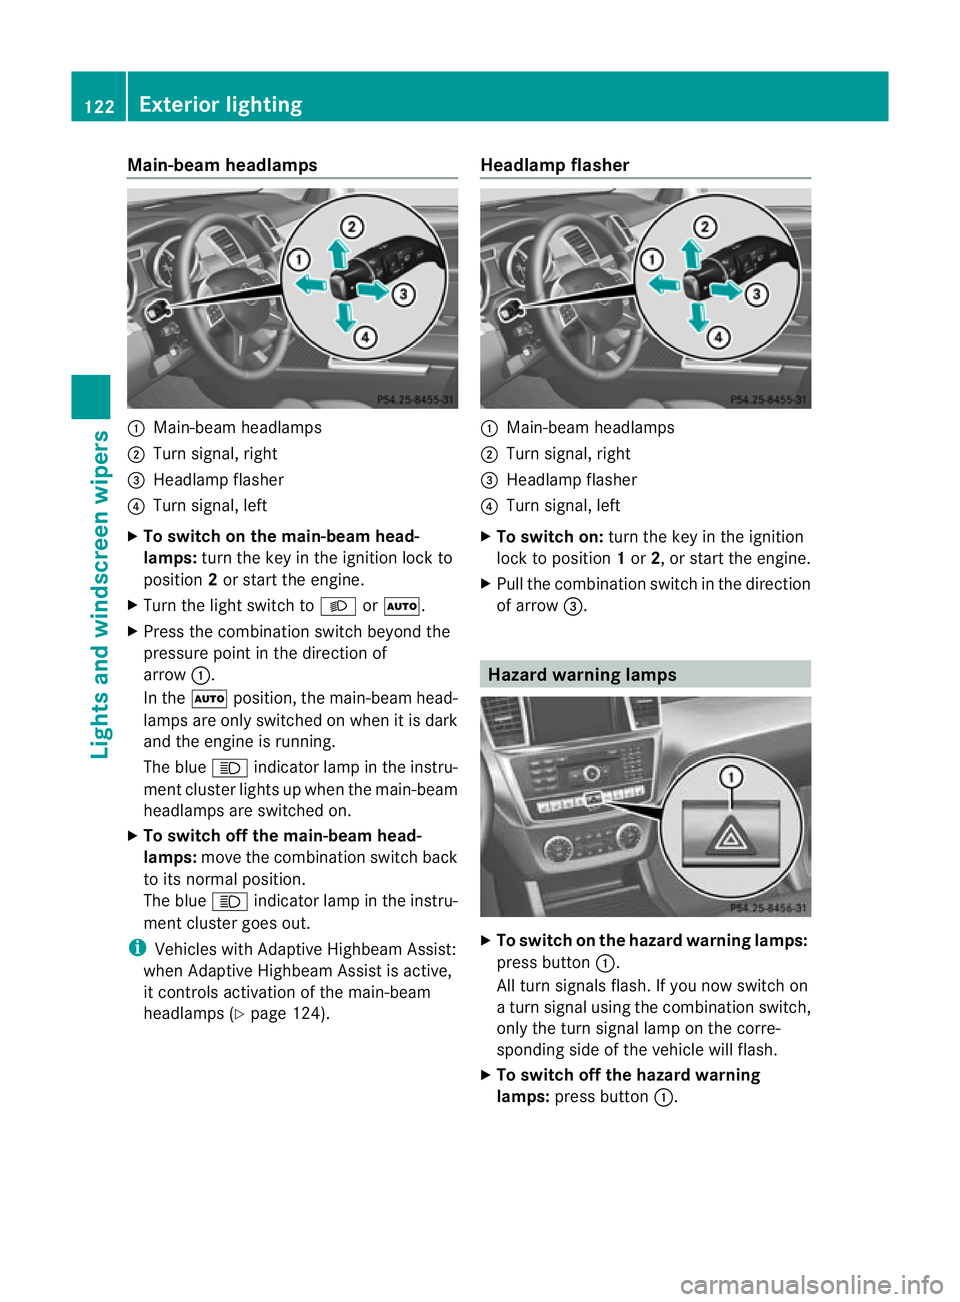
:
Main-beam headlamps
; Turn signal, right
= Headlam pflasher
? Turn signal, left
X To switch on the main-beam head-
lamps: turn the key in the ignitio nlock to
position 2or star tthe engine.
X Tur nthe light switch to LorÃ.
X Press the combination switch beyond the
pressure point in the direction of
arrow :.
In the Ãposition, the main-beam head-
lamps ar eonly switched on whe nitisdark
and the engine is running.
The blue Kindicator lamp in the instru-
ment cluster lights up when the main-beam
headlamps are switched on.
X To switch off the main-beam head-
lamps: move the combinatio nswitch back
to its normal position.
The blue Kindicator lamp in the instru-
ment cluster goes out.
i Vehicles with Adaptive Highbeam Assist:
when Adaptive Highbeam Assist is active,
it controls activation of the main-beam
headlamps (Y page124). Headlamp flasher :
Main-beam headlamps
; Turn signal, right
= Headlam pflasher
? Turn signal, left
X To switch on: turn the key in the ignition
lock to position 1or 2,ors tart the engine.
X Pul lthe combination switch in the direction
of arrow =. Hazard warning lamps
X
To switch on th ehazard warnin glamps:
press button :.
All turn signals flash .Ifyou now switch on
at urn signa lusing the combination switch,
only the tur nsigna llam pont he corre-
sponding side of the vehicle will flash.
X To switch of fthe hazard warn ing
lamps: press button :.122
Exterior lightingLights and windscreen wipers
Page 126 of 441

The hazar
dwarning lamps automatically
switch on if:
R an airbag is deployed.
R the vehicle decelerates rapidly from a
spee dofm ore than 70 km /hand come sto
as tandstill.
The hazard warning lamps switch off auto-
maticall yifthe vehicle reaches aspeed of
over 10 km/ hagain after afull brake appli-
cation.
i The hazard warning lamps still operate if
the ignition is switched off. Headlamp cleanin
gsystem
Th eh eadlamps are cleane dautomaticall yif
the "Wip ewithw ashe rfluid" function is oper-
ated fiv etimes (Y page 131 )while the lights
ar eona nd the engine is running. Whe nyou
switc hoff th eignition, the automatic head-
lam pcleaning system is reset and countin gis
resumed from 0. Intelligent Light Sys
tem
General notes Th
eI ntelligent Light System is asystem that
adjusts the headlamps automatically to suit
the prevailing drivin gand weather conditions.
It offers advanced functions for improved illu-
mination of the road surface, e.g. depending
on the vehicle speed or weather conditions.
The system includes the active light function,
cornering light function, motorway mode and
extended range foglamps. The system is only
active when it is dark.
You can activate or deactivate the "Intelligent
Light System" using the on-board computer
(Y page 281). Active light function
The active light function is
asystem that
moves the headlamps according to the steer-
ing movements of the front wheels. In this
way, relevant areas remain illuminated while
driving. This allows you to recognise pedes-
trians, cyclists and animals.
Active: when the lights are switched on.
Cornering light function The cornering ligh
tfunction improves the illu-
mination of the road over awide angle in the
direction you are turning, enabling better vis-
ibility in tight bends, for example. It can only
be activated when the dipped-beam head-
lamps are switched on.
Active:
R if you are drivin gatspeeds below
40 km/ hand the turn si gnal is activatedor
the steerin gwheel is turned.
R if you ar edriving at speeds between
40 km/h and 70 km/h and tur nthe steer-
ing wheel. Exterior lighting
123Lightsand windscreen wipers Z
Page 131 of 441

A
p To switc hthe right-hand fron tread-
ing lam pon/off
B To switch the automati cinterior lighting
control on
X To switch on the front interior lighting:
set the switch to the cpositio n.
X To switch off the interior lighting: set the
switch to the |positio nor(if the door
is closed) to the centre position.
X To switch the rear interior lighting on/
off: press the ubutton.
X To switch the reading lamp son/off:
press the pbutton. Crash-responsive emergency lighting
The interior lightin gisa ctivated automatically
if the vehicle is involved in an accident.
X To switch off the crash-responsive
emergenc ylighting: press the hazard
warning lamp button.
or
X Lock and then unlock the vehicle using the
key. Replacing bulbs
Important safet
ynotes
Xenon bulbs G
DANGER
Xenon bulbs are under high voltage. If you
touch the electrical contact sofaxenon bulb,
you could suffer an electric shock and be seri-
ously or even fatally inju red. For this reason,
do not remove the cover of xenon bulbs.
Do not change the xenon bulbs yourself, but
have them replaced at aqualified workshop.
If your vehicle is equipped with xenon bulbs,
you can recognise this by the following :the
con eoflight from the xenon bulbs moves
from the top to the bottom and back again
when you start the engine. For this to be observed, the lights must be switched on
before starting the engine.
Bulbs and lamps are an important aspect of
vehicle safety. You must therefore make sure
that these function correctly at all times.
Hav
ethe headlamp setting checked regularly.
Other bulbs G
WARNING
Bulbs and lamps can be ver yhot. You should
therefore allow them to cool down befor eyou
change them .Otherwise, you could be burned
if you touch them.
Keep bulbs out of the reach of children .Oth-
erwise, the ycould damage the bulbs, for
example, and inj uret hemselves.
Never use abulbw hich ha sbeend ropped.
Suc hab ulbm ay break or even explode and
injure you.
Haloge nbulbs are pressurised and can
explode when you change them ,particularly
if they are ver yhot.Y ou should therefor ewear
eye protec tion and gloves when you are
changing them.
There are bulbs other than the xenon bulbs
that you can notreplace. Replace only the
bulbs listed (Y page 129). Hav ethe bulbs that
you can notreplace yourself changed at a
qualified specialist workshop.
If you require assistanc echanging bulbs, con-
sult aqualified specialist workshop.
Do not touch the glass tube of new bulbs with
your bare hands. Even minor contamination
can burn into the glass surface and reduce
the service life of the bulbs .Always use alint-
free cloth or only touch the base of the bulb
when fitting.
Only use bulbs of the correc ttype.
If the new bulb still does not light up, consult
aq ualified specialist workshop.
Bulbs and lamps are an importan taspect of
vehicle safety .You must therefor emake sure
that these function correctly at all times.
Have the headlamp setting checked regularly. 128
Replacing bulbsLights and windscree
nwipers
Page 136 of 441

X
Firml ypress release knob :and pull the
wipe rblade upwards from the wiper arm in
the directio nofthe arrow.
Fitting th ewiper blades X
Position the new wiper blade in the retainer
on the wiper arm and slide it into place in
the opposite direction to the arrow.
The wiper blade audibly engages.
X Make sure that wiper blade is seated cor-
rectly.
X Fold the wiper arm back onto the wind-
screen.
Replacing the rear window wiper blade Removing the wiper blades
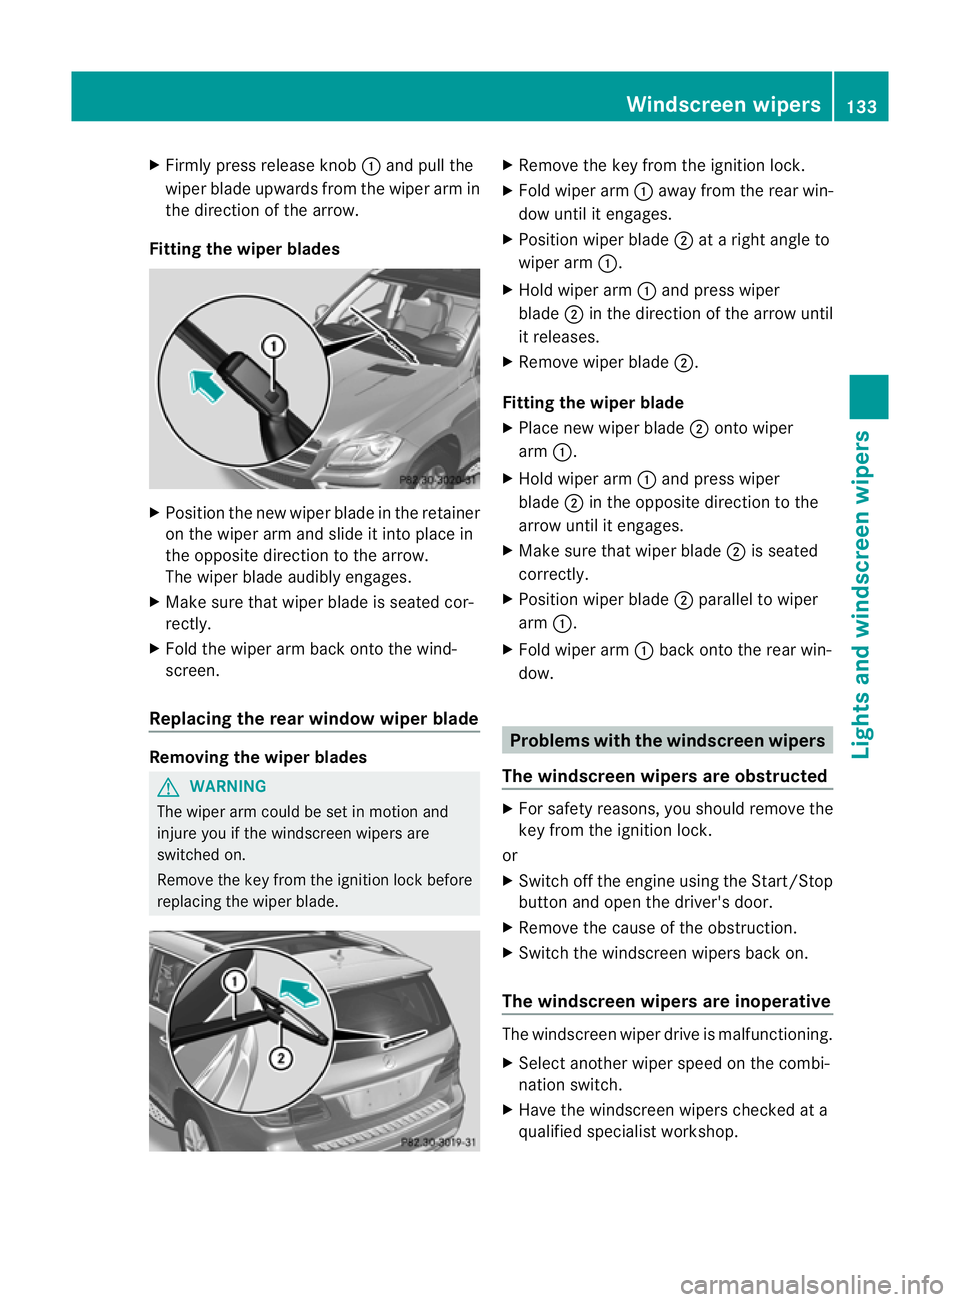
G
WARNING
The wiper arm could be set in motion and
injur eyou if the windscreen wiper sare
switched on.
Remove th ekey from the ignition lock before
replacing the wiper blade. X
Remov ethe key from the ignition lock.
X Fold wiper arm :away from the rea rwin-
dow until it engages.
X Position wiper blade ;atar ight angle to
wiper arm :.
X Hold wiper arm :and press wiper
blade ;in the direction of the arrow until
it releases.
X Remove wiper blade ;.
Fitting the wiper blade
X Place new wiper blade ;onto wiper
arm :.
X Hold wiper arm :and press wiper
blade ;in the opposite direction to the
arrow until it engages.
X Make sure that wiper blade ;is seated
correctly.
X Position wiper blade ;parallel to wiper
arm :.
X Fold wiper arm :back onto the rear win-
dow. Problems with the windscreen wipers
The windscreen wipers are obstructed X
For safety reasons, you should remov ethe
key from the ignition lock.
or
X Switc hoff th eengine using the Start/Stop
butto nand ope nthe driver's door.
X Remove the cause of the obstruction.
X Switc hthe windscreen wiper sback on.
The windscreen wipers are inoperative The windscreen wiper drive is malfunctioning.
X
Select another wiper spee donthe combi-
nation switch.
X Hav ethe windscreen wiper schecked at a
qualified specialist workshop. Windscreen wipers
133Lights and windscreen wipers Z
Page 139 of 441

Usefu
linfor mati on
i This Owner's Manual describes all mod-
els, series and optional equipment for your
vehicle that were available at the time of
going to press. National variation sare pos-
sible. Note that your vehicl emay not be
equippe dwith all of the function sdescri-
bed. This is also the case for system sand
functions relevant to safety.
i Read the information on qualified special-
ist workshops: (Y page25). Overvie
wofclimatecontrol systems Important safet
ynotes G
WARNING
Observ ethe settings recommende donthe
followin gpages. The windows could other-
wise mist up. This may preven tyou from
observing the traffic conditions, thereby caus-
ing an accident.
Climate control regulates the temperature
and the humidity in the vehicle interior and
filters undesirable substances out of the air.
Climate control is only operational when the
engine is running. The system only works
optimally if the side windows and the roof are
closed.
The residual heat function can only be acti-
vated or deactivated with the ignition
switched off (Y page 147).
i Ven tilate the vehicle for abriefp eriod
during war mweather ,e.g. using the con-
venienc eopening feature (Y page 90).
This will speed up the cooling process and
the desired vehicle interior temperature
will be reached mor equickly.
i The integrated filter can filter out most
particles of dust and completely filters out
pollen. Aclogged filter reduces the amount
of air supplied to the vehicle interior .For
this reason, you should always observ ethe interval for replacing the filter
,which is
specifie dinthe Servic eBooklet .Asit
depends on environmental conditions, e.g.
heavy air pollution, the interval may be
shorter than stated in the Servic eBooklet. 136
Overview of climat
econtrol systemsClimat econtrol
Page 144 of 441

Q
Switche srear-com partment climate contro lon/of f(Y page 141)
R Reduces the airflow (Y page 144)Informat
iona bout using
THERMOTRONIC automatic climate
control
The following contains instructions and rec-
omm endations to enabl eyou to get the most
ou tofy our THERMOTRONIC automatic cli-
mate con trol.
R Activate climate con trol using the Ãand
¿ buttons. The indicator lamps above
the à and¿ button slight up.
R In automatic mode, you can also use the
ñ button to set aclimate mode
(FOCUS/MEDIUM/DIFFUSE). The
MEDIU Mlevel is recommended.
R Set the temperature to 22 †.
R Only use the demisting function briefly until
the windscreen is clear again.
R Only use the air-recir culation mode briefly,
e.g. if there are unpleasant outside odours
or when in atunnel. The windows could
otherwis emist up as no fresh air is drawn
into the vehicle in air-recirculation mode.
R Use the ZONE func tion to adopt the tem-
peratur esettings on the driver' sside for
the front-passenger side and the rear com-
partmen taswell. The indicator lamp above
the á button goes out.
R Use the residual heat function if you want
to heat or ventilate the vehicl einterior
whe nthe ignition is switched off .The resid-
ual heat func tion can only be activated or
deactivated with the ignition switched off. Operating th
eclimat econtrol system Switching climate control on/off
Points to observe before use i
If climat econtrol is switched off ,the air
supply and air circulation ar ealso switched off. Only select this settin
gbriefly. Other-
wise ,the windows ma ymist up.
i Switch on climate control primarily using
the à button (Y page 142).
In the rear compartment, you can also switch
climate control on and off using the Ãand
^ buttons.
Switching on/off X
Turn the key to position 2in the ignition
lock.
X To switch on: press buttonÃ.
The indicator lamp in the Ãbutton lights
up. Airflow and air distribution are set to
automatic mode.
or
X Press the ^button.
The indicator lamp in the ^button goes
out. The previous settings are reactivated.
X To switch off: press the^button.
The indicator lamp in the ^button lights
up. Activating/deactivating the cooling
with air dehu
midification function
Points to observe before use G
WARNING
If the "cooling with air dehumidification" func-
tion is deactivated, the air inside the vehicle
will not be cooled (during warm weather) or
dehumidified. The windows could mist up
more quickly. This may prevent you from
observing the traffic conditions, thereby caus-
ing an accident.
The cooling with air dehumidification function
is only available when the engine is running.
The air inside the vehicle is cooled and dehu- Operating the climate control system
141Climatecontrol Z