2012 MERCEDES-BENZ GL key
[x] Cancel search: keyPage 298 of 384

found on the reverse side of the remote
control).
The integrated garage door opener is
compatible with devices that can be
operated with units in a frequency range of
280 to 390 MHz.
R change the batteries in garage door remote
control A. This increases the probability
that garage door remote control A will
send a strong and precise signal to the
integrated garage door opener on the rear-
view mirror.
R when programming, hold garage door
remote control A at different distances
and angles from the transmitter button that
you are programming. Try different angles
at a distance between 2 and 12 inches (5
to 30 cm) or the same angle at varying
distances.
R if another remote control for the same
garage door drive is available, repeat the
same programming steps with this remote
control. Before you perform the steps of the
operation, make sure that there are new
batteries in the garage door remote
control.
R note that some remote controls only
transmit for a limited amount of time (the
indicator lamp on the remote control goes
out). Press the remote control button again
before it stops transmitting.
R align the antenna cable of the garage door
opener unit. This can improve signal
reception/transmission.
Opening/closing the garage door
Once programmed, the integrated garage
door opener will assume the function of the
garage door system's remote control. Please
also read the operating instructions for the
garage door system.
XTurn the SmartKey to position 2 in the
ignition lock.XPress transmitter button ;, = or ? in the
overhead control panel that you have
programmed to operate the garage door.
Garage door system with a fixed code:
indicator lamp : lights up green.
Garage door system with a rolling code:
indicator lamp : flashes green.
i
The transmitter will transmit a signal for
as long as the transmitter button is being
pressed. After a maximum of ten seconds,
transmission is terminated and indicator
lamp : flashes yellow. Press the
transmitter button again, if necessary.
Clearing the memory of the integrated
garage door opener on the rear-view
mirror
XTurn the SmartKey to position 2 in the
ignition lock.XPress transmitter buttons ; and ?.
The indicator lamp lights up yellow.XPress and hold transmitter buttons ;
and ? until the indicator lamp turns green.
i
Make sure that you clear the memory of
the integrated garage door opener before
selling the vehicle.
Compass
Calling up the compass
XPress the V or U button on the
multifunction steering wheel repeatedly
until the Offroad menu appears in the
multifunction display.
The compass shows which direction the
vehicle is currently traveling in: N, NE , E , SE ,
S , SW , W or NW.296FeaturesStowing and features
Page 302 of 384
Useful information
i This Operator's Manual describes all
models and all standard and optional
equipment of your vehicle available at the
time of publication of the Operator's
Manual. Country-specific differences are
possible. Please note that your vehicle may
not be equipped with all features
described. This also applies to safety-
related systems and functions.
i Please read the information on qualified
specialist workshops ( Y page 24).
Engine compartment
Hood
Opening the hood
GWARNING
Do not pull the release lever while the vehicle
is in motion. Otherwise, the hood could be
forced open by passing air flow.
This could cause the hood to come loose and
injure you and/or others.
GWARNING
Do not open the hood when the engine is
overheated. You could be seriously injured.
Observe the coolant temperature display to
determine whether the engine may be
overheated. If you see flames or smoke
coming from the engine compartment, move
away from the vehicle. Wait until the engine
has cooled. If necessary, call the fire
department.
GWARNING
There is a risk of injury if the hood is open,
even if the engine is not running.
Some engine components can become very
hot.
To avoid the risk of burns, only touch those
components described in the Operator's
Manual and observe the relevant safety notes.
GWARNING
To help prevent personal injury, stay clear of
moving parts when the hood is open and the
engine is running.
The radiator fan may continue to run for
approximately 30 seconds or may even
restart after the engine has been turned off.
Stay clear of fan blades.
GWARNING
Vehicles with gasoline engine:
The engine is equipped with a transistorized
ignition system. Because of the high voltage
it is dangerous to touch any components
(ignition coils, spark plug sockets, diagnostic
socket) of the ignition system
R with the engine running
R while starting the engine
R when the ignition is switched on and the
engine is turned manually
GWARNING
Vehicles with diesel engine:
The engine is equipped with a high-voltage
electronic control unit for the injection
system. Because of the high voltage it is
dangerous to touch any components of the
injection system (injectors, electrical wires)
R with the engine running
R while starting the engine
R when the ignition is switched on
XMake sure that the windshield wipers are
switched off.GWARNING
The windshield wipers and wiper linkage
could be set in motion.
When the hood is open, you or others could
be injured by the wiper linkage.
Make sure that the windshield wipers are
switched off. Remove the SmartKey or make
sure that no ignition position has been
selected with KEYLESS-GO. All indicator
lamps must be off in the instrument cluster.
300Engine compartmentMaintenance and care
Page 305 of 384
damage to the engine or the catalytic
converter. Have excess oil siphoned off.
For further information on engine oil, see
( Y page 375).XReplace cap : on the filler neck and
tighten clockwise.
Ensure that the cap locks into place
securely.
Checking and adding other service
products
Checking the coolant level
Only check the coolant level when the vehicle
is on a level surface and the engine has cooled
down.
XTurn the SmartKey to position
2 (Y page 149) in the ignition lock.
On vehicles with KEYLESS-GO, press the
Start/Stop button twice ( Y page 149).XCheck the coolant temperature gauge in
the multifunction display.
The coolant temperature must be below
158 ‡ (70 †).GWARNING
In order to avoid any potentially serious burns:
R use extreme caution when opening the
hood if there are any signs of steam or
coolant leaking from the cooling system, or
if the coolant temperature display indicates
that the coolant is overheated.
R do not remove the pressure cap on the
coolant reservoir if the coolant temperature
is above 158 ‡ (70 †). Allow the engine to
cool down before removing the cap. The
coolant reservoir contains hot fluid and is
under pressure.
R using a rag, slowly turn the cap
approximately 1
/ 2 turn to relieve excess
pressure. If opened immediately, scalding
hot fluid and steam will be blown out under
pressure.
R do not spill antifreeze on hot engine parts.
Antifreeze contains ethylene glycol which
may burn if it comes into contact with hot
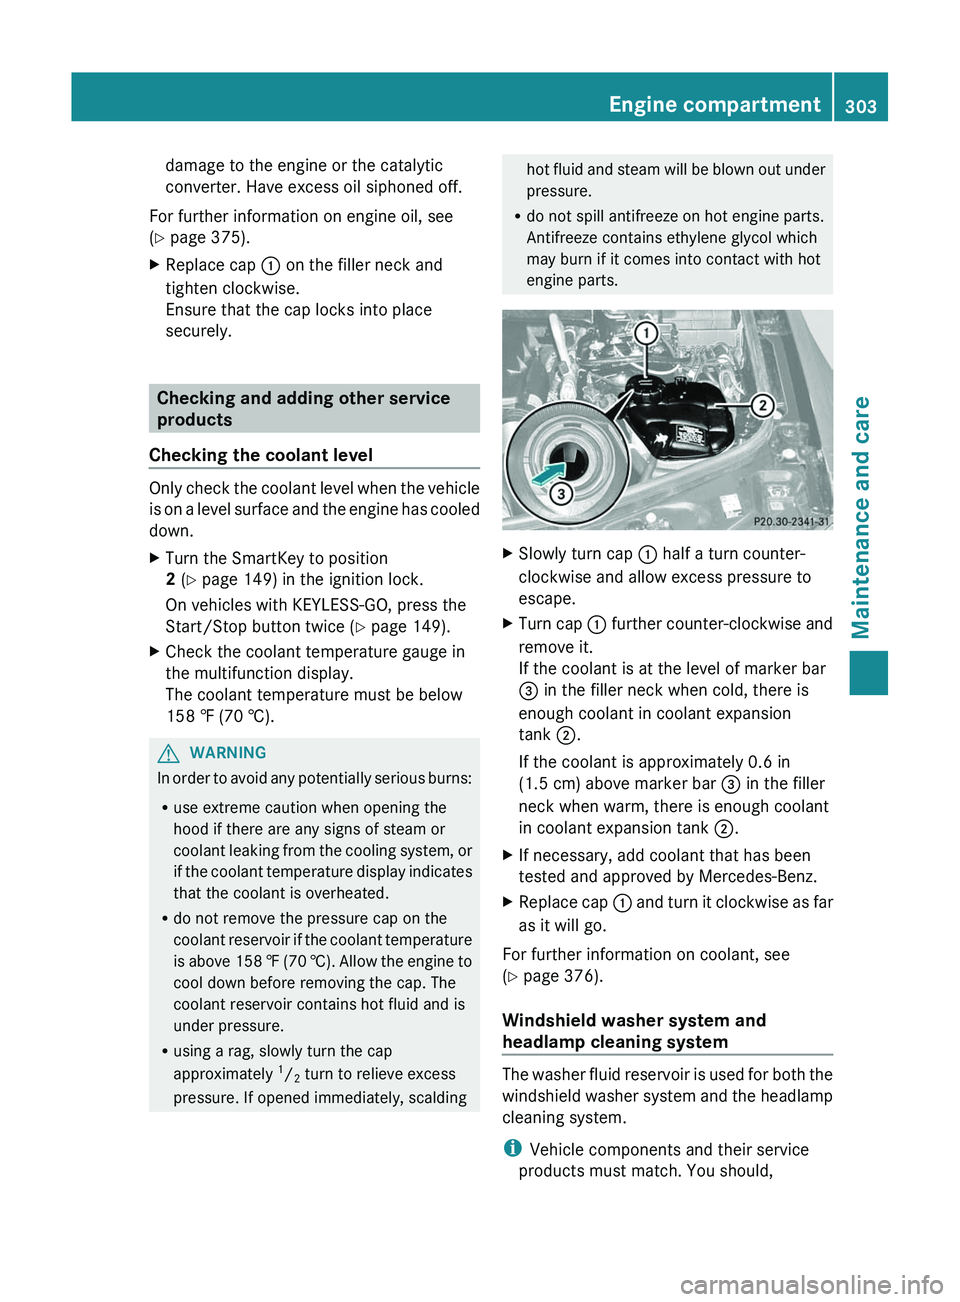
engine parts.XSlowly turn cap : half a turn counter-
clockwise and allow excess pressure to
escape.XTurn cap : further counter-clockwise and
remove it.
If the coolant is at the level of marker bar
= in the filler neck when cold, there is
enough coolant in coolant expansion
tank ;.
If the coolant is approximately 0.6 in
(1.5 cm) above marker bar = in the filler
neck when warm, there is enough coolant
in coolant expansion tank ;.XIf necessary, add coolant that has been
tested and approved by Mercedes-Benz.XReplace cap : and turn it clockwise as far
as it will go.
For further information on coolant, see
( Y page 376).
Windshield washer system and
headlamp cleaning system
The washer fluid reservoir is used for both the
windshield washer system and the headlamp
cleaning system.
i Vehicle components and their service
products must match. You should,
Engine compartment303Maintenance and careZ
Page 308 of 384
Use care products and cleaning agents
recommended and approved by Mercedes-
Benz.GWARNING
Many cleaning products can be hazardous.
Some are poisonous, others are flammable.
Always follow the instructions on the
particular container. Always open your
vehicle's doors or windows when cleaning the
inside.
Never use fluids or solvents that are not
designed for cleaning your vehicle.
Always lock away cleaning products and keep
them out of reach of children.
! For cleaning your vehicle, do not use any
of the following:
R dry, rough or hard cloths
R abrasive cleaning agents
R solvents
R cleaning agents containing solvents
Do not scrub.
Do not touch the surfaces or protective
films with hard objects, e.g. a ring or ice
scraper. You could otherwise scratch or
damage the surfaces and protective film.
HEnvironmental note
Dispose of empty packaging and cleaning
cloths in an environmentally responsible
manner.
! Do not park the vehicle for an extended
period straight after cleaning it, particularly
after having cleaned the wheels with wheel
cleaner. Wheel cleaners could cause
increased corrosion of the brake discs and
brake pads/linings. For this reason, you
should drive for a few minutes after
cleaning. Braking heats the brake discs and
the brake pads/linings, thus drying them.
The vehicle can then be parked.
Exterior care
Automatic car washGWARNING
Braking efficiency is reduced after washing
the vehicle. This could cause an accident. For
this reason, you must drive particularly
carefully after washing the vehicle until the
brakes have dried.
You can wash the vehicle in an automatic car
wash from the very start.
! Never clean your vehicle in a Touchless
Automatic Car Wash as these use special
cleaning agents. These cleaning agents can
damage the paintwork or plastic parts.
If the vehicle is very dirty, pre-wash it before
cleaning it in an automatic car wash.
! In car washes with a towing mechanism,
make sure that the automatic transmission
is in transmission position N, otherwise the
vehicle could be damaged.
R Vehicles with a SmartKey:
Do not remove the SmartKey from the
ignition lock. Do not open the driver's
door or front-passenger door when the
engine is switched off. Otherwise, the
automatic transmission selects park
position P automatically and locks the
wheels. You can prevent this by shifting
the automatic transmission to N
beforehand.
R Vehicles with KEYLESS-GO:
Do not open the driver's door or front-
passenger door when the engine is
switched off. Otherwise, the automatic
transmission selects park position P
automatically and locks the wheels.
Observe the following to make sure that the
automatic transmission stays in position N:
306CareMaintenance and care
Page 309 of 384
XMake sure the vehicle is stationary and the
ignition is switched off.XTurn the SmartKey to position
2 (Y page 149) in the ignition lock.
Use the SmartKey instead of the Start/
Stop button on vehicles with KEYLESS-GO.XDepress and hold the brake pedal.XShift the automatic transmission to
position N.XRelease the brake pedal.XRelease the parking brake.XSwitch off the ignition and leave the
SmartKey in the ignition lock.
! Make sure that:
R the side windows and the sliding sunroof
are fully closed.
R the ventilation/heating is switched off
(the OFF button has been pressed).
R the windshield wiper switch is in position
0 .
Otherwise, the vehicle might be damaged.
After using an automatic car wash, wipe off
wax from the windshield and the wiper
blades. This will prevent smears and reduce
wiping noises caused by residue on the
windshield.
Washing by hand
Carefully remove all deposits of road salt as
soon as possible when driving in winter.
Also, clean the insides of the wheels when
washing the underbody of the vehicle.
XDo not use hot water and do not wash the
vehicle in direct sunlight.XUse a soft car sponge for cleaning.XUse a gentle cleaning agent, e.g. a
Mercedes-Benz approved car shampoo.XWash down the vehicle with a gentle water
jet.XDo not point the water jet directly at the air
inlets.XUse plenty of water and rinse the sponge
frequently.XRinse the vehicle with clean water and dry
it thoroughly with a chamois.XDo not allow the cleaning agent to dry on
the paintwork.
Power washers
GWARNING
Do not use power washers with circular-jet
nozzles (dirt grinders) to clean your vehicle, in
particular the tires. You could otherwise
damage the tires and cause an accident.
! Always maintain a distance of at least
11.8 in (30 cm) between the vehicle and the
power washer nozzle. Information about
the correct distance is available from the
equipment manufacturer.
Move the power washer nozzle around
when cleaning your vehicle.
Do not aim directly at any of the following:
R tires
R door gaps, roof gaps, joints etc.
R electrical components
R battery
R connectors
R lights
R seals
R trim elements
R ventilation slots
Damaged seals or electrical components
can lead to leaks or failures.
Cleaning the wheels
! Do not use acidic wheel cleaning products
to remove brake dust. This could damage
wheel bolts and brake components.
! Do not park the vehicle for an extended
period straight after cleaning it, particularly
after having cleaned the wheels with wheel
cleaner. Wheel cleaners could cause
increased corrosion of the brake discs and
brake pads/linings. For this reason, you
should drive for a few minutes after
Care307Maintenance and careZ
Page 311 of 384
Cleaning the windowsGWARNING
Before cleaning the windshield or wiper
blades, switch off the windshield wipers and
remove the SmartKey from the ignition lock.
On vehicles with KEYLESS-GO, press the
Start/Stop button repeatedly until all
indicator lamps in the instrument cluster have
gone out. The windshield wipers could
otherwise move and injure you.
XClean the inside and outside of the
windows with a damp cloth and a cleaning
agent that is recommended and approved
by Mercedes-Benz.
! Do not use dry cloths, abrasive products,
solvents or cleaning agents containing
solvents to clean the inside of the windows.
Do not touch the insides of the windows
with hard objects, e.g. an ice scraper or
ring. There is otherwise a risk of damaging
the windows.
! Clean the water drainage channels of the
windshield and the rear window at regular
intervals. Deposits such as leaves, petals
and pollen may under certain
circumstances prevent water from draining
away. This can lead to corrosion damage
and damage to electronic components.
Cleaning the wiper blades
GWARNING
Before cleaning the windshield or wiper
blades, switch off the windshield wipers and
remove the SmartKey from the ignition lock.
On vehicles with KEYLESS-GO, press the
Start/Stop button repeatedly until all
indicator lamps in the instrument cluster have
gone out. The windshield wipers could
otherwise move and injure you.
! Do not pull the wiper blade. Otherwise,
the wiper blade could be damaged.
! Do not clean wiper blades too often and
do not rub them too hard. Otherwise, the
graphite coating could be damaged. This
could cause wiper noise.XFold the wiper arms away from the
windshield.XCarefully clean the wiper blades with a
damp cloth.XFold the windshield wipers back again
before switching on the ignition.
! Hold the wiper arm securely when folding
back. The windshield could be damaged if
the wiper arm smacks against it suddenly.
Cleaning the exterior lighting
XClean the plastic lenses of the exterior
lights with a wet sponge and a mild cleaning
agent, e.g. Mercedes-Benz car shampoo or
cleaning cloths.
! Only use cleaning agents or cleaning
cloths which are suitable for plastic light
lenses. Unsuitable cleaning agents or
cleaning cloths could scratch or damage
the plastic light lenses.
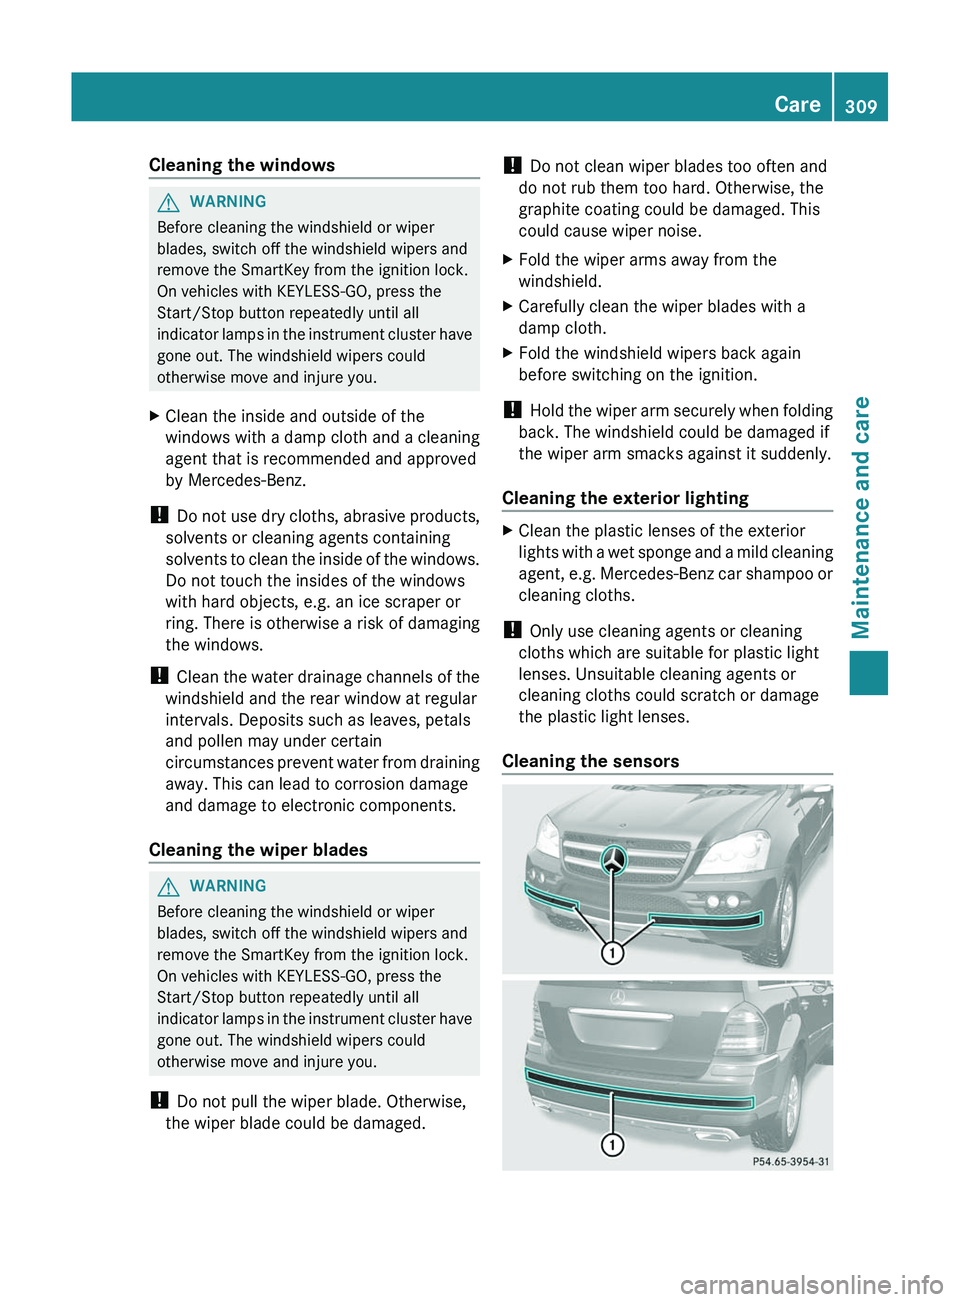
Cleaning the sensors
Care309Maintenance and careZ
Page 318 of 384
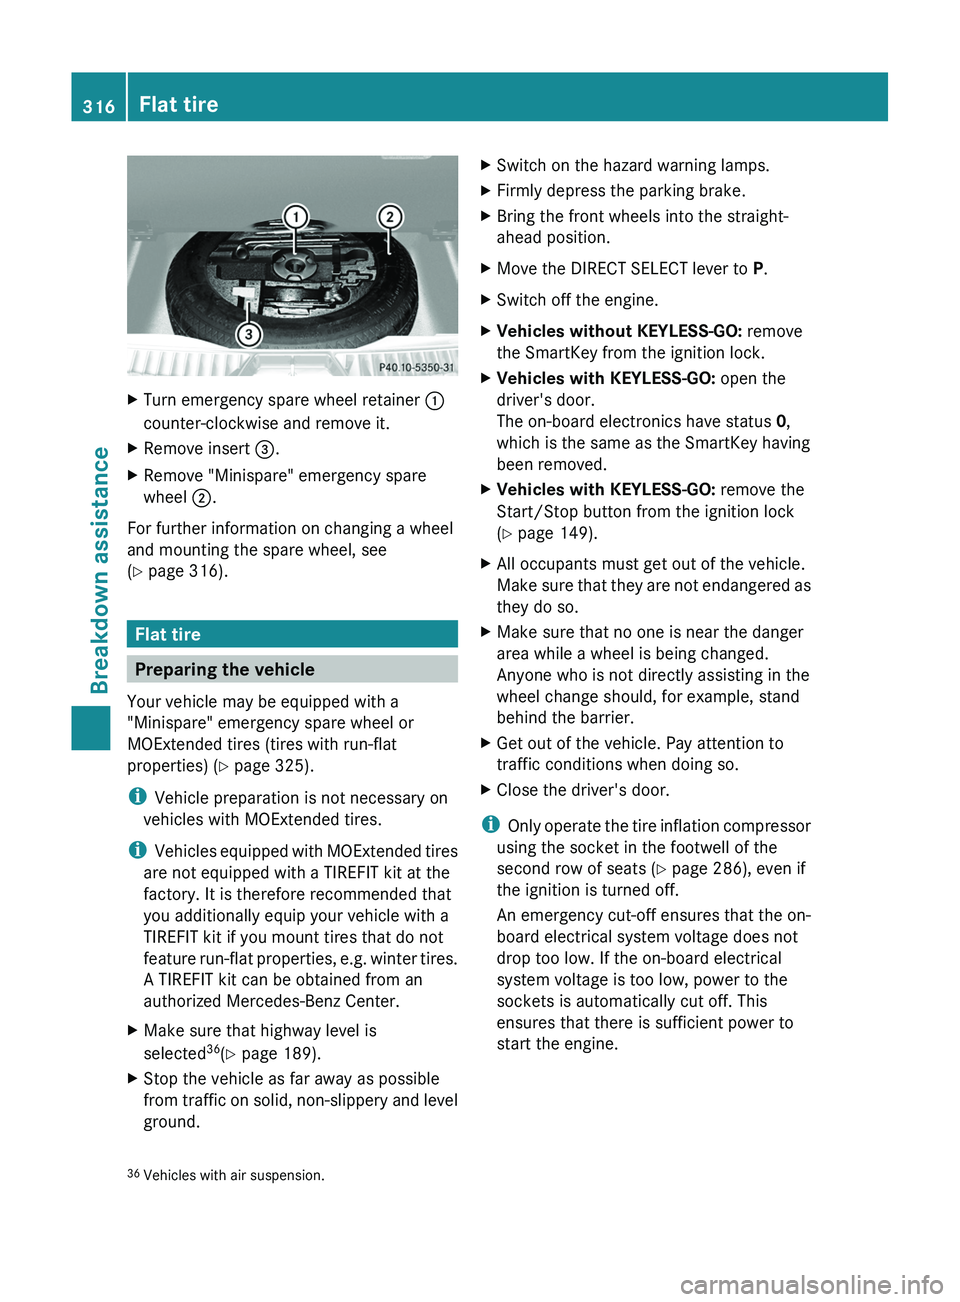
XTurn emergency spare wheel retainer :
counter-clockwise and remove it.XRemove insert =.XRemove "Minispare" emergency spare
wheel ;.
For further information on changing a wheel
and mounting the spare wheel, see
( Y page 316).
Flat tire
Preparing the vehicle
Your vehicle may be equipped with a
"Minispare" emergency spare wheel or
MOExtended tires (tires with run-flat
properties) ( Y page 325).
i Vehicle preparation is not necessary on
vehicles with MOExtended tires.
i Vehicles equipped with MOExtended tires
are not equipped with a TIREFIT kit at the
factory. It is therefore recommended that
you additionally equip your vehicle with a
TIREFIT kit if you mount tires that do not
feature run-flat properties, e.g. winter tires.
A TIREFIT kit can be obtained from an
authorized Mercedes-Benz Center.
XMake sure that highway level is
selected 36
(Y page 189).XStop the vehicle as far away as possible
from traffic on solid, non-slippery and level
ground.XSwitch on the hazard warning lamps.XFirmly depress the parking brake.XBring the front wheels into the straight-
ahead position.XMove the DIRECT SELECT lever to P.XSwitch off the engine.XVehicles without KEYLESS-GO: remove
the SmartKey from the ignition lock.XVehicles with KEYLESS-GO: open the
driver's door.
The on-board electronics have status 0,
which is the same as the SmartKey having
been removed.XVehicles with KEYLESS-GO: remove the
Start/Stop button from the ignition lock
( Y page 149).XAll occupants must get out of the vehicle.
Make sure that they are not endangered as
they do so.XMake sure that no one is near the danger
area while a wheel is being changed.
Anyone who is not directly assisting in the
wheel change should, for example, stand
behind the barrier.XGet out of the vehicle. Pay attention to
traffic conditions when doing so.XClose the driver's door.
i Only operate the tire inflation compressor
using the socket in the footwell of the
second row of seats ( Y page 286), even if
the ignition is turned off.
An emergency cut-off ensures that the on-
board electrical system voltage does not
drop too low. If the on-board electrical
system voltage is too low, power to the
sockets is automatically cut off. This
ensures that there is sufficient power to
start the engine.
36 Vehicles with air suspension.316Flat tireBreakdown assistance
Page 320 of 384
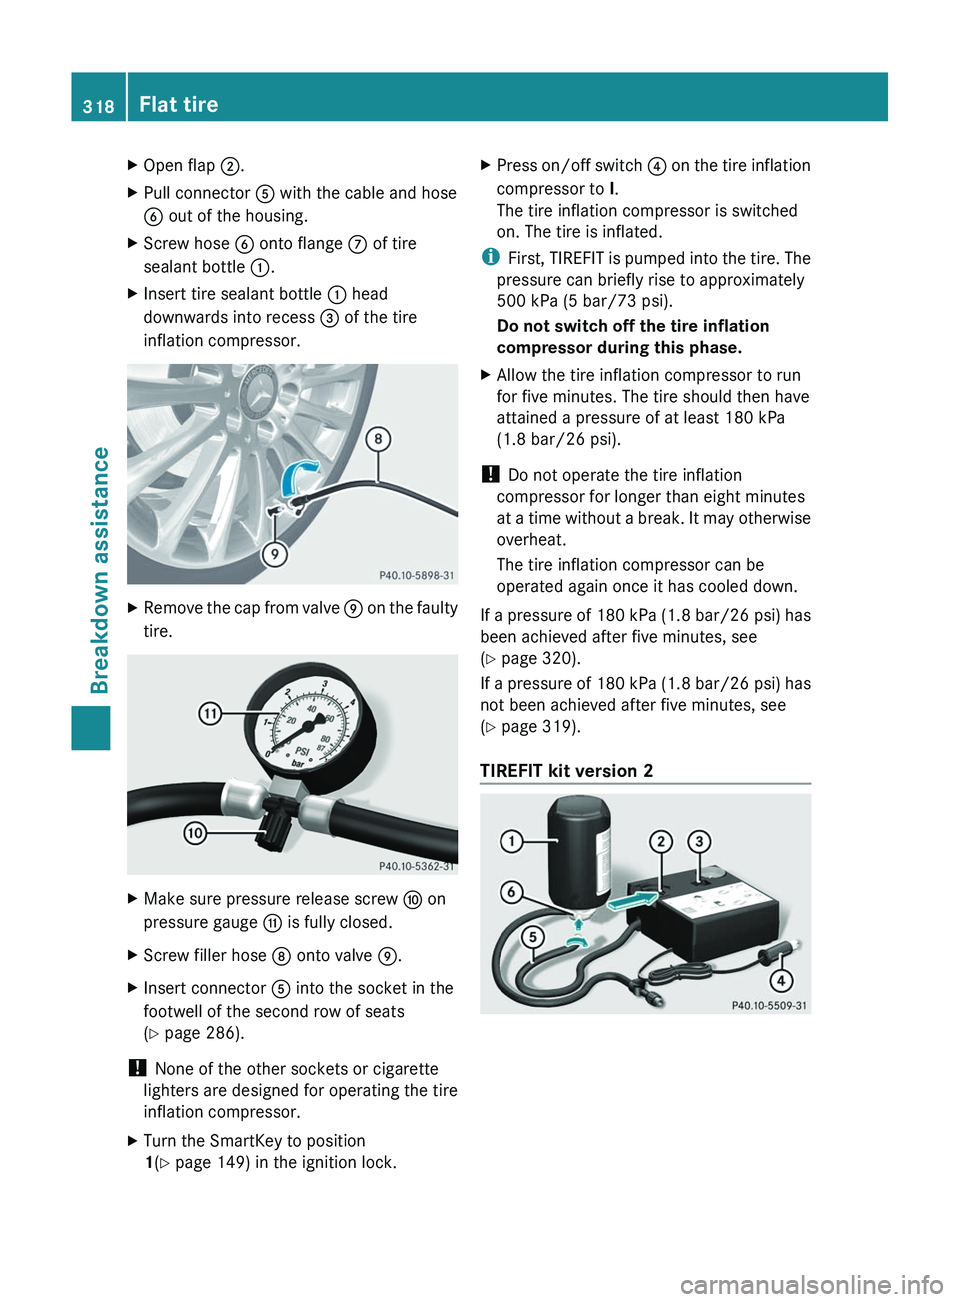
XOpen flap ;.XPull connector A with the cable and hose
B out of the housing.XScrew hose B onto flange C of tire
sealant bottle :.XInsert tire sealant bottle : head
downwards into recess = of the tire
inflation compressor.XRemove the cap from valve E on the faulty
tire.XMake sure pressure release screw F on
pressure gauge G is fully closed.XScrew filler hose D onto valve E.XInsert connector A into the socket in the
footwell of the second row of seats
( Y page 286).
!
None of the other sockets or cigarette
lighters are designed for operating the tire
inflation compressor.
XTurn the SmartKey to position
1 (Y page 149) in the ignition lock.XPress on/off switch ? on the tire inflation
compressor to I.
The tire inflation compressor is switched
on. The tire is inflated.
i First, TIREFIT is pumped into the tire. The
pressure can briefly rise to approximately
500 kPa (5 bar/73 psi).
Do not switch off the tire inflation
compressor during this phase.
XAllow the tire inflation compressor to run
for five minutes. The tire should then have
attained a pressure of at least 180 kPa
(1.8 bar/26 psi).
! Do not operate the tire inflation
compressor for longer than eight minutes
at a time without a break. It may otherwise
overheat.
The tire inflation compressor can be
operated again once it has cooled down.
If a pressure of 180 kPa (1.8 bar/26 psi) has
been achieved after five minutes, see
( Y page 320).
If a pressure of 180 kPa (1.8 bar/26 psi) has
not been achieved after five minutes, see
( Y page 319).
TIREFIT kit version 2
318Flat tireBreakdown assistance