2012 MERCEDES-BENZ GL key
[x] Cancel search: keyPage 227 of 384
Rthe license plate lamp
R the side marker lamps
On vehicles with daytime running lamps, the
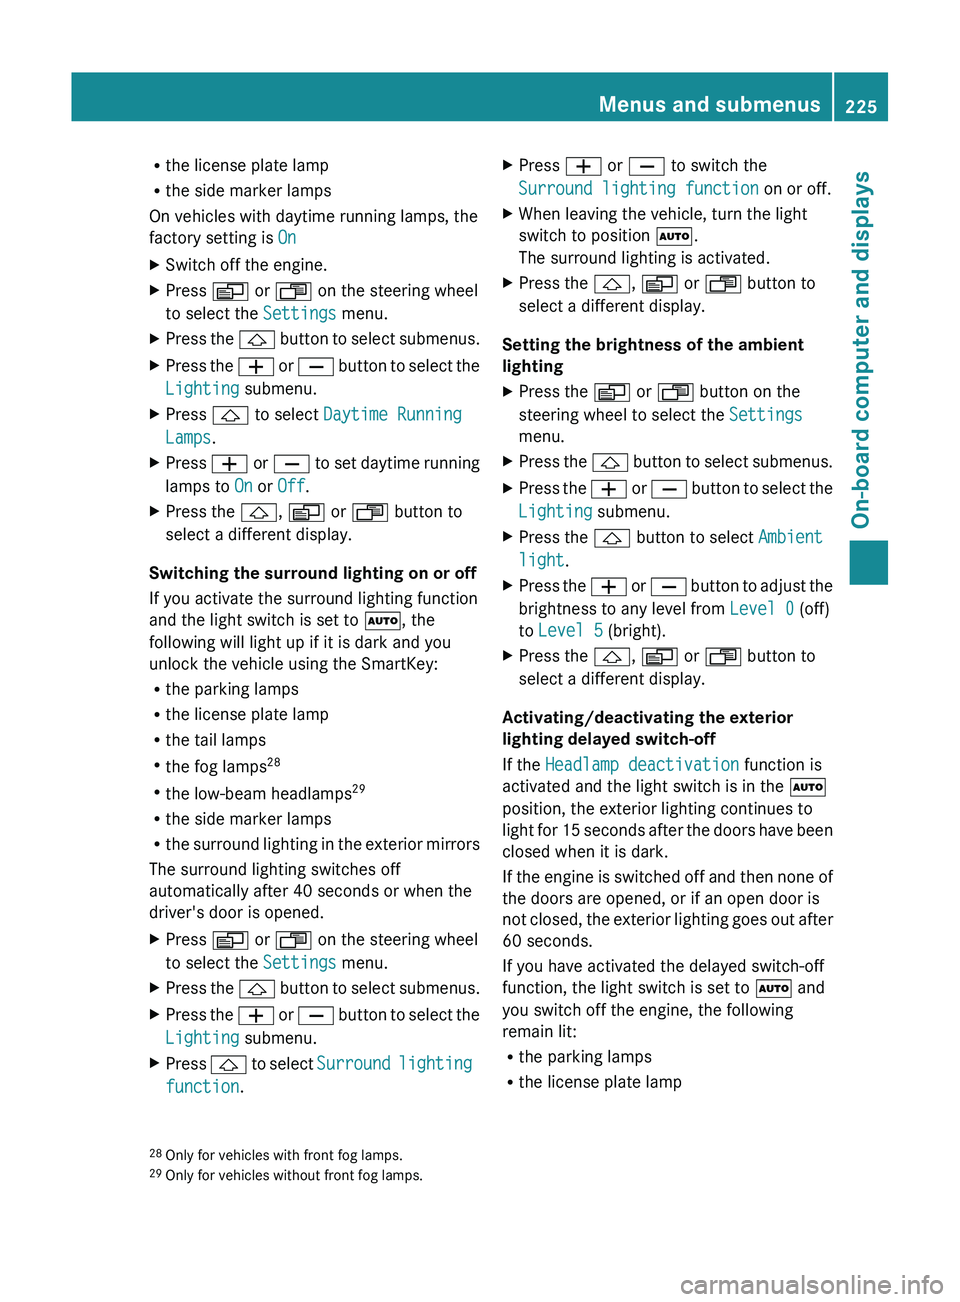
factory setting is OnXSwitch off the engine.XPress V or U on the steering wheel
to select the Settings menu.XPress the & button to select submenus.XPress the W or X button to select the
Lighting submenu.XPress & to select Daytime Running
Lamps .XPress W or X to set daytime running
lamps to On or Off .XPress the &, V or U button to
select a different display.
Switching the surround lighting on or off
If you activate the surround lighting function
and the light switch is set to Ã, the
following will light up if it is dark and you
unlock the vehicle using the SmartKey:
R the parking lamps
R the license plate lamp
R the tail lamps
R the fog lamps 28
R the low-beam headlamps 29
R the side marker lamps
R the surround lighting in the exterior mirrors
The surround lighting switches off
automatically after 40 seconds or when the
driver's door is opened.
XPress V or U on the steering wheel
to select the Settings menu.XPress the & button to select submenus.XPress the W or X button to select the
Lighting submenu.XPress & to select Surround lighting
function .XPress W or X to switch the
Surround lighting function on or off.XWhen leaving the vehicle, turn the light
switch to position Ã.
The surround lighting is activated.XPress the &, V or U button to
select a different display.
Setting the brightness of the ambient
lighting
XPress the V or U button on the
steering wheel to select the Settings
menu.XPress the & button to select submenus.XPress the W or X button to select the
Lighting submenu.XPress the & button to select Ambient
light .XPress the W or X button to adjust the
brightness to any level from Level 0 (off)
to Level 5 (bright).XPress the &, V or U button to
select a different display.
Activating/deactivating the exterior
lighting delayed switch-off
If the Headlamp deactivation function is
activated and the light switch is in the Ã
position, the exterior lighting continues to
light for 15 seconds after the doors have been
closed when it is dark.
If the engine is switched off and then none of
the doors are opened, or if an open door is
not closed, the exterior lighting goes out after
60 seconds.
If you have activated the delayed switch-off
function, the light switch is set to à and
you switch off the engine, the following
remain lit:
R the parking lamps
R the license plate lamp
28Only for vehicles with front fog lamps.
29 Only for vehicles without front fog lamps.Menus and submenus225On-board computer and displaysZ
Page 228 of 384
Rthe tail lamps
R the fog lamps 30
R the low-beam headlamps 31
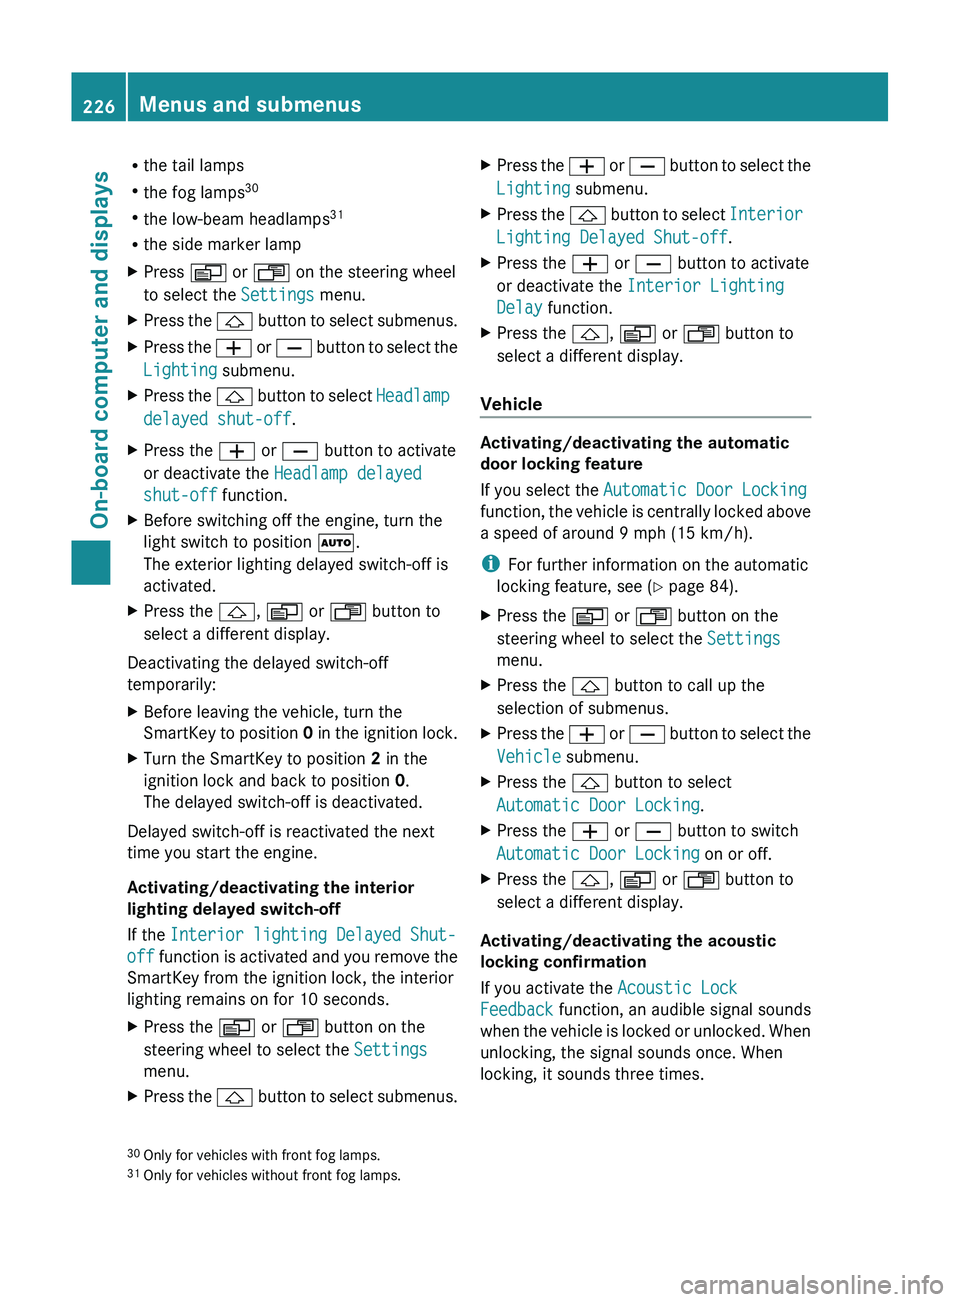
R the side marker lampXPress V or U on the steering wheel
to select the Settings menu.XPress the & button to select submenus.XPress the W or X button to select the
Lighting submenu.XPress the & button to select Headlamp
delayed shut-off .XPress the W or X button to activate
or deactivate the Headlamp delayed
shut-off function.XBefore switching off the engine, turn the
light switch to position Ã.
The exterior lighting delayed switch-off is
activated.XPress the &, V or U button to
select a different display.
Deactivating the delayed switch-off
temporarily:
XBefore leaving the vehicle, turn the
SmartKey to position 0 in the ignition lock.XTurn the SmartKey to position 2 in the
ignition lock and back to position 0.
The delayed switch-off is deactivated.
Delayed switch-off is reactivated the next
time you start the engine.
Activating/deactivating the interior
lighting delayed switch-off
If the Interior lighting Delayed Shut-
off function is activated and you remove the
SmartKey from the ignition lock, the interior
lighting remains on for 10 seconds.
XPress the V or U button on the
steering wheel to select the Settings
menu.XPress the & button to select submenus.XPress the W or X button to select the
Lighting submenu.XPress the & button to select Interior
Lighting Delayed Shut-off .XPress the W or X button to activate
or deactivate the Interior Lighting
Delay function.XPress the &, V or U button to
select a different display.
Vehicle
Activating/deactivating the automatic
door locking feature
If you select the Automatic Door Locking
function, the vehicle is centrally locked above
a speed of around 9 mph (15 km/h).
i For further information on the automatic
locking feature, see ( Y page 84).
XPress the V or U button on the
steering wheel to select the Settings
menu.XPress the & button to call up the
selection of submenus.XPress the W or X button to select the
Vehicle submenu.XPress the & button to select
Automatic Door Locking .XPress the W or X button to switch
Automatic Door Locking on or off.XPress the &, V or U button to
select a different display.
Activating/deactivating the acoustic
locking confirmation
If you activate the Acoustic Lock
Feedback function, an audible signal sounds
when the vehicle is locked or unlocked. When
unlocking, the signal sounds once. When
locking, it sounds three times.
30 Only for vehicles with front fog lamps.
31 Only for vehicles without front fog lamps.226Menus and submenusOn-board computer and displays
Page 238 of 384
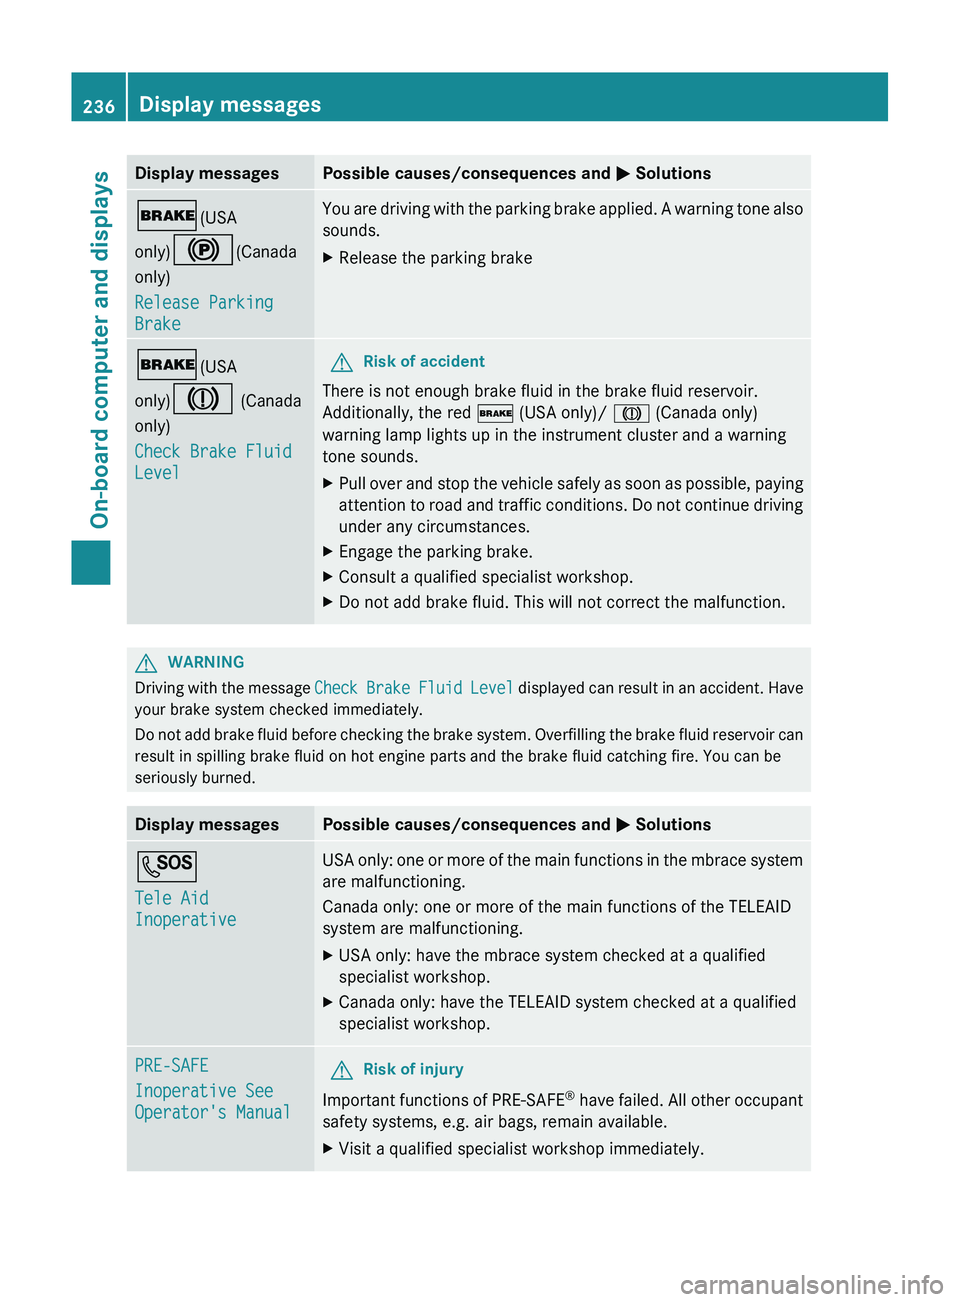
Display messagesPossible causes/consequences and M Solutions$ (USA
only) ! (Canada
only)
Release Parking
BrakeYou are driving with the parking brake applied. A warning tone also
sounds.XRelease the parking brake$ (USA
only) J (Canada
only)
Check Brake Fluid
LevelGRisk of accident
There is not enough brake fluid in the brake fluid reservoir.
Additionally, the red $ (USA only)/ J (Canada only)
warning lamp lights up in the instrument cluster and a warning
tone sounds.
XPull over and stop the vehicle safely as soon as possible, paying
attention to road and traffic conditions. Do not continue driving
under any circumstances.XEngage the parking brake.XConsult a qualified specialist workshop.XDo not add brake fluid. This will not correct the malfunction.GWARNING
Driving with the message Check Brake Fluid Level displayed can result in an accident. Have
your brake system checked immediately.
Do not add brake fluid before checking the brake system. Overfilling the brake fluid reservoir can
result in spilling brake fluid on hot engine parts and the brake fluid catching fire. You can be
seriously burned.
Display messagesPossible causes/consequences and M SolutionsG
Tele Aid
InoperativeUSA only: one or more of the main functions in the mbrace system
are malfunctioning.
Canada only: one or more of the main functions of the TELEAID
system are malfunctioning.XUSA only: have the mbrace system checked at a qualified
specialist workshop.XCanada only: have the TELEAID system checked at a qualified
specialist workshop.PRE-SAFE
Inoperative See
Operator's ManualGRisk of injury
Important functions of PRE-SAFE ®
have failed. All other occupant
safety systems, e.g. air bags, remain available.
XVisit a qualified specialist workshop immediately.236Display messagesOn-board computer and displays
Page 257 of 384
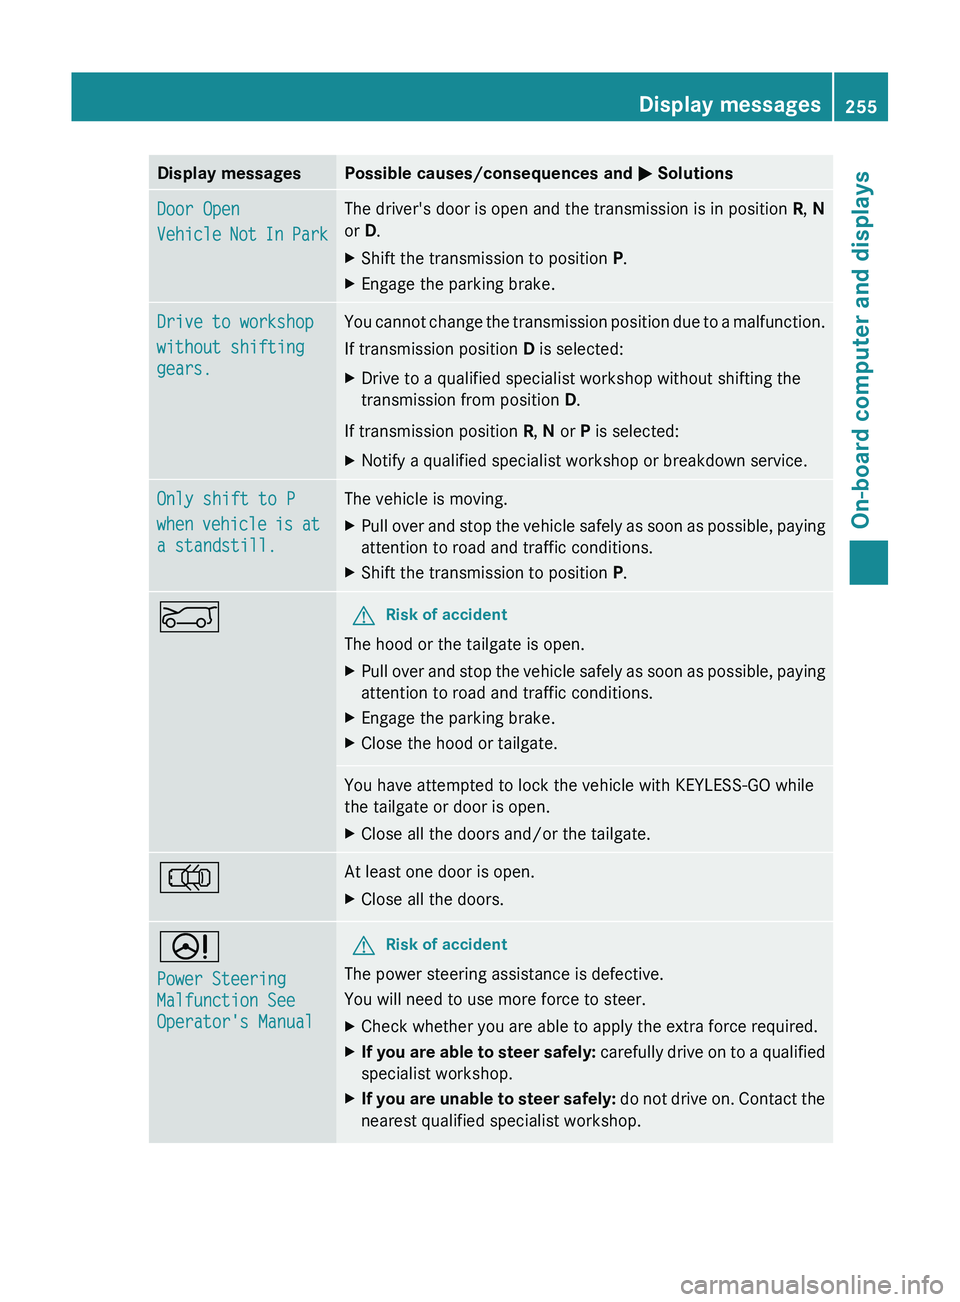
Display messagesPossible causes/consequences and M SolutionsDoor Open
Vehicle Not In ParkThe driver's door is open and the transmission is in position R, N
or D.XShift the transmission to position P.XEngage the parking brake.Drive to workshop
without shifting
gears.You cannot change the transmission position due to a malfunction.
If transmission position D is selected:XDrive to a qualified specialist workshop without shifting the
transmission from position D.
If transmission position R, N or P is selected:
XNotify a qualified specialist workshop or breakdown service.Only shift to P
when vehicle is at
a standstill.The vehicle is moving.XPull over and stop the vehicle safely as soon as possible, paying
attention to road and traffic conditions.XShift the transmission to position P.EGRisk of accident
The hood or the tailgate is open.
XPull over and stop the vehicle safely as soon as possible, paying
attention to road and traffic conditions.XEngage the parking brake.XClose the hood or tailgate.You have attempted to lock the vehicle with KEYLESS-GO while
the tailgate or door is open.XClose all the doors and/or the tailgate.;At least one door is open.XClose all the doors.D
Power Steering
Malfunction See
Operator's ManualGRisk of accident
The power steering assistance is defective.
You will need to use more force to steer.
XCheck whether you are able to apply the extra force required.XIf you are able to steer safely: carefully drive on to a qualified
specialist workshop.XIf you are unable to steer safely: do not drive on. Contact the
nearest qualified specialist workshop.Display messages255On-board computer and displaysZ
Page 258 of 384
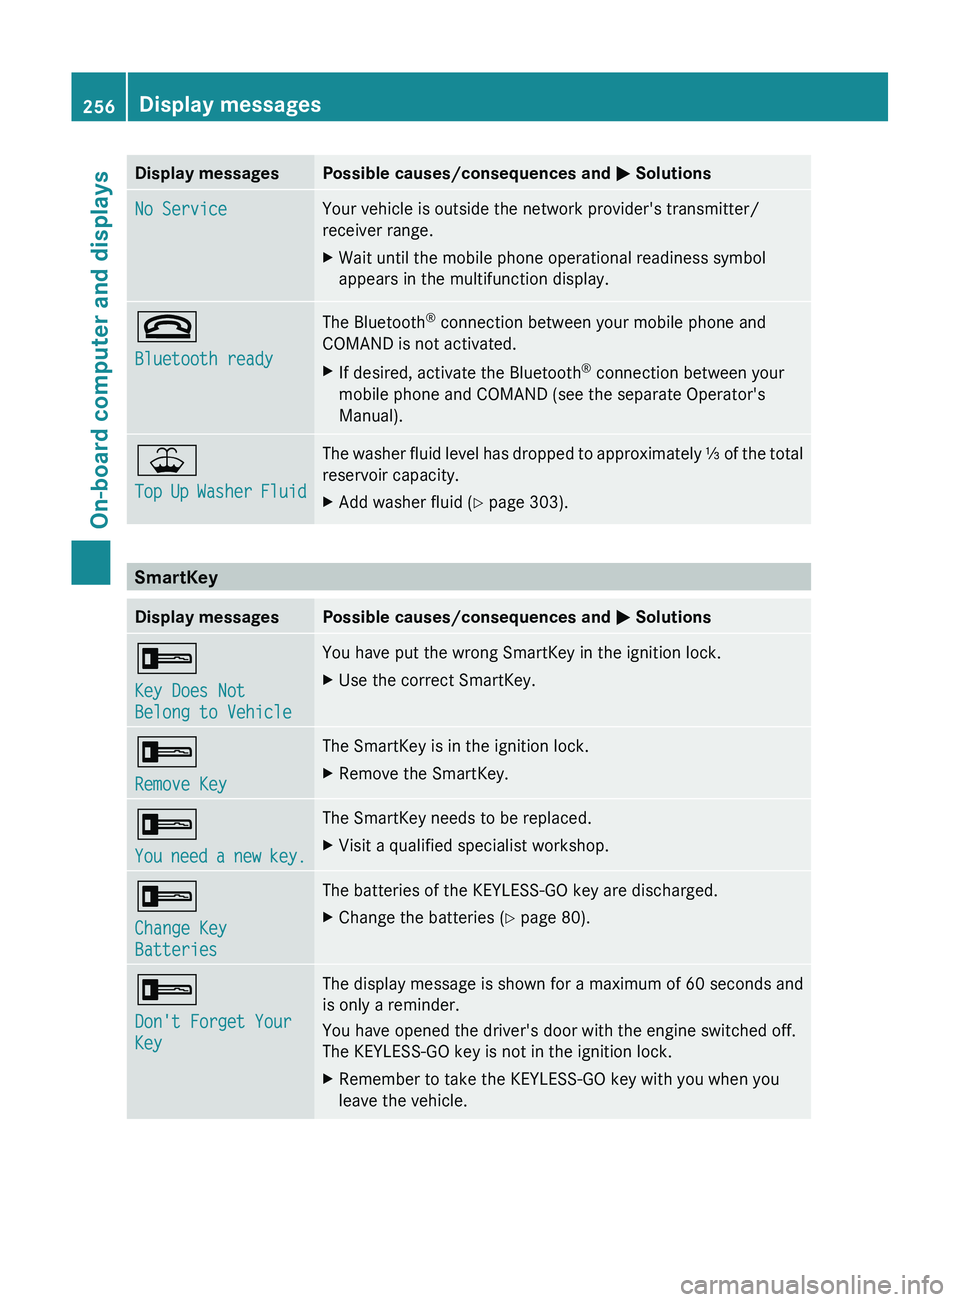
Display messagesPossible causes/consequences and M SolutionsNo ServiceYour vehicle is outside the network provider's transmitter/
receiver range.XWait until the mobile phone operational readiness symbol
appears in the multifunction display.~
Bluetooth readyThe Bluetooth ®
connection between your mobile phone and
COMAND is not activated.XIf desired, activate the Bluetooth ®
connection between your
mobile phone and COMAND (see the separate Operator's
Manual).¥
Top Up Washer FluidThe washer fluid level has dropped to approximately ⅓ of the total
reservoir capacity.XAdd washer fluid ( Y page 303).
SmartKey
Display messagesPossible causes/consequences and M Solutions+
Key Does Not
Belong to VehicleYou have put the wrong SmartKey in the ignition lock.XUse the correct SmartKey.+
Remove KeyThe SmartKey is in the ignition lock.XRemove the SmartKey.+
You need a new key.The SmartKey needs to be replaced.XVisit a qualified specialist workshop.+
Change Key
BatteriesThe batteries of the KEYLESS-GO key are discharged.XChange the batteries ( Y page 80).+
Don't Forget Your
KeyThe display message is shown for a maximum of 60 seconds and
is only a reminder.
You have opened the driver's door with the engine switched off.
The KEYLESS-GO key is not in the ignition lock.XRemember to take the KEYLESS-GO key with you when you
leave the vehicle.256Display messagesOn-board computer and displays
Page 259 of 384
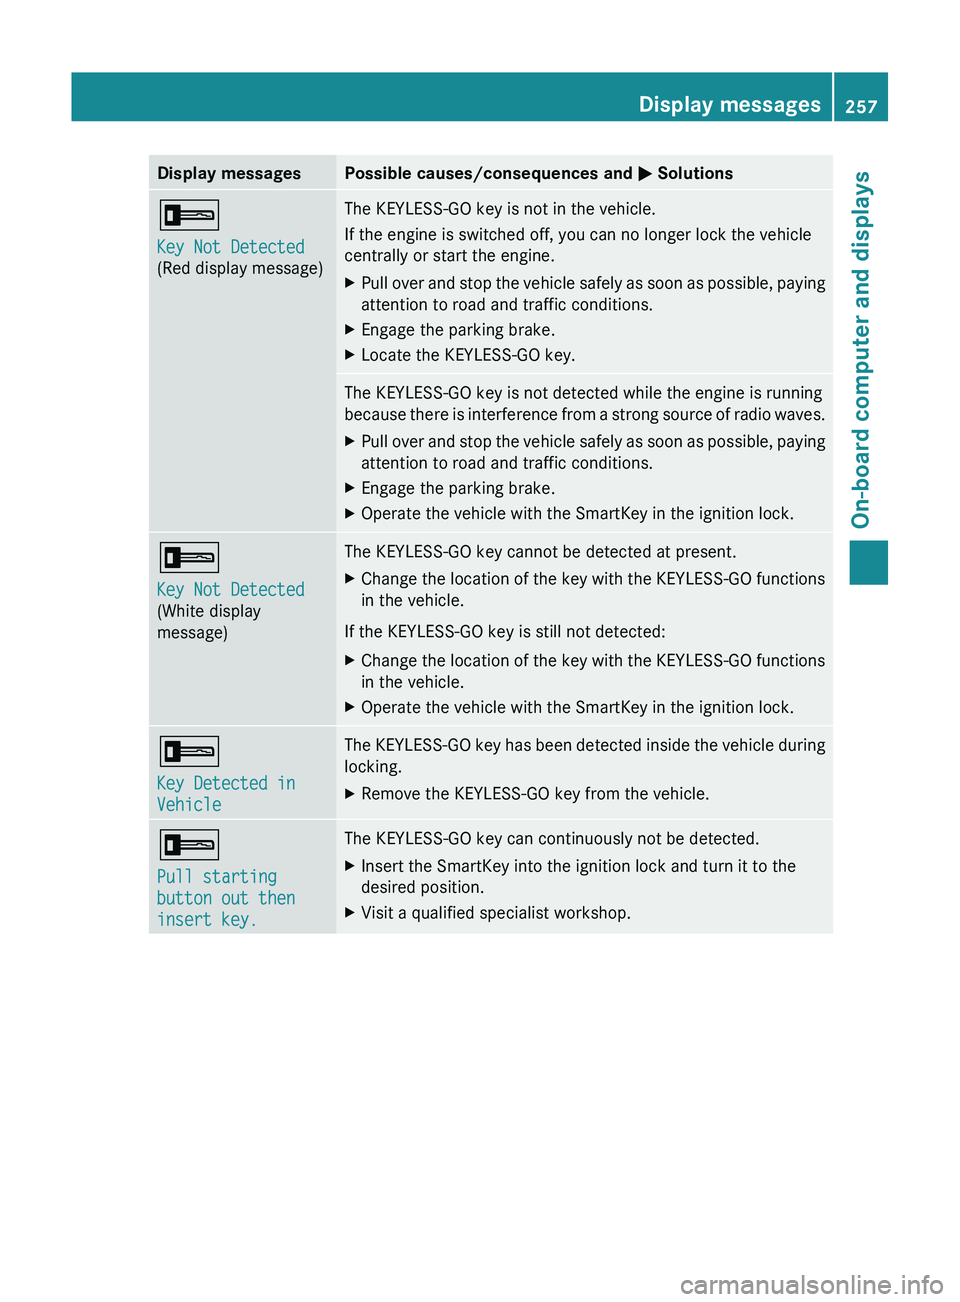
Display messagesPossible causes/consequences and M Solutions+
Key Not Detected
(Red display message)The KEYLESS-GO key is not in the vehicle.
If the engine is switched off, you can no longer lock the vehicle
centrally or start the engine.XPull over and stop the vehicle safely as soon as possible, paying
attention to road and traffic conditions.XEngage the parking brake.XLocate the KEYLESS-GO key.The KEYLESS-GO key is not detected while the engine is running
because there is interference from a strong source of radio waves.XPull over and stop the vehicle safely as soon as possible, paying
attention to road and traffic conditions.XEngage the parking brake.XOperate the vehicle with the SmartKey in the ignition lock.+
Key Not Detected
(White display
message)The KEYLESS-GO key cannot be detected at present.XChange the location of the key with the KEYLESS-GO functions
in the vehicle.
If the KEYLESS-GO key is still not detected:
XChange the location of the key with the KEYLESS-GO functions
in the vehicle.XOperate the vehicle with the SmartKey in the ignition lock.+
Key Detected in
VehicleThe KEYLESS-GO key has been detected inside the vehicle during
locking.XRemove the KEYLESS-GO key from the vehicle.+
Pull starting
button out then
insert key.The KEYLESS-GO key can continuously not be detected.XInsert the SmartKey into the ignition lock and turn it to the
desired position.XVisit a qualified specialist workshop.Display messages257On-board computer and displaysZ
Page 271 of 384
Do not pile luggage or cargo higher than the
seat backrests.
If so equipped, always use the cargo net when
transporting cargo. The cargo net cannot
secure hard or heavy objects.
Parcel nets cannot secure hard or heavy
objects.
Keep compartment lids closed. This will help
to prevent stored objects from being thrown
about and injuring vehicle occupants during
R braking
R vehicle maneuvers
R an accident
Stowage compartments in the front
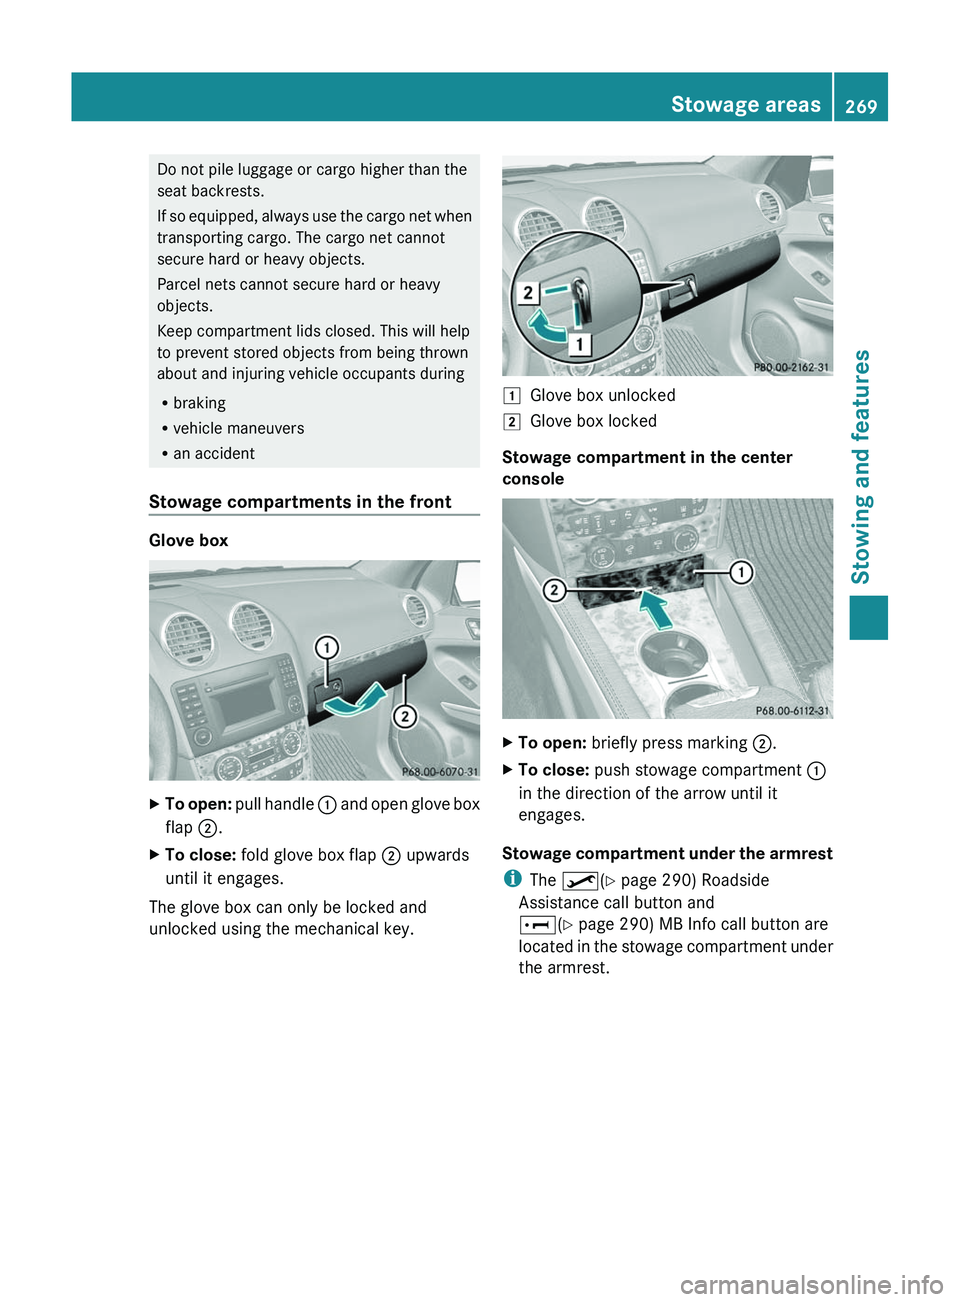
Glove box
XTo open: pull handle : and open glove box
flap ;.XTo close: fold glove box flap ; upwards
until it engages.
The glove box can only be locked and
unlocked using the mechanical key.
1Glove box unlocked2Glove box locked
Stowage compartment in the center
console
XTo open: briefly press marking ;.XTo close: push stowage compartment :
in the direction of the arrow until it
engages.
Stowage compartment under the armrest
i The º (Y page 290) Roadside
Assistance call button and
E (Y page 290) MB Info call button are
located in the stowage compartment under
the armrest.
Stowage areas269Stowing and featuresZ
Page 280 of 384
XSecure the roof carrier to roof rails :.XObserve the manufacturer's installation
instructions.
Cross bar
Points to observe before use
The maximum roof load that can be used with
additional accessories decreases by the dead
weight of the crossbars (13.7 lbs/6.2 kg).
! Note that installing the crossbar
increases the vehicle height by 50 mm
compared to the height stated in the
"Technical data" section.
The wrench and the Allen key are located with
the vehicle tool kit in the stowage space
underneath the trunk floor ( Y page 314).
i Replacement parts are available as
Mercedes-Benz accessories. Contact your
authorized Mercedes-Benz Service Center.
Installing the crossbars
GWARNING
Please follow these installation instructions
carefully. Caution should be exercised to
avoid damage to the vehicle while installing
the crossbars. Also, be careful not to injure
yourself or others while installing and
adjusting the crossbars or loading items on
them.
Each individual step of the installation
instructions, the warning notices, the general
safety precautions and the instructions for
use must be followed exactly. If the crossbars
are not mounted correctly, they and the
objects attached to them could come loose
from your vehicle and cause an accident,
thereby injuring you and other persons and/
or causing damage to property, including
damage to your vehicle.
GWARNING
Every time the crossbars are mounted, before
you set off on a journey and periodically
during longer journeys, check all the screws
on the crossbars to make sure that they are
secure, and tighten them if necessary. Repeat
these checks at regular intervals as road-
surface conditions dictate, and at least after
every 1500 miles (2500 km) of continuous
use.
Otherwise, the crossbars, mounted
accessories and the objects attached to them
could come loose from the vehicle causing an
accident, thereby injuring you and other
persons and/or causing damage to property,
including damage to your vehicle.
Do not use lubricant on the screws of the
crossbars. The screws could work loose and
the crossbars could become detached from
your vehicle, together with the objects
attached to them causing an accident,
thereby injuring you and other persons and/
or causing damage to property, including
damage to your vehicle.GWARNING
Only install the crossbars at the exact
locations designated on the roof rails. The
designated locations for the front crossbars
are between the markings engraved on the
inside of the roof rails. The designated
locations for the rear crossbars are between
the gaps on the roof rails.
Otherwise, the crossbars, mounted
accessories and the objects attached to them
could come loose from the vehicle causing an
accident, thereby injuring you and other
persons and/or causing damage to property,
including damage to your vehicle.
GWARNING
A roof load creates a greater surface area
exposed to the wind and causes the vehicle
to have a higher center of gravity, thereby
changing the vehicle's driving characteristics.
Accordingly, the additional weight on the roof
of the vehicle can have a detrimental effect
on braking, cornering and acceleration.
Never exceed the maximum permissible roof
load or the maximum permissible vehicle
278Stowage areasStowing and features