2012 MERCEDES-BENZ GL key
[x] Cancel search: keyPage 192 of 384
the speed increases. As the vehicle
decelerates, the vehicle is raised back up to
highway level. In ADS SPORT(Y page 195),
the vehicle skips highway level and is lowered
directly to high-speed level.
Make changes to the vehicle level while the
vehicle is in motion. This enables the vehicle
to adjust to the new level as quickly as
possible.
The vehicle level may change visibly when you
park the vehicle and the outside temperature
changes. When the temperature drops, the
vehicle level is lower; with an increase in
temperature, the vehicle level rises.
When you unlock the vehicle or open a door,
the vehicle begins to balance the load
discrepancies while still parked. However, for
significant level changes, e.g. after the
vehicle has been stationary for a long period,
the engine must be on. For safety reasons,
the vehicle is only lowered when the doors are
closed. Lowering is interrupted if a door is
opened and continues once the door has
been closed.GWARNING
Make sure that nobody is in the vicinity of the
wheel arch or the underbody when changing
the vehicle level. You could otherwise trap
yourself or others.
GWARNING
Always select as low a vehicle level as
possible. If the vehicle level is high, the vehicle
center of gravity shifts upwards. This
increases the risk of the vehicle tipping over.
Adapt your driving style to suit the vehicle
level. ESP ®
cannot reduce the risk of an
accident if you drive too fast. ESP ®
cannot
override the laws of physics.
! When driving on extremely rough terrain,
select a high vehicle level in good time.
Make sure that there is always sufficient
ground clearance to prevent damage to the
vehicle.
! Remove the key from the ignition before
raising one or more wheels with the
appropriate equipment.
For information about driving off-road, see
( Y page 174).
Vehicles without extended Off-Road Pro
engineering package
Basic setting
The extent to which the vehicle is raised or
lowered depends on the basic setting
selected.
Select:
R Raised level, for driving on normal off-road
terrain
R Highway/high-speed level for normal roads
The individual vehicle levels differ from
highway level as follows:
R +2.3 in (+ 60 mm) at the raised level
R +/–0 in (+/–0 mm) at the highway level 23
R –0.6 in (–15 mm) at the high-speed level
Raised level
Only select raised level when this is
appropriate for the road conditions.
Otherwise, fuel consumption increases and
handling performance may be affected.
Your selection remains stored even if you
remove the SmartKey from the ignition lock.
XStart the engine.
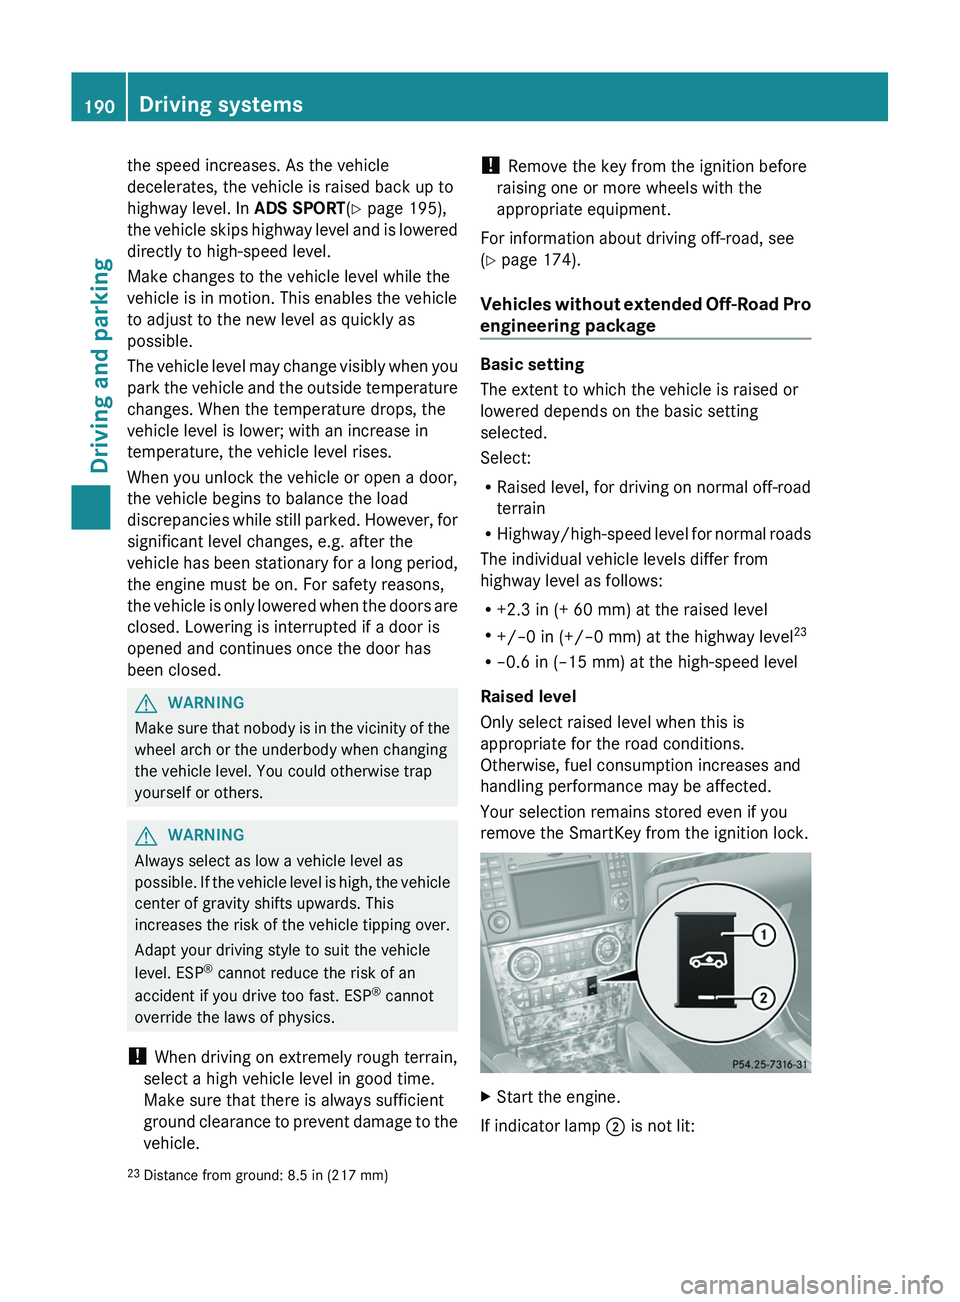
If indicator lamp ; is not lit:
23
Distance from ground: 8.5 in (217 mm)190Driving systemsDriving and parking
Page 194 of 384
Vehicles with extended Off-Road Pro
engineering package
Basic settings
The extent to which the vehicle is raised or
lowered depends on the basic setting
selected.
Select:
R Off-road level 3 for freeing the vehicle in
impassable terrain at low speeds only
R Off-road level 2 for driving on normal off-
road terrain
R Off-road level 1 for driving on easily
negotiable off-road terrain
R Highway/high-speed level for normal roads
The individual vehicle levels differ from
highway level as follows:
R +3.5 in (+ 90 mm) at off-road level 3
R +2.3 in (+ 60 mm) at off-road level 2
R +1.2 in (+ 30 mm) at off-road level 1
R +/–0 in (+/–0 mm) at the highway level
R –0.6 in (–15 mm) at the high-speed level
Off-road levels
GWARNING
Vehicle off-road level 3 is not intended for use
on paved roads. This vehicle level is intended
for clearing impracticable situations at low
speed exclusively. The vehicle has a very high
center of gravity in off-road level 3. This
increases the overturning hazard.
R Select off-road level 3 exclusively for
clearing impracticable situations at low
speed.
R Adapt your driving style to the modified
conditions.
R Do not exceed a speed of 12 mph
(20 km/h).
R Avoid extreme, quick steering movements.
R Keep in mind the vehicle's driving
characteristics are modified.
You should therefore drive in off-road level 3
with particular caution as it could otherwise
lead to an accident and/or serious injury to
you or others.
If you drive too fast at off-road level 3, then
the Reduce speed to below 12 mph
( 20 km/h ) message appears in the
multifunction display. You also hear a
warning. The vehicle is lowered.
i You cannot clear these messages.
Only select an off-road level when this is
appropriate for road conditions. Otherwise,
fuel consumption increases and handling
performance may be affected.
Your selection remains stored even if you
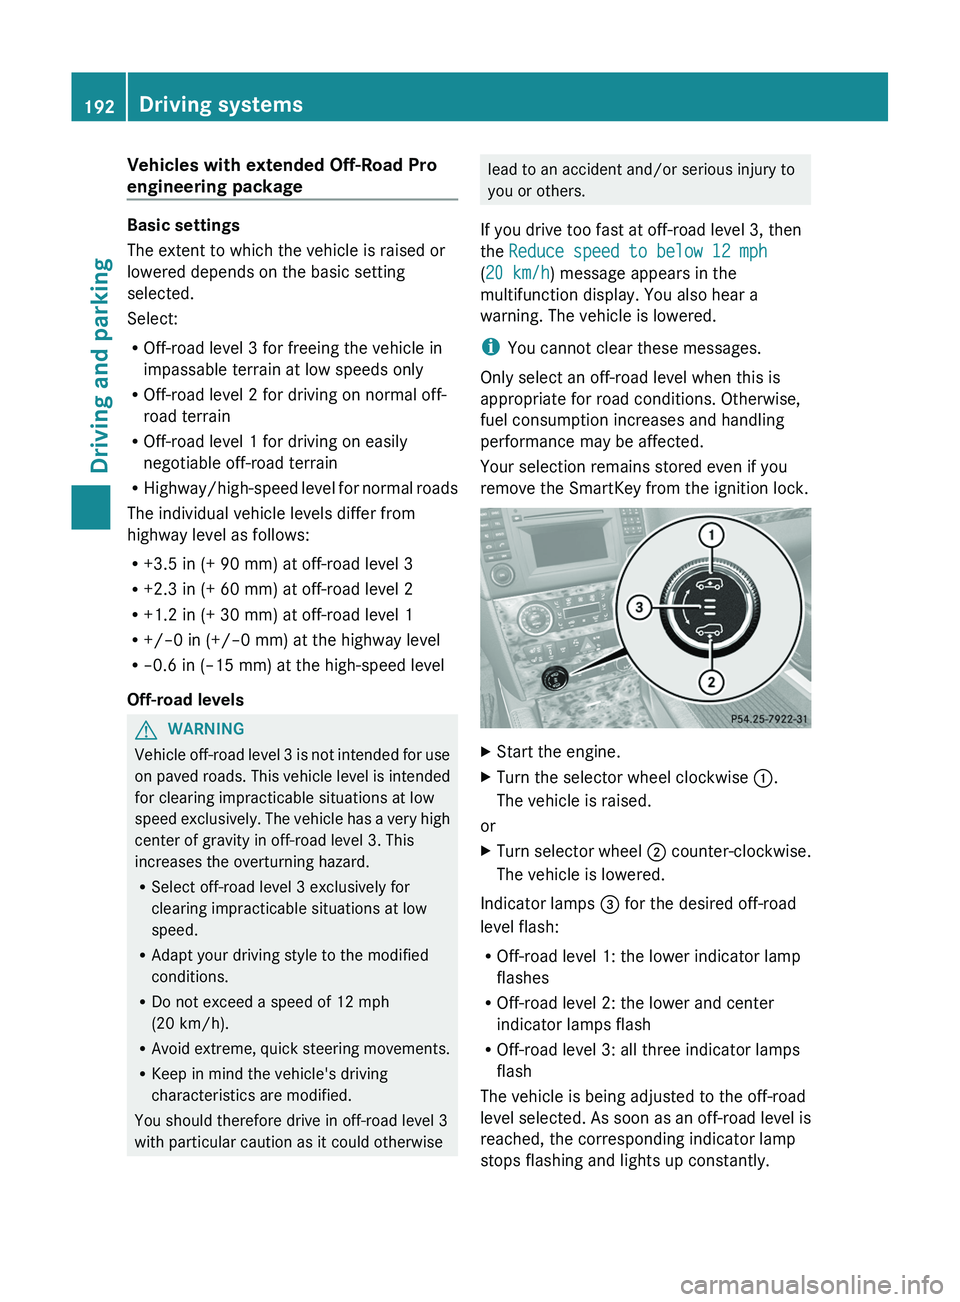
remove the SmartKey from the ignition lock.XStart the engine.XTurn the selector wheel clockwise :.
The vehicle is raised.
or
XTurn selector wheel ; counter-clockwise.
The vehicle is lowered.
Indicator lamps = for the desired off-road
level flash:
R Off-road level 1: the lower indicator lamp
flashes
R Off-road level 2: the lower and center
indicator lamps flash
R Off-road level 3: all three indicator lamps
flash
The vehicle is being adjusted to the off-road
level selected. As soon as an off-road level is
reached, the corresponding indicator lamp
stops flashing and lights up constantly.
192Driving systemsDriving and parking
Page 197 of 384
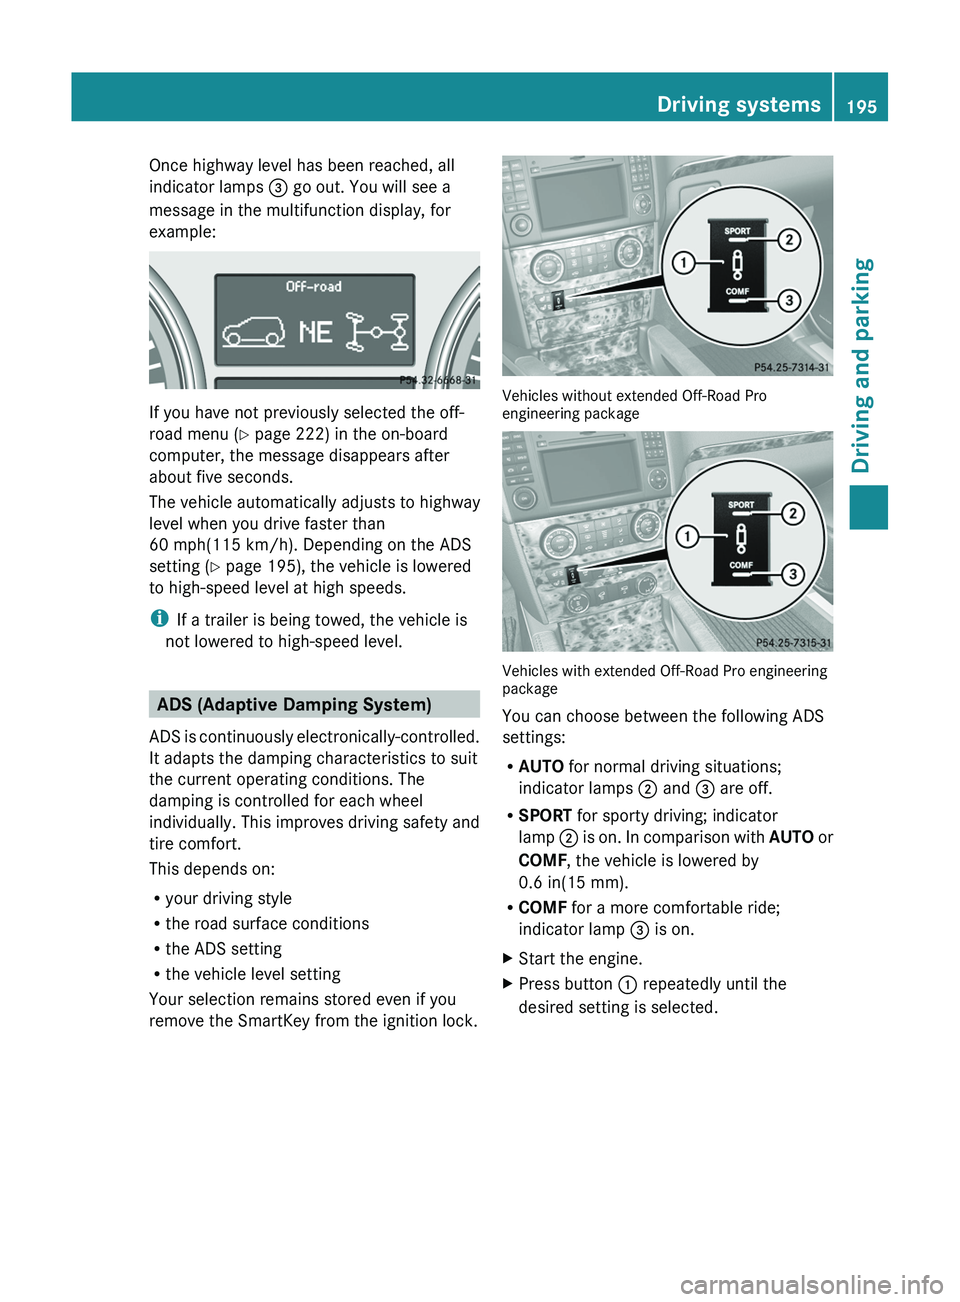
Once highway level has been reached, all
indicator lamps = go out. You will see a
message in the multifunction display, for
example:
If you have not previously selected the off-
road menu ( Y page 222) in the on-board
computer, the message disappears after
about five seconds.
The vehicle automatically adjusts to highway
level when you drive faster than
60 mph(115 km/h). Depending on the ADS
setting ( Y page 195), the vehicle is lowered
to high-speed level at high speeds.
i If a trailer is being towed, the vehicle is
not lowered to high-speed level.
ADS (Adaptive Damping System)
ADS is continuously electronically-controlled.
It adapts the damping characteristics to suit
the current operating conditions. The
damping is controlled for each wheel
individually. This improves driving safety and
tire comfort.
This depends on:
R your driving style
R the road surface conditions
R the ADS setting
R the vehicle level setting
Your selection remains stored even if you
remove the SmartKey from the ignition lock.
Vehicles without extended Off-Road Pro
engineering package
Vehicles with extended Off-Road Pro engineering
package
You can choose between the following ADS
settings:
R AUTO for normal driving situations;
indicator lamps ; and = are off.
R SPORT for sporty driving; indicator
lamp ; is on. In comparison with AUTO or
COMF , the vehicle is lowered by
0.6 in(15 mm).
R COMF for a more comfortable ride;
indicator lamp = is on.
XStart the engine.XPress button : repeatedly until the
desired setting is selected.Driving systems195Driving and parkingZ
Page 200 of 384
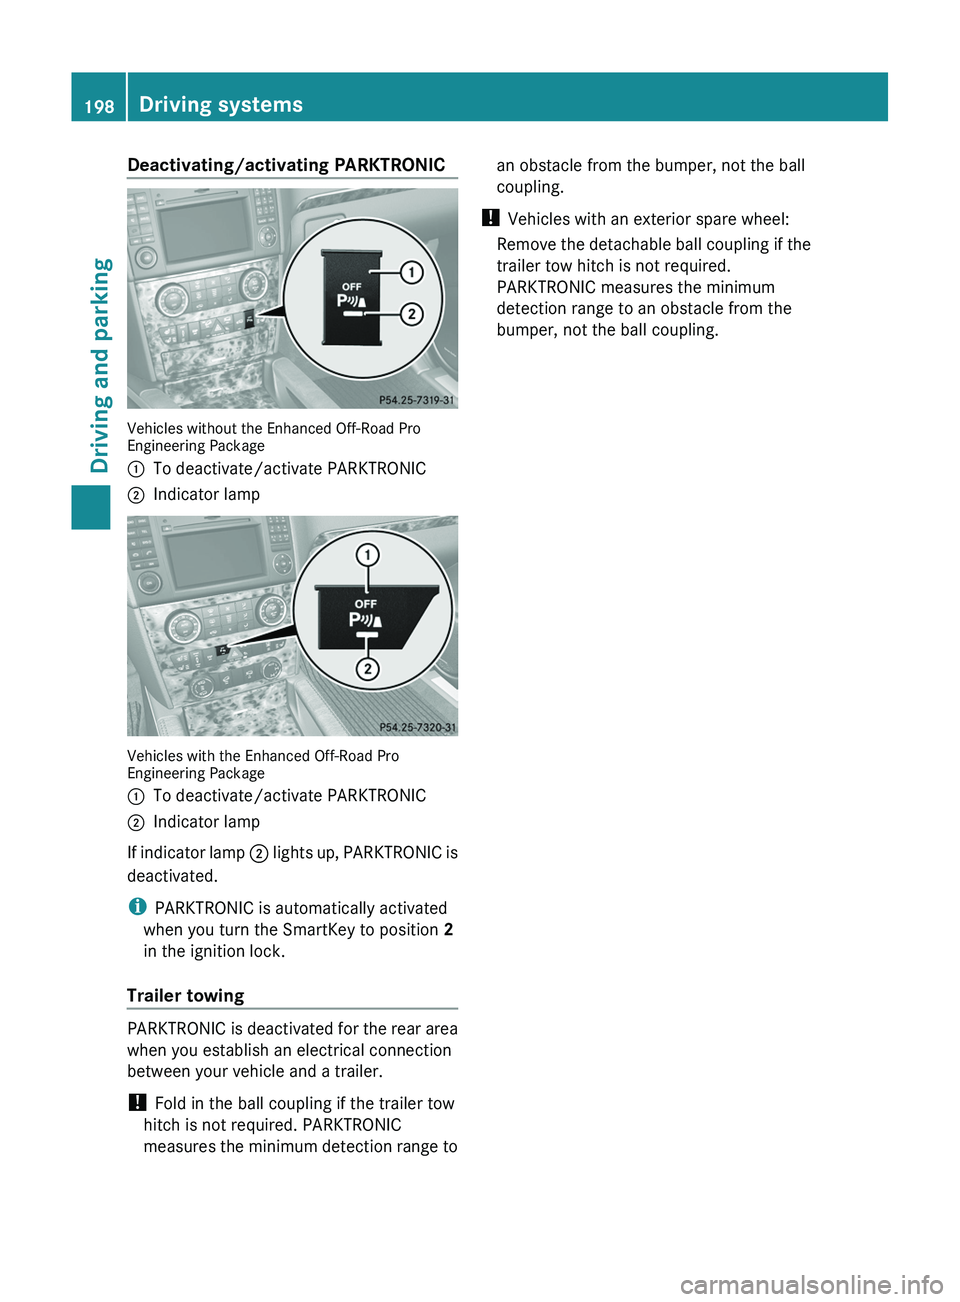
Deactivating/activating PARKTRONIC
Vehicles without the Enhanced Off-Road Pro
Engineering Package
:To deactivate/activate PARKTRONIC;Indicator lamp
Vehicles with the Enhanced Off-Road Pro
Engineering Package
:To deactivate/activate PARKTRONIC;Indicator lamp
If indicator lamp ; lights up, PARKTRONIC is
deactivated.
i PARKTRONIC is automatically activated
when you turn the SmartKey to position 2
in the ignition lock.
Trailer towing
PARKTRONIC is deactivated for the rear area
when you establish an electrical connection
between your vehicle and a trailer.
! Fold in the ball coupling if the trailer tow
hitch is not required. PARKTRONIC
measures the minimum detection range to
an obstacle from the bumper, not the ball
coupling.
! Vehicles with an exterior spare wheel:
Remove the detachable ball coupling if the
trailer tow hitch is not required.
PARKTRONIC measures the minimum
detection range to an obstacle from the
bumper, not the ball coupling.198Driving systemsDriving and parking
Page 202 of 384
GWARNING
The rear view camera is only an aid and may
display obstacles
R from a distorted perspective
R inaccurately
R may not display obstacles at all
The rear view camera does not relieve you of
the responsibility to be cautious. Take care
and pay careful attention. The rear view
camera may not show objects which are
R very close to the rear bumper
R under the rear bumper
R above the tailgate handle
You are responsible for safety at all times and
must continue to pay attention to the
immediate surroundings when parking and
maneuvering. This includes the area behind,
in front of, and beside the vehicle. Otherwise
you could endanger yourself and/or others.
GWARNING
The rear view camera will not function or will
not fully function if:
R the tailgate is open
R it is raining or snowing strongly or if it is
foggy
R it is night or if you are parking/
maneuvering your vehicle in a very dark
area
R a very bright white light is affecting the
camera
R the immediate vicinity is illuminated with
fluorescent light (the display can flicker)
R temperature changes abruptly, for example
if you drive out of the cold into a heated
garage (condensation on the lens)
R the camera lens is dirty or covered
R the rear of your vehicle is damaged
In this case, have the position and the
setting of the camera checked at a
specialist workshop. Mercedes-Benz
recommends that you consult a Mercedes-
Benz Center for this purpose.
Do not use the rear view camera in these
situations. You could otherwise injure
yourself and other people and/or cause
damage - including damage to your vehicle -
while parking/maneuvering.
Activating the rear view cameraXMake sure that the SmartKey is in position
2 in the ignition lock.XMake sure that the "rear view camera"
function is selected in COMAND (see the
separate operating instructions for
COMAND).XEngage reverse gear.
The area behind the vehicle is shown in the
COMAND display with guide lines.
Guide lines in the COMAND display
GWARNING
Use of rear view camera can be dangerous if
you are color-blind or have impaired color
vision.
Only use rear view camera if you can see and
distinguish all colored guidelines shown by
rear view camera on the COMAND system
display.
GWARNING
Please note that objects that do not touch the
ground may appear to be further away than
they actually are, for example:
R the bumper of a vehicle parked behind you
R the trailer drawbar
R the ball coupling of a trailer tow hitch
R the rear end of a truck
R a slanted post
In such cases, you should not use the guide
lines to judge the distance. You may misjudge
the distance, which increases the risk of
impacting the objects.
Even if the object you approach is directly on
the ground, do not approach the object any
closer than the red guide line.
200Driving systemsDriving and parking
Page 205 of 384
side. When you are passing another vehicle,
the warning is emitted only if the difference
in speed is less than 7 mph (12 km/h).
The yellow indicator lamp goes out if the
reverse gear is engaged. In this event, Blind
Spot Assist is no longer active.
The brightness of the indicator/warning
lamps is adjusted automatically according to
the ambient light.GWARNING
Blind Spot Assist is not active at speeds under
approximately 20 mph (30 km/h). The
indicator lamps in the exterior mirrors are
yellow. Vehicles in the monitoring range are
then not indicated.
Always pay attention to traffic conditions and
your surroundings. Otherwise, you may fail to
recognize dangers in time, cause an accident
and injure yourself and others.
Collision warning
If a vehicle is detected in the monitoring range
of Blind Spot Assist and you switch on the turn
signal, a double warning tone sounds. Red
warning lamp : flashes. If the turn signal
remains on, detected vehicles are indicated
by the flashing of red warning lamp :. There
are no further warning tones.
Switching on Blind Spot Assist
XMake sure that the radar sensor system
( Y page 227) and Blind Spot Assist
( Y page 228) are activated in the on-board
computer.XTurn the SmartKey to position 2 in the
ignition lock.
Warning lamps : light up red in the
exterior mirrors for approximately 1.5
seconds and then turn yellow.
Trailer towing
When you attach a trailer, make sure you have
correctly established the electrical
connection. This can be accomplished by
checking the trailer lighting. In this event,
Blind Spot Assist is deactivated. The indicator
lamp in the exterior mirrors lights up yellow
and the Blind Spot Assist Currently
Unavailable See Operator's Manual
message appears in the multifunction
display.
i You can deactivate the indicator lamps in
the exterior mirrors.
To do so, switch off Blind Spot Assist when:
R the SmartKey is in position 2 in the
ignition lock.
R the engine is not running.
R the electrical connection to the trailer
has been established.
Off-road driving systems
4MATIC (permanent four-wheel drive)
4MATIC ensures that all four wheels are
permanently driven. Together with ESP ®
and
4ETS , it improves the traction of your vehicle
whenever a drive wheel spins due to
insufficient grip.
GWARNING
If a drive wheel is spinning due to insufficient
traction:
R While driving off, apply as little throttle as
possible.
R While driving, ease up on the accelerator
pedal.
R Adapt your speed and driving style to the
prevailing road conditions.
Failure to observe these guidelines could
cause the vehicle to skid.
The 4MATIC cannot prevent accidents
resulting from excessive speed.
! Never tow the vehicle with one axle
raised. This may damage the transfer case.
Damage of this sort is not covered by the
Mercedes-Benz Limited Warranty. All
wheels must remain either on the ground
Off-road driving systems203Driving and parkingZ
Page 206 of 384
or be fully raised. Observe the instructions
for towing the vehicle with all wheels in full
contact with the ground.
i In wintry driving conditions, the maximum
effect of 4MATIC can only be achieved if
you use winter tires ( M+S tires), with snow
chains if necessary.
! When testing the parking brake, operate
the vehicle only briefly (for a maximum of
ten seconds) on a brake test dynamometer.
When doing this, turn the key to position
0 or 1 in the ignition. Failure to do this can
cause damage to the drive train or the
brake system.
! Function or performance tests may only
be performed on a 2-axle dynamometer. If
you wish to operate the vehicle on such a
dynamometer, please consult an
authorized Mercedes-Benz Center
beforehand. You could otherwise damage
the drive train or the brake system.
For information about driving off-road, see
( Y page 174).
DSR (Downhill Speed Regulation)
Important safety notes
DSR is an aid to assist you when driving
downhill. It keeps the speed of travel at the
speed selected on the on-board computer.
The steeper the downhill gradient, the greater
the DSR braking effect on the vehicle. When
driving on flat stretches of road or on an uphill
gradient, the DSR braking effect is minimal or
non-existent.
The set speed is set to 4 mph (6 km/h) at the
factory; this can be adjusted using the on-
board computer ( Y page 228).
GWARNING
Downhill Speed Regulation (DSR) is a
convenience system designed to assist the
driver during vehicle operation. The system
setting must be appropriate to the
topographical and weather conditions
encountered, which can change quickly. The
driver is responsible for the vehicle speed and
for safe brake operation at all times.
Depending on the programmed speed, actual
vehicle speed and gradient, switching on DSR
while driving can cause the vehicle to slow
down rapidly, and you may hear a sound,
caused by the activation of the vehicle's brake
system through DSR. Sudden and unexpected
deceleration can result in loss of vehicle
control, causing an accident and/or serious
personal injury to you and others. Do not
switch on DSR in a situation where rapid
deceleration could result in a loss of vehicle
control.
DSR controls the set speed when it is active
and the automatic transmission is in the D,
R or N position. You can drive at a higher or
a lower speed than that set on the on-board
computer at any time by accelerating or
braking.GWARNING
If you depress the accelerator pedal with DSR
activated, the vehicle can drive faster than the
programmed set speed. You should therefore
drive downhill with particular caution as it
could lead to an accident and/or serious
injury to you or others. Keep in mind that as
soon as you remove your foot from the
accelerator pedal with DSR switched on, DSR
will start regulating the vehicle's speed
including use of brakes if required. Depending
on the programmed set speed, actual vehicle
speed and gradient, DSR can cause the
vehicle to slow down rapidly. Sudden and
unexpected deceleration can result in loss of
vehicle control, causing an accident and/or
serious personal injury to you and others.
For information about driving off-road, see
( Y page 174).
204Off-road driving systemsDriving and parking
Page 219 of 384
surface is free of ice. The road may still be icy,
especially in wooded areas or on bridges.
Changes in the outside temperature are
displayed after a short delay.
Speedometer with segments
The segments in the speedometer indicate
which speed range is available.
DISTRONIC ( Y page 182) activated:
One or two segments in the set speed range
light up.
DISTRONIC detects a vehicle in front:
The segments between the speed of the
vehicle in front and the stored speed light up.
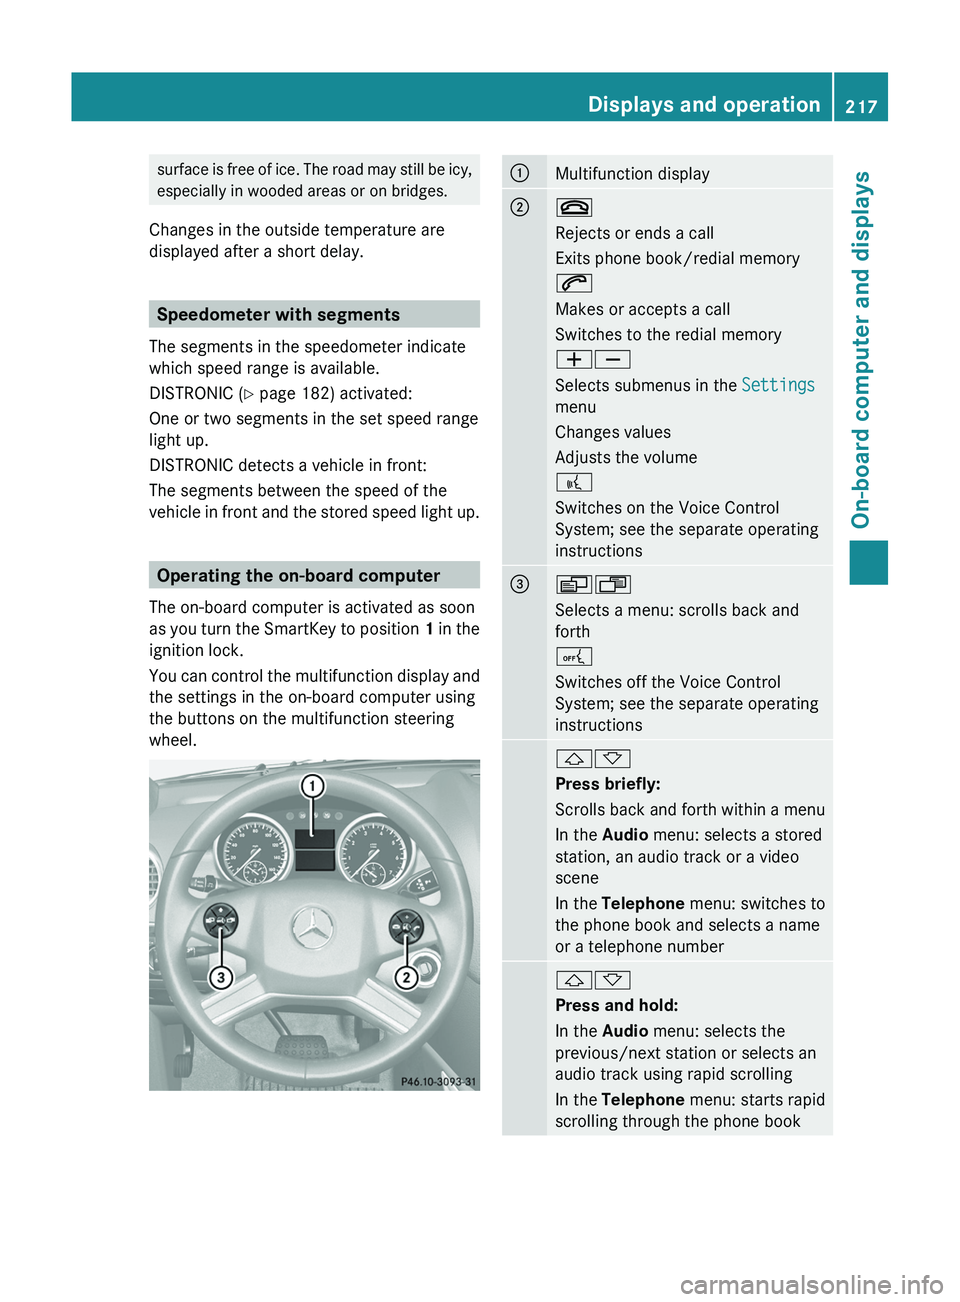
Operating the on-board computer
The on-board computer is activated as soon
as you turn the SmartKey to position 1 in the
ignition lock.
You can control the multifunction display and
the settings in the on-board computer using
the buttons on the multifunction steering
wheel.
:Multifunction display;~
Rejects or ends a call
Exits phone book/redial memory
6
Makes or accepts a call
Switches to the redial memory
WX
Selects submenus in the Settings
menu
Changes values
Adjusts the volume
?
Switches on the Voice Control
System; see the separate operating
instructions=VU
Selects a menu: scrolls back and
forth
A
Switches off the Voice Control
System; see the separate operating
instructions&*
Press briefly:
Scrolls back and forth within a menu
In the Audio menu: selects a stored
station, an audio track or a video
scene
In the Telephone menu: switches to
the phone book and selects a name
or a telephone number&*
Press and hold:
In the Audio menu: selects the
previous/next station or selects an
audio track using rapid scrolling
In the Telephone menu: starts rapid
scrolling through the phone bookDisplays and operation217On-board computer and displaysZ