2012 MERCEDES-BENZ G-CLASS SUV wheel
[x] Cancel search: wheelPage 102 of 357
Position of the steering wheel when the
EASY-ENTRY/EXIT featurei s activeThe steering wheel moves upwards and
towards the dashboard if:
R you remove the key from the ignition lock
or
R you open the driver's door with the key in
position 0or 1in the ignition lock.
i The steering wheel only moves upwards
and towards the dashboard if it has not
already reached the upper end stop.
Position of the steering wheel for driv-
ing The steering wheel is moved to the previously
set position if:
R the driver's door is closed and
R you insert the key into the ignition lock
The last position of the steering wheel is
stored when you switch off the ignition or
when you store the setting with the memory
function (Y page 102). Mirrors
Rear-view mirror
X Adjust the rear-view mirror by hand so you
have a good overview of the traffic condi-
tions behind you. Exterior mirrors
Adjusting the exterior mirrors G
WARNING
The exterior mirrors reduce the size of the
image. Objects are actually closer than they
appear. You could misjudge the distance from
vehicles driving behind and cause an acci-
dent, e.g. when changin glane. For this rea-
son, make sure of the actual distance from the
vehicle driving behind by glancing ove ryour
shoulder. X
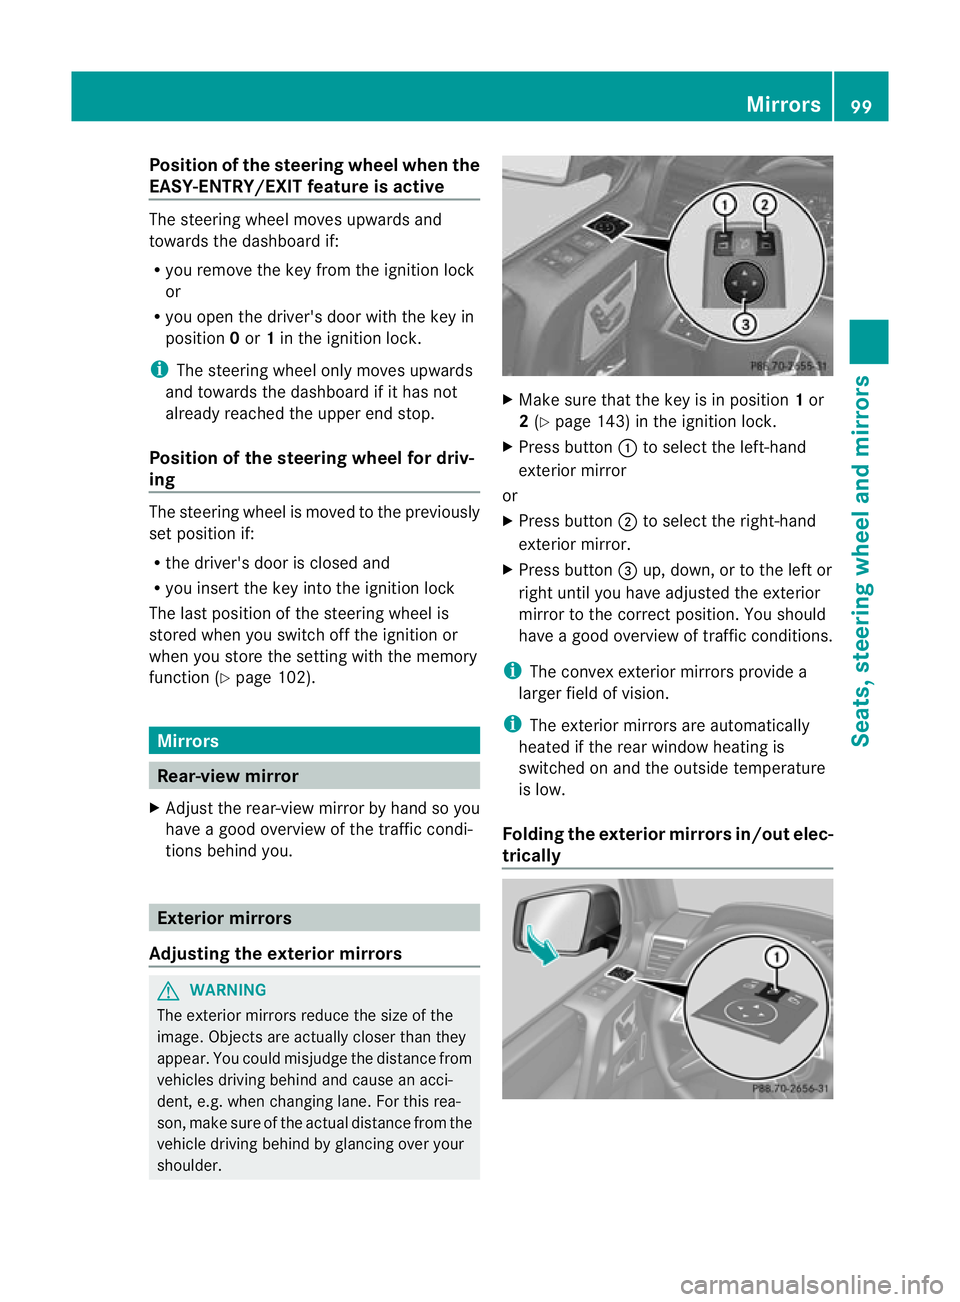
Make sure that the key is in position 1or
2 (Y page 143) in the ignition lock.
X Press button :to select the left-hand
exterior mirror
or
X Press button ;to select the right-hand
exterior mirror.
X Press button =up, down, or to the left or
right until you have adjusted the exterior
mirror to the correc tposition. You should
have a good overview of traffic conditions.
i The convex exterior mirrors provide a
larger field of vision.
i The exterior mirrors are automatically
heated if the rear window heating is
switched on and the outside temperature
is low.
Folding the exterior mirrors in/out elec-
trically Mirrors
99Seats, steering wheel and mirrors Z
Page 103 of 357

X
Make sure that the key is in position 1or
2 (Y page 143) in the ignition lock.
X Briefly press button :.
Both exterior mirrors fold in or out.
i Make sure that the exterior mirrors are
always folded out fully while driving. They
could otherwise vibrate.
Setting the exterior mirrors If the battery has been disconnected or com-
pletely discharged, the exterior mirrors must
be reset. The exterior mirrors will otherwise
not fold in when you select the "Fold in mir-
rors when locking" function in the on-board
computer (Y page 225).
X Make sure that the key is in position
1(Y page 143)in the ignition lock.
X Briefly press button :.
Folding the exterior mirrors in/out
automatically If the "Fold in mirrors when locking" function
is activated in the on-board computer
(Y
page 225):
R the exterior mirrors fold in automatically as
soon as you lock the vehicle from the out-
side.
R the exterior mirrors fold out again automat-
ically as soon as you unlock the vehicle and
then open the driver's or front-passenger
door. Exterior mirror pushed out of position X
Press button :repeatedly until you hear
the mirror engage in position.
The mirror housing is engaged again and
you can adjust the exterior mirrors as usual
(Y page 99). Automatic anti-dazzle mirrors
G
WARNING
If incident light from headlamps is prevented
from striking the sensor in the rear-view mir-
ror, for instance, by luggage piled too high in
the vehicle, the mirror's automatic anti-dazzle
function will not operate.
Incident light could then blind you. This may
distract you from the traffic conditions and,
as a result, you may cause an accident.
The rear-view mirror and the exterior mirror
on the driver's side automatically go into anti-
dazzle mode if:
R the ignition is switched on and
R incident light from headlamps strikes the
sensor in the rear-view mirror.
i The mirrors do not go into anti-dazzle
mode if reverse gear is engaged or if the
interior lighting is switched on. 100
MirrorsSeats, steering wheel and mirrors
Page 104 of 357
Parking position for the exterior mir-
ror on the front-passenger side
Setting/storing the parking position Using reverse gear
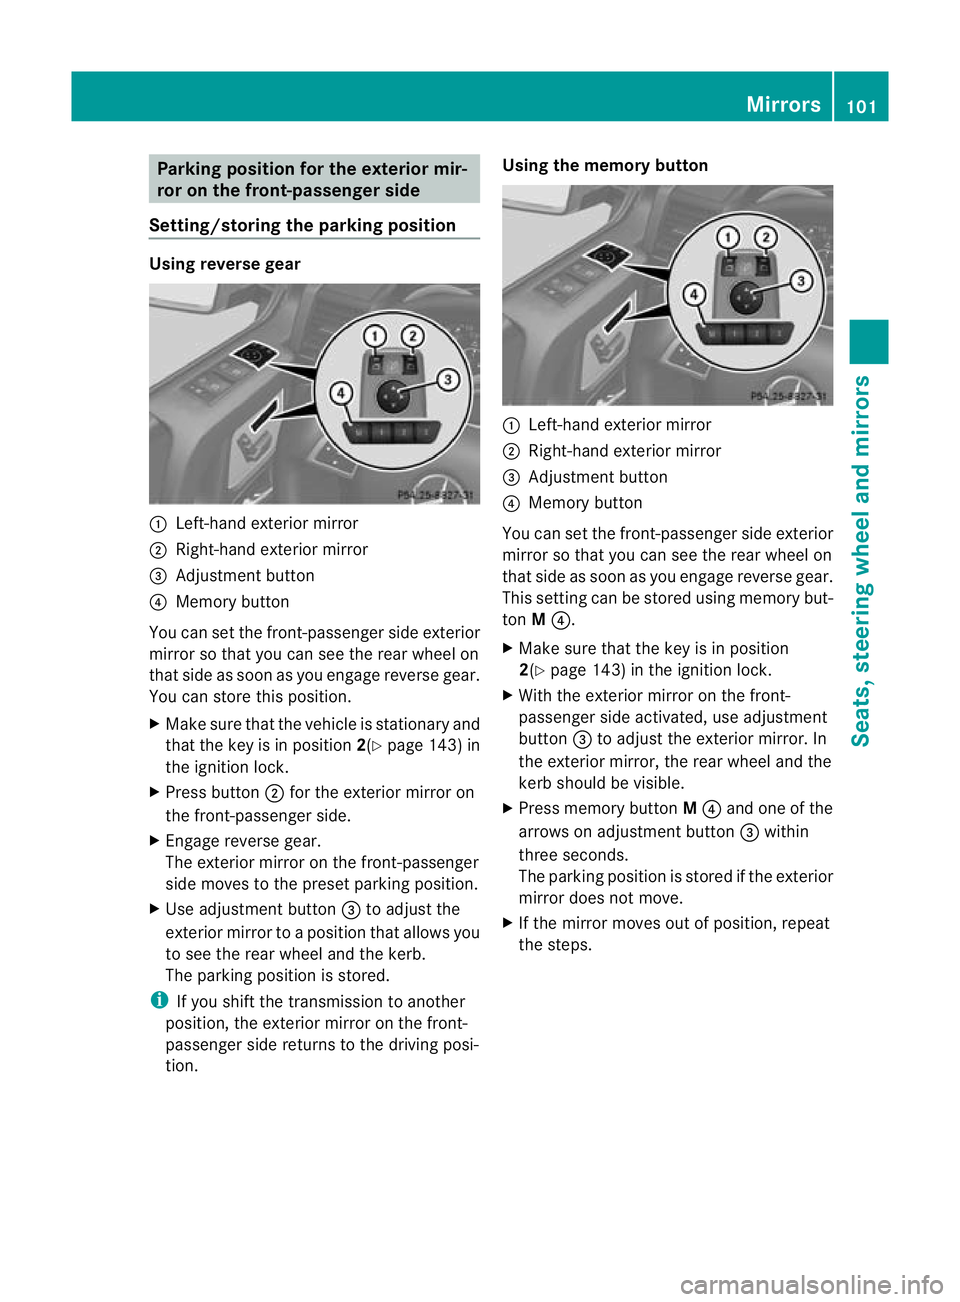
:
Left-hand exterior mirror
; Right-hand exterior mirror
= Adjustment button
? Memory button
You can set the front-passenger side exterior
mirror so that you can see the rear wheel on
that side as soon as you engage reverse gear.
You can store this position.
X Make sure that the vehicle is stationary and
that the key is in position 2(Ypage 143) in
the ignition lock.
X Press button ;for the exterior mirror on
the front-passenger side.
X Engage reverse gear.
The exterior mirror on the front-passenger
side moves to the preset parking position.
X Use adjustment button =to adjust the
exterior mirror to a position that allows you
to see the rear wheel and the kerb.
The parking position is stored.
i If you shift the transmission to another
position, the exterior mirror on the front-
passenger side returns to the driving posi-
tion. Using the memory button
:
Left-hand exterior mirror
; Right-hand exterior mirror
= Adjustment button
? Memory button
You can set the front-passenger side exterior
mirror so that you can see the rear wheel on
that side as soon as you engage reverse gear.
This setting can be stored using memory but-
ton M?.
X Make sure that the key is in position
2(Y page 143) in the ignition lock.
X With the exterior mirror on the front-
passenger side activated, use adjustment
button =to adjust the exterior mirror. In
the exterior mirror, the rear wheel and the
kerb should be visible.
X Press memory button M? and one of the
arrows on adjustment button =within
three seconds.
The parking position is stored if the exterior
mirror does not move.
X If the mirror moves out of position, repeat
the steps. Mirrors
101Seats, steering wheel and mirrors Z
Page 105 of 357
Calling up
astore dparking position set-
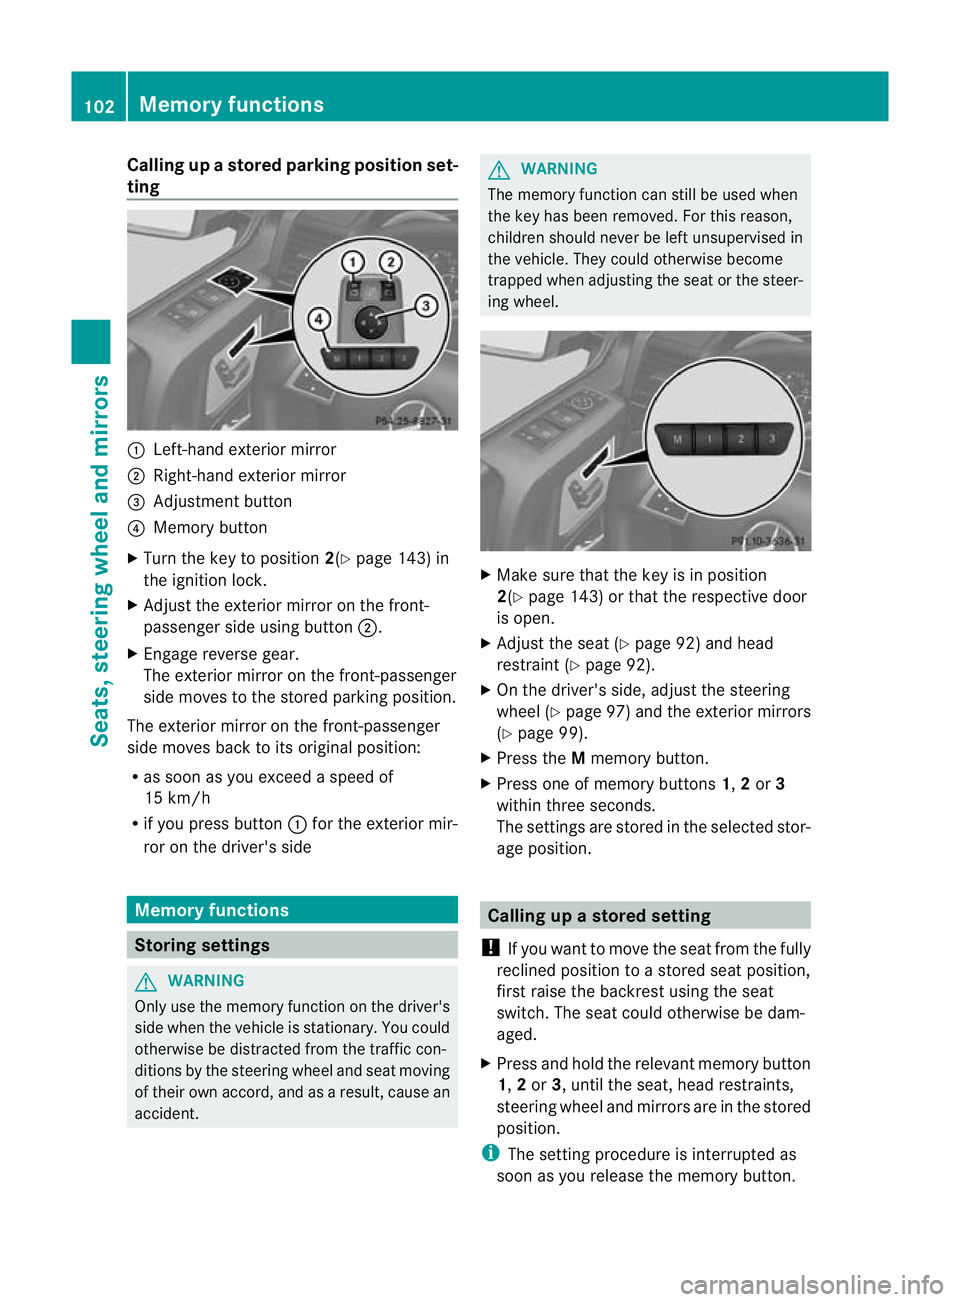
ting :
Left-hand exterior mirror
; Right-hand exterio rmirror
= Adjustment button
? Memory button
X Turn the key to position 2(Ypage 143) in
the ignition lock.
X Adjust the exterior mirror on the front-
passenger side using button ;.
X Engage reverse gear.
The exterior mirror on the front-passenger
side moves to the stored parking position.
The exterior mirror on the front-passenger
side moves back to its original position:
R as soon as you exceed a speed of
15 km/h
R if you press button :for the exterior mir-
ror on the driver's side Memory functions
Storing settings
G
WARNING
Only use the memory function on the driver's
side when the vehicle is stationary. You could
otherwise be distracted from the traffic con-
ditions by the steering wheel and seat moving
of their own accord, and as a result, cause an
accident. G
WARNING
The memory function can still be used when
the key has been removed. For this reason,
children should never be left unsupervised in
the vehicle. They could otherwise become
trapped when adjusting the seat or the steer-
ing wheel. X
Make sure that the key is in position
2(Y page 143) or that the respective door
is open.
X Adjust the seat (Y page 92) and head
restraint (Y page 92).
X On the driver's side, adjust the steering
wheel (Y page 97) and the exterior mirrors
(Y page 99).
X Press the Mmemory button.
X Press one of memory buttons 1,2or 3
within three seconds.
The settings are stored in the selected stor-
age position. Calling up
astore dsetting
! If you want to move the seat from the fully
reclined position to a stored seat position,
first raise the backres tusing the seat
switch. The seat could otherwise be dam-
aged.
X Press and hold the relevant memory button
1, 2or 3, until the seat, head restraints,
steering wheel and mirrors are in the stored
position.
i The setting procedure is interrupted as
soon as you release the memory button. 102
Memory functionsSeats, steering wheel and mirrors
Page 113 of 357
The hazard warning lamps automatically
switch on if:
R
an airbag is deployed
R the seat belt tensioners are triggered, or
R the vehicle decelerates rapidly from a
speed of more than 70 km/ha nd comes to
a standstill.
The hazard warning lamp switches on auto-
matically if an airbag or the belt tensioners
are triggered and the key is in position 1in
the ignition lock.
The hazard warning lamps switch off auto-
matically if the vehicle reaches a speed of
over 10 km/h again after a full brake appli-
cation.
i The hazard warning lamps still operate if
the ignition is switched off. Cornering light function
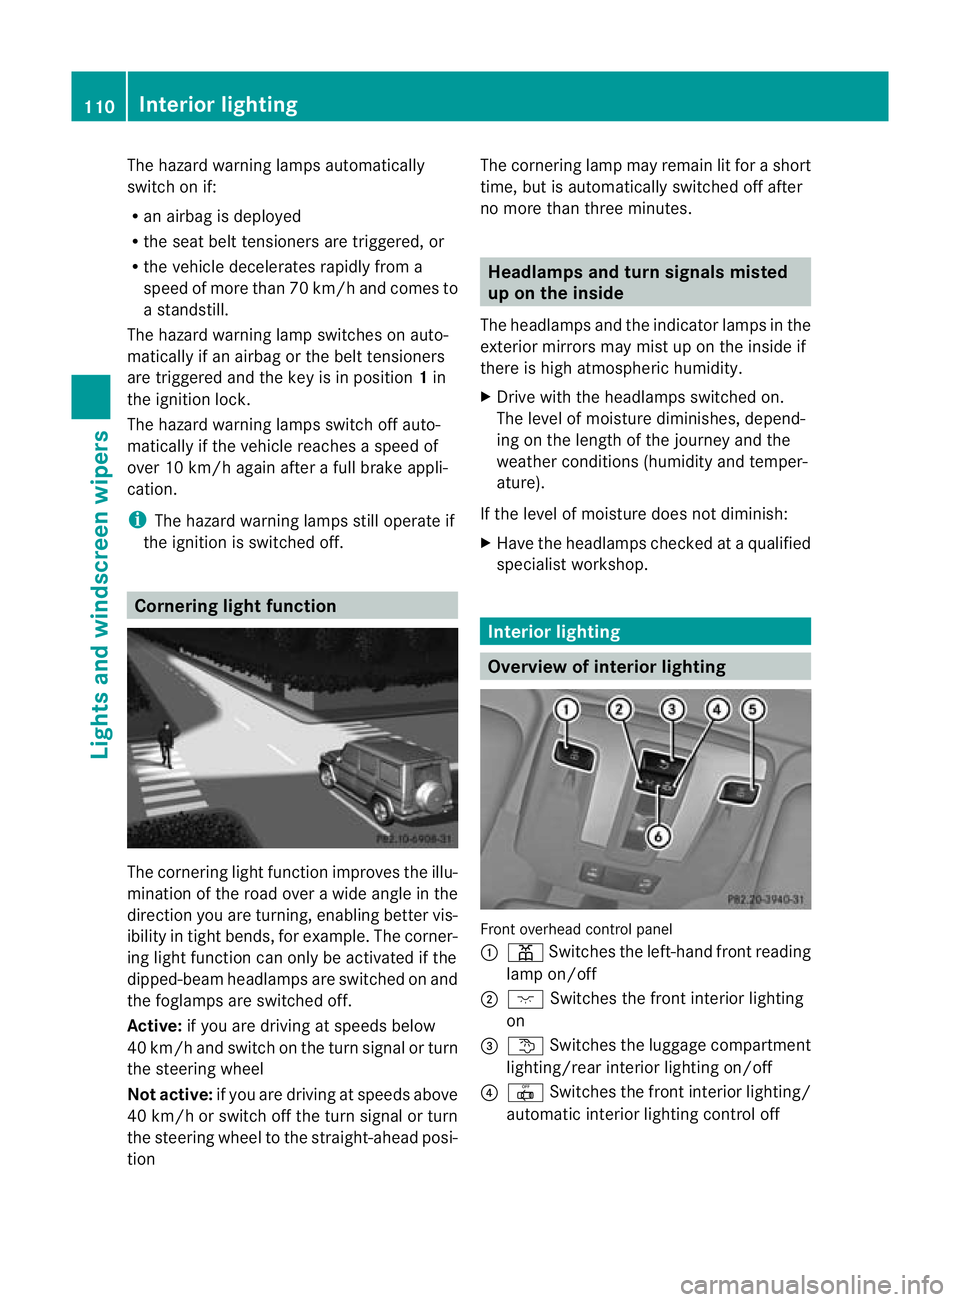
The cornering light functio
nimproves the illu-
mination of the road over a wide angle in the
directio nyou are turning, enabling better vis-
ibility in tight bends, for example. The corner-
ing light function can only be activated if the
dipped-beam headlamps are switched on and
the foglamps are switched off.
Active: if you are driving at speeds below
40 km/ha nd switch on the tur nsignal or turn
the steering wheel
Not active: if you are driving at speeds above
40 km/h or switch off the turn signal or turn
the steering wheel to the straight-ahead posi-
tion The cornering lamp may remain lit for a short
time, but is automatically switched off after
no more than three minutes. Headlamps and turn signals misted
up on the inside
The headlamps and the indicator lamps in the
exterior mirrors may mist up on the inside if
there is high atmospheric humidity.
X Drive with the headlamps switched on.
The level of moisture diminishes, depend-
ing on the length of the journey and the
weathe rconditions (humidity and temper-
ature).
If the level of moisture does not diminish:
X Have the headlamps checked at a qualified
specialist workshop. Interior lighting
Overview of interior lighting
Front overhead control panel
:
p Switches the left-hand front reading
lamp on/off
; c Switches the front interior lighting
on
= t Switches the luggage compartment
lighting/rear interior lighting on/off
? | Switches the front interior lighting/
automatic interior lighting control off 110
Interior lightingLights and windscreen wipers
Page 114 of 357
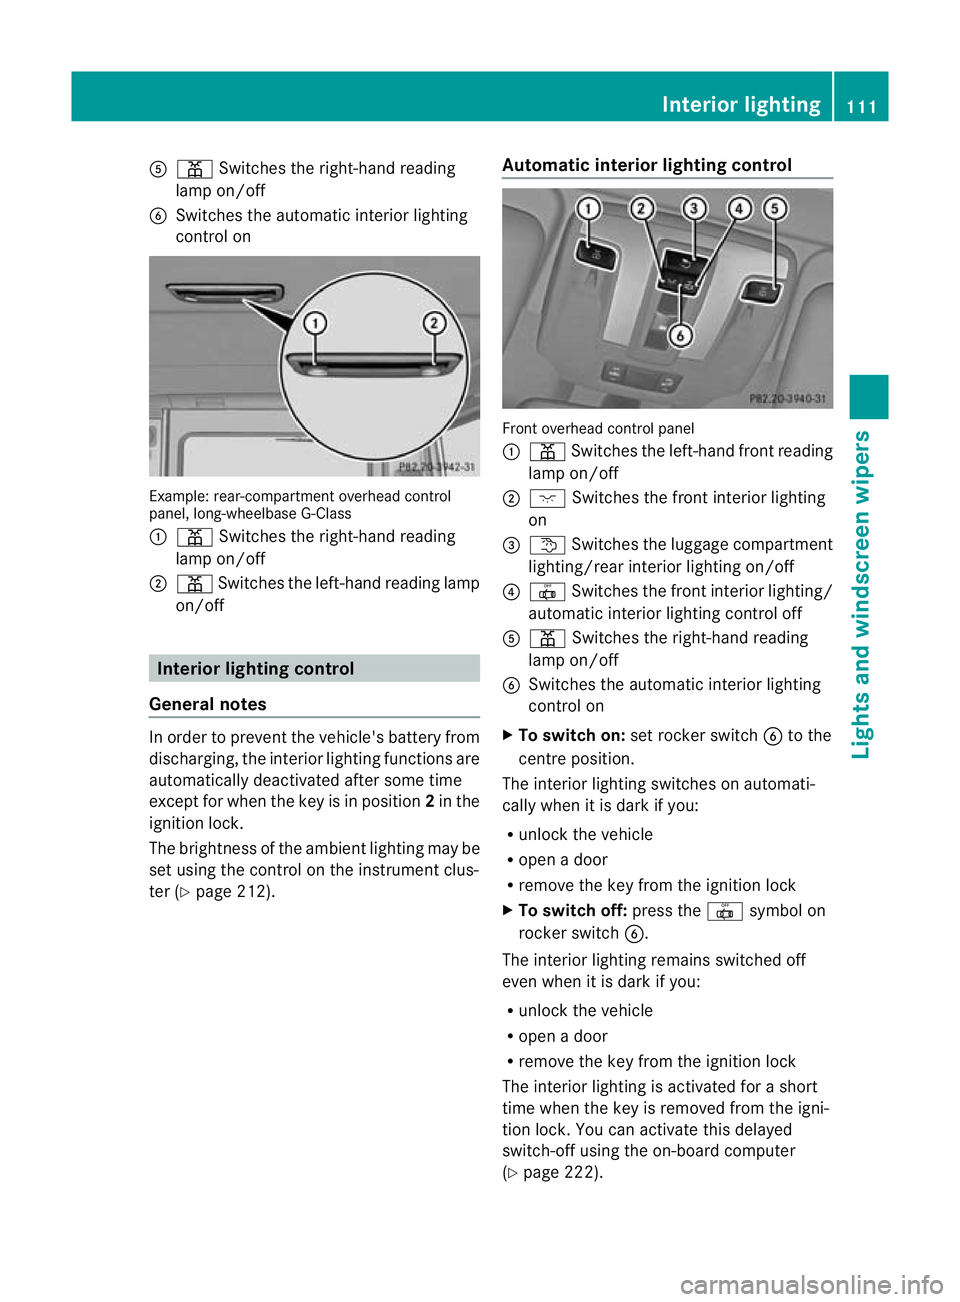
A
p Switches the right-hand reading
lamp on/off
B Switches the automatic interio rlighting
control on Example: rear-compartment overhead control
panel, long-wheelbase G-Class
: p Switches the right-hand reading
lamp on/off
; p Switches the left-hand reading lamp
on/off Interior lighting control
General notes In order to prevent the vehicle's battery from
discharging, the interior lighting functions are
automatically deactivated after some time
except for when the key is in position 2in the
ignition lock.
The brightness of the ambien tlighting may be
set using the control on the instrument clus-
ter (Y page 212). Automatic interior lighting control Front overhead control panel
:
p Switches the left-hand front reading
lamp on/off
; c Switches the front interior lighting
on
= t Switches the luggage compartment
lighting/rear interior lighting on/off
? | Switches the front interior lighting/
automatic interior lighting control off
A p Switches the right-hand reading
lamp on/off
B Switches the automatic interior lighting
control on
X To switch on: set rocker switch Bto the
centre position.
The interior lighting switches on automati-
cally when it is dark if you:
R unloc kthe vehicle
R open a door
R remove the key from the ignition lock
X To switch off: press the|symbol on
rocker switch B.
The interior lighting remains switched off
even when it is dark if you:
R unlock the vehicle
R open a door
R remove the key from the ignition lock
The interior lighting is activated for a short
time when the key is removed from the igni-
tion lock. You can activate this delayed
switch-off using the on-board computer
(Y page 222). Interior lighting
111Lights and windscreen wipers Z
Page 118 of 357
Before changing bulbs
Have the following bulbs changed at a quali-
fied specialist workshop:
R
additional turn signals in the exterio rmir-
rors
R third brake lamp
R main-beam/dipped-beam headlamps
(xenon bulbs)
R daytime driving lights
R licence plate lamp
i Individual segments of the licence plate
lamp LEDs may fail without a display mes-
sage appearing in the multifunction dis-
play. Regularly chec kthe licence plate
lighting. If necessary, visit a qualified spe-
cialist workshop.
You can replace the following bulbs:
R side lamps/parking lamps
R foglamp/cornering lamp with foglamp
function
R turn signal lamp (front)
R brake/tail lamp
R turn signal lamp (rear)
R tail lamp/parking lamp
R reversing lamp
R rear foglamp Overview of bulb replacement
–bulbs
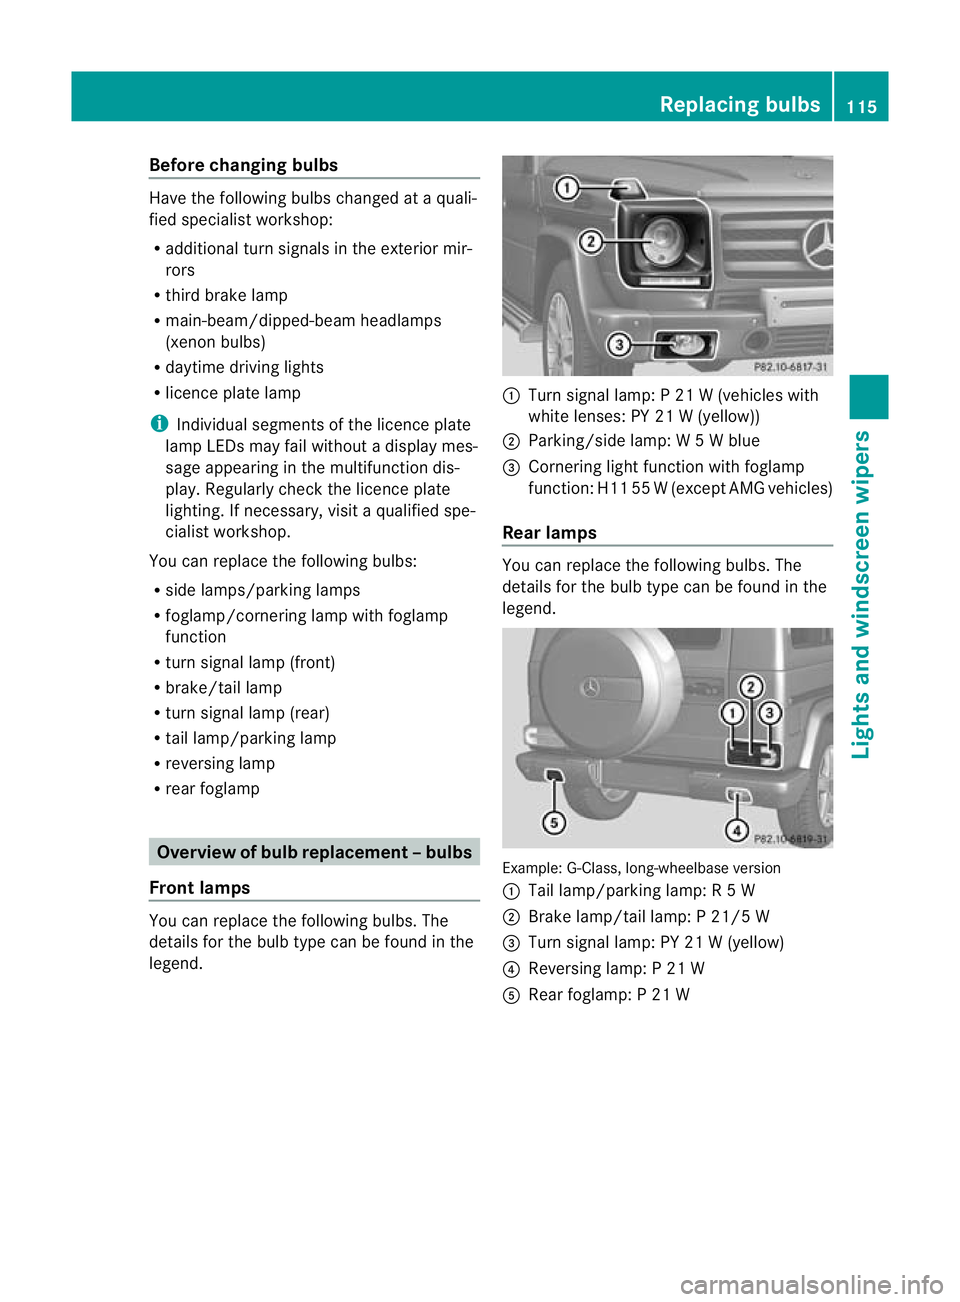
Front lamps You can replace the following bulbs. The
details for the bulb type can be found in the
legend. :
Turn signal lamp: P 21 W (vehicles with
white lenses: PY 21 W (yellow))
; Parking/side lamp: W 5Wblue
= Cornering light function with foglamp
function: H11 55 W(except AMG vehicles)
Rear lamps You can replace the following bulbs. The
details for the bulb type can be found in the
legend.
Example: G-Class, long-wheelbase version
:
Tail lamp/parking lamp: R 5W
; Brake lamp/tail lamp: P 21/5 W
= Turn signal lamp: PY 21 W (yellow)
? Reversing lamp: P 21 W
A Rear foglamp: P 21 W Replacing bulbs
115Lights and windscreen wipers Z
Page 142 of 357
Display messages Possible causes/consequences and
M Solutions
If the auxiliary heating is faulty:
X
Have the auxiliary heating checked at a qualified specialist
workshop. Adjusting the air vents
Important safety notes
G
WARNING
Very hot or very cold air can flow from the air
vents .This could cause burns or frostbite to
bare skin in the immediate vicinity of the
vents. Keep bare skin away from these air
outlets. If necessary, direct the airflow away
to a different area of the vehicle interior. General notes
In order to ensure the direct flow of fresh air
through the air vents into the vehicle interior,
please observe the following notes:
R keep the air inlet grille on the bonnet free
of blockages, such as ice, snow or leaves.
R never cover the vents or ventilation grilles
in the vehicle interior.
i For virtually draught-free ventilation,
adjust the sliders of the air vents to the
centre position.
i If the automatic climate control con-
stantly differs from the set temperature or
if undesired draughts are noticeable, pro-
ceed as follows:
XOpen the side air vents
X Open the centre air vents
X Open the rear air vents
X Set the temperature to 22 †.
The automatic climate control adjusts
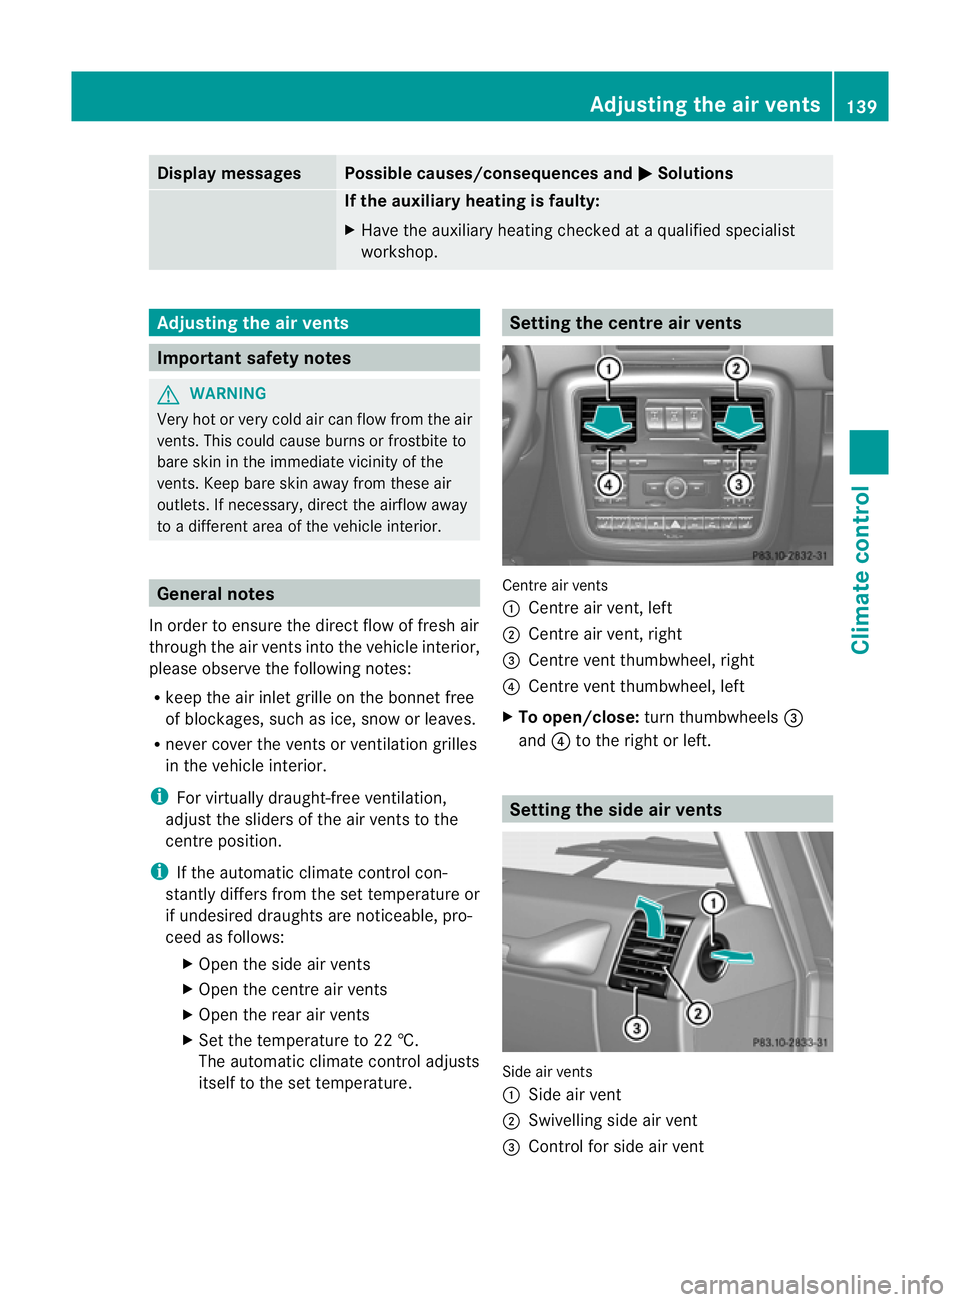
itself to the set temperature. Setting the centre air vents
Centre air vents
:
Centre air vent, left
; Centre air vent, right
= Centre vent thumbwheel, right
? Centre vent thumbwheel, left
X To open/close: turn thumbwheels =
and ?to the right or left. Setting the side air vents
Side air vents
:
Side air vent
; Swivelling side air vent
= Control for side air vent Adjusting the air vents
139Climate control Z