2012 MERCEDES-BENZ G-CLASS SUV wheel
[x] Cancel search: wheelPage 77 of 357

The central locking button does not lock or
unlock the fuel filler flap.
X
To unlock: press button :.
X To lock: press button ;.
i You cannot unlock the vehicle centrally
from the inside if the vehicle has been
locked from the outside using the key.
i It is only possible to lock the vehicle cen-
trally if all doors are closed. Automatic locking feature
:
To switch off
; To activate
X To deactivate: press and hold button :
for about five seconds until a tone sounds.
X To activate: press and hold button ;for
about five seconds until a tone sounds.
i If you press one of the two buttons and
do not hear a tone, the relevant setting has
already been selected. The vehicle is locked automatically when the
ignition is switched on and the wheels are
turning.
You could therefore be locked out if:
R
the vehicle is being pushed.
R the vehicle is being towed.
R the vehicle is being tested on a dynamom-
eter.
You can also switch the automatic locking
function on and off using the on-board com-
puter (Y page 223). Unlocking the driver's door (emer-
gency key element)
If the vehicle can no longer be centrally
unlocked with the key, use the emergency
key element.
If you use the emergenc ykey element to
unlock and open the driver's door, the anti-
thef talarm system will be triggered
(Y page 64).
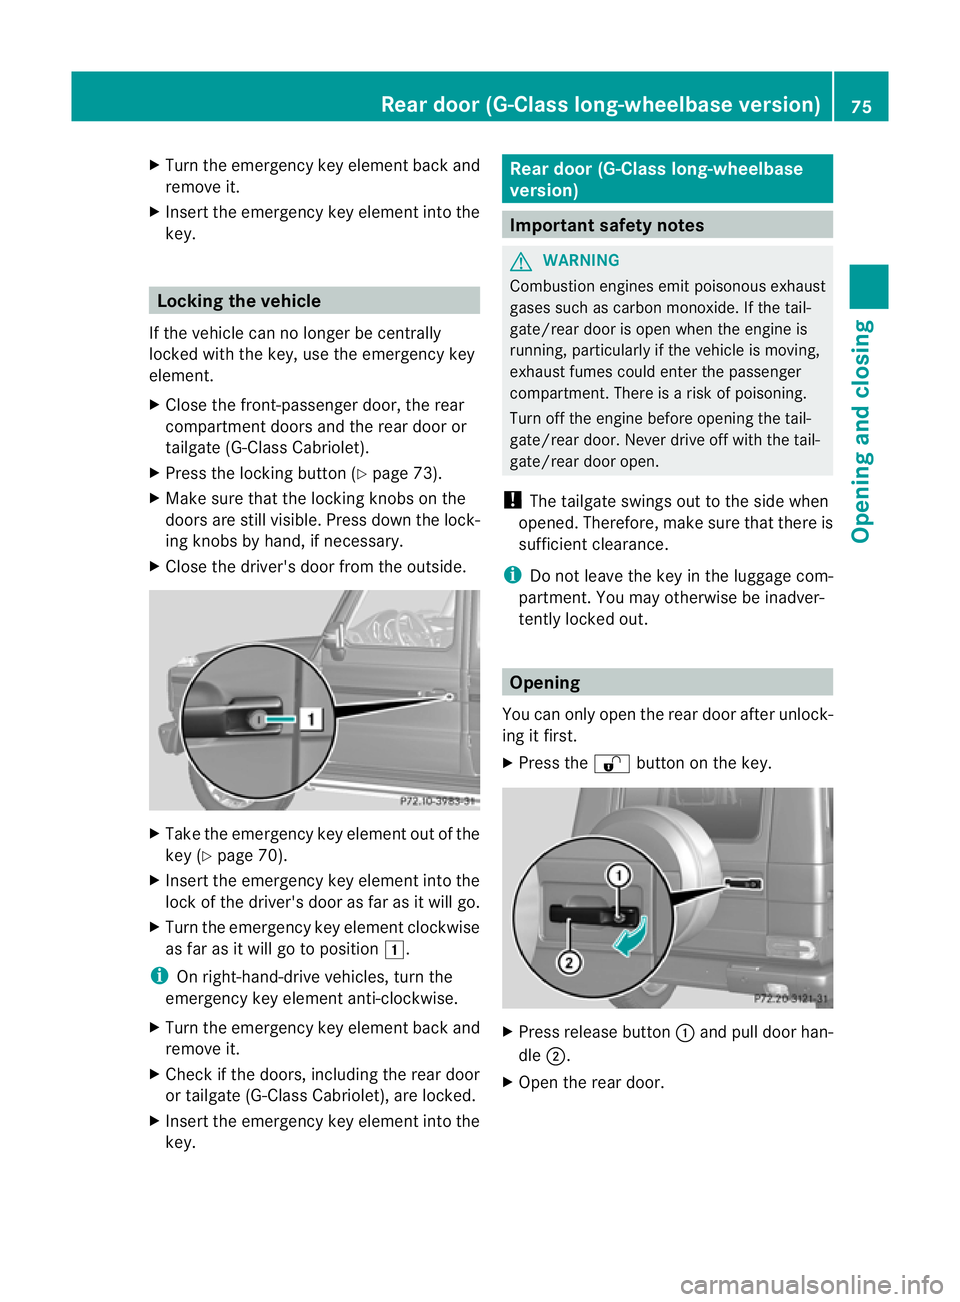
Take the emergency key elemen tout of the
key (Y page 70). X
Inser tthe emergency key element into the
lock of the driver's door as far as it will go.
X Turn the emergency key element anti-
clockwise to position 1.
The door is unlocked.
i On right-hand-drive vehicles, turn the
emergency key element clockwise. 74
DoorsOpening and closing
Page 78 of 357
X
Turn the emergency key element back and
remove it.
X Insert the emergency key element into the
key. Locking the vehicle
If the vehicle can no longer be centrally
locked with the key, use the emergency key
element.
X Close the front-passenger door, the rear
compartment doors and the rear door or
tailgate (G-Class Cabriolet).
X Press the locking button (Y page 73).
X Make sure that the lockin gknobs on the
doors are still visible .Press downt he lock-
ing knobs by hand, if necessary.
X Close the driver's door from the outside. X
Take the emergency key element out of the
key (Y page 70).
X Insert the emergency key element into the
lock of the driver's door as far as it will go.
X Turn the emergency key element clockwise
as far as it will go to position 1.
i On right-hand-drive vehicles, turn the
emergency key element anti-clockwise.
X Turn the emergency key element back and
remove it.
X Check if the doors, including the rear door
or tailgate (G-Class Cabriolet), are locked.
X Insert the emergency key element into the
key. Rear door (G-Class long-wheelbase
version)
Important safety notes
G
WARNING
Combustion engines emit poisonous exhaust
gases such as carbon monoxide. If the tail-
gate/rear door is open when the engine is
running, particularly if the vehicle is moving,
exhaust fumes could enter the passenger
compartment. There is a risk of poisoning.
Turn off the engine before opening the tail-
gate/rear door. Never drive off with the tail-
gate/rear door open.
! The tailgate swings out to the side when
opened. Therefore, make sure that there is
sufficient clearance.
i Do not leave the key in the luggage com-
partment.Y ou may otherwise be inadver-
tently locked out. Opening
You can only open the rear door after unlock-
ing it first.
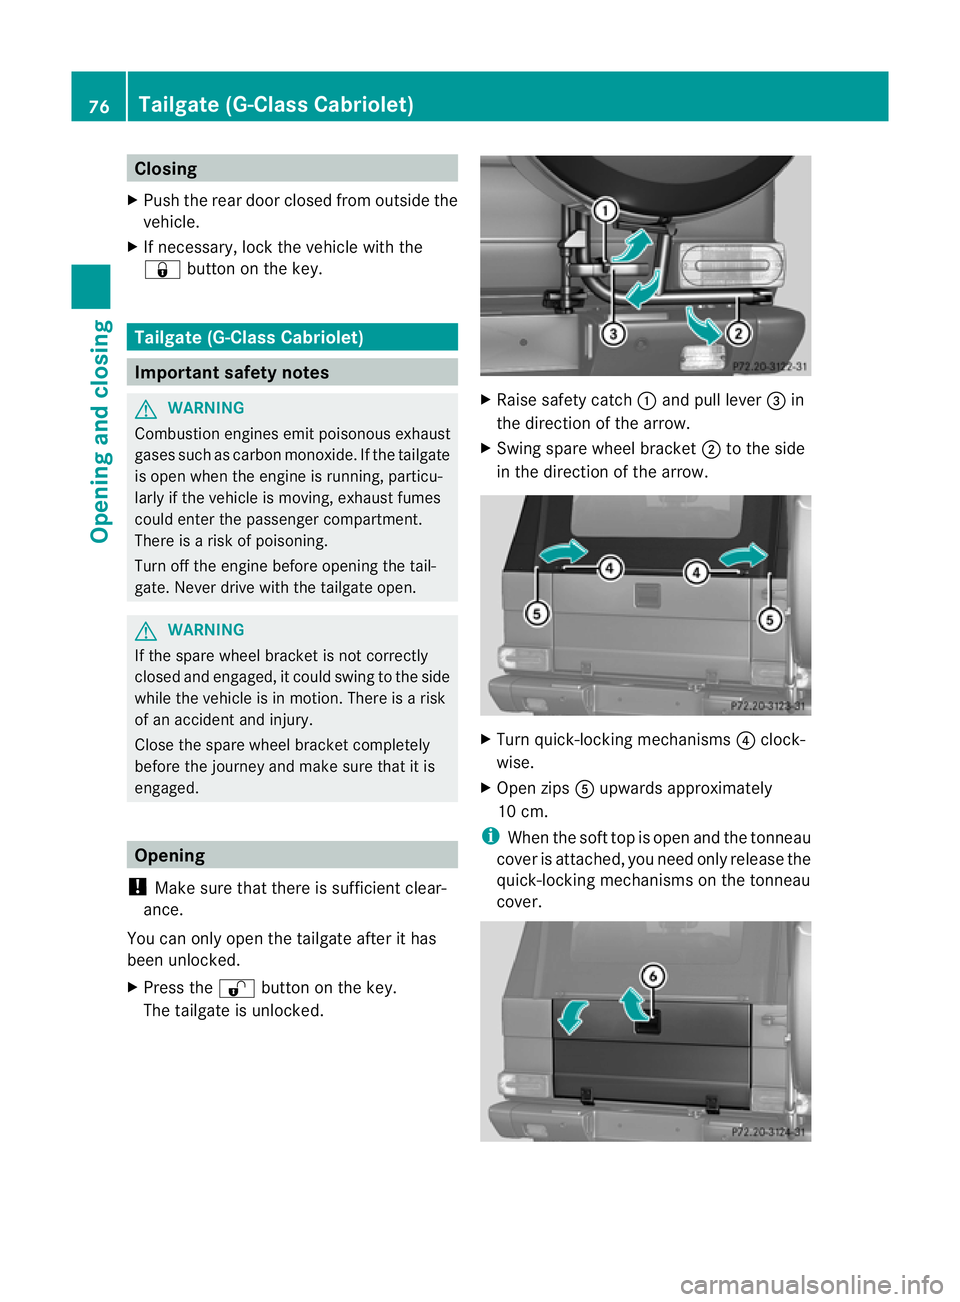
X Press the %button on the key. X
Press release button :and pull door han-
dle ;.
X Open the rear door. Rear door (G-Class long-wheelbase version)
75Opening and closing Z
Page 79 of 357
Closing
X Push the rear door closed from outside the
vehicle.
X If necessary, loc kthe vehicle with the
& button on the key. Tailgate (G-Class Cabriolet)
Important safety notes
G
WARNING
Combustion engines emit poisonous exhaust
gases such as carbon monoxide. If the tailgate
is open when the engine is running, particu-
larly if the vehicle is moving, exhaust fumes
could enter the passenger compartment.
There is a risk of poisoning.
Turn off the engine before opening the tail-
gate. Never drive with the tailgate open. G
WARNING
If the spare wheel bracket is not correctly
closed and engaged, it could swing to the side
while the vehicle is in motion. There is a risk
of an accident and injury.
Close the spare wheel bracket completely
before the journey and make sure that it is
engaged. Opening
! Make sure that there is sufficient clear-
ance.
You can only open the tailgate after it has
been unlocked.
X Press the %button on the key.
The tailgate is unlocked. X
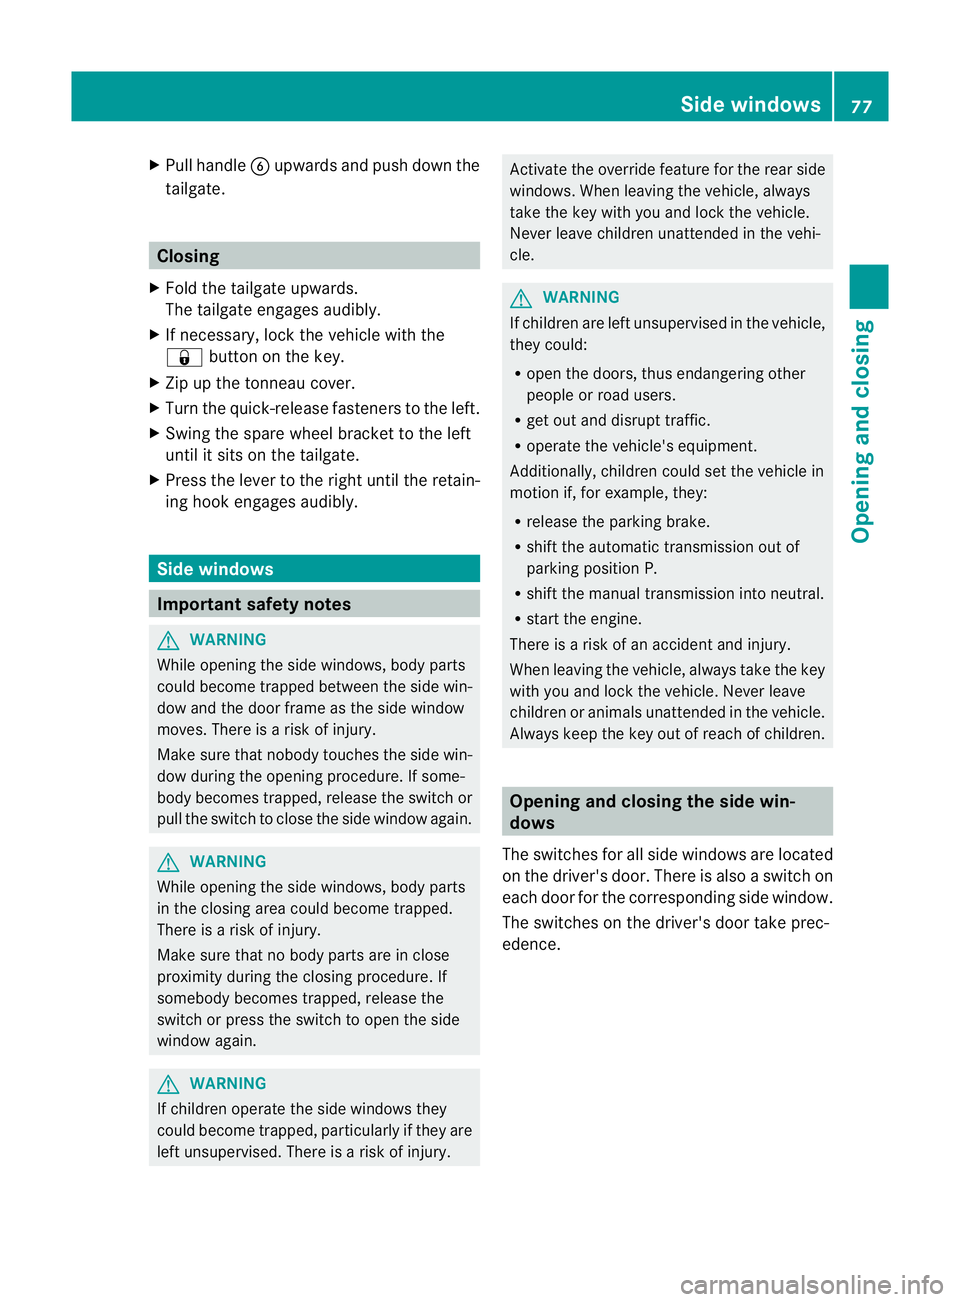
Raise safety catch :and pull lever =in
the direction of the arrow.
X Swing spare wheel bracket ;to the side
in the direction of the arrow. X
Turn quick-locking mechanisms ?clock-
wise.
X Open zips Aupwards approximately
10 cm.
i When the soft top is open and the tonneau
cover is attached, you need only release the
quick-locking mechanisms on the tonneau
cover. 76
Tailgate (G-Class Cabriolet)Opening and closing
Page 80 of 357
X
Pull handle Bupwards and push down the
tailgate. Closing
X Fold the tailgate upwards.
The tailgate engages audibly.
X If necessary, lock the vehicle with the
& button on the key.
X Zip up the tonneau cover.
X Turn the quick-release fasteners to the left.
X Swing the spare wheel bracket to the left
until it sits on the tailgate.
X Press the lever to the right until the retain-
ing hook engages audibly. Side windows
Important safety notes
G
WARNING
While opening the side windows, body parts
could become trapped between the side win-
dow and the door frame as the side window
moves. There is a risk of injury.
Make sure that nobody touches the side win-
dow during the opening procedure. If some-
body becomes trapped, release the switch or
pull the switch to close the side window again. G
WARNING
While opening the side windows, body parts
in the closing area could become trapped.
There is a risk of injury.
Make sure that no body parts are in close
proximity during the closing procedure. If
somebody becomes trapped, release the
switch or press the switch to open the side
window again. G
WARNING
If children operate the side windows they
could become trapped, particularly if they are
left unsupervised. There is a risk of injury. Activate the override feature for the rear side
windows. When leaving the vehicle, always
take the key with you and lock the vehicle.
Never leave children unattended in the vehi-
cle.
G
WARNING
If children are left unsupervised in the vehicle,
they could:
R open the doors, thus endangering other
people or road users.
R get out and disrupt traffic.
R operate the vehicle's equipment.
Additionally, children could set the vehicle in
motion if, for example, they:
R release the parking brake.
R shift the automatic transmission out of
parking position P.
R shift the manual transmission into neutral.
R start the engine.
There is a risk of an accident and injury.
When leaving the vehicle, always take the key
with you and lock the vehicle. Never leave
children or animals unattended in the vehicle.
Always keep the key out of reach of children. Opening and closing the side win-
dows
The switches for all side windows are located
on the driver's door. There is also a switch on
each door for the corresponding side window.
The switches on the driver's door take prec-
edence. Side windows
77Opening and closing Z
Page 81 of 357
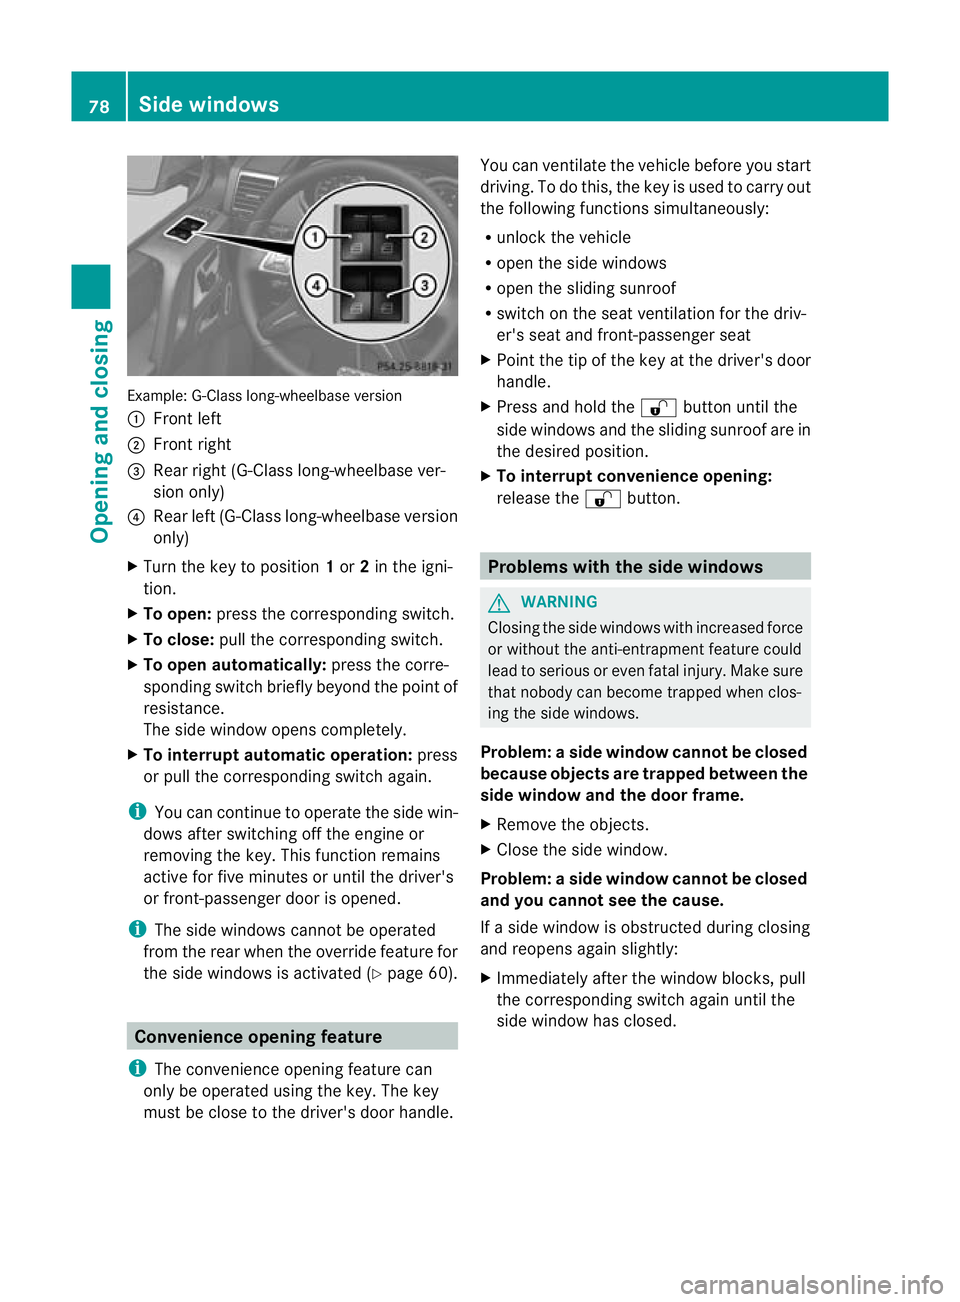
Example: G-Class long-wheelbase version
: Front left
; Front right
= Rear right (G-Class long-wheelbase ver-
sion only)
? Rear left (G-Class long-wheelbase version
only)
X Turn the key to position 1or 2in the igni-
tion.
X To open: press the corresponding switch.
X To close: pull the corresponding switch.
X To open automatically: press the corre-
sponding switch briefly beyond the point of
resistance.
The side window opens completely.
X To interrupt automatic operation: press
or pull the corresponding switch again.
i You can continue to operate the side win-
dows after switching off the engine or
removing the key. This function remains
active for five minutes or until the driver's
or front-passenger door is opened.
i The side windows canno tbe operated
from the rear when the override feature for
the side windows is activated (Y page 60).Convenience opening feature
i The convenience opening feature can
only be operated using the key. The key
must be close to the driver's door handle. You can ventilate the vehicle before you start
driving. To do this, the key is used to carry out
the following functions simultaneously:
R unlock the vehicle
R open the side windows
R open the sliding sunroof
R switch on the seat ventilation for the driv-
er's seat and front-passenger seat
X Point the tip of the key at the driver's door
handle.
X Press and hold the %button until the
side windows and the sliding sunroof are in
the desired position.
X To interrupt convenience opening:
release the %button. Problems with the side windows
G
WARNING
Closing the side windows with increased force
or without the anti-entrapment feature could
lead to serious or even fatal injury. Make sure
that nobody can become trapped when clos-
ing the side windows.
Problem: aside window cannot be closed
because objects are trapped between the
side window and the door frame.
X Remove the objects.
X Close the side window.
Problem :aside window cannot be closed
and you cannot see the cause.
If a side window is obstructed during closing
and reopens again slightly:
X Immediately afte rthe window blocks, pull
the corresponding switch again until the
side window has closed. 78
Side windowsOpening and closing
Page 83 of 357
X
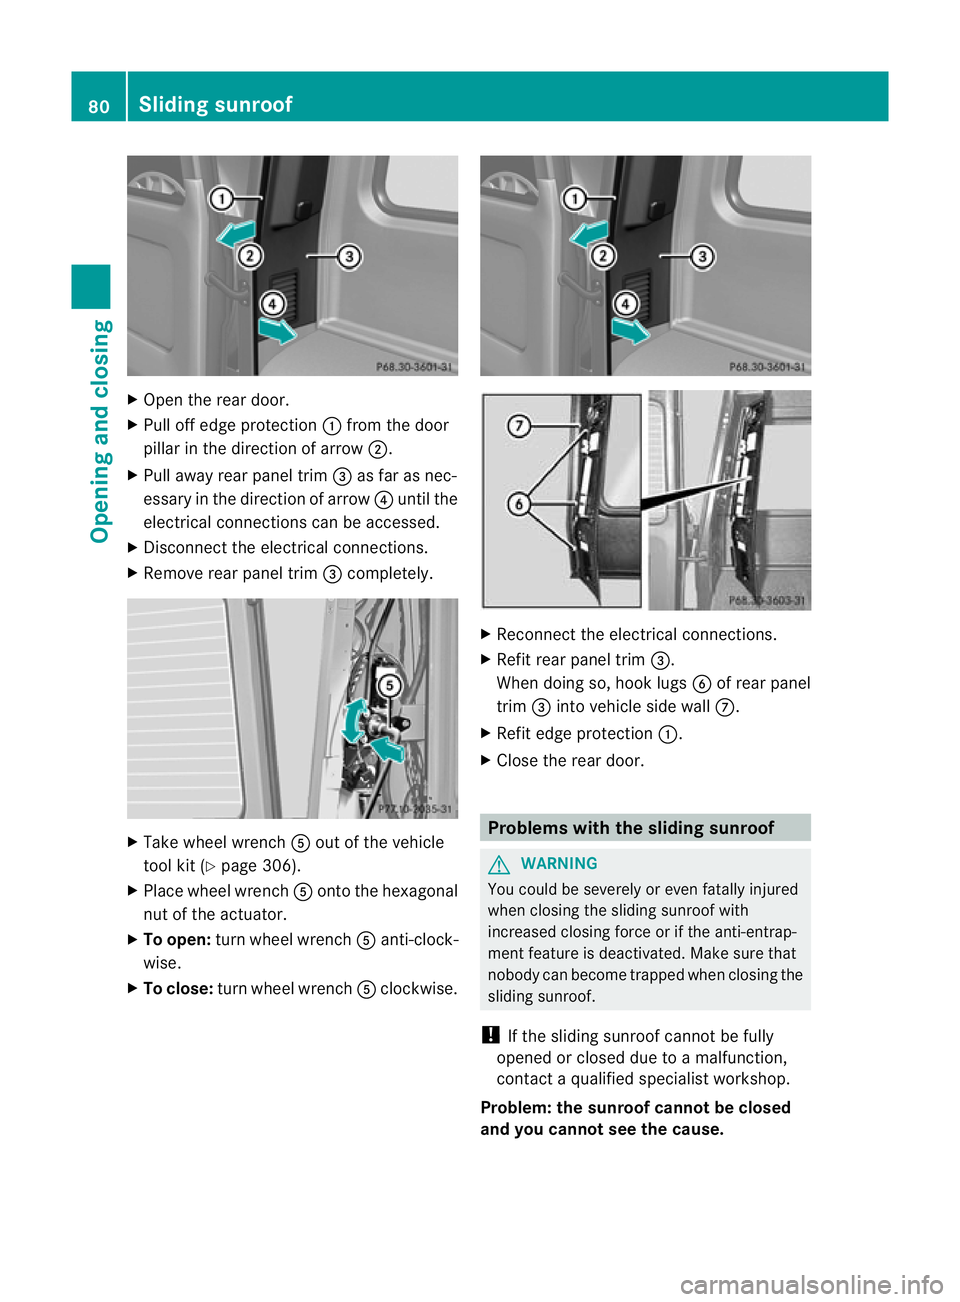
Open the rear door.
X Pull off edge protection :from the door
pillar in the direction of arrow ;.
X Pull away rear panel trim =as far as nec-
essary in the direction of arrow ?until the
electrical connections can be accessed.
X Disconnect the electrical connections.
X Remove rear panel trim =completely. X
Take wheel wrench Aout of the vehicle
tool kit (Y page 306).
X Place wheel wrench Aonto the hexagonal
nut of the actuator.
X To open: turn wheel wrench Aanti-clock-
wise.
X To close: turn wheel wrench Aclockwise. X
Reconnect the electrical connections.
X Refit rear panel trim =.
When doing so, hook lugs Bof rear panel
trim =into vehicle side wall C.
X Refit edge protection :.
X Close the rear door. Problems with the sliding sunroof
G
WARNING
You could be severely or even fatally injured
when closing the sliding sunroof with
increased closing force or if the anti-entrap-
ment feature is deactivated. Make sure that
nobody can become trapped when closing the
sliding sunroof.
! If the sliding sunroof cannot be fully
opened or closed due to a malfunction,
contact a qualified specialist workshop.
Problem: the sunroof cannot be closed
and you cannot see the cause. 80
Sliding sunroofOpening and closing
Page 92 of 357
Useful information
..............................90
Correct driver's seat position ............90
Seats .................................................... 91
Steering wheel .................................... 97
Mirrors ................................................. 99
Memor yfunctions ............................. 102 89Seats, steering wheel and mirrors
Page 93 of 357
Useful information
i This Owner's Manual describes all mod-
els, series and optional equipment for your
vehicle that were available at the time of
going to press. Country-specific differen-
ces are possible. Note that your vehicle
may not be fitted with all features descri-
bed. This is also the case for systems and
functions relevant to safety.
i Read the information on qualified special-
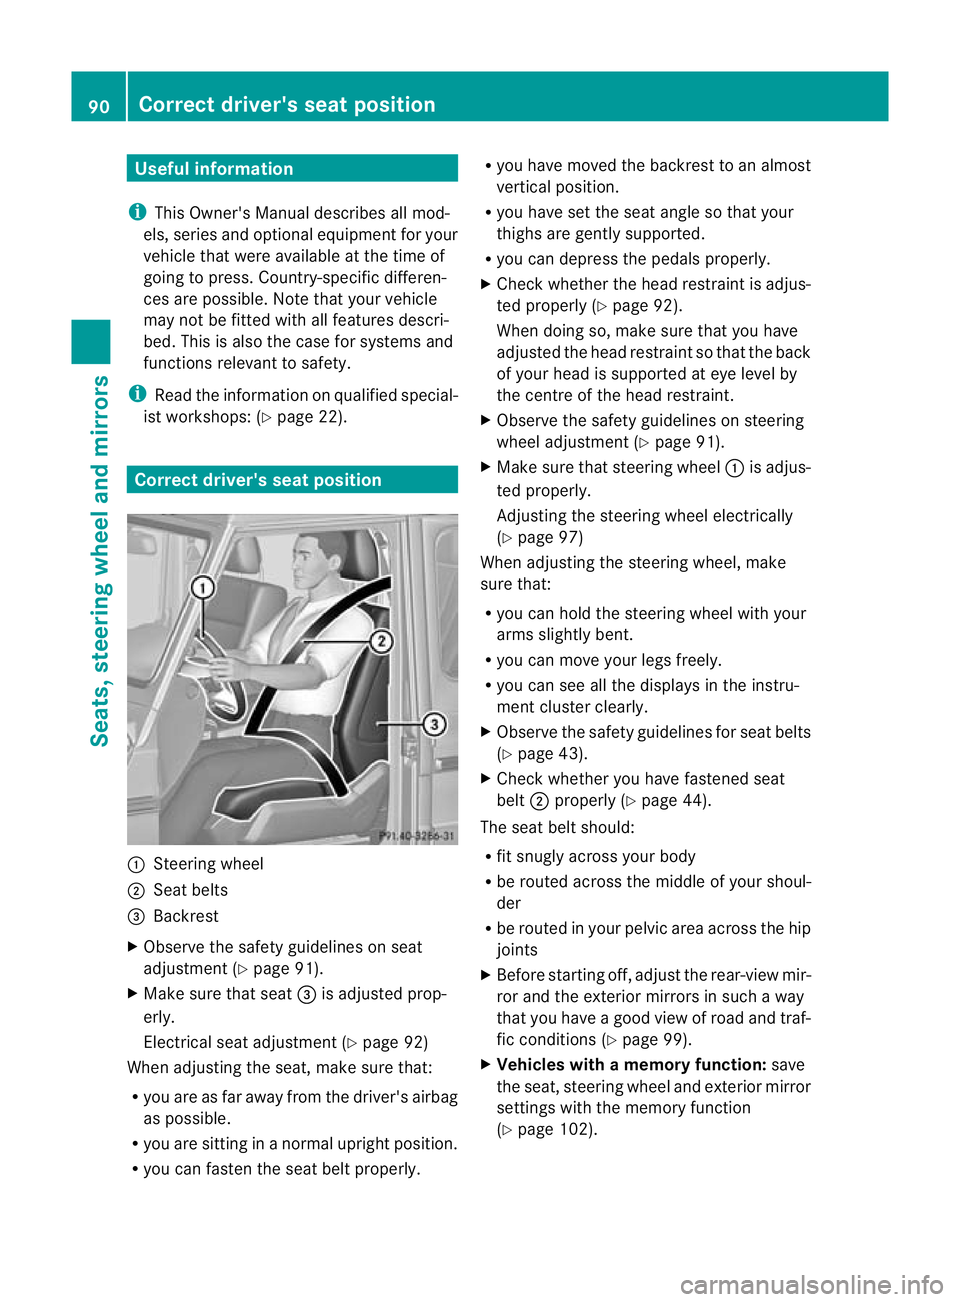
ist workshops: (Y page 22). Correct driver's seat position
:
Steering wheel
; Seat belts
= Backrest
X Observe the safety guidelines on seat
adjustment (Y page 91).
X Make sure that seat =is adjusted prop-
erly.
Electrical seat adjustment (Y page 92)
When adjusting the seat, make sure that:
R you are as far away from the driver's airbag
as possible.
R you are sitting in a normal upright position.
R you can faste nthe seat belt properly. R
you have moved the backrest to an almost
vertical position.
R you have set the seat angle so that your
thighs are gently supported.
R you can depress the pedals properly.
X Check whether the head restraint is adjus-
ted properly (Y page 92).
When doing so, make sure that you have
adjusted the head restraint so that the back
of your head is supported at eye level by
the centre of the head restraint.
X Observe the safety guidelines on steering
wheel adjustment (Y page 91).
X Make sure that steering wheel :is adjus-
ted properly.
Adjusting the steering wheel electrically
(Y page 97)
When adjusting the steering wheel, make
sure that:
R you can hold the steering wheel with your
arms slightly bent.
R you can move your legs freely.
R you can see all the displays in the instru-
ment cluster clearly.
X Observe the safety guidelines for seat belts
(Y page 43).
X Check whether you have fastened seat
belt ;properly (Y page 44).
The seat belt should:
R fit snugly across your body
R be routed across the middle of your shoul-
der
R be routed in your pelvic area across the hip
joints
X Before starting off, adjust the rear-view mir-
ror and the exterior mirrors in such a way
that you have a good view of road and traf-
fic conditions (Y page 99).
X Vehicles with a memory function: save
the seat, steering wheel and exterior mirror
settings with the memory function
(Y page 102). 90
Correct driver's seat positionSeats, steering wheel and mirrors