2012 MERCEDES-BENZ G-CLASS SUV wheel
[x] Cancel search: wheelPage 176 of 357
R
Accelerate gently and make sure that the
wheels are gripping.
R Avoid high engine speeds, except when
driving on sandy and muddy routes with
high driving resistance.
R Whe ndriving downaslope, use the braking
power of the engine. Observe the engine
speed; do not overrev the engine.
R Select a shift range appropriate to the gra-
dient.
R Before tackling steep downhill gradients,
select shift range 1(Ypage 153).
R Always check the brakes after driving off-
road.
Maximum gradient-climbing capability On good road surfaces and with the
LOW
RANGE gear selected, the maximum gradi-
ent-climbing capability is 80%.
i If the load on the front axle is reduced
when pulling away on a steep uphill slope,
the front wheels have a tendency to spin.
4ETS recognises this and brakes the
wheels accordingly. The rear wheel torque
is increased and it is easier to pull away.
Hilltops When driving up an uphill gradient, slightly
reduce pressure on the accelerator immedi-
ately before reaching the brow of the hill.
Make use of the vehicle's own impetus to
travel over the brow.
This style of driving prevents:
R the vehicle from lifting off the ground on the
brow of a hill
R loss of traction
R the vehicle from travelling too quickly down
the other side.
Driving downhill R
Before tackling steep downhill gradients,
select shift range 1(Ypage 153). This way you use the engine's braking
effect to reduce the speed. If this is not
sufficient, brake gently. When doing so,
make sure that the vehicle is facing in the
direction of the line of fall.
R Observe the notes on driving in mountain-
ous terrain (Y page 173).
R Drive slowly.
R Do not drive at an angle down steep
inclines. Steer into the line of fall and drive
with the front wheels aligned straight. Oth-
erwise, the vehicle could slip sideways, tip
and overturn.
R Check that the brakes are working normally
after a long downhill stretch. Driving systems
Cruise control
Important safety notes G
WARNING
The brake pedal moves when cruise control
brakes the vehicle. Afoot in the area under
the brake pedal could become trapped. The
movement of the pedal, and therefore the
vehicle's ability to brake, may be restricted by
objects in the area under the brake. There is
a risk of an accident and injury.
Do not place your foot under the brake pedal.
Keep the area under the brake pedal free from
obstructions.
If you fail to adapt your driving style, cruise
control can neither reduce the risk of acci-
dent nor override the laws of physics. Cruise
control cannot take account of road, weather
and traffic conditions. Cruise control is only
an aid. You are responsible for the distance
to the vehicle in front, for vehicle speed and
for braking in good time. Adjust your driving
style to the traffic conditions. Only engage
cruise control when the current road, weather
and traffic conditions permit it to be done
safely. Drive carefully and maintain a suitable
distance to the vehicle in front. Driving systems
173Driving and parking Z
Page 177 of 357
Do not use cruise control:
R
in traffi cconditions that do not allow you
to drive at a constant speed, e.g. heavy
traffic, on winding roads or off-road
R on slippery road surfaces. Braking or accel-
erating could cause the drive wheels to lose
traction and the vehicle could then skid.
R when there is poor visibility, e.g. due to fog,
heavy rain or snow
General notes Cruise control maintains a constant road
speed for you. On long and steep downhill
gradients, especially if the vehicle is laden or
towing a trailer, you must select shift range
1,
2or 3in good time. By doing so, you will
make use of the braking effect of the engine.
This relieves the load on the brake system and
prevents the brakes from overheating and
wearing too quickly.
Use cruise control only if road and traffic con-
ditions make it appropriate to maintain a
steady speed for a prolonged period. You can
store any road speed above 30 km/h.
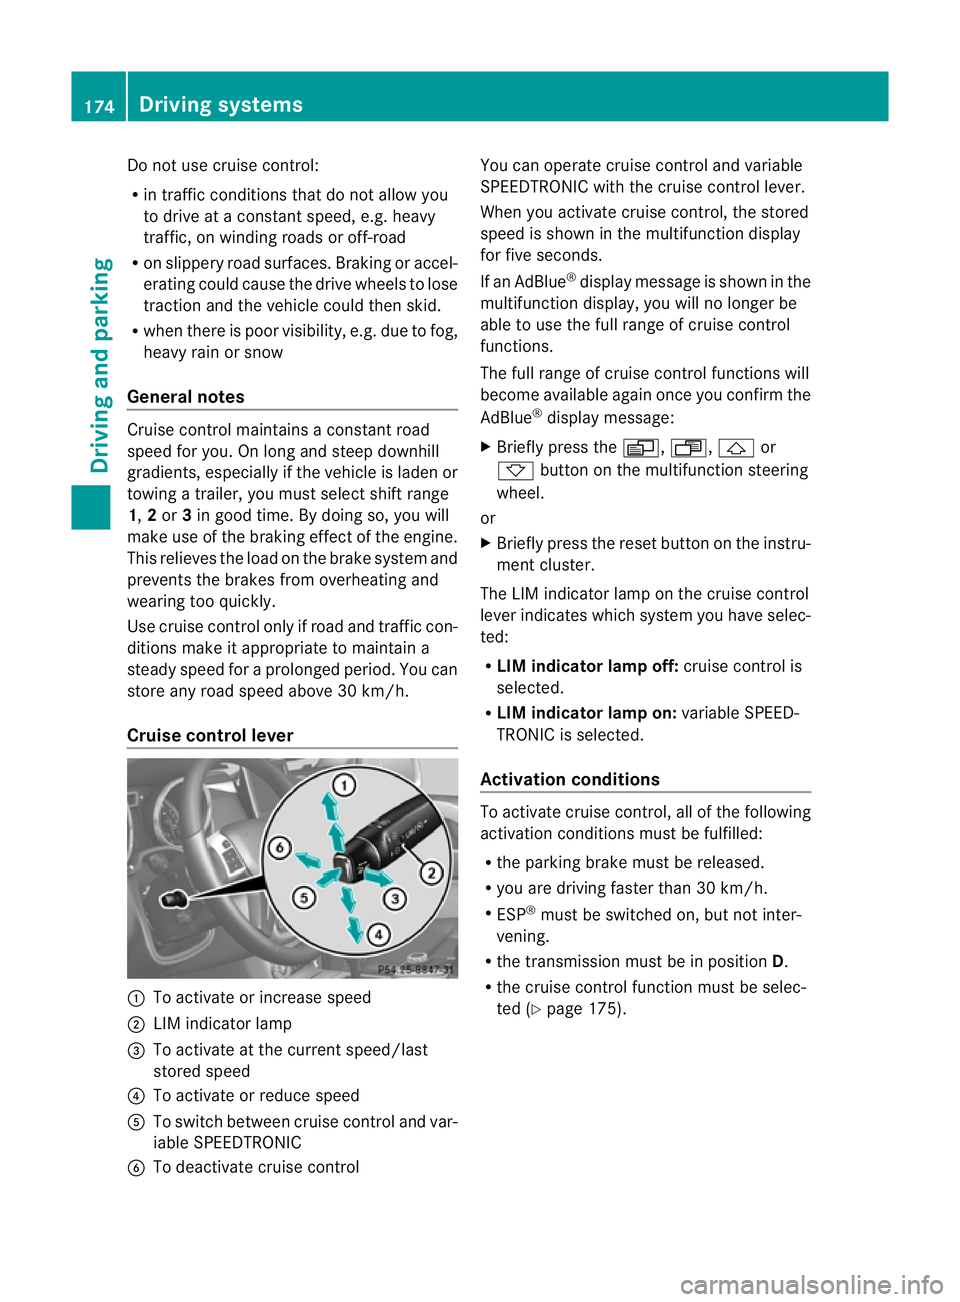
Cruise control lever :
To activate or increase speed
; LIM indicator lamp
= To activate at the current speed/last
stored speed
? To activate or reduce speed
A To switch between cruise control and var-
iable SPEEDTRONIC
B To deactivate cruise control You can operate cruise control and variable
SPEEDTRONIC with the cruise control lever.
When you activate cruise control, the stored
speed is shown in the multifunction display
for five seconds.
If an AdBlue ®
display message is shown in the
multifunction display, you will no longer be
able to use the full range of cruise control
functions.
The full range of cruise control functions will
become available again once you confirm the
AdBlue ®
display message:
X Briefly press the V,U,&or
* button on the multifunction steering
wheel.
or
X Briefly press the reset button on the instru-
ment cluster.
The LIM indicator lamp on the cruise control
lever indicates which system you have selec-
ted:
R LIM indicator lamp off: cruise control is
selected.
R LIM indicator lamp on: variable SPEED-
TRONIC is selected.
Activation conditions To activate cruise control, all of the following
activation conditions must be fulfilled:
R
the parking brake must be released.
R you are driving faster than 30 km/h.
R ESP ®
must be switched on, but not inter-
vening.
R the transmission must be in position D.
R the cruise control function must be selec-
ted (Y page 175). 174
Driving systemsDriving and parking
Page 200 of 357

There is a risk of an accident.
Before leaving the vehicle, always deactivate
the HOLD function and secure the vehicle
from rolling away.
The HOLD function is deactivated automati-
cally if:
R you accelerate and the transmission is in
position Dor R.
R you shift the transmission to position P.
R you depress the brake pedal again with a
certain amount of pressure until ëdis-
appears from the multifunction display.
R you activate DISTRONIC PLUS.
On steep uphill or downhill gradients or if
there is a malfunction, the transmission may
also be automatically shifted into position P.4MATIC (permanent all-wheel drive)
! Never tow the vehicle with one axle
raised. This may damage the transfer case.
Damage of this sort is not covered by the
Mercedes-Benz implied warranty. All
wheels must remain either on the ground
or be fully raised. Observe the instructions
for towing the vehicle with all wheels in full
contact with the ground.
! When testing the parking brake, operate
the vehicle only briefly (for a maximum of
ten seconds) on a brake test dynamometer.
When doing this, turn the key to position
0 or 1in the ignition .Failure to do this can
cause damage to the drive train or the
brake system.
! A function or performance test should
only be carried out on atwin-axle dyna-
mometer. Before you operate the vehicle
on such a dynamometer, please consult a
qualified workshop .You could otherwise
damage the drive train or the brake system.
4MATIC ensures that all four wheels are per-
manently driven. Together with ESP ®
and
4ETS, it improves the traction of your vehicle whenever a drive wheel spins due to insuffi-
cient grip.
If a drive wheel spins due to insufficient grip:
R
when pulling away, only depress the accel-
erator pedal as far as is necessary.
R accelerate less when driving.
If you fail to adapt your driving style, 4MATIC
can neither reduce the risk of accident nor
override the laws of physics. 4MATIC cannot
take account of road, weather and traffic con-
ditions. 4MATIC is only an aid. You are
responsible for the distance to the vehicle in
front, for vehicle speed, for braking in good
time and for staying in lane. Only engage
4MATIC when the current road, weather and
traffic conditions permit it to be done safely,
and adapt your driving style accordingly.
Drive carefully and maintain a suitable dis-
tance to the vehicle in front.
i In wintry driving conditions, the maximum
effect of 4MATIC can only be achieved if
you use winter tyres (M+ Styres), with snow
chains if necessary.
Fo rinformation abou tdriving off-road, see
(Y page 169). PARKTRONIC
Important safety notes !
When parking, pay particular attention to
objects above or below the sensors, such
as flower pots or trailer drawbars .PARK-
TRONIC does not detect such objects when
they are in the immediate vicinity of the
vehicle. You could damage the vehicle or
the objects.
The sensors may not detect snow and
objects which absorb ultrasoni csources.
Ultrasonic sources, such as an automatic
car wash, a lorry's compressed-air brakes
or a pneumatic drill, could cause PARK-
TRONIC to malfunction.
PARKTRONIC may not function correctly on
uneven terrain. Driving systems
197Driving and parking Z
Page 201 of 357

PARKTRONIC is an electronic parking aid with
ultrasonic sensors
.Itindicates visually and
audibly the distance between your vehicle
and an object.
PARKTRONIC is only an aid. It is not a replace-
ment for your attention to your immediate
surroundings. You are always responsible for
safe manoeuvring, parking and exiting a park-
ing space. Check in front, behind and to the
sides of the vehicle before manoeuvring,
parking or exiting a parking space. There
must not be any persons, animals or objects
in the area in which yo uare manoeuvring.
PARKTRONIC cannot identify any persons or
objects outside of the detection range. As a
result, PARKTRONIC cannot warn you about
objects in this area.
PARKTRONIC is activated automatically if
you:
R switch on the ignition
R shift the transmission to position D,Ror N
R release the parking brake
PARKTRONIC is deactivated at speeds above
18 km/h. It is reactivated at lower speeds.
PARKTRONIC monitors the area around your
vehicle using six sensors in the front bumper
and four sensors in the rear bumper.
Range of the sensors General notes
:
Example: sensors in the front bumper,
left-hand side Side view
Top view
The sensors must be free of dirt, ice and
slush. Otherwise, they may not function cor-
rectly. Clean the sensors regularly, taking
care not to scratch or damage them
(Y
page 298).
Front sensors Centre Approximately 100 cm
Corners Approximately 60 cm
Rear sensors
Centre Approximately 90 cm
(from spare wheel)
Corners Approximately 80 cm
Minimum distance
Centre Approximately 20 cm
Corners Approximately 20 cm
If there is an obstacle withi
nthis range, the
relevant warning displays light up and a warn-
ing tone sounds. If the distance falls below
the minimum, the distance may no longer be
shown. 198
Driving systemsDriving and parking
Page 204 of 357
Activating/deactivating the reversing
camera
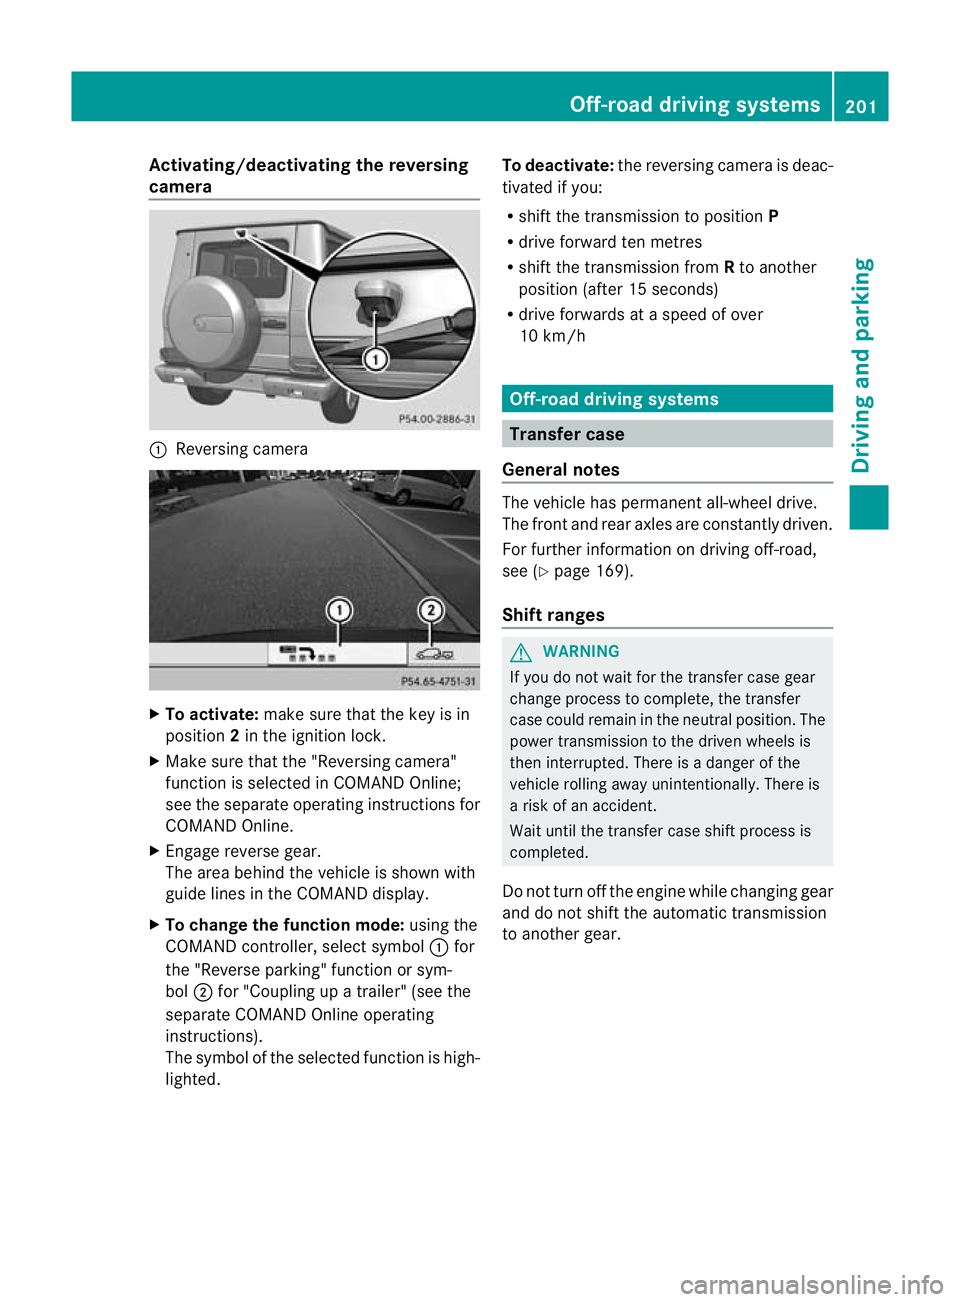
:
Reversing camera X
To activate: make sure that the key is in
position 2in the ignition lock.
X Make sure that the "Reversing camera"
function is selected in COMAND Online;
see the separate operating instructions for
COMAND Online.
X Engage reverse gear.
The area behind the vehicle is shown with
guide lines in the COMAND display.
X To change the function mode: using the
COMAND controller, select symbol :for
the "Reverse parking" function or sym-
bol ;for "Coupling up a trailer" (see the
separate COMAND Online operating
instructions).
The symbol of the selected function is high-
lighted. To deactivate:
the reversing camera is deac-
tivated if you:
R shif tthe transmission to position P
R drive forward ten metres
R shift the transmission from Rto another
position (after 15 seconds)
R drive forwards at a speed of over
10 km/h Off-road driving systems
Transfer case
General notes The vehicle has permanent all-wheel drive.
The front and rear axles are constantly driven.
For further information on driving off-road,
see (Y
page 169).
Shift ranges G
WARNING
If you do not wait for the transfer case gear
change process to complete, the transfer
case could remain in the neutral position. The
power transmission to the driven wheels is
then interrupted. There is a danger of the
vehicle rolling away unintentionally. There is
a risk of an accident.
Wait until the transfer case shift process is
completed.
Do not turn off the engine while changing gear
and do not shift the automatic transmission
to another gear. Off-road driving systems
201Driving and parking Z
Page 205 of 357
HIGH
RANGE
Position for all normal on-
road driving conditions
LOW
RANGE
Low-range position for driv-
ing off-road
Also for use on steep uphill
or downhill gradients, espe-
cially when towing a trailer
The vehicle travels around
halft
he speed of on-road
driving range HIGH RANGE.
The tractive power is corre-
spondingly higher. Shifting the transfer case
Important safety notes
G
WARNING
When the transfer case is in the neutral posi-
tion, power transmission to the driven wheels
is interrupted. As a result, the vehicle could
roll away.T here is a risk of an accident.
Secure the vehicle with the parking brake, and
on uphill or downhill gradients, also secure it
with a device such as a wheel chock. G
WARNING
When the transfer case is in the neutral posi-
tion, power transmission to the driven wheels
is interrupted. As a result, the vehicle could
roll away.T here is a risk of an accident.
Secure the vehicle with the parking brake, and
on uphill or downhill gradients, also secure it
with a device such as a wheel chock.
Always wait for the gear change process from
HIGH RANGE toLOW RANGE and from
LOW RANGE toHIGH RANGE to complete.
Do not turn off the engine while changing gear
and do not shift the automatic transmission
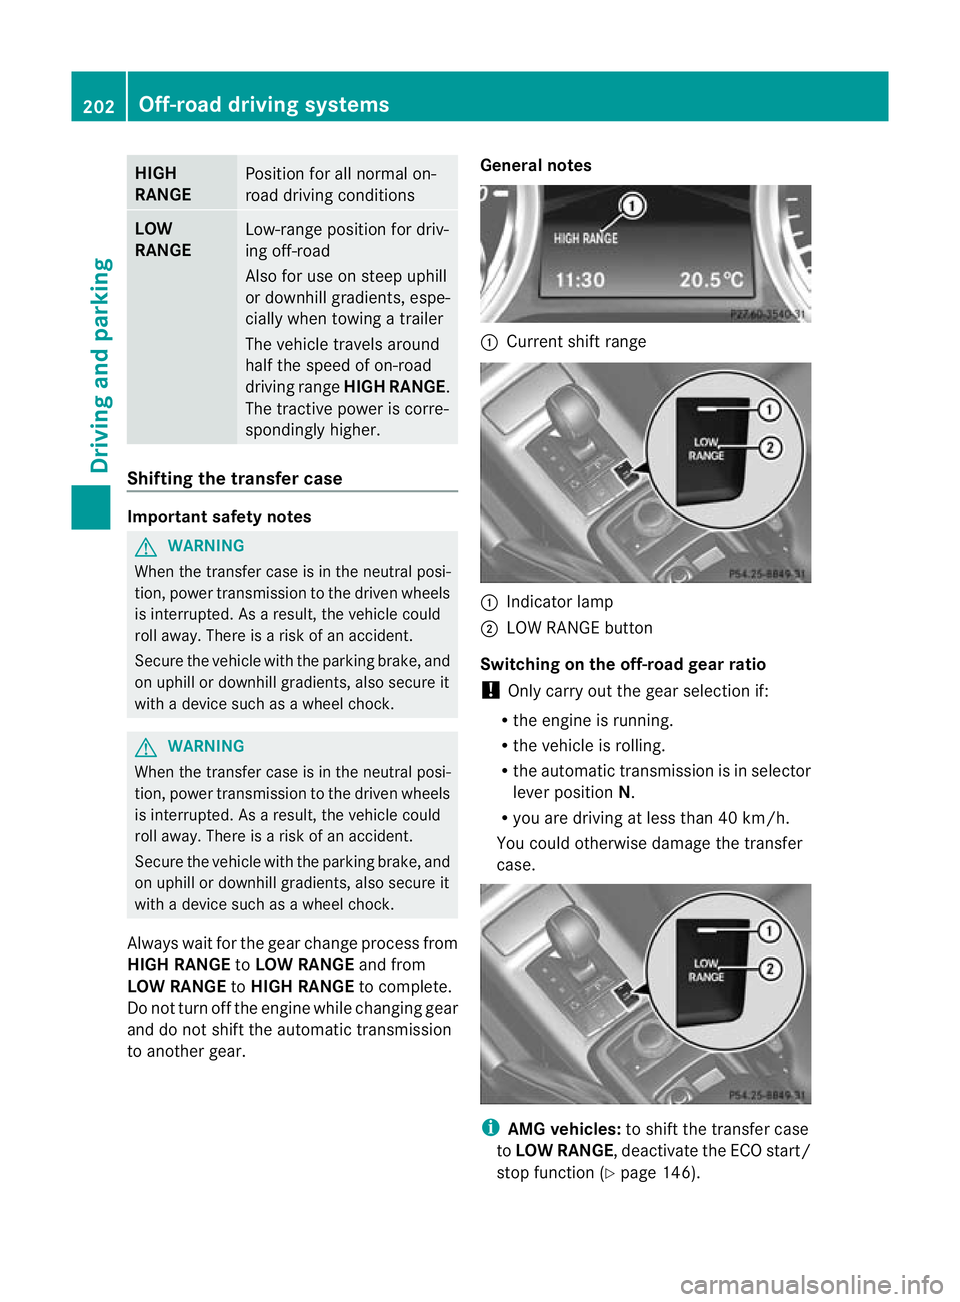
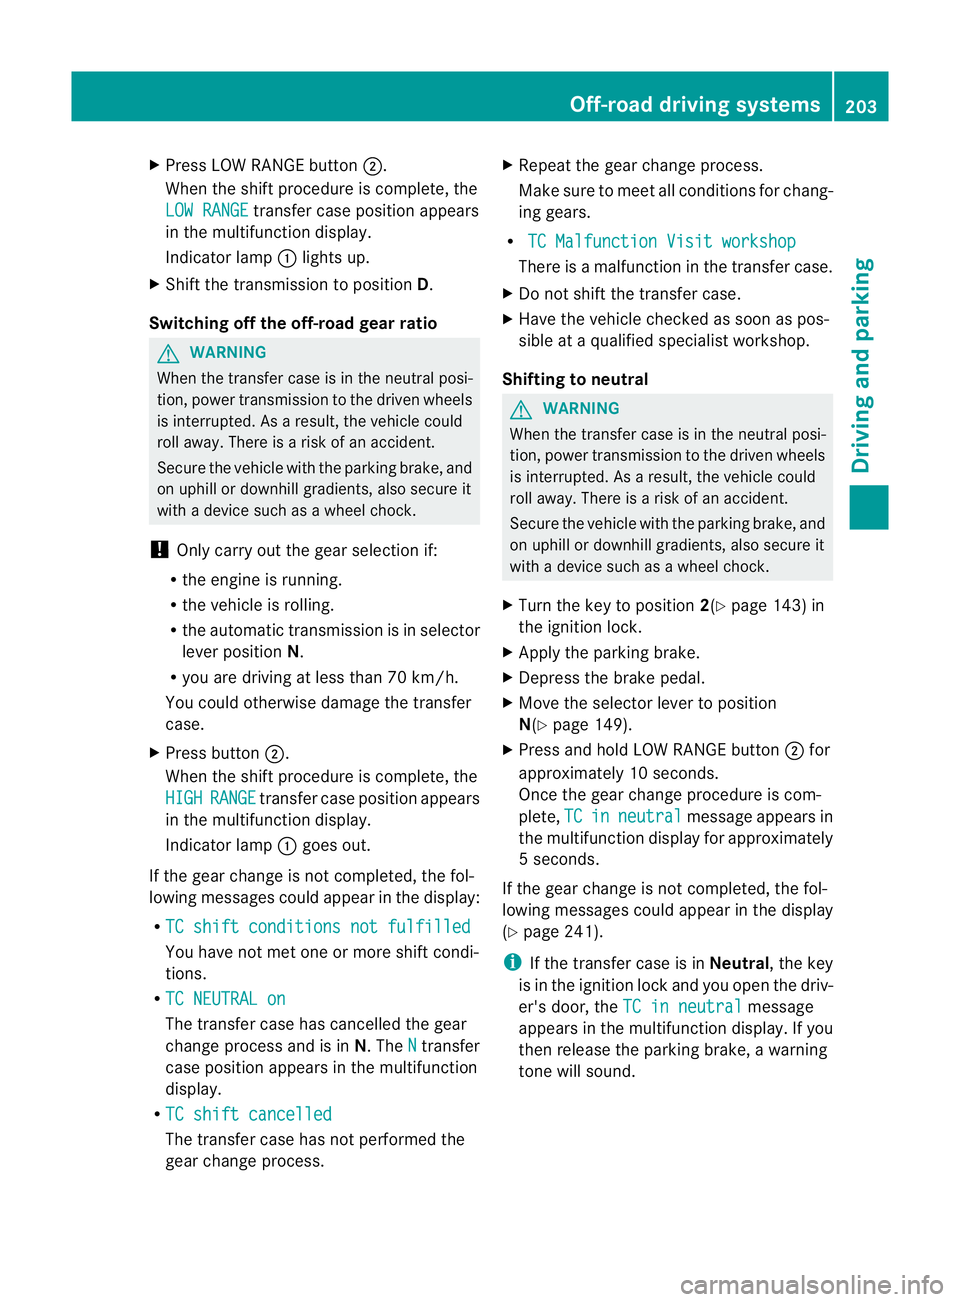
to another gear. General notes :
Current shift range :
Indicator lamp
; LOW RANGE button
Switching on the off-road gear ratio
! Only carry out the gear selection if:
R the engine is running.
R the vehicle is rolling.
R the automatic transmission is in selector
lever position N.
R you are driving at less than 40 km/h.
You could otherwise damage the transfer
case. i
AMG vehicles: to shift the transfer case
to LOW RANGE, deactivate the ECO start/
stop function (Y page 146).202
Off-road driving systemsDriving and parking
Page 206 of 357
X
Press LOW RANGE button ;.
When the shift procedure is complete, the
LOW RANGE transfer case position appears
in the multifunction display.
Indicator lamp :lights up.
X Shift the transmission to position D.
Switching off the off-road gear ratio G
WARNING
When the transfer case is in the neutral posi-
tion, power transmission to the driven wheels
is interrupted. As a result, the vehicle could
roll away .There is a risk of an accident.
Secure the vehicle with the parking brake, and
on uphill or downhill gradients, also secure it
with a device such as a wheel chock.
! Only carry out the gear selection if:
R the engine is running.
R the vehicle is rolling.
R the automatic transmission is in selector
lever position N.
R you are driving at less than 70 km/h.
You could otherwise damage the transfer
case.
X Press button ;.
When the shift procedure is complete, the
HIGH RANGE transfer case position appears
in the multifunction display.
Indicator lamp :goes out.
If the gear change is not completed, the fol-
lowing messages could appearint he display:
R TC shift conditions not fulfilled You have not met one or more shift condi-
tions.
R TC NEUTRAL on The transfer case has cancelled the gear
change process and is in N.TheN transfer
case position appears in the multifunction
display.
R TC shift cancelled The transfer case has not performed the
gear change process. X
Repeatt he gear change process.
Make sure to meet all conditions for chang-
ing gears.
R TC Malfunction Visit workshop There is a malfunction in the transfer case.
X Do not shift the transfer case.
X Have the vehicle checked as soon as pos-
sible at a qualified specialist workshop.
Shifting to neutral G
WARNING
When the transfer case is in the neutral posi-
tion, power transmission to the driven wheels
is interrupted. As a result, the vehicle could
roll away.T here is a risk of an accident.
Secure the vehicle with the parking brake, and
on uphill or downhill gradients, also secure it
with a device such as a wheel chock.
X Turn the key to position 2(Ypage 143) in
the ignition lock.
X Apply the parking brake.
X Depress the brake pedal.
X Move the selector lever to position
N(Y page 149).
X Press and hold LOW RANGE button ;for
approximately 10 seconds.
Once the gear change procedure is com-
plete, TC in neutral message appears in
the multifunction display for approximately
5s econds.
If the gear change is not completed, the fol-
lowing messages could appear in the display
(Y page 241).
i If the transfer case is in Neutral, the key
is in the ignition lock and you open the driv-
er's door, the TC in neutral message
appears in the multifunction display. If you
then release the parking brake, a warning
tone will sound. Off-road driving systems
203Driving and parking Z
Page 207 of 357
Differential lock
General notes G
WARNING
Whe ndifferential locks are engaged on a firm,
high-grip surface, the vehicle's steerability is
greatly impaired .Inparticular, engaging the
differential locks when cornering could lead
to you losing control of the vehicle .There is a
risk of an accident.
Disengage the differential locks immediately
on firm, high-grip surfaces.
! To prevent damage in the transfer case,
you may only operate the vehicle on a roller
dynamometer (single-axle roller dynamom-
eter) if:
R the axle that is not being driven is raised.
or
R the corresponding propeller shaft is dis-
connected and the transfer case differ-
ential lock is activated.
Otherwise, the transfer case can be dam-
aged.
Differential locks improve the traction of the
vehicle.
Your vehicle is equipped with adifferential
lock for:
R the transfer case: this controls the balance
between the front and rear axles.
R the rear axle: this controls the balance
between the wheels on the rear axle.
R the front axle: this controls the balance
between the wheels on the front axle.
Activating the differentia llock Important safety notes
G
WARNING
When differential locks are engaged on a firm,
high-grip surface, the vehicle's steerability is
greatly impaired. In particular, engaging the
differential locks when cornering could lead to you losing control of the vehicle
.There is a
risk of an accident.
Disengage the differential locks immediately
on firm, high-grip surfaces. G
WARNING
ABS, 4ETS, ESP ®
and BAS are deactivated
while the differential locks are engaged. As a
result, the wheels could lock when braking
and the braking distance is increased. There
is a risk of an accident.
Disengage the differential locks immediately
on firm, high-grip surfaces.
! Only activate the differential locks when:
R you are driving at walking pace.
R the driven wheels are not spinning.
R you are not driving on a firm road surface.
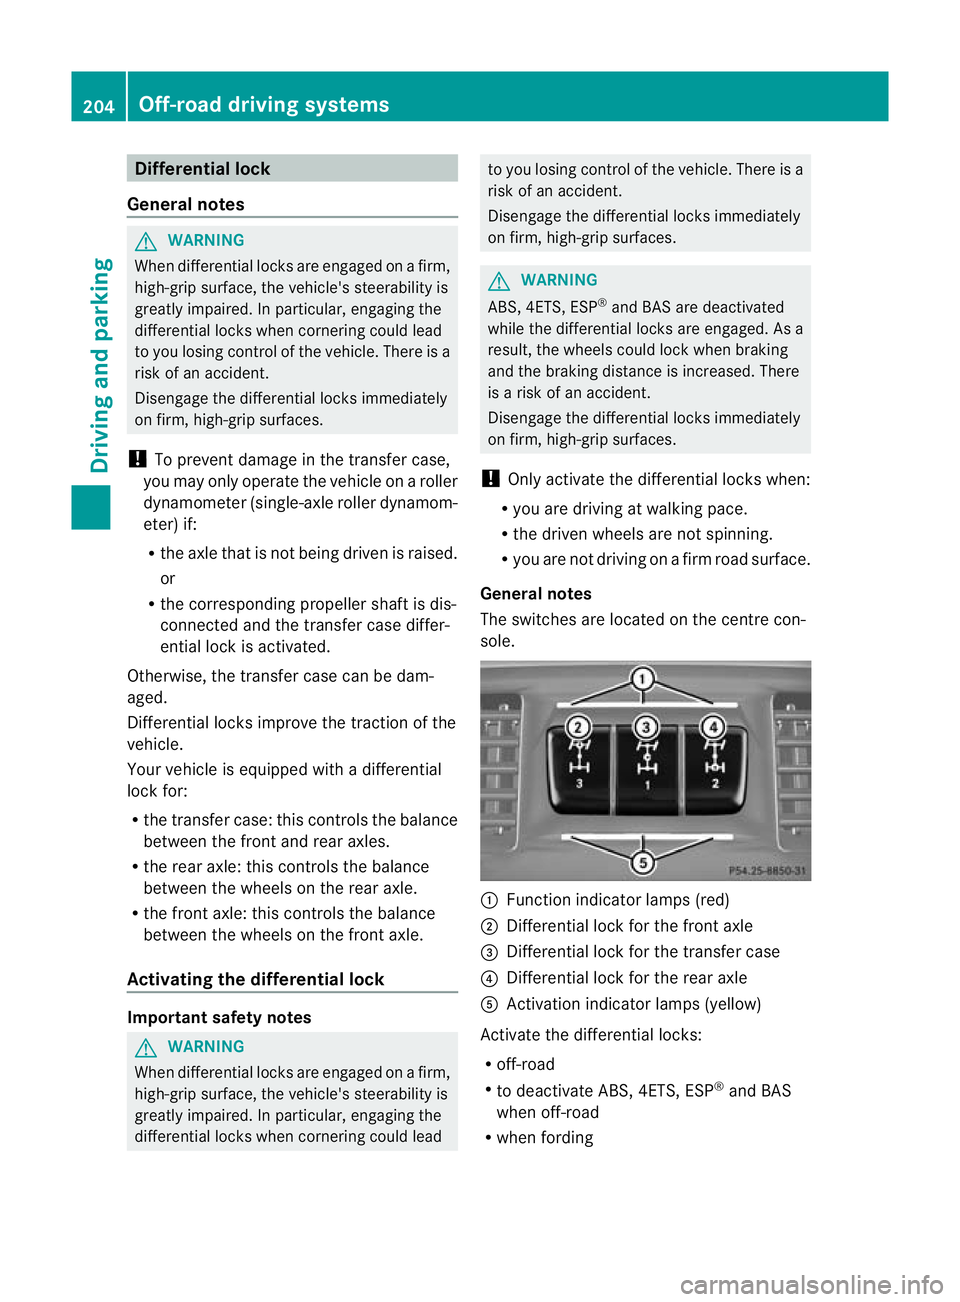
General notes
The switches are located on the centre con-
sole. :
Function indicator lamps (red)
; Differential lock for the front axle
= Differential lock for the transfer case
? Differential lock for the rear axle
A Activation indicator lamps (yellow)
Activate the differential locks:
R off-road
R to deactivate ABS, 4ETS, ESP ®
and BAS
when off-road
R when fording 204
Off-road driving systemsDriving and parking