2012 MERCEDES-BENZ G-CLASS SUV brake light
[x] Cancel search: brake lightPage 169 of 357
New brake pads/linings
New brake pads/brake pads and discs that
have been replaced only achieve optimum
braking effect after several hundred kilome-
tres of driving. Compensate for the reduced
braking effect by applying greate rforce to the
brake pedal.
For safety reasons, Mercedes-Benz recom-
mends that you only have brake pads/linings
fitted to your vehicle which have been
approved for Mercedes-Benz vehicles or
which correspond to an equivalent quality
standard. Brake pads/linings which have not
been approved for Mercedes-Benz vehicles or
which are not of an equivalent quality could
affect your vehicle's operating safety.
High-performance brake system for
AMG vehicles The high-performance brake system is
designed for high loads. This may lead to
noise when braking. This is dependent on:
R speed
R braking force
R environmental conditions, such as temper-
ature and humidity.
The wear of individual components of the
brake system, such as the brake pads/linings
or brake discs, depends on the individual driv-
ing style and operating conditions.
For this reason, it is impossible to state a
mileage (service life) that will be valid under
all circumstances. An aggressive driving style
will lead to high wear. You can obtain further
information about this from your Mercedes-
Benz Service Centre.
Parking brake G
WARNING
If you must brake the vehicle with the parking
brake, the braking distance is considerably
longer and the wheels could lock. This increa-
ses the risk of skidding and an accident. Only use the parking brake to brake the vehi-
cle when the service brake is faulty. Do not
apply the parking brake too firmly. If the
wheels lock, release the parking brake until
the wheels begin turning again.
When you apply the parking brake to brake
the vehicle, the brake lamps do not light up.
If you drive on wet roads or dirt-covered sur-
faces, road salt and/or dirt could get into the
parking brake.
In order to prevent corrosion and a reduction
in the braking power of the parking brake,
observe the following:
R pull the parking brake upwards with the
release button depressed from time to time
before beginning the journey
(Y page 164).
R drive for approximately 100 m at a maxi-
mum speed of 20 km/h. Tyre traction
G
WARNING
Whereas the vehicle can be fully controlled at
a certain speed on dry roads, you must reduce
your speed on wet or icy roads to achieve the
same road safety. You could otherwise cause
an accident.
Pay particular attention to the road conditions
at temperatures around freezing point.
If ice has formed on the road surface (e.g.
from fog), a thin film of water rapidly forms on
the ice when you brake, considerably reduc-
ing tyre traction. Drive with particular care in
such weather conditions. Driving on slippery surfaces
! If possible, do not let the drive wheels
spin. Otherwise, you could damage the
drive train.
X Engage the differential locks if necessary
(Y page 204). 166
Driving tipsDriving and parking
Page 174 of 357
Checklist after driving off-road
Driving ove
rrough terrain places greater
demands on your vehicle than driving on nor-
mal roads. After driving off-road, check the
vehicle. This allows you to detect damage
promptly and reduce the risk of an accident
to yourself and other road users.
X Shift the transfer case to HIGH
RANGE(Y page 202).
X Disengage the differential locks
(Y page 204).
X Clean the headlamps and rear lights and
check for damage.
X Clean the front and rear licence plates.
X Clean the wheels and tyres with a water jet
and remove any foreign objects.
X Clean the wheels, tyres, wheel arches and
the vehicle underside with a water jet;
check for any foreign objects and damage.
X Check whether twigs or other parts of
plants have become trapped. These
increase the risk of fire and can damage
fuel pipes, brake hoses or the rubber bel-
lows of the axle joints and propeller shafts.
X After the trip, examine without fail the
entire undercarriage, wheels, tyres, brakes,
bodywork structure, steering, chassis and
exhaust system for damage.
X After driving for extended periods across
sand, mud, gravel, water or in similarly dirty
conditions, have the brake discs, wheels,
brake pads/linings and axle joints checked
and cleaned.
X If you notice strong vibrations after off-road
driving, check for foreign objects in the
wheels and drive train and, if necessary,
remove them. Foreign objects can disturb
the balance and cause vibrations. Driving on sand Observe the following rules when driving on
sand:
R
Shift the transfer case to LOW
RANGE(Y page 202).
R Avoid high engine speeds.
R Limit the shift range of the automatic trans-
mission according to the off-road condi-
tions.
R Drive quickly to overcome the rolling resist-
ance. Otherwise, the vehicle could dig itself
into the sand.
R Drive in the tracks of other vehicles if pos-
sible. Make sure that the ruts are not too
deep, that the sand is firm enough and that
your vehicle has sufficient ground clear-
ance.
Tyre ruts and gravel roads !
Check that the ruts are not too deep and
that your vehicle has sufficient clearance.
Otherwise, your vehicle could be damaged
or bottom out and get stuck.
Observe the following rules when driving
along ruts in off-road terrain or on roads with
loose gravel:
R Shift the transfer case to LOW
RANGE(Y page 202).
R Avoid high engine speeds.
R Observe the safety notes (Y page 169) and
the general notes (Y page 169) on off-road
driving.
R Restrict the shift range of the automatic
transmission to 1(Ypage 153).
R Drive slowly.
R Where ruts are too deep, drive with the
wheels on one side on the middle section
of turf if possible.
Driving over obstacles !
Obstacles could damage the floor of the
vehicle or components of the chassis. Ask
passengers for guidance when driving over Driving tips
171Driving and parking Z
Page 176 of 357
R
Accelerate gently and make sure that the
wheels are gripping.
R Avoid high engine speeds, except when
driving on sandy and muddy routes with
high driving resistance.
R Whe ndriving downaslope, use the braking
power of the engine. Observe the engine
speed; do not overrev the engine.
R Select a shift range appropriate to the gra-
dient.
R Before tackling steep downhill gradients,
select shift range 1(Ypage 153).
R Always check the brakes after driving off-
road.
Maximum gradient-climbing capability On good road surfaces and with the
LOW
RANGE gear selected, the maximum gradi-
ent-climbing capability is 80%.
i If the load on the front axle is reduced
when pulling away on a steep uphill slope,
the front wheels have a tendency to spin.
4ETS recognises this and brakes the
wheels accordingly. The rear wheel torque
is increased and it is easier to pull away.
Hilltops When driving up an uphill gradient, slightly
reduce pressure on the accelerator immedi-
ately before reaching the brow of the hill.
Make use of the vehicle's own impetus to
travel over the brow.
This style of driving prevents:
R the vehicle from lifting off the ground on the
brow of a hill
R loss of traction
R the vehicle from travelling too quickly down
the other side.
Driving downhill R
Before tackling steep downhill gradients,
select shift range 1(Ypage 153). This way you use the engine's braking
effect to reduce the speed. If this is not
sufficient, brake gently. When doing so,
make sure that the vehicle is facing in the
direction of the line of fall.
R Observe the notes on driving in mountain-
ous terrain (Y page 173).
R Drive slowly.
R Do not drive at an angle down steep
inclines. Steer into the line of fall and drive
with the front wheels aligned straight. Oth-
erwise, the vehicle could slip sideways, tip
and overturn.
R Check that the brakes are working normally
after a long downhill stretch. Driving systems
Cruise control
Important safety notes G
WARNING
The brake pedal moves when cruise control
brakes the vehicle. Afoot in the area under
the brake pedal could become trapped. The
movement of the pedal, and therefore the
vehicle's ability to brake, may be restricted by
objects in the area under the brake. There is
a risk of an accident and injury.
Do not place your foot under the brake pedal.
Keep the area under the brake pedal free from
obstructions.
If you fail to adapt your driving style, cruise
control can neither reduce the risk of acci-
dent nor override the laws of physics. Cruise
control cannot take account of road, weather
and traffic conditions. Cruise control is only
an aid. You are responsible for the distance
to the vehicle in front, for vehicle speed and
for braking in good time. Adjust your driving
style to the traffic conditions. Only engage
cruise control when the current road, weather
and traffic conditions permit it to be done
safely. Drive carefully and maintain a suitable
distance to the vehicle in front. Driving systems
173Driving and parking Z
Page 181 of 357
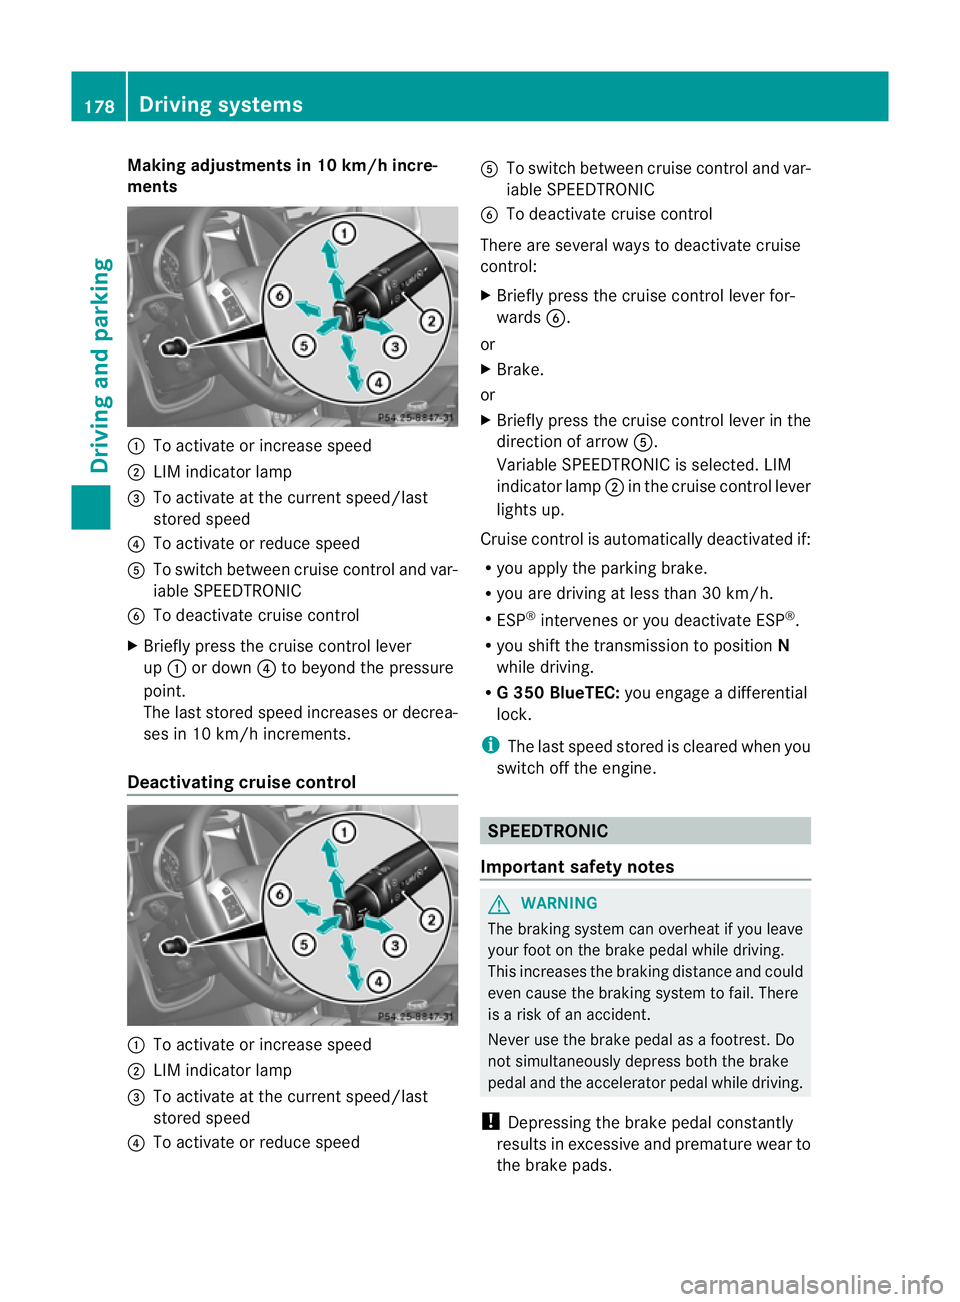
Making adjustments in 10 km/h incre-
ments
:
To activate or increase speed
; LIM indicator lamp
= To activate at the current speed/last
stored speed
? To activate or reduce speed
A To switch between cruise control and var-
iable SPEEDTRONIC
B To deactivate cruise control
X Briefly press the cruise control lever
up : or down ?to beyond the pressure
point.
The lasts tored speed increases or decrea-
ses in 10 km/h increments.
Deactivating cruise control :
To activate or increase speed
; LIM indicator lamp
= To activate at the current speed/last
stored speed
? To activate or reduce speed A
To switch between cruise control and var-
iable SPEEDTRONIC
B To deactivate cruise control
There are several ways to deactivate cruise
control:
X Briefly press the cruise control lever for-
wards B.
or
X Brake.
or
X Briefly press the cruise control lever in the
directio nofarrowA.
Variable SPEEDTRONIC is selected. LIM
indicator lamp ;in the cruise control lever
lights up.
Cruise control is automatically deactivated if:
R you apply the parking brake.
R you are driving at less than 30 km/h.
R ESP ®
intervenes or you deactivate ESP ®
.
R you shift the transmission to position N
while driving.
R G3 50 BlueTEC: you engage a differential
lock.
i The last speed stored is cleared when you
switch off the engine. SPEEDTRONIC
Important safety notes G
WARNING
The braking system can overheat if you leave
your foot on the brake pedal while driving.
This increases the braking distance and could
even cause the braking system to fail. There
is a risk of an accident.
Never use the brake pedal as a footrest .Do
not simultaneously depress both the brake
pedal and the accelerato rpedal while driving.
! Depressing the brake pedal constantly
results in excessive and premature wear to
the brake pads. 178
Driving systemsDriving and parking
Page 182 of 357
If you fail to adapt yourd
riving style, SPEED-
TRONIC can neither reduce the risk of acci-
dent nor override the laws of physics. SPEED-
TRONIC cannot take account of road, weather
and traffic conditions. SPEEDTRONIC is only
an aid.Y ou are responsible for the distance
to the vehicle in front, for vehicle speed, for
braking in good time and for staying in lane.
Only engage SPEEDTRONIC when the current
road, weather and traffic conditions permit it
to be done safely. Drive carefully and main-
tain a suitable distance to the vehicle in front.
General notes SPEEDTRONIC brakes automatically so that
you do not exceed the set speed. On long and
steep downhill gradients, especially if the
vehicle is laden or towing a trailer, you must
select shift range 1,2or 3in good time. By
doing so, you will make use of the braking
effect of the engine. This relieves the load on
the brake system and prevents the brakes
from overheating and wearing too quickly. If
you need additional braking, depress the
brake pedal repeatedly rather than continu-
ously.
i The speed indicated in the speedometer
may differ slightly from the limit speed
stored.
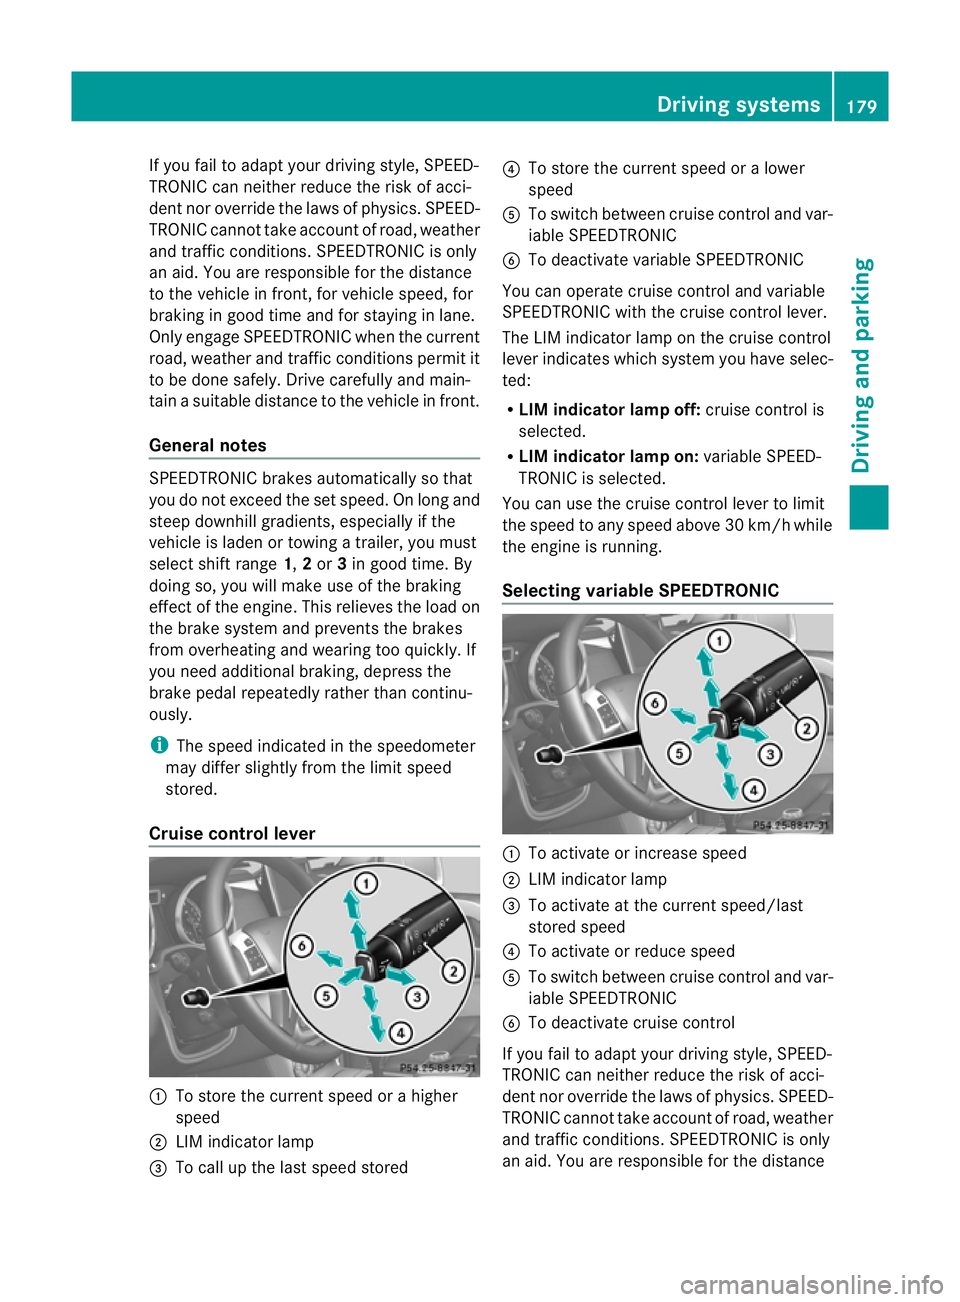
Cruise control lever :
To store the current speed or a higher
speed
; LIM indicator lamp
= To call up the last speed stored ?
To store the current speed or a lower
speed
A To switch between cruise control and var-
iable SPEEDTRONIC
B To deactivate variable SPEEDTRONIC
You can operate cruise control and variable
SPEEDTRONIC with the cruise control lever.
The LIM indicator lamp on the cruise control
lever indicates which system you have selec-
ted:
R LIM indicator lamp off: cruise control is
selected.
R LIM indicator lamp on: variable SPEED-
TRONIC is selected.
You can use the cruise control lever to limit
the speed to any speed above 30 km/hw hile
the engine is running.
Selecting variable SPEEDTRONIC :
To activate or increase speed
; LIM indicator lamp
= To activate at the current speed/last
stored speed
? To activate or reduce speed
A To switch between cruise control and var-
iable SPEEDTRONIC
B To deactivate cruise control
If you fail to adapt your driving style, SPEED-
TRONIC can neither reduce the risk of acci-
dent nor override the laws of physics. SPEED-
TRONIC cannot take account of road, weather
and traffic conditions. SPEEDTRONIC is only
an aid. You are responsible for the distance Driving systems
179Driving and parking Z
Page 183 of 357
to the vehicle in front, for vehicle speed, for
braking in good time and for staying in lane.
Only engage SPEEDTRONIC when the current
road, weather and traffi
cconditions permit it
to be done safely. Drive carefully and main-
tain a suitable distance to the vehicle in front.
X Check whether LIM indicator lamp ;is on.
If it is on, variable SPEEDTRONIC is already
selected.
If it is not, press the cruise control lever in
the direction of arrow A.
LIM indicator lamp ;in the cruise control
lever lights up. Variable SPEEDTRONIC is
selected.
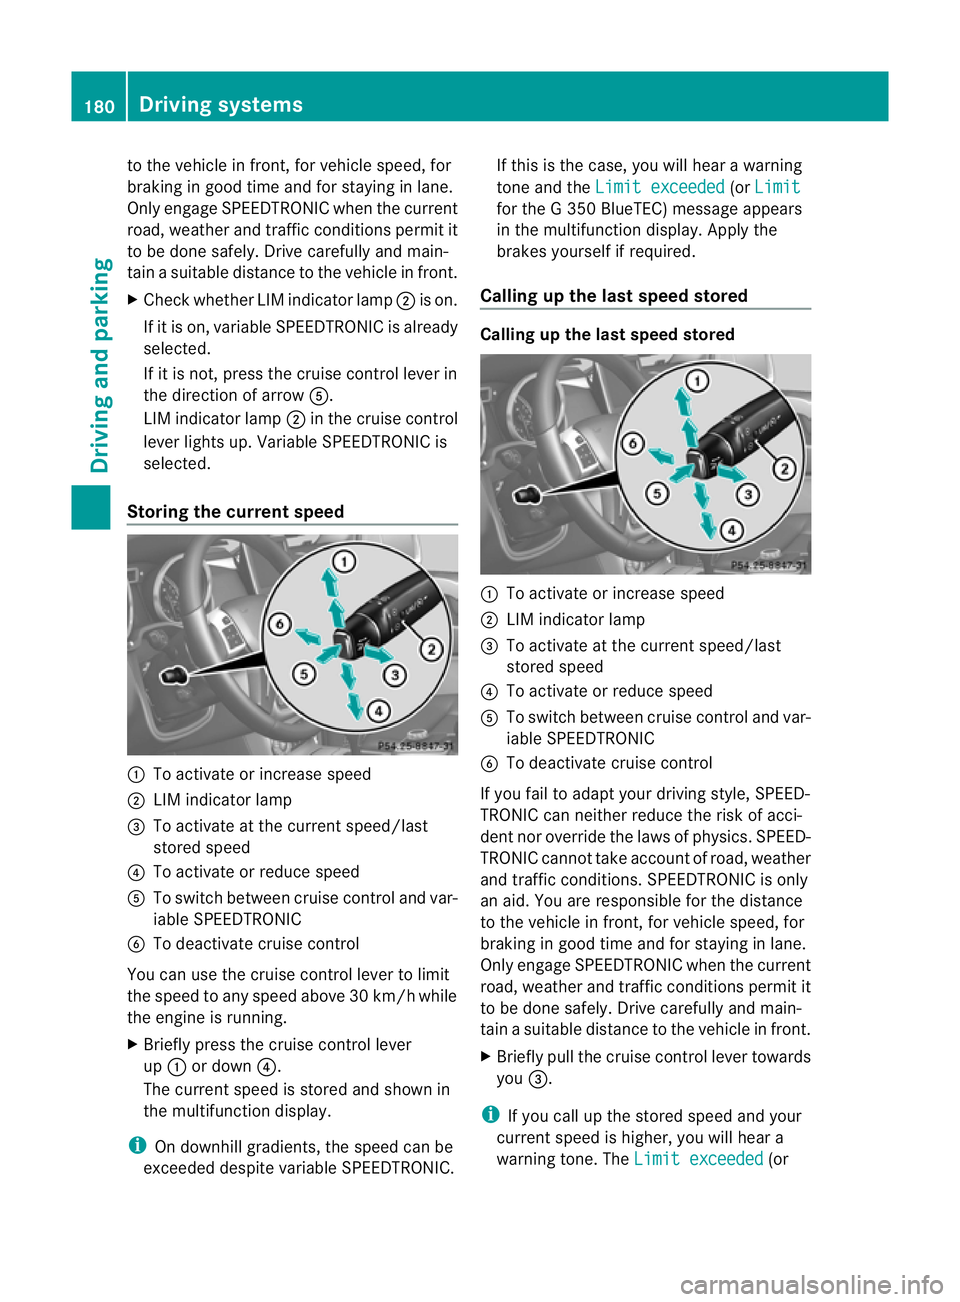
Storing the current speed :
To activate or increase speed
; LIM indicator lamp
= To activate at the current speed/last
stored speed
? To activate or reduce speed
A To switch between cruise control and var-
iable SPEEDTRONIC
B To deactivate cruise control
You can use the cruise control lever to limit
the speed to any speed above 30 km/hw hile
the engine is running.
X Briefly press the cruise control lever
up : or down ?.
The current speed is stored and shown in
the multifunction display.
i On downhill gradients, the speed can be
exceeded despite variable SPEEDTRONIC. If this is the case, you will hear a warning
tone and the
Limit exceeded (or
Limit for the G 350 BlueTEC) message appears
in the multifunction display. Apply the
brakes yourself if required.
Calling up the last speed stored Calling up the last speed stored
:
To activate or increase speed
; LIM indicator lamp
= To activate at the current speed/last
stored speed
? To activate or reduce speed
A To switch between cruise control and var-
iable SPEEDTRONIC
B To deactivate cruise control
If you fail to adapt your driving style, SPEED-
TRONIC can neither reduce the risk of acci-
dent nor override the laws of physics. SPEED-
TRONIC cannot take account of road, weather
and traffic conditions. SPEEDTRONIC is only
an aid. You are responsible for the distance
to the vehicle in front, for vehicle speed, for
braking in good time and for staying in lane.
Only engage SPEEDTRONIC when the current
road, weather and traffic conditions permit it
to be done safely. Drive carefully and main-
tain a suitable distance to the vehicle in front.
X Briefly pull the cruise control lever towards
you =.
i If you call up the stored speed and your
current speed is higher, you will hear a
warning tone. The Limit exceeded (or180
Driving systemsDriving and parking
Page 186 of 357

be warned visually and acoustically. DIS-
TRONIC PLUS cannot preven tacollision with-
out your intervention. An intermittent warn-
ing tone will then sound and the distance
warning lamp will light up in the instrument
cluster. Brake immediately in order to
increase the distance from the vehicle in
front, or take evasive action, provided it is
safe to do so.
DISTRONIC PLUS may not detect narrow
vehicles driving in front, e.g. motorcycles, or
vehicles driving on a different line. Therefore,
always pay attention to traffic conditions
even when DISTRONIC PLUS is activated.
Otherwise, you may fail to recognise dangers
in time, cause an accident and injure yourself
and others.
If DISTRONIC PLUS is activated, the vehicle
brakes automatically in certain situations.
This can happe nunexpectedly, especially
when towing or in a car wash. There is a risk
of an accident. In these or similar situations,
deactivate DISTRONIC PLUS.
If you want DISTRONIC PLUS to assist you,
the following activatio nconditions must be
fulfilled (Y page 184) and the radar sensor
system must be operational.
General notes DISTRONIC PLUS regulates the speed and
automatically helps you maintain the dis-
tance to the vehicle detected in front. DIS-
TRONIC PLUS brakes automatically so that
the set speed is not exceeded.
On long and steep downhill gradients, espe-
cially if the vehicle is laden or towing a trailer,
you must select shift range 1,2or 3in good
time. By doing so, you will make use of the
braking effect of the engine. This relieves the
load on the brake system and prevents the
brakes from overheating and wearing too
quickly.
If DISTRONIC PLUS detects a slower-moving
vehicle in front, your vehicle is braked in order
to maintain the preset distance to the vehicle
in front. If there is no vehicle in front, DISTRONIC
PLUS operates in the same way as cruise
control in the speed range between
30 km/ha
nd 200 km/h. If avehicle is driving
in front of you, DISTRONIC operates in the
speed range between 0km/h and
200 km/h.
Do not use DISTRONIC PLUS on roads with
steep gradients.
Cruise control lever :
To activate or increase speed
; To set the specified minimu mdistance
= LIM indicator lamp
? To activate at the current speed/last
stored speed
A To activate or reduce speed
B To switch between DISTRONIC PLUS and
variable SPEEDTRONIC
C To deactivate DISTRONIC PLUS
With the cruise control lever, you can operate
DISTRONIC PLUS and variable SPEED-
TRONIC.
X To switch between variable SPEED-
TRONIC and DISTRONIC PLUS: press the Driving systems
183Driving and parking Z
Page 189 of 357
R
you switch on the respective tur nsignals.
R DISTRONIC PLUS does not detect a danger
of collision.
If these conditions are met, your vehicle is
accelerated. Acceleration will be interrupted
if changing lanes takes too long or if the dis-
tance between your vehicle and the vehicle in
front becomes too small.
i When changing lanes, DISTRONIC PLUS
monitors the left lane for left-hand-drive
vehicles and the right lane for right-hand-
drive vehicles.
Stopping G
WARNING
When leaving the vehicle, even if it is braked
only by DISTRONIC PLUS, it could roll away if:
R there is a malfunction in the system or in
the voltage supply.
R DISTRONIC PLUS has been deactivated
with the cruise control lever, e.g. by a vehi-
cle occupant or fro moutside the vehicle.
R the electrical system in the engine com-
partment, the battery or the fuses have
been tampered with.
R the battery is disconnected.
R the accelerato rpedal has been depressed,
e.g. by a vehicle occupant.
There is a risk of an accident.
If you wish to exit the vehicle, always turn off
DISTRONIC PLUS and secure the vehicle
against rolling away.
If DISTRONIC PLUS detects that the vehicle
in fron tis stopping, it brakes your vehicle until
it is stationary.
Once your vehicle is stationary, it remains
stationary and you do not need to depress the
brake.
i Depending on the specified minimum dis-
tance, your vehicle will come to a standstill
at a sufficient distance behind the vehicle
in front.T he specified minimum distance is
set using the control on the cruise control
lever. On steep uphill or downhill gradients or if
there is a malfunction, the transmission may
also be automatically shifted into position
P.
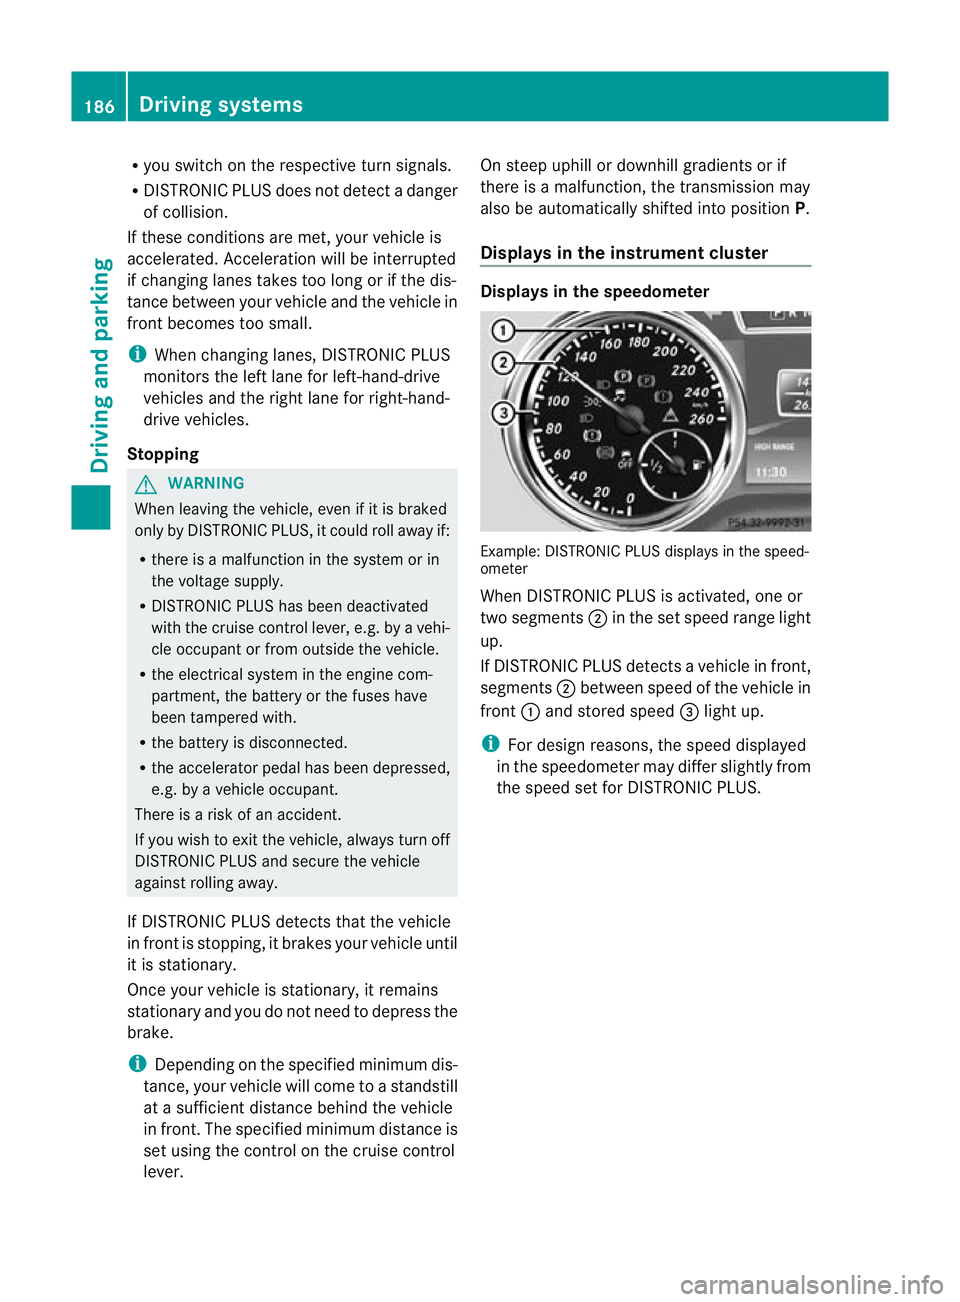
Displays in the instrument cluster Displays in the speedometer
Example: DISTRONIC PLUS displays in the speed-
ometer
When DISTRONIC PLUS is activated, one or
two segments
;in the set speed range light
up.
If DISTRONIC PLUS detectsav ehicle in front,
segments ;between speed of the vehicle in
front :and stored speed =light up.
i For design reasons, the speed displayed
in the speedometer may differ slightly from
the speed set for DISTRONIC PLUS. 186
Driving systemsDriving and parking