2012 MERCEDES-BENZ G-CLASS SUV brake light
[x] Cancel search: brake lightPage 113 of 357
The hazard warning lamps automatically
switch on if:
R
an airbag is deployed
R the seat belt tensioners are triggered, or
R the vehicle decelerates rapidly from a
speed of more than 70 km/ha nd comes to
a standstill.
The hazard warning lamp switches on auto-
matically if an airbag or the belt tensioners
are triggered and the key is in position 1in
the ignition lock.
The hazard warning lamps switch off auto-
matically if the vehicle reaches a speed of
over 10 km/h again after a full brake appli-
cation.
i The hazard warning lamps still operate if
the ignition is switched off. Cornering light function
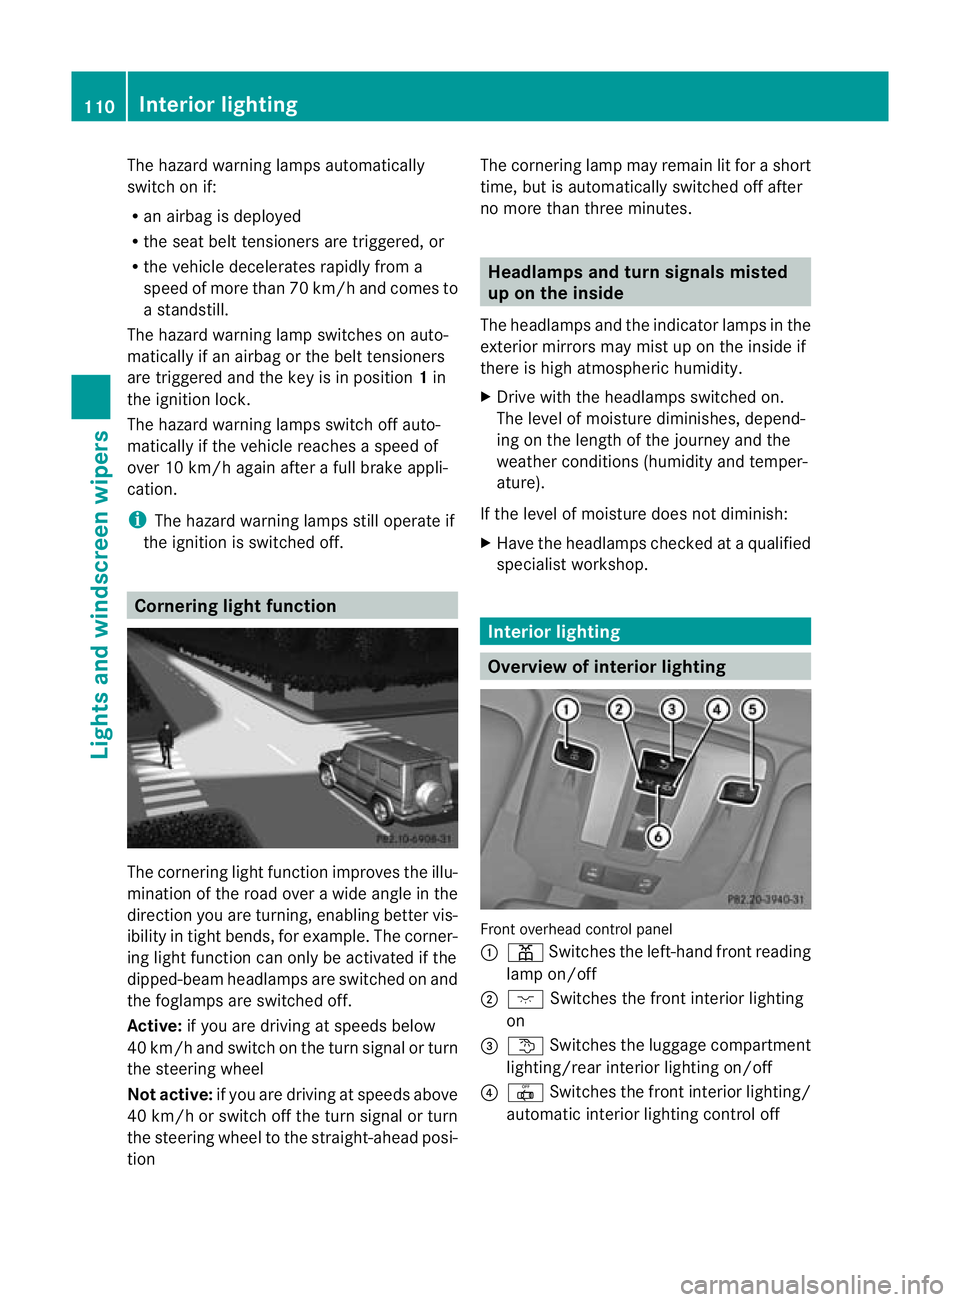
The cornering light functio
nimproves the illu-
mination of the road over a wide angle in the
directio nyou are turning, enabling better vis-
ibility in tight bends, for example. The corner-
ing light function can only be activated if the
dipped-beam headlamps are switched on and
the foglamps are switched off.
Active: if you are driving at speeds below
40 km/ha nd switch on the tur nsignal or turn
the steering wheel
Not active: if you are driving at speeds above
40 km/h or switch off the turn signal or turn
the steering wheel to the straight-ahead posi-
tion The cornering lamp may remain lit for a short
time, but is automatically switched off after
no more than three minutes. Headlamps and turn signals misted
up on the inside
The headlamps and the indicator lamps in the
exterior mirrors may mist up on the inside if
there is high atmospheric humidity.
X Drive with the headlamps switched on.
The level of moisture diminishes, depend-
ing on the length of the journey and the
weathe rconditions (humidity and temper-
ature).
If the level of moisture does not diminish:
X Have the headlamps checked at a qualified
specialist workshop. Interior lighting
Overview of interior lighting
Front overhead control panel
:
p Switches the left-hand front reading
lamp on/off
; c Switches the front interior lighting
on
= t Switches the luggage compartment
lighting/rear interior lighting on/off
? | Switches the front interior lighting/
automatic interior lighting control off 110
Interior lightingLights and windscreen wipers
Page 118 of 357
Before changing bulbs
Have the following bulbs changed at a quali-
fied specialist workshop:
R
additional turn signals in the exterio rmir-
rors
R third brake lamp
R main-beam/dipped-beam headlamps
(xenon bulbs)
R daytime driving lights
R licence plate lamp
i Individual segments of the licence plate
lamp LEDs may fail without a display mes-
sage appearing in the multifunction dis-
play. Regularly chec kthe licence plate
lighting. If necessary, visit a qualified spe-
cialist workshop.
You can replace the following bulbs:
R side lamps/parking lamps
R foglamp/cornering lamp with foglamp
function
R turn signal lamp (front)
R brake/tail lamp
R turn signal lamp (rear)
R tail lamp/parking lamp
R reversing lamp
R rear foglamp Overview of bulb replacement
–bulbs
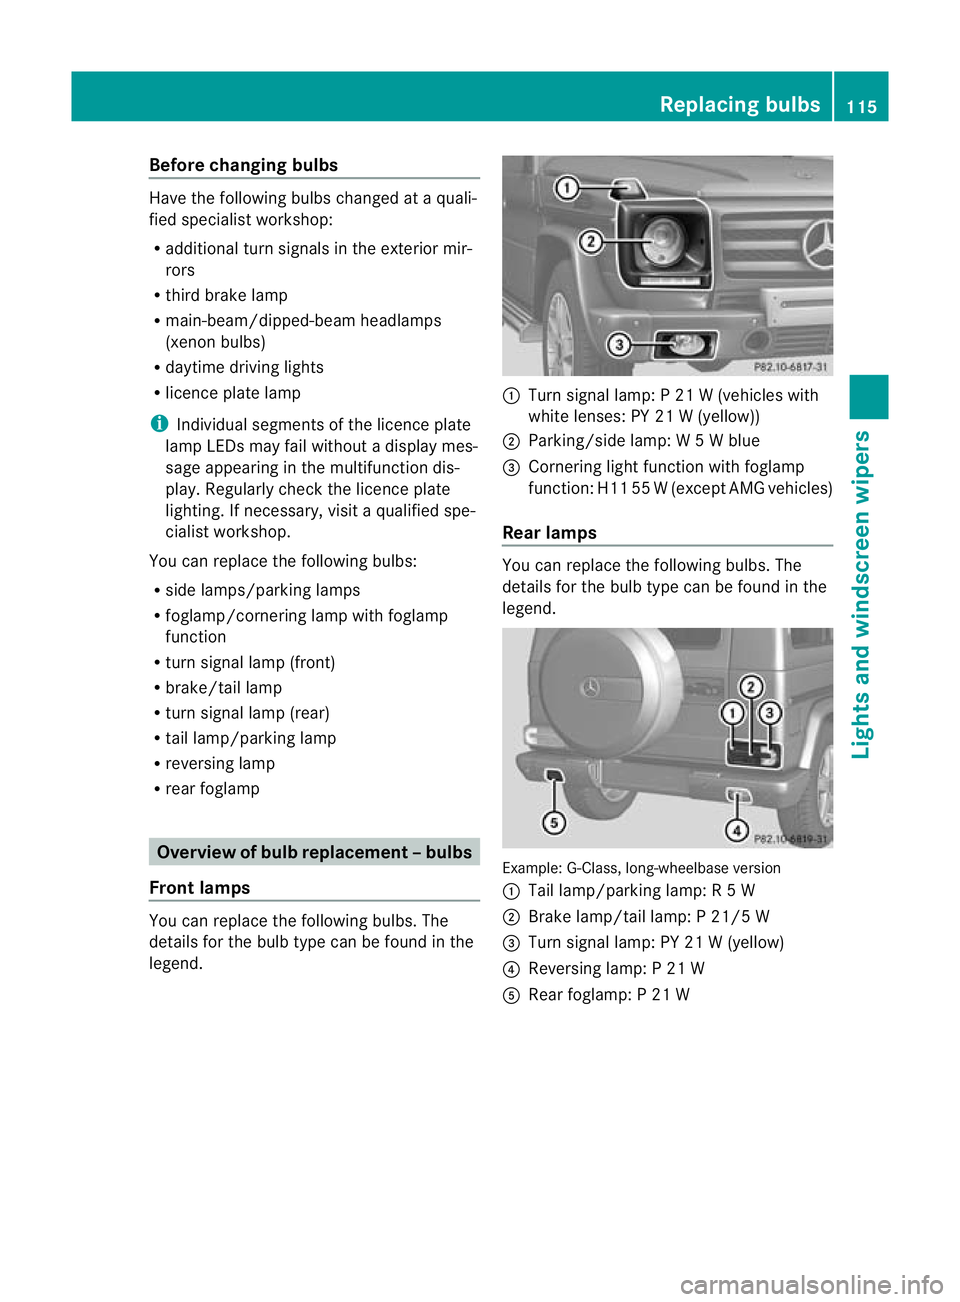
Front lamps You can replace the following bulbs. The
details for the bulb type can be found in the
legend. :
Turn signal lamp: P 21 W (vehicles with
white lenses: PY 21 W (yellow))
; Parking/side lamp: W 5Wblue
= Cornering light function with foglamp
function: H11 55 W(except AMG vehicles)
Rear lamps You can replace the following bulbs. The
details for the bulb type can be found in the
legend.
Example: G-Class, long-wheelbase version
:
Tail lamp/parking lamp: R 5W
; Brake lamp/tail lamp: P 21/5 W
= Turn signal lamp: PY 21 W (yellow)
? Reversing lamp: P 21 W
A Rear foglamp: P 21 W Replacing bulbs
115Lights and windscreen wipers Z
Page 121 of 357
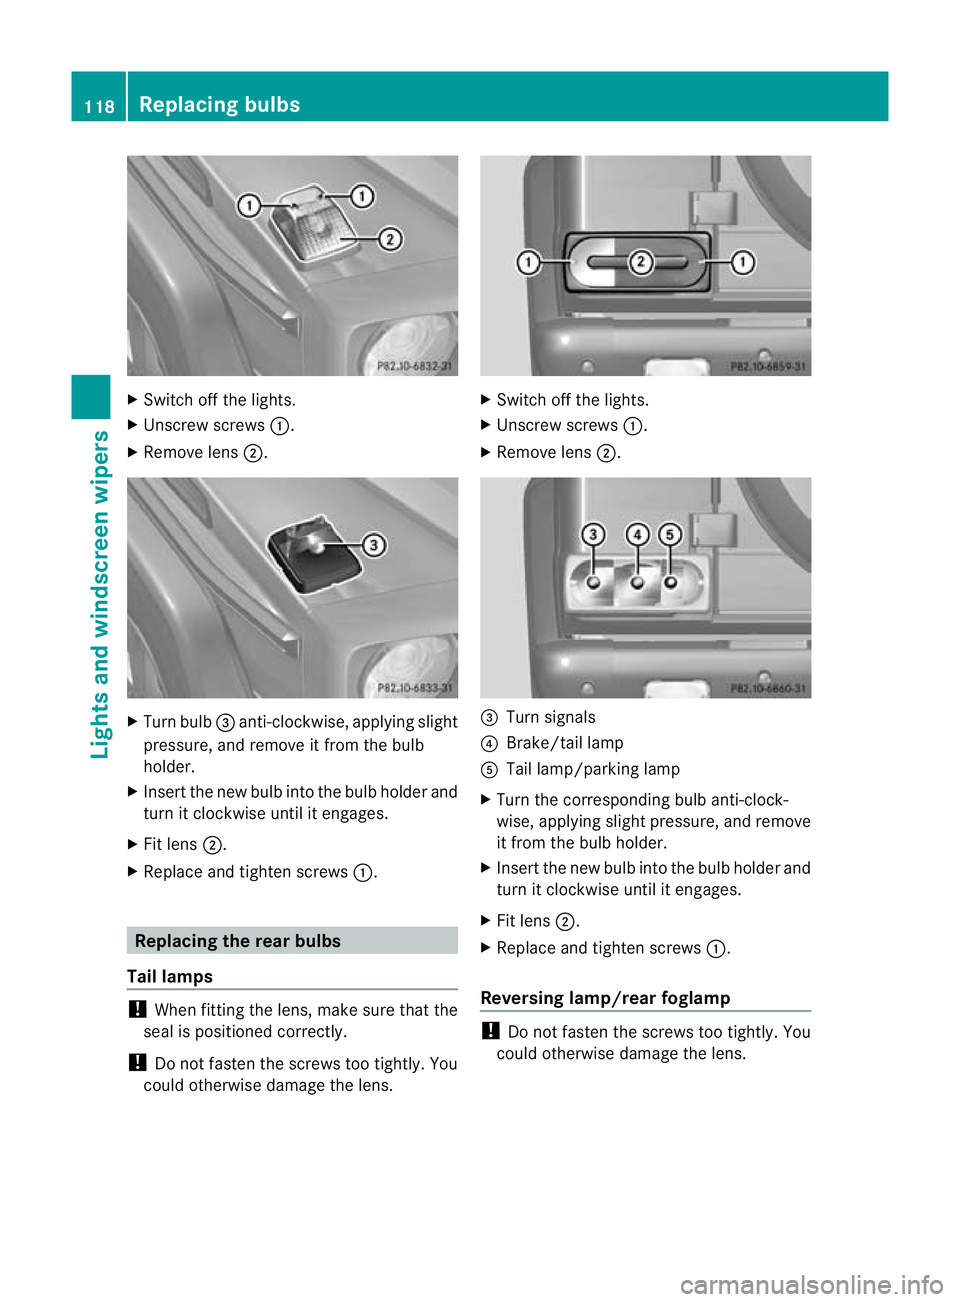
X
Switch off the lights.
X Unscrew screws :.
X Remove lens ;. X
Turn bulb =anti-clockwise, applying slight
pressure, and remove it from the bulb
holder.
X Insert the new bulb into the bulb holde rand
tur nitc lockwise until it engages.
X Fit lens ;.
X Replace and tighten screws :.Replacing the rear bulbs
Tail lamps !
When fitting the lens, make sure that the
seal is positioned correctly.
! Do not fasten the screws too tightly. You
could otherwise damage the lens. X
Switch off the lights.
X Unscrew screws :.
X Remove lens ;. =
Turn signals
? Brake/tail lamp
A Tail lamp/parking lamp
X Turn the corresponding bulb anti-clock-
wise, applying slight pressure, and remove
it fro mthe bulb holder.
X Insert the new bulb into the bulb holder and
turn it clockwise until it engages.
X Fit lens ;.
X Replace and tighten screws :.
Reversing lamp/rear foglamp !
Do not fasten the screws too tightly. You
could otherwise damage the lens. 118
Replacing bulbsLights and windscreen wipers
Page 146 of 357
G
WARNING
Unsuitable footwea rcan hinder correc tusage
of the pedals, e.g.:
R shoes with thick soles
R shoes with high heels
R slippers
There is a risk of an accident.
Wear suitable footwear to ensure correct
usage of the pedals. G
WARNING
If you switch off the ignition while driving,
safety-relevant functions are only available
with limitations, or not at all. This could affect,
for example, the power steering and the brake
boosting effect. You will require considerably
more effort to steer and brake. There is a risk
of an accident.
Do not switch off the ignition while driving. G
WARNING
If the parking brake has not been fully
released when driving, the parking brake can:
R overheat and cause a fire
R lose its hold function.
There is a risk of fire and an accident. Release
the parking brake fully before driving off.
! Warm up the engine quickly. Do not use
the engine's full performance until it has
reached operating temperature.
Only set the automatic transmission to the
respective drive positions when the vehicle
is stationary.
Where possible, avoid spinning the drive
wheels when pulling away on slippery
roads. Otherwise, you could damage the
drive train.
! Avoid high engine speeds when the
engine is cold. The engine's service life
could otherwise be significantly shortened.
Do not use the engine's full performance
until it has reached operating temperature. !
AMG vehicles: at low engine oil temper-
atures (below +20 †), the maximum
engine speed is restricted in order to pro-
tect the engine. To protect the engine and
maintain smooth engine operation, avoid
driving at full throttle when the engine is
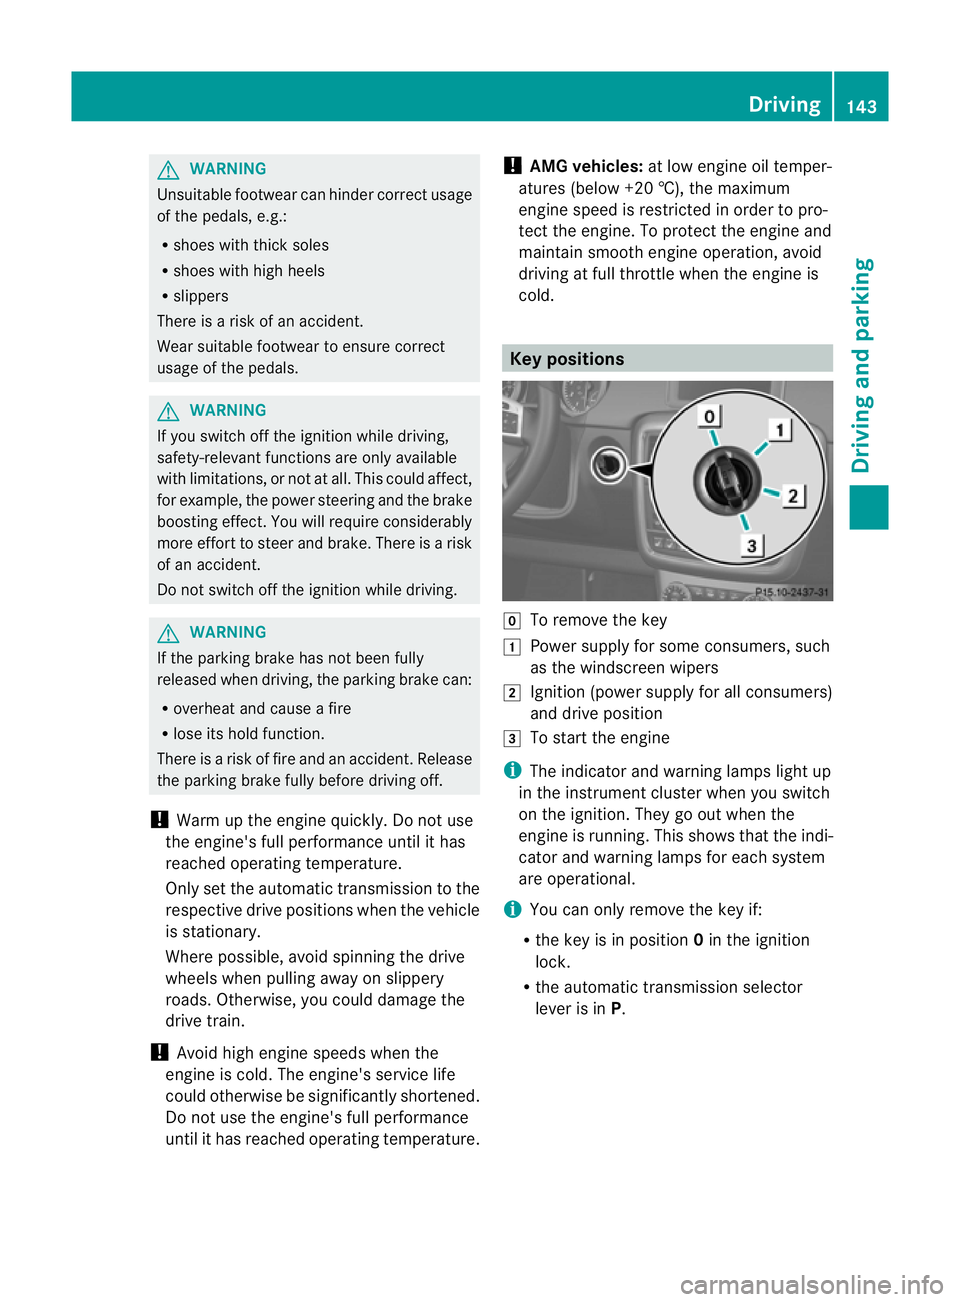
cold. Key positions
g
To remove the key
1 Power supply for some consumers, such
as the windscreen wipers
2 Ignition (power supply for all consumers)
and drive position
3 To start the engine
i The indicator and warning lamps light up
in the instrument cluster when you switch
on the ignition. They go out when the
engine is running. This shows that the indi-
cator and warning lamps for each system
are operational.
i You can only remove the key if:
R the key is in position 0in the ignition
lock.
R the automatic transmission selector
lever is in P. Driving
143Driving and parking Z
Page 147 of 357
Starting the engine
Important safety notes G
WARNING
Combustion engines emit poisonous exhaust
gases such as carbon monoxide. Inhaling
these exhaust gases leads to poisoning. There
is a risk of fatal injury. Therefore never leave
the engine running in enclosed spaces with-
out sufficient ventilation.
! Do not depress the accelerator pedal
when starting the engine.
Starting procedure X
Shift the automatic transmission to posi-
tion P.
The transmission position display in the
multifunction display shows P.
i You can also start the engine when the
automatic transmission is in position N.
i For further information about the auto-
matic transmission, see (Y page 149).
i If you depress the brake when starting the
engine, pedal travel is unusually long and
there is less pedal resistance.
X Make sure that the parking brake is
applied.
X To start a petrol engine: turn the key to
position 3in the ignition lock
(Y page 143) and release it as soon as the
engine is running.
X To startad iesel engine: turn the key to
position 2in the ignition lock
(Y page 143).
The % preglow indicator lamp in the
instrumen tcluster lights up.
X When the %preglow indicator lamp
goes out, tur nthe key to position
3(Y page 143)and release it as soon as the
engine is running.
i You can start the engine without preglow
if the engine is warm. i
You can also use the touch-start function.
To do this, turn the key to position 3
(Y page 143) and release it immediately.
The engine then starts automatically. Pulling away
Automatic transmission G
WARNING
If the engine speed is above the idling speed
and you engage transmission position Dor
R, the vehicle could pull away suddenly. There
is a risk of an accident.
When engaging transmission position Dor R,
always firmly depress the brake pedal and do
not simultaneously accelerate.
! Only shift the automatic transmission to
reverse gear Ror park position Pwhen the
vehicle is stationary. Otherwise, the auto-
matic transmission could be damaged.
! If a warning tone sounds and the
Release park. brake message appears
in the multifunction display, the parking
brake is still applied. Release the parking
brake.
X Depress the brake pedal and keep it
depressed.
X Shift the automatic transmission to posi-
tion Dor R.
i Before driving off, wait until the gear
change is fully completed.
X Release the parking brake (Y page 164).
X Release the brake pedal.
X Carefully depress the accelerator pedal.
i It is only possible to shift the automatic
transmission from position Pto a different
position if you depress the brake pedal.
Only then is the selector lever lock
released.
i The vehicle locks centrally once you have
pulled away.T he locking knobs in the doors
drop down. 144
DrivingDriving and parking
Page 149 of 357

If the ECO start/stop function has been man-
ually deactivated (Y
page 146) or if a mal-
function has caused the system to be deac-
tivated, the ¤symbol is not displayed.
The Stop/Start active or
Stop/Start inactive message in the AMG menu in the
multifunction display goes out.
Activating/deactivating the ECO start/
stop function ECO button
X
To switch off: in drive program C, press
button :.
or
X Switch to drive program Sor M
(Y page 152).
Indicator lamp ;on button :and the
¤ symbol in the multifunction display go
out.
The Stop/Start active or
Stop/Start inactive message in the AMG menu in the
multifunction display goes out.
X To switch on: press button:.
Indicator lamp ;lights up. If drive pro-
gram Sor Mis active, the automatic trans-
missio nswitches to drive program C.
If all conditions for automatic engine
switch-off (Y page 146) are fulfilled, the
¤ symbol is shown in gree ninthe mul-
tifunction display. In addition, the Stop/Start active message is shown in the
AMG menu in the multifunction display.
If not all conditions for automatic engine
switch-off (Y page 146) are fulfilled, the ¤
symbol is not shown. If this is the
case, the ECO start/stop function is not
available. In addition, the Stop/Start inactive message is shown in the AMG
menu in the multifunction display.
i If indicator lamp ;is off, the ECO start/
stop function has been deactivated man-
ually or as the result of a malfunction. The
engine will then not be switched off auto-
matically when the vehicle stops.
i The stop/start function is automatically
activated each time you start the engine
with the ignition key.
Automatic engine switch-off If the vehicle is braked to a standstill in trans-
mission position
Dor N, the ECO start/stop
function switches off the engine automati-
cally.
The ECO start/stop function is operational
and the ¤symbol is displayed in green in
the multifunction display if:
R the indicator lamp in the ECO button is lit
green
R none of the off-road programs are selected
R the vehicle is stationary
R the outside temperature is within the com-
fort range
R the engine is at normal operating temper-
ature
R the set temperature for the vehicle interior
has been reached
R the battery is sufficiently charged
R the system detects that the windscreen is
not misted up when the air-conditioning
system is switched on
R the bonnet is closed
R the driver's door is closed and the driver's
seat belt is fastened
If not all conditions for automatic engine
switch-off are fulfilled, the ¤symbol is
shown in yellow. 146
DrivingDriving and parking
Page 167 of 357
boosting effect. You will require considerably
more effor
tto steer and brake. There is a risk
of an accident.
Do not switch off the ignition while driving.
Vehicles with automatic transmission X
Shift the transmission to position P.
X Turn the key to position 0in the ignition
lock (Y page 143) and remove it.
The immobiliser is activated.
X Apply the parking brake firmly.
X Turn the steering wheel until the steering
wheel lock engages.
i If you switch the engine off with the trans-
mission in position Ror D, the automatic
transmission shifts to Nautomatically.
If you then open one of the front doors or
remove the key from the ignition, the auto-
matic transmission shifts to P.
If you shift the automatic transmission to
N before switching off the engine, the auto-
matic transmission remains in Neven if a
door is opened.
i The key can only be removed if the auto-
matic transmission is in position P.Parking brake
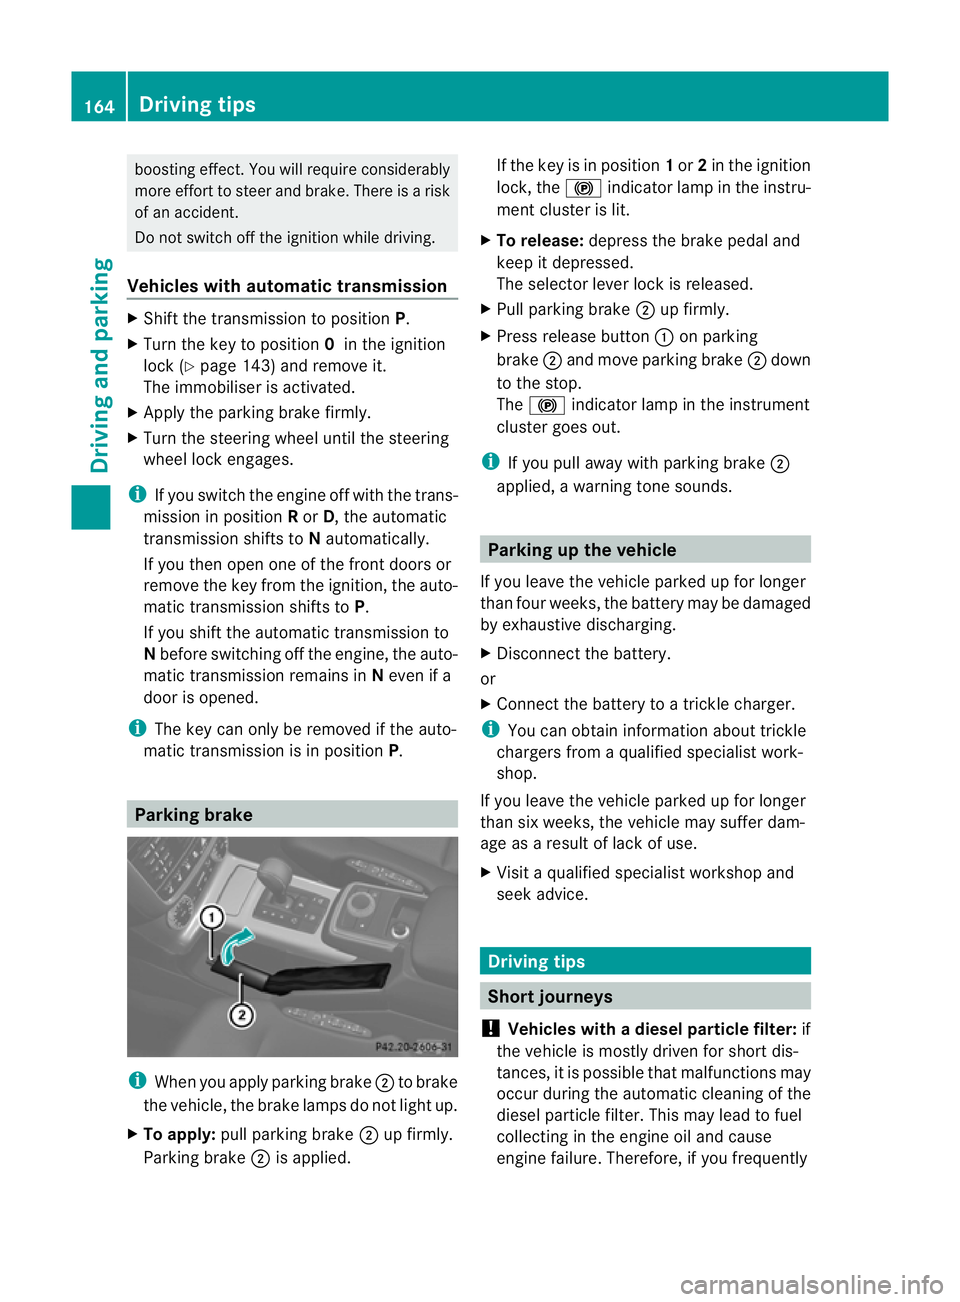
i
When you apply parking brake ;to brake
the vehicle, the brake lamps do not light up.
X To apply: pull parking brake ;up firmly.
Parking brake ;is applied. If the key is in position
1or 2in the ignition
lock, the !indicator lamp in the instru-
ment cluster is lit.
X To release: depress the brake pedal and
keep it depressed.
The selector lever lock is released.
X Pull parking brake ;up firmly.
X Press release button :on parking
brake ;and move parking brake ;down
to the stop.
The ! indicator lamp in the instrument
cluster goes out.
i If you pull away with parking brake ;
applied, a warning tone sounds. Parking up the vehicle
If you leave the vehicle parked up for longer
than four weeks, the battery may be damaged
by exhaustive discharging.
X Disconnect the battery.
or
X Connect the battery to a trickle charger.
i You can obtain information about trickle
chargers from a qualified specialist work-
shop.
If you leave the vehicle parked up for longer
than six weeks, the vehicle may suffer dam-
age as a result of lack of use.
X Visit a qualified specialist workshop and
seek advice. Driving tips
Short journeys
! Vehicles with adiesel particle filter: if
the vehicle is mostly driven for short dis-
tances, it is possible that malfunctions may
occur during the automatic cleaning of the
diesel particle filter. This may lead to fuel
collecting in the engine oil and cause
engine failure. Therefore, if you frequently 164
Driving tipsDriving and parking
Page 168 of 357
drive short distances, you should take a 20
minute trip on a motorway or rural road at
least every 500km. Brakes
Important safety notes G
WARNING
If you shift down on a slippery road surface in
an attempt to increase the engine's braking
effect, the drive wheels could lose their grip.
This increases the risk of skidding and having
an accident.
Do not shift down for additional engine brak-
ing on a slippery road surface.
Downhill gradients On long and steep downhill gradients, espe-
cially if the vehicle is laden or towing a trailer,
you must select shift range
1,2or 3
(Y page 153) in good time.
i This also applies if you have activated
cruise control or SPEEDTRONIC.
This will use the braking effec tofthe engine,
so less braking will be required to prevent the
vehicle from gaining speed. This relieves the
load on the brake system and prevents the
brakes from overheating and wearing too
quickly. If you need additional braking,
depress the brake pedal repeatedly rather
than continuously.
Heavy and light loads G
WARNING
The braking system can overheat if you leave
your foot on the brake pedal while driving.
This increases the braking distance and could
even cause the braking system to fail. There
is a risk of an accident.
Never use the brake pedal as a footrest.Do
not simultaneously depress both the brake
pedal and the accelerato rpedal while driving. If the brakes have been subjected to a heavy
load, do not stop the vehicle immediately, but
drive on for a short while. This allows the air-
flow to cool the brakes more quickly.
If the brakes have been used only moderately,
you should occasionally test their effective-
ness. To do this, brake more firmly from a
higher speed. This improves the grip of the
brakes.
Wet road surfaces
If driving in heavy rain for a prolonged period
of time without braking, there may be a
delayed reaction from the brakes when brak-
ing for the first time. This may also occur after
the vehicle has been washed.
You have to depress the brake pedal more
firmly. Maintain a greater distance from the
vehicle in front.
After driving on a wet road or having the vehi-
cle washed, brake firmly while paying atten-
tion to the traffic conditions .This will warm
up the brake discs, thereby drying them more
quickly and protecting them against corro-
sion.
Limited braking performance on salt-
treated roads If you drive on salt-treated roads, a layer of
salt may form on the brake discs and pads.
This can increase the braking distance con-
siderably.
R
Apply the brakes occasionally in order to
prevent any salt build-up. Ensure that you
do not endanger other road users when
doing so.
R Carefully depress the brake pedal at the
end of the journey and when starting the
next journey.
R Maintain a much greater distance to the
vehicle in front. Driving tips
165Driving and parking Z