2012 MERCEDES-BENZ G-CLASS SUV turn signal
[x] Cancel search: turn signalPage 111 of 357
BN
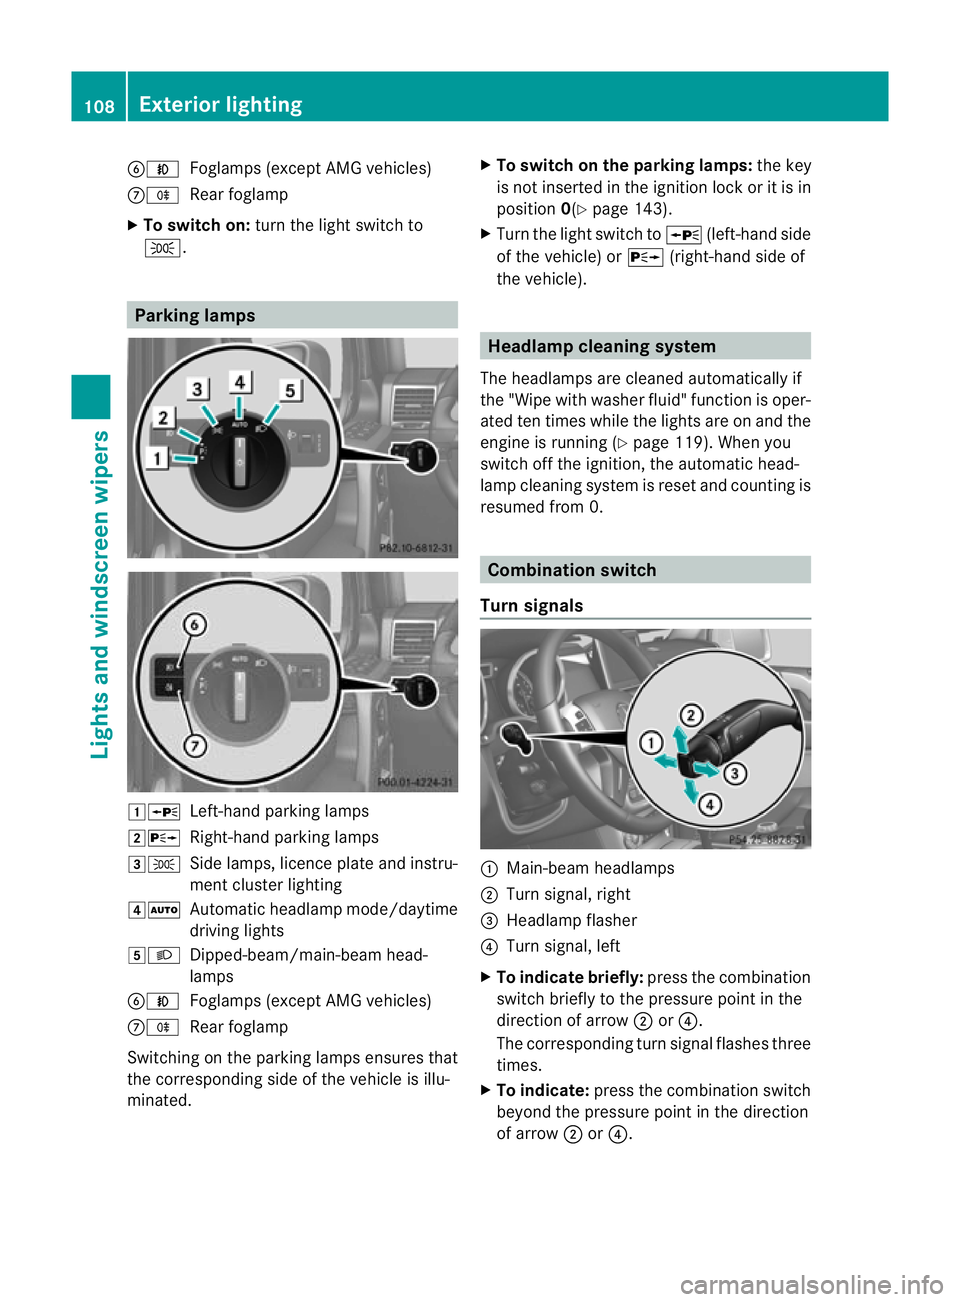
Foglamps (except AMG vehicles)
CR Rear foglamp
X To switc hon:turn the light switch to
T. Parking lamps
1W
Left-hand parking lamps
2X Right-hand parking lamps
3T Side lamps, licence plate and instru-
ment cluster lighting
4Ã Automatic headlamp mode/daytime
driving lights
5L Dipped-beam/main-beam head-
lamps
BN Foglamps (except AMG vehicles)
CR Rear foglamp
Switching on the parking lamps ensures that
the corresponding side of the vehicle is illu-
minated. X
To switch on the parking lamps: the key
is not inserted in the ignition lock or it is in
position 0(Ypage 143).
X Turn the light switch to W(left-hand side
of the vehicle) or X(right-hand side of
the vehicle). Headlamp cleaning system
The headlamps are cleaned automatically if
the "Wipe with washer fluid" function is oper-
ated ten times while the lights are on and the
engine is running (Y page 119). When you
switch off the ignition, the automatic head-
lamp cleaning system is reset and counting is
resumed from 0. Combination switch
Turn signals :
Main-beam headlamps
; Turn signal, right
= Headlamp flasher
? Turn signal, left
X To indicate briefly: press the combination
switch briefly to the pressure point in the
direction of arrow ;or?.
The corresponding turn signal flashes three
times.
X To indicate: press the combination switch
beyond the pressure point in the direction
of arrow ;or?. 108
Exterior lightingLights and windscreen wipers
Page 112 of 357
Main-beam headlamps
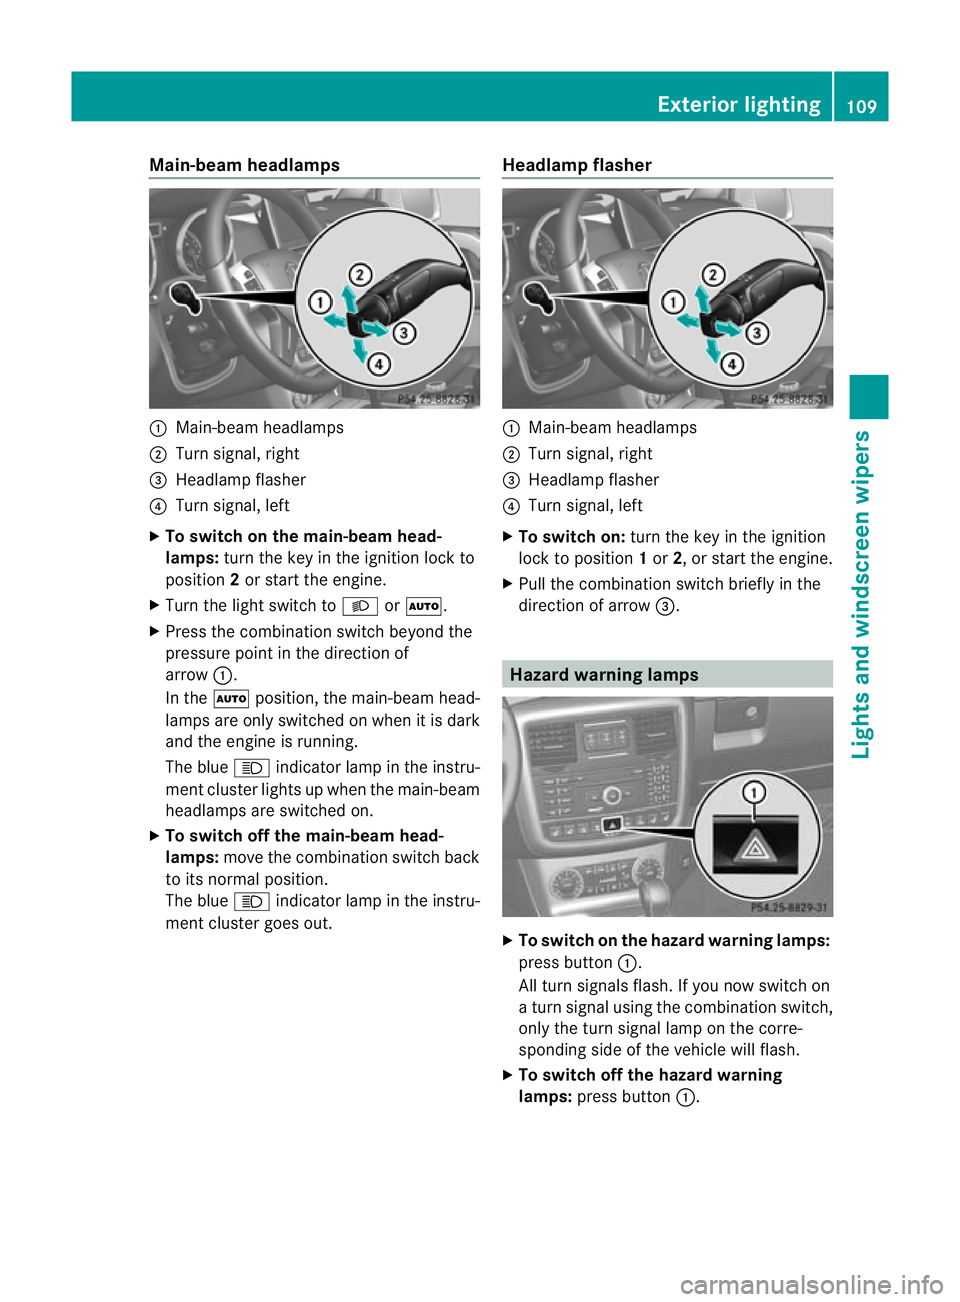
:
Main-beam headlamps
; Turn signal, right
= Headlamp flasher
? Turn signal, left
X To switch on the main-beam head-
lamps: turn the key in the ignition lock to
position 2or start the engine.
X Turn the light switch to LorÃ.
X Press the combination switch beyond the
pressure point in the direction of
arrow :.
In the Ãposition, the main-beam head-
lamps are only switched on when it is dark
and the engine is running.
The blue Kindicator lamp in the instru-
ment cluster lights up when the main-beam
headlamps are switched on.
X To switch off the main-beam head-
lamps: move the combination switch back
to its normal position.
The blue Kindicator lamp in the instru-
ment cluster goes out. Headlamp flasher :
Main-beam headlamps
; Turn signal, right
= Headlamp flasher
? Turn signal, left
X To switch on: turn the key in the ignition
lock to position 1or 2, or start the engine.
X Pull the combination switch briefly in the
direction of arrow =. Hazard warning lamps
X
To switch on the hazard warnin glamps:
press button :.
All turn signals flash. If you now switch on
a turn signal using the combination switch,
only the turn signal lamp on the corre-
sponding side of the vehicle will flash.
X To switch off the hazard warning
lamps: press button :. Exterior lighting
109Lights and windscreen wipers Z
Page 113 of 357
The hazard warning lamps automatically
switch on if:
R
an airbag is deployed
R the seat belt tensioners are triggered, or
R the vehicle decelerates rapidly from a
speed of more than 70 km/ha nd comes to
a standstill.
The hazard warning lamp switches on auto-
matically if an airbag or the belt tensioners
are triggered and the key is in position 1in
the ignition lock.
The hazard warning lamps switch off auto-
matically if the vehicle reaches a speed of
over 10 km/h again after a full brake appli-
cation.
i The hazard warning lamps still operate if
the ignition is switched off. Cornering light function
The cornering light functio
nimproves the illu-
mination of the road over a wide angle in the
directio nyou are turning, enabling better vis-
ibility in tight bends, for example. The corner-
ing light function can only be activated if the
dipped-beam headlamps are switched on and
the foglamps are switched off.
Active: if you are driving at speeds below
40 km/ha nd switch on the tur nsignal or turn
the steering wheel
Not active: if you are driving at speeds above
40 km/h or switch off the turn signal or turn
the steering wheel to the straight-ahead posi-
tion The cornering lamp may remain lit for a short
time, but is automatically switched off after
no more than three minutes. Headlamps and turn signals misted
up on the inside
The headlamps and the indicator lamps in the
exterior mirrors may mist up on the inside if
there is high atmospheric humidity.
X Drive with the headlamps switched on.
The level of moisture diminishes, depend-
ing on the length of the journey and the
weathe rconditions (humidity and temper-
ature).
If the level of moisture does not diminish:
X Have the headlamps checked at a qualified
specialist workshop. Interior lighting
Overview of interior lighting
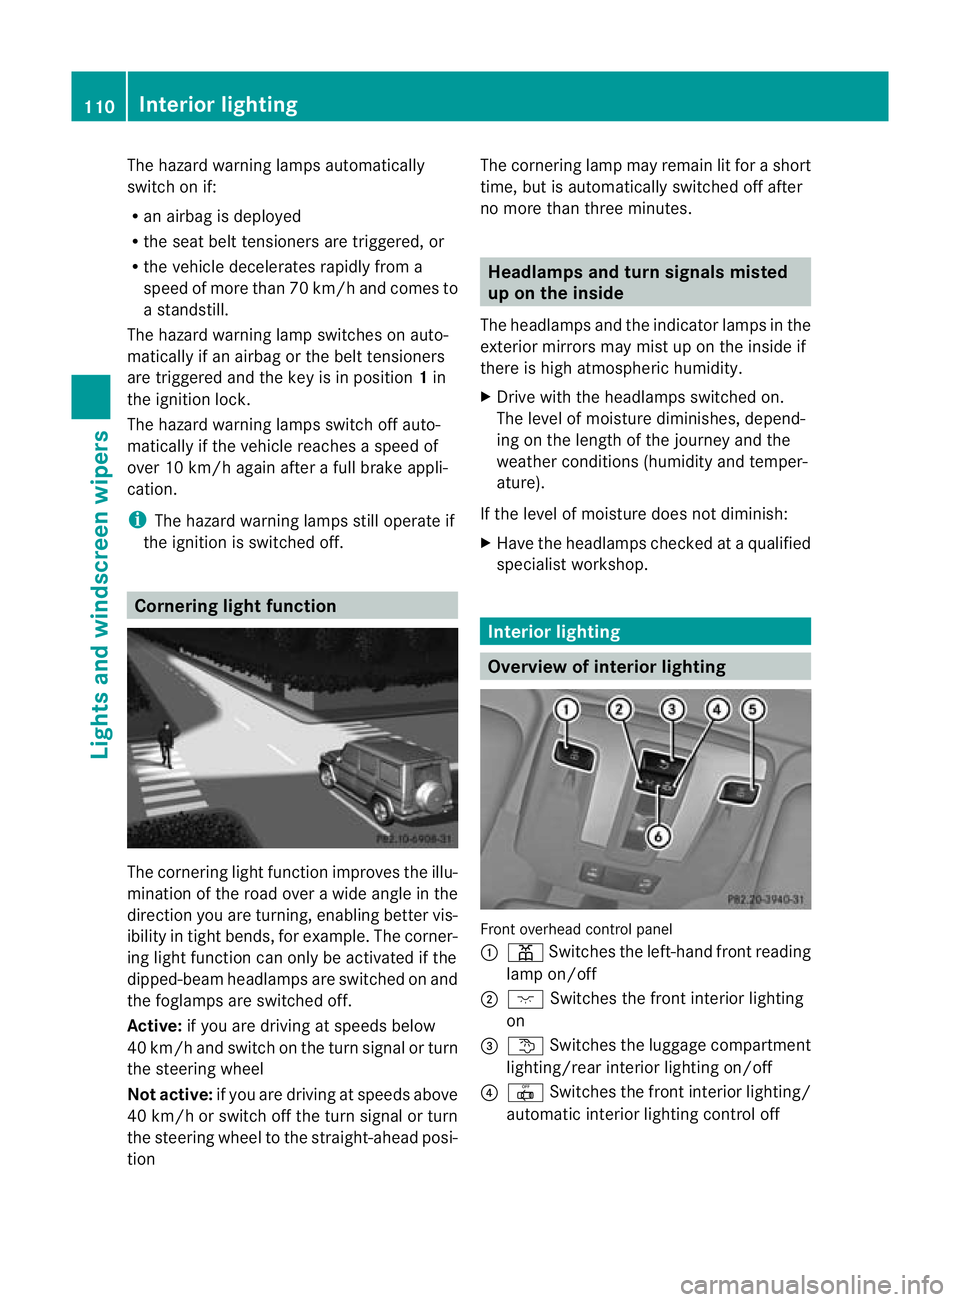
Front overhead control panel
:
p Switches the left-hand front reading
lamp on/off
; c Switches the front interior lighting
on
= t Switches the luggage compartment
lighting/rear interior lighting on/off
? | Switches the front interior lighting/
automatic interior lighting control off 110
Interior lightingLights and windscreen wipers
Page 118 of 357
Before changing bulbs
Have the following bulbs changed at a quali-
fied specialist workshop:
R
additional turn signals in the exterio rmir-
rors
R third brake lamp
R main-beam/dipped-beam headlamps
(xenon bulbs)
R daytime driving lights
R licence plate lamp
i Individual segments of the licence plate
lamp LEDs may fail without a display mes-
sage appearing in the multifunction dis-
play. Regularly chec kthe licence plate
lighting. If necessary, visit a qualified spe-
cialist workshop.
You can replace the following bulbs:
R side lamps/parking lamps
R foglamp/cornering lamp with foglamp
function
R turn signal lamp (front)
R brake/tail lamp
R turn signal lamp (rear)
R tail lamp/parking lamp
R reversing lamp
R rear foglamp Overview of bulb replacement
–bulbs
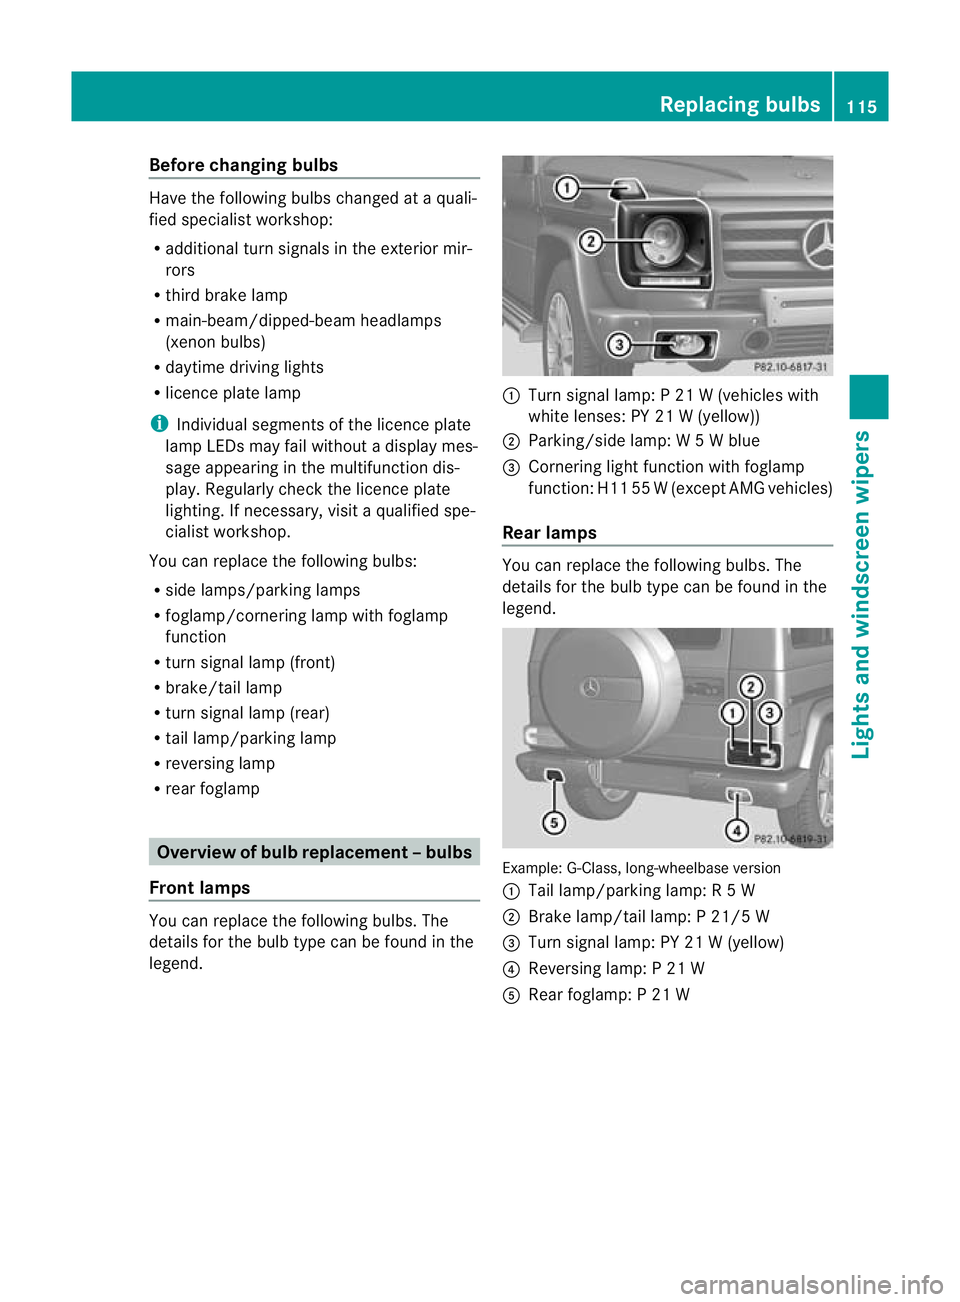
Front lamps You can replace the following bulbs. The
details for the bulb type can be found in the
legend. :
Turn signal lamp: P 21 W (vehicles with
white lenses: PY 21 W (yellow))
; Parking/side lamp: W 5Wblue
= Cornering light function with foglamp
function: H11 55 W(except AMG vehicles)
Rear lamps You can replace the following bulbs. The
details for the bulb type can be found in the
legend.
Example: G-Class, long-wheelbase version
:
Tail lamp/parking lamp: R 5W
; Brake lamp/tail lamp: P 21/5 W
= Turn signal lamp: PY 21 W (yellow)
? Reversing lamp: P 21 W
A Rear foglamp: P 21 W Replacing bulbs
115Lights and windscreen wipers Z
Page 120 of 357
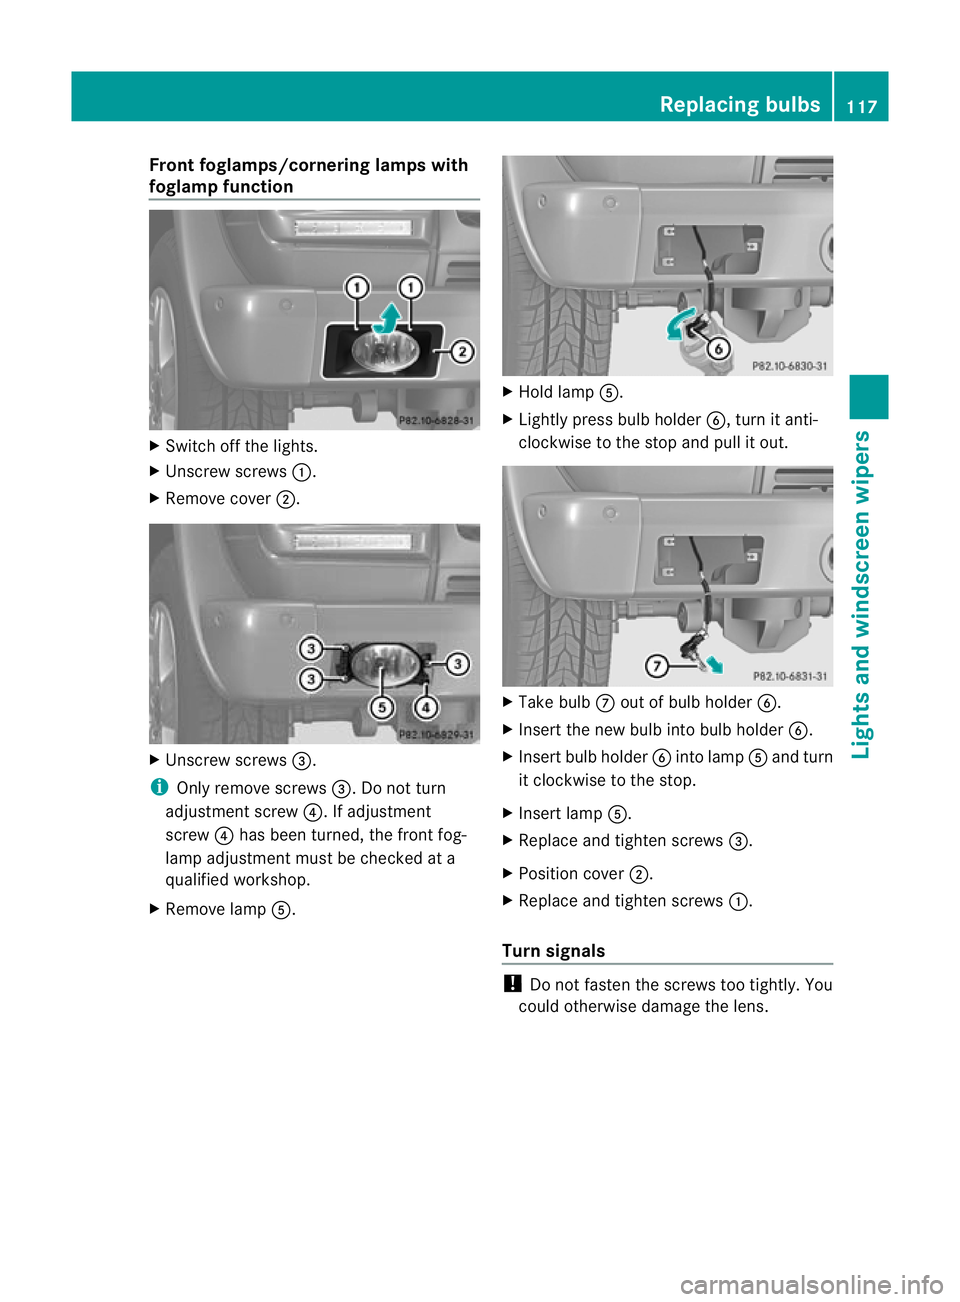
Fron
tfoglamps/cornering lamps with
foglamp function X
Switch off the lights.
X Unscrew screws :.
X Remove cover ;. X
Unscrew screws =.
i Only remove screws =. Do not turn
adjustment screw ?. If adjustment
screw ?has been turned, the front fog-
lamp adjustment must be checked at a
qualified workshop.
X Remove lamp A. X
Hold lamp A.
X Lightly press bulb holder B, turn it anti-
clockwise to the stop and pull it out. X
Take bulb Cout of bulb holder B.
X Inser tthe new bulb into bulb holder B.
X Insert bulb holder Binto lamp Aand turn
it clockwise to the stop.
X Insert lamp A.
X Replace and tighten screws =.
X Position cover ;.
X Replace and tighten screws :.
Turn signals !
Do not fasten the screws too tightly. You
could otherwise damage the lens. Replacing bulbs
117Lights and windscreen wipers Z
Page 121 of 357
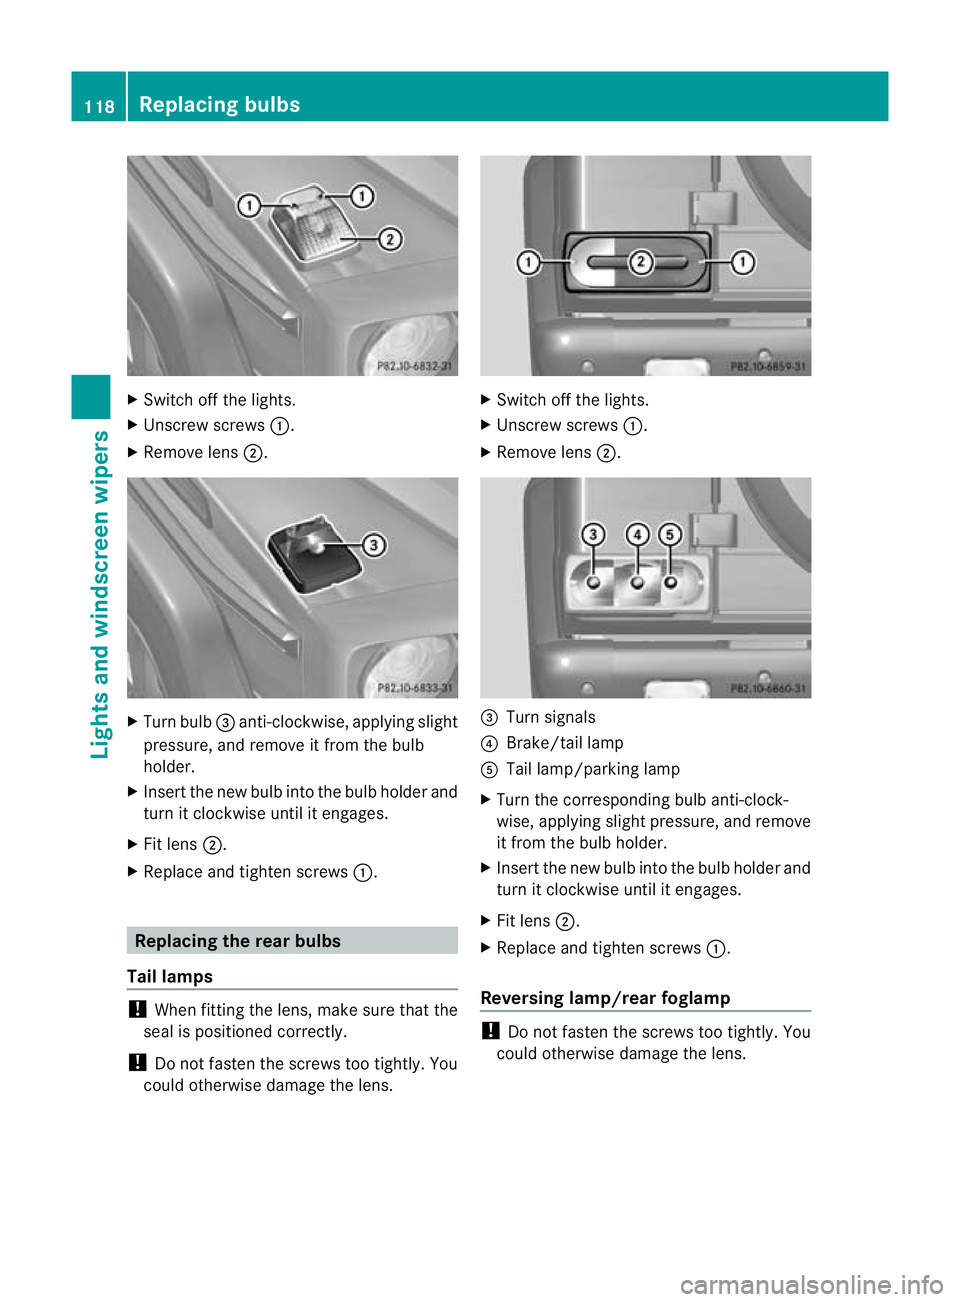
X
Switch off the lights.
X Unscrew screws :.
X Remove lens ;. X
Turn bulb =anti-clockwise, applying slight
pressure, and remove it from the bulb
holder.
X Insert the new bulb into the bulb holde rand
tur nitc lockwise until it engages.
X Fit lens ;.
X Replace and tighten screws :.Replacing the rear bulbs
Tail lamps !
When fitting the lens, make sure that the
seal is positioned correctly.
! Do not fasten the screws too tightly. You
could otherwise damage the lens. X
Switch off the lights.
X Unscrew screws :.
X Remove lens ;. =
Turn signals
? Brake/tail lamp
A Tail lamp/parking lamp
X Turn the corresponding bulb anti-clock-
wise, applying slight pressure, and remove
it fro mthe bulb holder.
X Insert the new bulb into the bulb holder and
turn it clockwise until it engages.
X Fit lens ;.
X Replace and tighten screws :.
Reversing lamp/rear foglamp !
Do not fasten the screws too tightly. You
could otherwise damage the lens. 118
Replacing bulbsLights and windscreen wipers
Page 189 of 357
R
you switch on the respective tur nsignals.
R DISTRONIC PLUS does not detect a danger
of collision.
If these conditions are met, your vehicle is
accelerated. Acceleration will be interrupted
if changing lanes takes too long or if the dis-
tance between your vehicle and the vehicle in
front becomes too small.
i When changing lanes, DISTRONIC PLUS
monitors the left lane for left-hand-drive
vehicles and the right lane for right-hand-
drive vehicles.
Stopping G
WARNING
When leaving the vehicle, even if it is braked
only by DISTRONIC PLUS, it could roll away if:
R there is a malfunction in the system or in
the voltage supply.
R DISTRONIC PLUS has been deactivated
with the cruise control lever, e.g. by a vehi-
cle occupant or fro moutside the vehicle.
R the electrical system in the engine com-
partment, the battery or the fuses have
been tampered with.
R the battery is disconnected.
R the accelerato rpedal has been depressed,
e.g. by a vehicle occupant.
There is a risk of an accident.
If you wish to exit the vehicle, always turn off
DISTRONIC PLUS and secure the vehicle
against rolling away.
If DISTRONIC PLUS detects that the vehicle
in fron tis stopping, it brakes your vehicle until
it is stationary.
Once your vehicle is stationary, it remains
stationary and you do not need to depress the
brake.
i Depending on the specified minimum dis-
tance, your vehicle will come to a standstill
at a sufficient distance behind the vehicle
in front.T he specified minimum distance is
set using the control on the cruise control
lever. On steep uphill or downhill gradients or if
there is a malfunction, the transmission may
also be automatically shifted into position
P.
Displays in the instrument cluster Displays in the speedometer
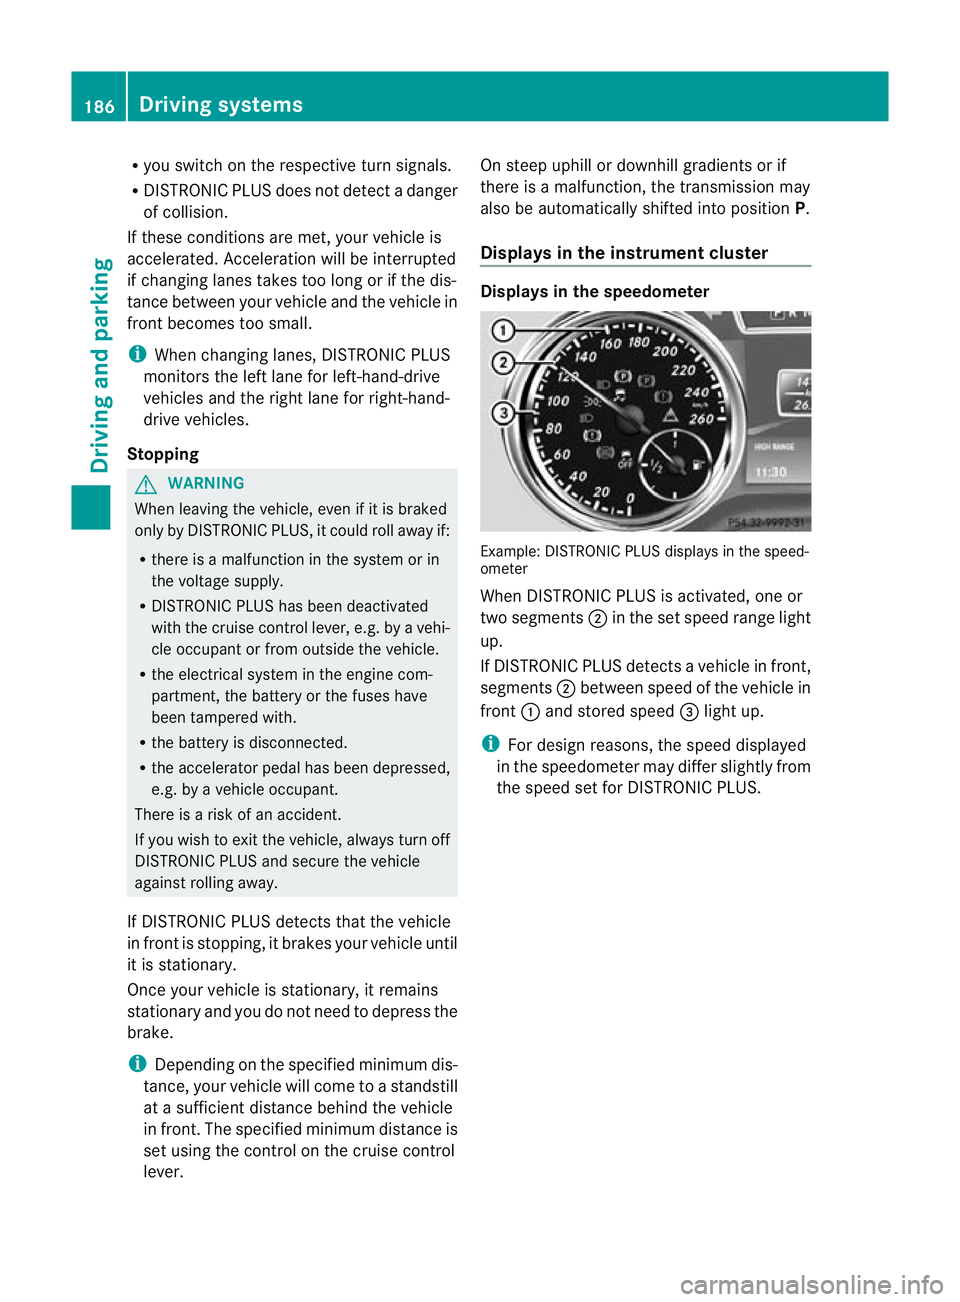
Example: DISTRONIC PLUS displays in the speed-
ometer
When DISTRONIC PLUS is activated, one or
two segments
;in the set speed range light
up.
If DISTRONIC PLUS detectsav ehicle in front,
segments ;between speed of the vehicle in
front :and stored speed =light up.
i For design reasons, the speed displayed
in the speedometer may differ slightly from
the speed set for DISTRONIC PLUS. 186
Driving systemsDriving and parking
Page 193 of 357

DISTRONIC PLUS has not yet detected the
vehicle in front on the edge of the carriage-
way, because of its narrow width
.The dis-
tance to the vehicle in front will be too short.
Obstructions and stationary vehicles DISTRONIC PLUS does not brake for obsta-
cles or stationary vehicles. If, for example, the
detected vehicle turns a corner and reveals
an obstacle or stationary vehicle, DISTRONIC
PLUS will not brake for these.
Crossing vehicles
DISTRONIC PLUS may detect vehicles that
are crossing your lane by mistake. Activating
DISTRONIC PLUS at traffic lights with cross-
ing traffic, for example, could cause your vehi-
cle to pull away unintentionally. Blind Spot Assist
Important safety notes G
WARNING
Blind Spot Assist does not react to:
R vehicles overtaken too closely on the side,
placing them in the blind spot area
R vehicles approaching and driving by with a
speed difference of more than approx-
imately 11 km/h
As a result, Blind Spot Assist may not give
warnings in such situations. There is a risk of
an accident.
Always observe the traffic conditions care-
fully, and maintain a safe lateral distance.
Blind Spot Assist is only an aid. It may fail to
detect some vehicles and is no substitute for
attentive driving.
In particular, the detection of obstacles can
be impaired if there is:
R dirt on the sensors or anything else cover-
ing the sensors
R visibility is poor, e.g. due to fog, heavy rain
or snow
R there is a narrow vehicle travelling in front,
e.g. a motorcycle or bicycle
R the road has very wide lanes
R the road has narrow lanes
R you are not driving in the middle of the lane
R there are barriers or other road boundaries
General notes Blind Spot Assist uses a radar sensor system
to monitor both the left and right sides of your
vehicle. It supports you from speeds of
30 km/h. A warning display in the exterior
mirrors draws your attention to vehicles
detected in the monitored area. If you then
switch on the corresponding turn signal to
change lane, you will also receive an optical
and audible collision warning. For this pur-
pose, Blind Spot Assist uses sensors in the
rear bumper.190
Driving systemsDriving and parking