2012 MERCEDES-BENZ G-CLASS SUV key battery
[x] Cancel search: key batteryPage 103 of 357

X
Make sure that the key is in position 1or
2 (Y page 143) in the ignition lock.
X Briefly press button :.
Both exterior mirrors fold in or out.
i Make sure that the exterior mirrors are
always folded out fully while driving. They
could otherwise vibrate.
Setting the exterior mirrors If the battery has been disconnected or com-
pletely discharged, the exterior mirrors must
be reset. The exterior mirrors will otherwise
not fold in when you select the "Fold in mir-
rors when locking" function in the on-board
computer (Y page 225).
X Make sure that the key is in position
1(Y page 143)in the ignition lock.
X Briefly press button :.
Folding the exterior mirrors in/out
automatically If the "Fold in mirrors when locking" function
is activated in the on-board computer
(Y
page 225):
R the exterior mirrors fold in automatically as
soon as you lock the vehicle from the out-
side.
R the exterior mirrors fold out again automat-
ically as soon as you unlock the vehicle and
then open the driver's or front-passenger
door. Exterior mirror pushed out of position X
Press button :repeatedly until you hear
the mirror engage in position.
The mirror housing is engaged again and
you can adjust the exterior mirrors as usual
(Y page 99). Automatic anti-dazzle mirrors
G
WARNING
If incident light from headlamps is prevented
from striking the sensor in the rear-view mir-
ror, for instance, by luggage piled too high in
the vehicle, the mirror's automatic anti-dazzle
function will not operate.
Incident light could then blind you. This may
distract you from the traffic conditions and,
as a result, you may cause an accident.
The rear-view mirror and the exterior mirror
on the driver's side automatically go into anti-
dazzle mode if:
R the ignition is switched on and
R incident light from headlamps strikes the
sensor in the rear-view mirror.
i The mirrors do not go into anti-dazzle
mode if reverse gear is engaged or if the
interior lighting is switched on. 100
MirrorsSeats, steering wheel and mirrors
Page 114 of 357

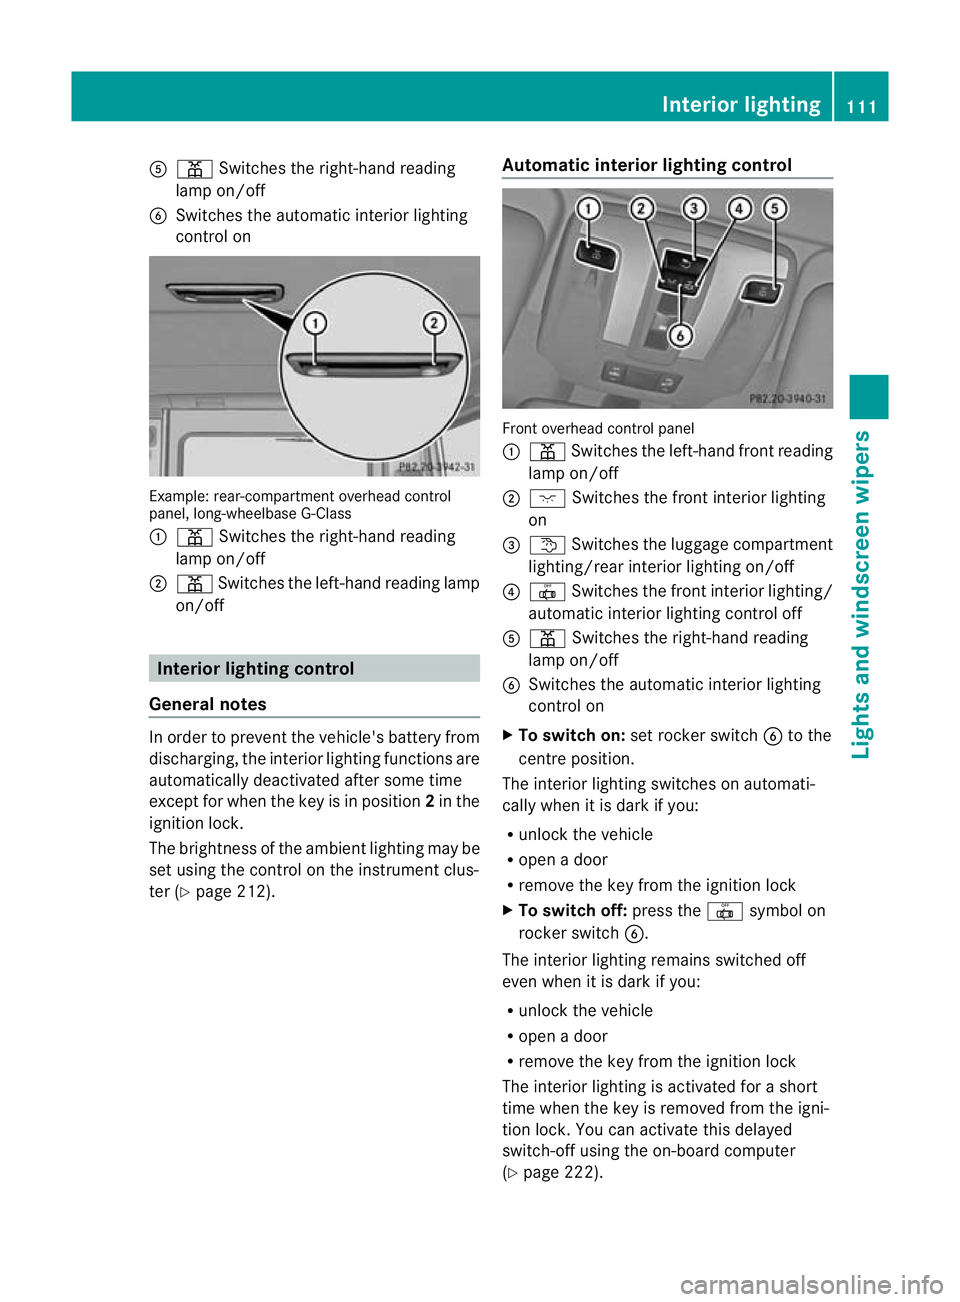
A
p Switches the right-hand reading
lamp on/off
B Switches the automatic interio rlighting
control on Example: rear-compartment overhead control
panel, long-wheelbase G-Class
: p Switches the right-hand reading
lamp on/off
; p Switches the left-hand reading lamp
on/off Interior lighting control
General notes In order to prevent the vehicle's battery from
discharging, the interior lighting functions are
automatically deactivated after some time
except for when the key is in position 2in the
ignition lock.
The brightness of the ambien tlighting may be
set using the control on the instrument clus-
ter (Y page 212). Automatic interior lighting control Front overhead control panel
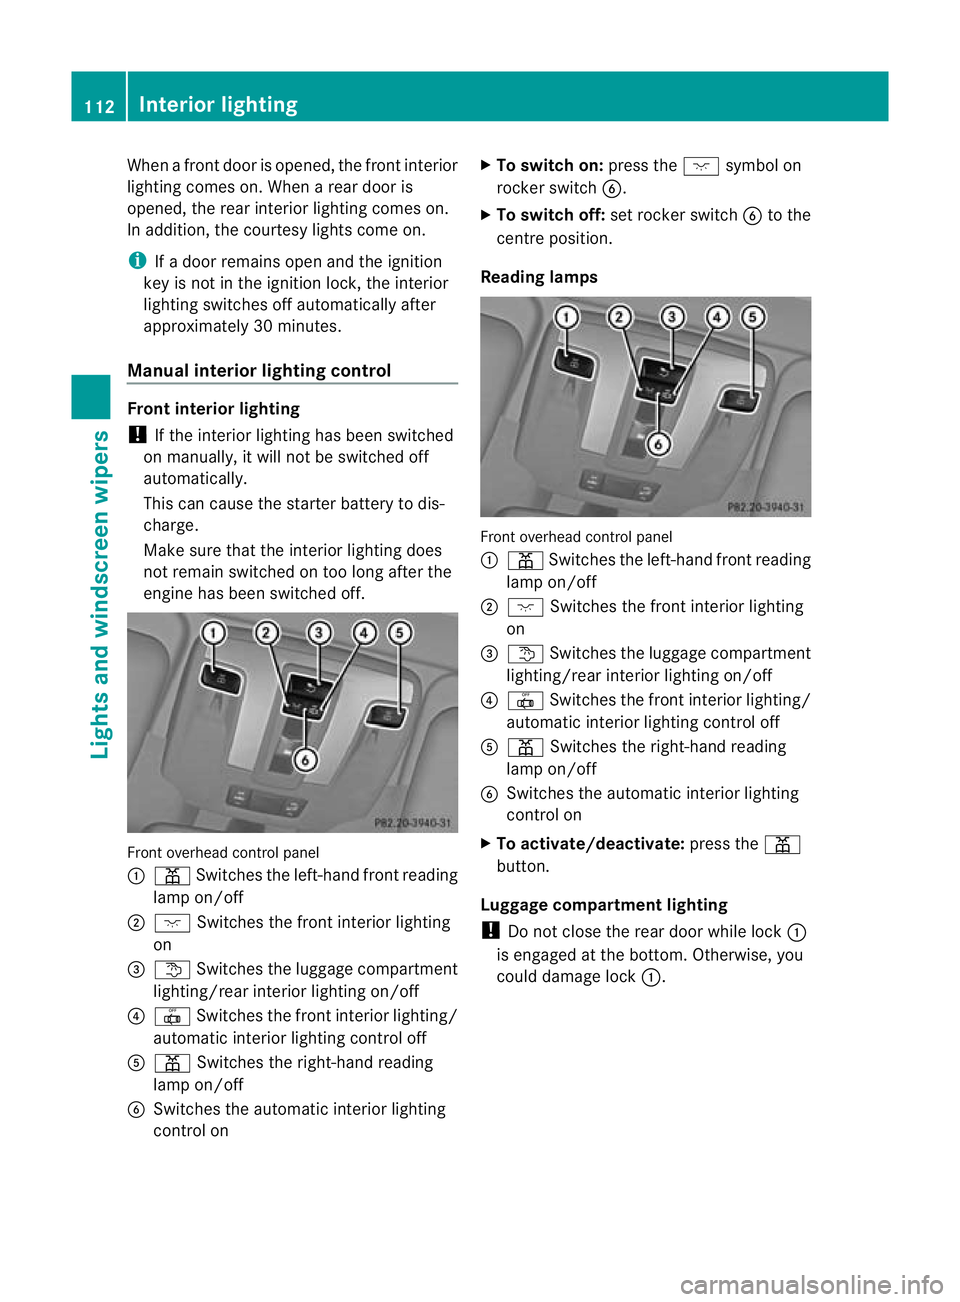
:
p Switches the left-hand front reading
lamp on/off
; c Switches the front interior lighting
on
= t Switches the luggage compartment
lighting/rear interior lighting on/off
? | Switches the front interior lighting/
automatic interior lighting control off
A p Switches the right-hand reading
lamp on/off
B Switches the automatic interior lighting
control on
X To switch on: set rocker switch Bto the
centre position.
The interior lighting switches on automati-
cally when it is dark if you:
R unloc kthe vehicle
R open a door
R remove the key from the ignition lock
X To switch off: press the|symbol on
rocker switch B.
The interior lighting remains switched off
even when it is dark if you:
R unlock the vehicle
R open a door
R remove the key from the ignition lock
The interior lighting is activated for a short
time when the key is removed from the igni-
tion lock. You can activate this delayed
switch-off using the on-board computer
(Y page 222). Interior lighting
111Lights and windscreen wipers Z
Page 115 of 357

When a fron
tdoor is opened, the front interior
lighting comes on. When arear door is
opened, the rear interior lighting comes on.
In addition, the courtesy lights come on.
i If a door remains open and the ignition
key is not in the ignition lock, the interior
lighting switches off automatically after
approximately 30 minutes.
Manual interior lighting control Front interior lighting
!
If the interior lighting has been switched
on manually, it will not be switched off
automatically.
This can cause the starter battery to dis-
charge.
Make sure that the interior lighting does
not remain switched on too long after the
engine has been switched off. Front overhead control panel
:
p Switches the left-hand fron treading
lamp on/off
; c Switches the front interior lighting
on
= t Switches the luggage compartment
lighting/rear interior lighting on/off
? | Switches the fron tinterior lighting/
automatic interio rlighting control off
A p Switches the right-hand reading
lamp on/off
B Switches the automatic interior lighting
control on X
To switch on: press thecsymbol on
rocker switch B.
X To switch off: set rocker switch Bto the
centre position.
Reading lamps Front overhead control panel
:
p Switches the left-hand front reading
lamp on/off
; c Switches the front interior lighting
on
= t Switches the luggage compartment
lighting/rear interior lighting on/off
? | Switches the front interior lighting/
automatic interior lighting control off
A p Switches the right-hand reading
lamp on/off
B Switches the automatic interior lighting
control on
X To activate/deactivate: press thep
button.
Luggage compartment lighting
! Do not close the rear door while lock :
is engaged at the bottom .Otherwise, you
could damage lock :.112
Interior lightingLights and
windscreen wipers
Page 135 of 357

The climate control system switches to the
following functions:
R
cooling with air dehumidification (only
with engine running)
R high airflow (depending on the outside
temperature)
R high temperature (depending on the out-
side temperature)
R air distribution to the windscreen and
fronts ide windows
R air-recirculation mode off
X To deactivate: press the¬button.
The indicator lamp in the ¬button goes
out. The previous settings are reactivated.
The cooling with air dehumidification func-
tion remains on. Air-recirculation mode
remains deactivated.
or
X Press the Ãbutton.
The indicator lamp in the ¬button goes
out. Airflow and air distribution are set to
automatic mode.
or
X Turn controls :orB clockwise or anti-
clockwise (Y page 125).
or
X Press the KorI button. Demisting the windows
Windows misted up on th einside X
Activate the Ácooling with air dehu-
midification function.
X Activate automatic mode Ã.
X If the windows continue to mist up, activate
the demisting function (Y page 131).
i You should only select this setting until
the windscreen is clear again. Windows misted up on the outside X
Switch on the windscreen wipers
(Y page 119).
X Press the _button repeatedly until the
P orO symbol appears in the dis-
play.
i You should only select this setting until
the windscreen is clear again. Switching the windscreen heating
on/off
X
Turn the key to position 2(Ypage 143) in
the ignition lock.
X To switch on: press button;.
Indicator lamp :lights up.
X To switch off: press button;.
Indicator lamp :goes out.
i At outside temperatures above 10 †, the
windscreen heating cannot be activated.
Indicator lamp :lights up briefly when you
attempt to activate it and then goes out
again.
i The windscreen heating has a high cur-
rent draw. You should therefore switch it
off as soon as the windscreen is clear. The
windscreen heating otherwise switches
itself off automatically after 10 minutes.
i If the battery voltage is too low, the wind-
screen heating may switch off. If the wind-
screen heating is automatically deactiva-
ted, indicator lamp :flashes. The wind-
screen heating will automatically switch 132
Operating the climate control systemClimate control
Page 136 of 357

back on as soon as ther
eis sufficient volt-
age. Switching the rear window heating
on/off
Switching on/off G
WARNING
Cleara ll windows of ice or snow before setting
off .O therwise, impaired visibility could
endanger you and others.
X Turn the key to position 2(Ypage 143) in
the ignition lock.
X USA only: press theªbutton.
The indicator lamp in the ªbutton lights
up or goes out.
i The rea rwindow heating has ahigh cur-
ren tdraw.Y ou should therefore switch it
off as soon as the window is clear. It only
switches itself off automatically after a few
minutes.
i If the battery voltage is too low, the rear
window heating may switch off.
Problems with the rear window heating If the indicator lamp in the
ªrear window
heating button flashes, the on-board voltage
is too low. The rear window heating has
switched off prematurely or cannot be acti-
vated.
X Switch off any consumers that are not
required, e.g. reading lamps or interior
lighting.
When the battery is sufficiently charged,
the rear window heating is activated again
automatically. Activating/deactivating air-recircula-
tion mode
G
WARNING
Only switch over to air-recirculation mode
briefly at low outside temperatures. Other-
wise, the windows could mist up, thus impair-
ing visibility and endangering yourself and
others. This may prevent you from observing
the traffic conditions, thereby causing an
accident.
X Turn the key to position 2(Ypage 143) in
the ignition lock.
X To switch on: press thedbutton.
The indicator lamp in the dbutton lights
up.
i Air-recirculation mode is automatically
activated at high levels of pollution or at
high outside temperatures. When air-recir-
culation mode is activated automatically,
the indicator lamp in the dbutton is not
lit.
Outside air is added after approximately
30 minutes.
X To deactivate: press thedbutton.
The indicator lamp in the dbutton goes
out.
i Air-recirculation mode switches off auto-
matically:
R after approximately five minutes at out-
side temperatures below approximately
5 †
R after approximately five minutes if cool-
ing with air dehumidification is deactiva-
ted
R after approximately 30 minutes at out-
side temperatures above approximately
5 † Activating/deactivating the residual
heat function
It is possible to make use of the residual heat
of the engine to continue heating the station- Operating the climate control system
133Climate control Z
Page 137 of 357

ary vehicle for up to 30 minutes after the
engine has been switched off
.The heating
time depends on the coolant temperature and
on the interior temperature that has been set.
i The blower will run at a low speed regard-
less of the airflow setting.
i If you activate the residual heat function
at high temperatures, only the ventilation
will be activated.
X Turn the key to position 0(Ypage 143) in
the ignition lock or remove it.
X To activate: press theÁbutton.
The indicator lamp in the Ábutton lights
up.
X To deactivate: press theÁbutton.
The indicator lamp in the Ábutton goes
out.
i Residual heat is deactivated automati-
cally:
R after approximately 30 minutes
R when the ignition is switched on
R if the battery voltage drops
R if the coolant temperature is too low Auxiliary heating
Important safety notes G
WARNING
Exhaust fumes are produced when the auxili-
ary heating is in operation. Inhaling these
exhaust fumes can be poisonous. You should
therefore switch off the auxiliary heating in
confined spaces without an extraction sys-
tem, e.g. a garage. G
WARNING
When operating the auxiliary heating parts of
the vehicle can get very hot. Make sure that
the exhaust system does not under any cir-
cumstances come into contact with easily
ignitable material such as dry grass or fuels.
The material could otherwise ignite and set the vehicle alight. Choose your parking spot
accordingly.
Operating the auxiliary heating is thus pro-
hibited at filling stations or when your vehicle
is being refuelled. You must therefore switch
off the auxiliary heating at filling stations.
! Operating the auxiliary heating/ventila-
tion draws on the vehicle battery. After you
have heated or ventilated the vehicle a
maximum of two times, drive for a longer
distance.
i Switch the auxiliary heating on regularly
once a month for approximately ten
minutes.
The auxiliary heating heats the air in the vehi-
cle interior without using the heat of the run-
ning engine. The auxiliary heating is operated
directly using the vehicle's fuel. For this rea-
son, the tank content must be at least at
reserve fuel level to ensure that the auxiliary
heating functions.
The auxiliary heating/ventilation automati-
cally adjusts to changes in temperature and
weather conditions. For this reason, the aux-
iliary heating could switch from ventilation
mode to heating mode or from heating mode
to ventilation mode.
You cannot use the auxiliary ventilation to
cool the vehicle interior to a temperature
lower than the outside temperature.
Before switching on X
Turn the key to position 2(Ypage 143) in
the ignition lock.
X Set the temperature.
The auxiliary heating/ventilation can be acti-
vated even when climate control is set to
manual. Optimum comfort can be attained
when the system is set to automatic mode.
Set the temperature to 22 †.
The auxiliary heating/ventilation can be acti-
vated or deactivated using the remote control
or the button on the centre console. 134
Operating the climate control systemClimate control
Page 149 of 357

If the ECO start/stop function has been man-
ually deactivated (Y
page 146) or if a mal-
function has caused the system to be deac-
tivated, the ¤symbol is not displayed.
The Stop/Start active or
Stop/Start inactive message in the AMG menu in the
multifunction display goes out.
Activating/deactivating the ECO start/
stop function ECO button
X
To switch off: in drive program C, press
button :.
or
X Switch to drive program Sor M
(Y page 152).
Indicator lamp ;on button :and the
¤ symbol in the multifunction display go
out.
The Stop/Start active or
Stop/Start inactive message in the AMG menu in the
multifunction display goes out.
X To switch on: press button:.
Indicator lamp ;lights up. If drive pro-
gram Sor Mis active, the automatic trans-
missio nswitches to drive program C.
If all conditions for automatic engine
switch-off (Y page 146) are fulfilled, the
¤ symbol is shown in gree ninthe mul-
tifunction display. In addition, the Stop/Start active message is shown in the
AMG menu in the multifunction display.
If not all conditions for automatic engine
switch-off (Y page 146) are fulfilled, the ¤
symbol is not shown. If this is the
case, the ECO start/stop function is not
available. In addition, the Stop/Start inactive message is shown in the AMG
menu in the multifunction display.
i If indicator lamp ;is off, the ECO start/
stop function has been deactivated man-
ually or as the result of a malfunction. The
engine will then not be switched off auto-
matically when the vehicle stops.
i The stop/start function is automatically
activated each time you start the engine
with the ignition key.
Automatic engine switch-off If the vehicle is braked to a standstill in trans-
mission position
Dor N, the ECO start/stop
function switches off the engine automati-
cally.
The ECO start/stop function is operational
and the ¤symbol is displayed in green in
the multifunction display if:
R the indicator lamp in the ECO button is lit
green
R none of the off-road programs are selected
R the vehicle is stationary
R the outside temperature is within the com-
fort range
R the engine is at normal operating temper-
ature
R the set temperature for the vehicle interior
has been reached
R the battery is sufficiently charged
R the system detects that the windscreen is
not misted up when the air-conditioning
system is switched on
R the bonnet is closed
R the driver's door is closed and the driver's
seat belt is fastened
If not all conditions for automatic engine
switch-off are fulfilled, the ¤symbol is
shown in yellow. 146
DrivingDriving and parking
Page 151 of 357

Problems with the engine
Problem Possible causes/consequences and
M Solutions
The engine does not
start. The starter motor
can be heard. R
There is a malfunction in the engine electronics.
R There is a malfunction in the fuel supply.
X Turn the key back to position 0in the ignition lock before
attempting to start the engine again.
X Try to start the engine again (Y page 144). Avoid excessively
long and frequent attemptst o start the engine, as this
(Y page 143) will drain the battery.
If the engine does not start after several attempts:
X Consult a qualified specialist workshop. The engine does not
start.T
he starter motor
can be heard. The yel-
low reserve fuel warn-
ing lamp is lit and the
needle of the fuel gauge
display shows 0. The fuel tank is empty.
X
Refuel the vehicle.
X Vehicles with adiesel engine: bleed the fuel system
(Y page 159). The engine does not
start. You cannot hear
the starter motor. The on-board voltage is too low because the battery is too weak
or discharged.
X
Jump-start the vehicle (Y page 313).
If the engine does not start despite attempts to jump-start it:
X Consult a qualified specialist workshop. The starter motor was exposed to a thermal load that was too high.
X
Allow the starter motor to cool down for approximately two
minutes.
X Try to star tthe engine again.
If the engine still does not start:
X Consult a qualified specialist workshop. Vehicles with a petrol
engine:
The engine is not run-
ning smoothly and is
misfiring. There is a malfunction in the engine electronics or in a mechanical
component of the engine management system.
X
Only depress the accelerator pedal slightly.
Otherwise, non-combusted fuel may get into the catalytic con-
verter and damage it.
X Have the cause rectified immediately at a qualified specialist
workshop. 148
DrivingDriving and parking