2012 MERCEDES-BENZ G-CLASS SUV ECO mode
[x] Cancel search: ECO modePage 204 of 357
Activating/deactivating the reversing
camera
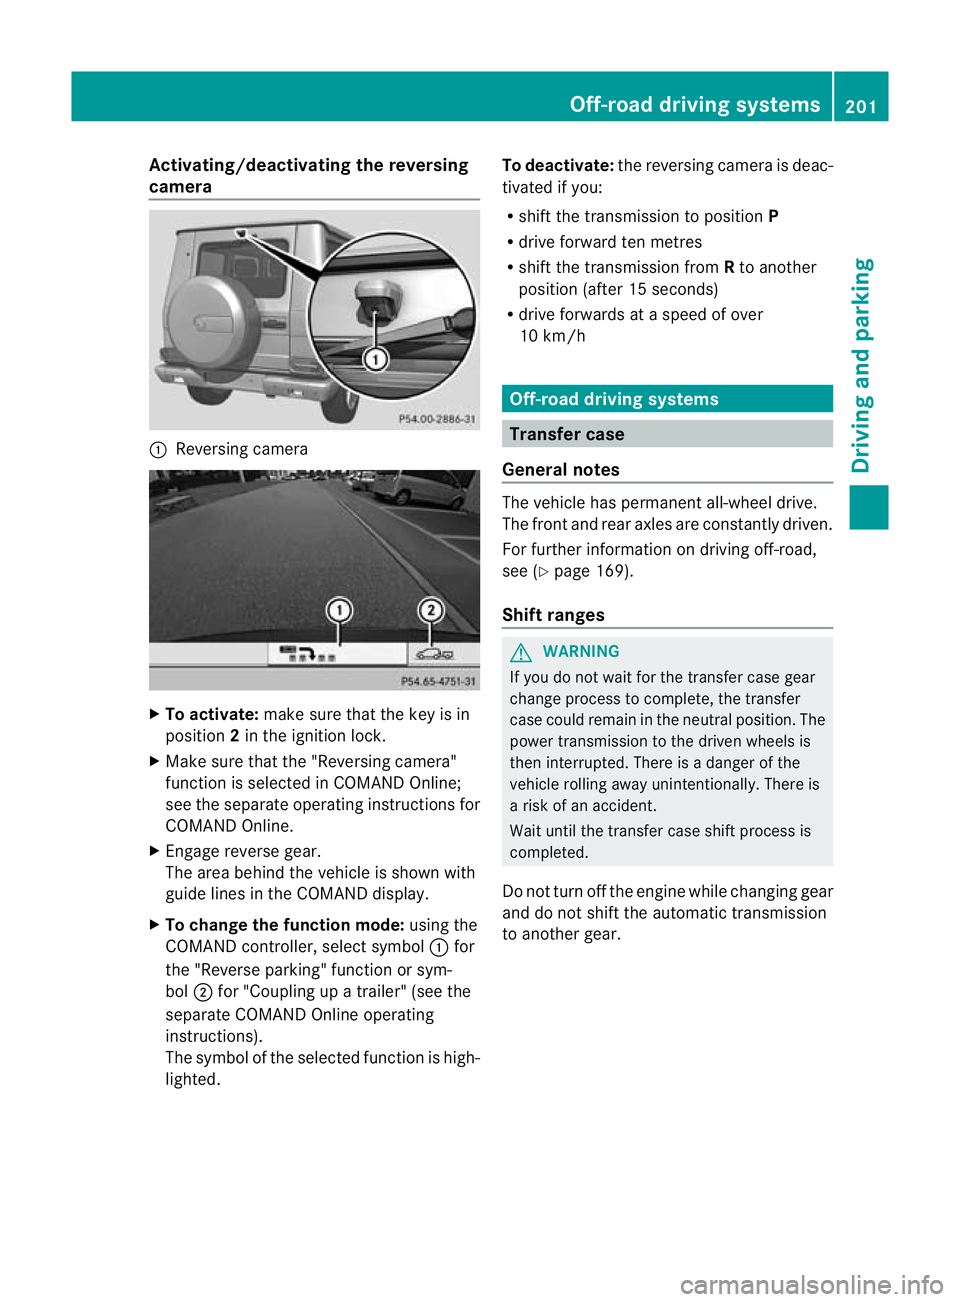
:
Reversing camera X
To activate: make sure that the key is in
position 2in the ignition lock.
X Make sure that the "Reversing camera"
function is selected in COMAND Online;
see the separate operating instructions for
COMAND Online.
X Engage reverse gear.
The area behind the vehicle is shown with
guide lines in the COMAND display.
X To change the function mode: using the
COMAND controller, select symbol :for
the "Reverse parking" function or sym-
bol ;for "Coupling up a trailer" (see the
separate COMAND Online operating
instructions).
The symbol of the selected function is high-
lighted. To deactivate:
the reversing camera is deac-
tivated if you:
R shif tthe transmission to position P
R drive forward ten metres
R shift the transmission from Rto another
position (after 15 seconds)
R drive forwards at a speed of over
10 km/h Off-road driving systems
Transfer case
General notes The vehicle has permanent all-wheel drive.
The front and rear axles are constantly driven.
For further information on driving off-road,
see (Y
page 169).
Shift ranges G
WARNING
If you do not wait for the transfer case gear
change process to complete, the transfer
case could remain in the neutral position. The
power transmission to the driven wheels is
then interrupted. There is a danger of the
vehicle rolling away unintentionally. There is
a risk of an accident.
Wait until the transfer case shift process is
completed.
Do not turn off the engine while changing gear
and do not shift the automatic transmission
to another gear. Off-road driving systems
201Driving and parking Z
Page 225 of 357
Lights
Setting the daytime driving lights
The Day lights function can only be
switched on with the engine turned off.
X Press the =or; button on the steer-
ing wheel to selec tthe Settings menu.
X Press the :or9 button to select the
Light submenu.
X Press ato confirm.
X Press :or9 to select the Daytime driving lights: function.
If the Daytime driving lights have
been switched on, the cone of light and the
W symbol in the multifunction display
are shown in red.
X Press the abutton to save the setting.
Further information on daytime driving lights
(Y page 105).
Surround lighting and exterior lighting
delayed switch-off
X Press the =or; button on the steer-
ing wheel to select the Settings menu.
X Press the :or9 button to select the
Light submenu.
X Press ato confirm.
X Press :or9 to select the Sur‐ round lighting function.
When the Surround lighting function is
activated, the cone of light in the multi-
function display is shown in red.
X Press the abutton to save the setting.
Deactivating delayed switch-off of the exte-
rior lighting temporarily:
X Before leaving the vehicle, turn the key to
position 0(Ypage 143) in the ignition lock.
X Turn the key to position 2in the ignition
lock (Y page 143).
The exterior lighting delayed switch-off is
deactivated.
Delayed switch-off of the exterior lighting is
reactivated the next time you start the
engine. If you have activated the
Surround light‐ ing function and the light switch is set to
Ã, the following functions are activated
when it is dark:
R Surround lighting: the exterior lighting
remains lit for 40 seconds after unlocking
with the key. If you start the engine, the
surround lighting is switched off and auto-
matic headlamp mode is activated
(Y page 105).
R Exterior lighting delayed switch-off: the
exterior lighting remains lit for
60 seconds after the engine is switched off.
If you close all the doors and the boot lid,
the exterior lighting goes off after
15 seconds.
i Depending on your vehicle's equipment,
when the surround lighting and delayed
switch-off exterior lighting are on, the fol-
lowing light up:
R side lamps
R foglamps
R dipped-beamh eadlamps
R daytime driving lights
R surround lighting in the exterior mirrors
Activating/deactivating the interior light-
ing delayed switch-off
If you activate the Light. delay function,
the interior lighting remains on for
20 seconds after you remove the key from the
ignition lock.
X Press the =or; button on the steer-
ing wheel to select the Settings menu.
X Press the :or9 button to select the
Light submenu.
X Press ato confirm.
X Press :or9 to select the Light. delay function.
When the Light. delay function is acti-
vated, the vehicle interior is displayed in
red in the multifunction display.
X Press the abutton to save the setting. 222
Menus and submenusOn-board computer and displays
Page 229 of 357
using the full output of the engine during this
time.
SETUP
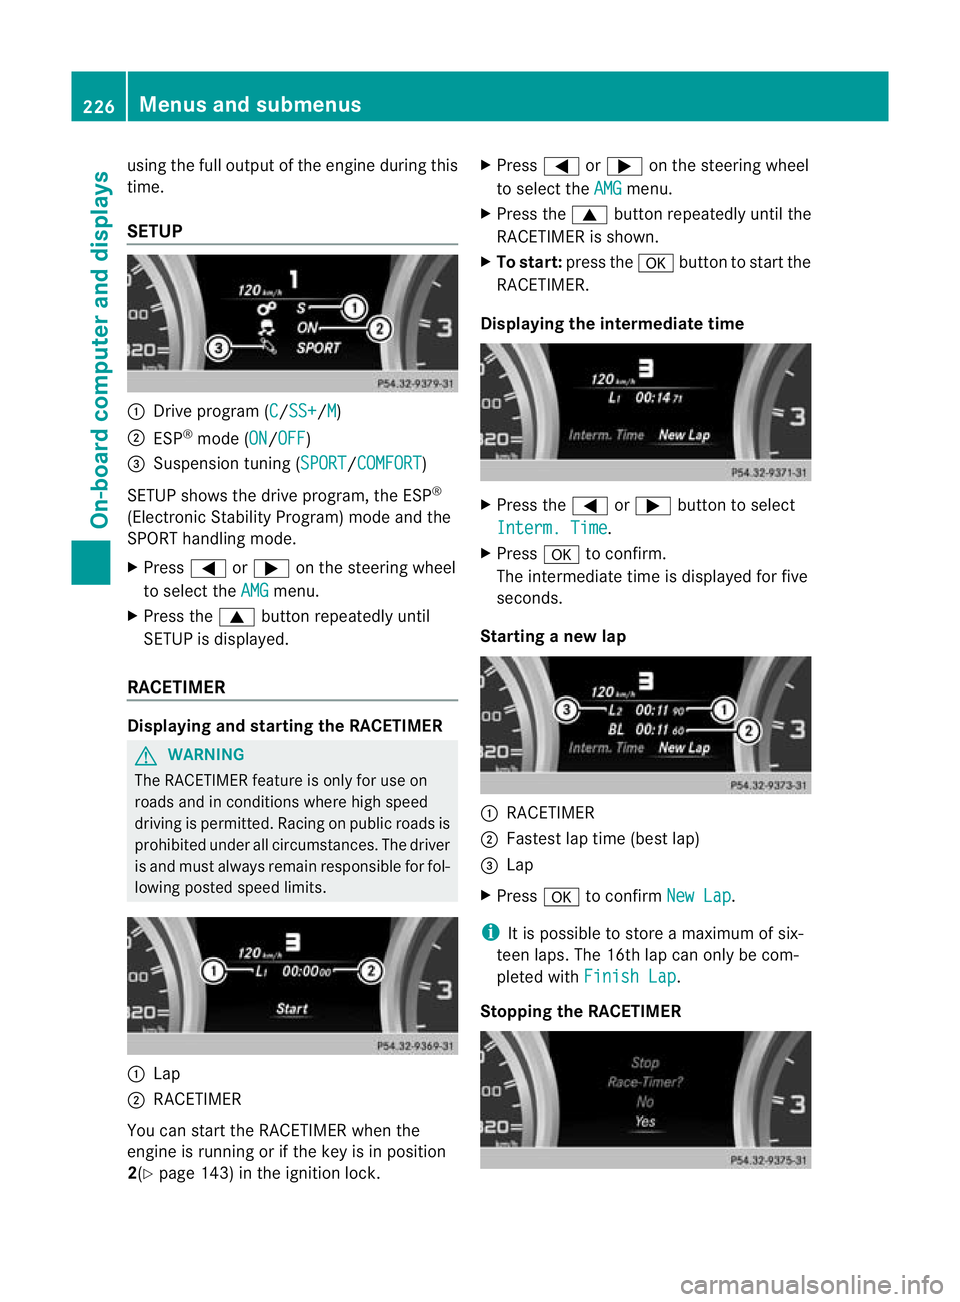
:
Drive program (C /SS+ /M )
; ESP ®
mode (ON /OFF )
= Suspension tuning (SPORT /COMFORT )
SETUP shows the drive program, the ESP ®
(Electronic Stability Program) mode and the
SPORT handling mode.
X Press =or; on the steering wheel
to select the AMG menu.
X Press the 9buttonrepeatedly until
SETUP is displayed.
RACETIMER Displaying and starting the RACETIMER
G
WARNING
The RACETIMER feature is only for use on
roads and in conditions where high speed
driving is permitted. Racing on public roads is
prohibited under all circumstances. The driver
is and must always remain responsible for fol-
lowing posted speed limits. :
Lap
; RACETIMER
You can start the RACETIMER when the
engine is running or if the key is in position
2(Y page 143) in the ignition lock. X
Press =or; on the steering wheel
to select the AMG menu.
X Press the 9button repeatedly until the
RACETIMER is shown.
X To start: press the abutton to start the
RACETIMER.
Displaying the intermediate time X
Press the =or; button to select
Interm. Time .
X Press ato confirm.
The intermediate time is displayed for five
seconds.
Starting a new lap :
RACETIMER
; Fastes tlap time (bes tlap)
= Lap
X Press ato confirm New Lap .
i It is possible to store a maximum of six-
teen laps. The 16th lap can only be com-
pleted with Finish Lap .
Stopping the RACETIMER 226
Menus and submenusOn-board computer and displays
Page 282 of 357
motion, you must only do so if the traffic sit-
uation permits. Otherwise, you could be dis-
tracted from the traffic conditions, cause an
accident and injure yourself and others.
Two-way radios and fax equipment used with-
out low-reflection exterior aerials can inter-
fere with the vehicle's electronics and thereby
jeopardise the operating safety of the vehicle
and yours afety. Therefore, you must only use
this equipment if it is correctly connected to
a separate reflection-free exterio raerial. G
WARNING
Excessive levels of electromagnetic radiation
may cause damage to your health and the
health of others. Using an exterior aerial takes
into account current scientific discussions
relating to the possible health risk posed by
electromagnetic fields.
Mercedes-Benz recommends the use of an
approved exterior aerial. This ensures:
R optimal mobile phone reception quality in
the vehicle
R mutual influences between the vehicle
electronics and mobile phones are mini-
mised
An exterior aerial has the following advan-
tages:
R it conducts the electromagnetic fields gen-
erated by a wireless device to the exterior.
R the field strength in the vehicle interior is
lower than in a vehicle that does not have
an exterior aerial.
i There are various mobile phone brackets
that may be fitted in your vehicle; in some
cases, these are country-specific. You can
obtain these mobile phone brackets from a
qualified specialist workshop.
The functions and services available when
you use the phone depend on your mobile
phone model and service provider. Mobile telephone bracket in the stow-
age space
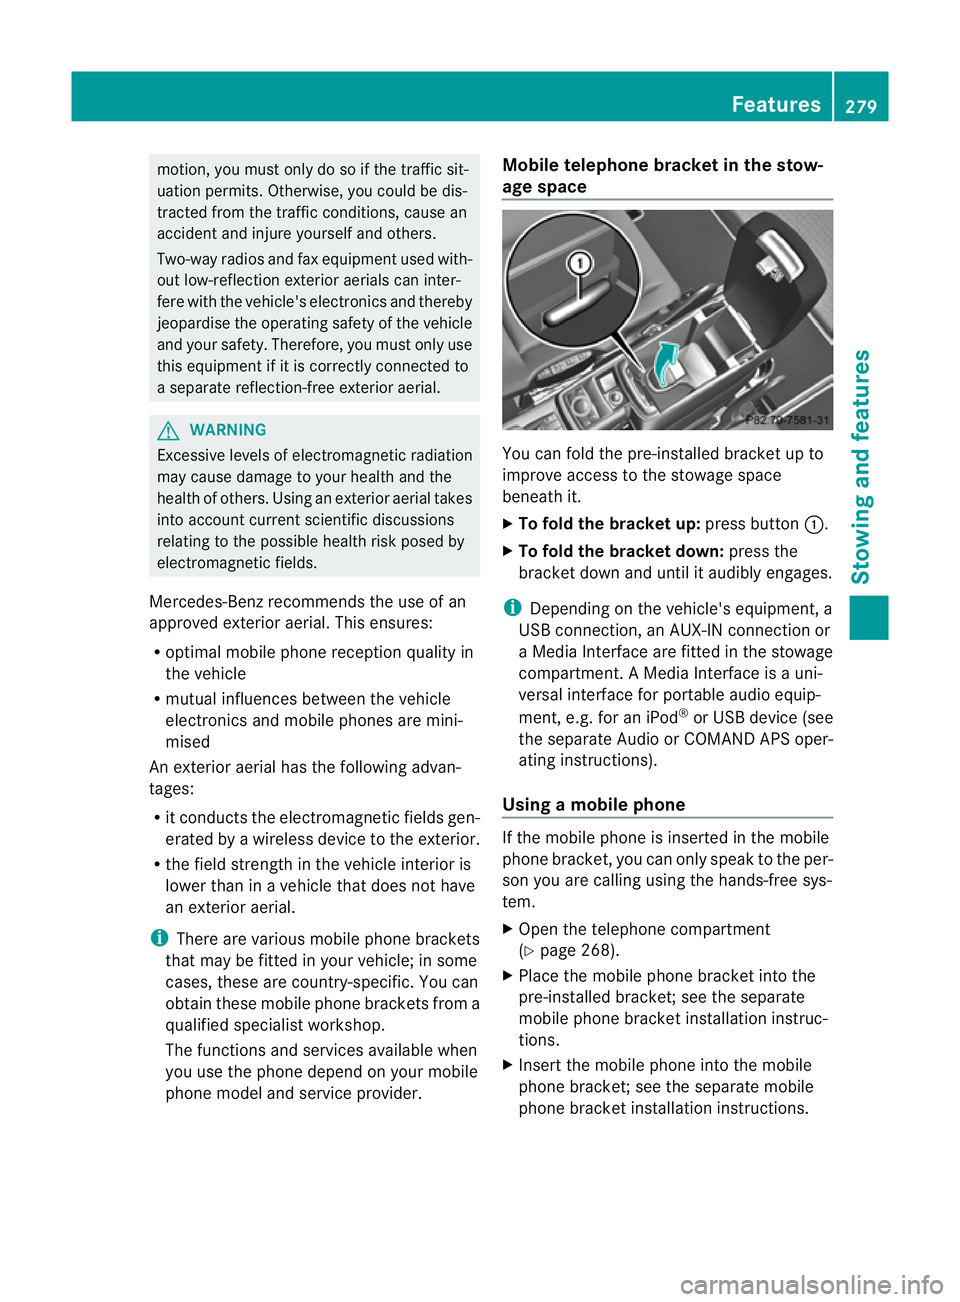
You can fold the pre-installed bracket up to
improve access to the stowage space
beneath it.
X
To fold the bracket up: press button:.
X To fold the bracket down: press the
bracket down and until it audibly engages.
i Depending on the vehicle's equipment, a
USB connection, an AUX-IN connection or
a Media Interface are fitted in the stowage
compartment. A Media Interface is a uni-
versal interface for portable audio equip-
ment, e.g. for an iPod ®
or USB device (see
the separate Audio or COMAND APS oper-
ating instructions).
Using amobile phone If the mobile phone is inserted in the mobile
phone bracket, you can only speak to the per-
son you are calling using the hands-free sys-
tem.
X
Open the telephone compartment
(Y page 268).
X Place the mobile phone bracket into the
pre-installed bracket; see the separate
mobile phone bracket installation instruc-
tions.
X Inser tthe mobile phone into the mobile
phone bracket; see the separate mobile
phone bracket installation instructions. Features
279Stowing and features Z
Page 295 of 357
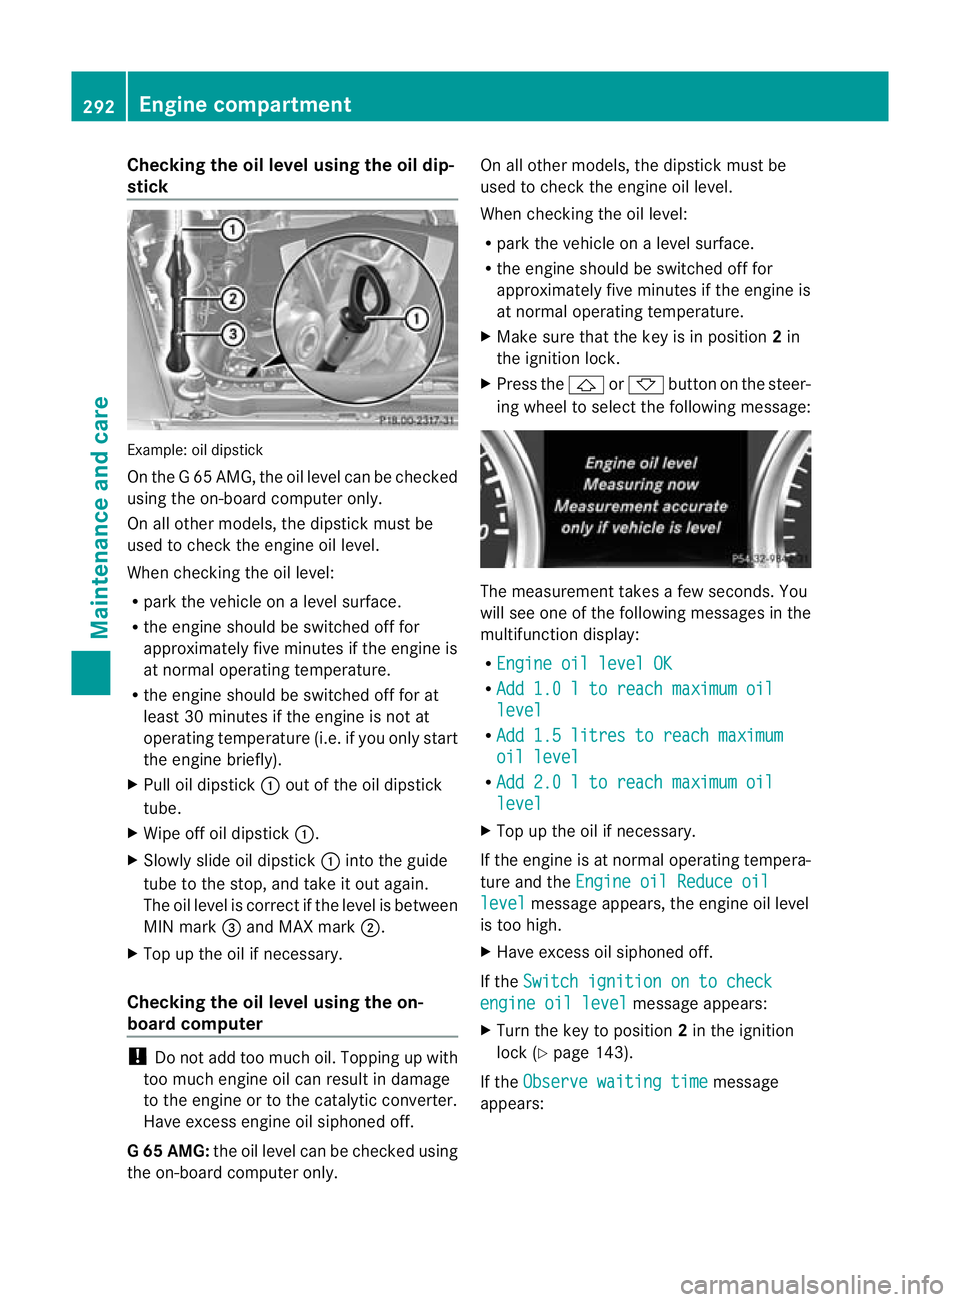
Checking the oil level using the oil dip-
stick
Example
:oil dipstick
On the G 65 AMG, the oil level can be checked
using the on-board computer only.
On all other models, the dipstick must be
used to chec kthe engine oil level.
When checking the oil level:
R park the vehicle on a level surface.
R the engine should be switched off for
approximately five minutes if the engine is
at normal operating temperature.
R the engine should be switched off for at
least 30 minutes if the engine is not at
operating temperature (i.e. if you only start
the engine briefly).
X Pull oil dipstick :out of the oil dipstick
tube.
X Wipe off oil dipstick :.
X Slowly slide oil dipstick :into the guide
tube to the stop, and take it out again.
The oil level is correct if the level is between
MIN mark =and MAX mark ;.
X Top up the oil if necessary.
Checking the oil level using the on-
board computer !
Do not add too much oil. Topping up with
too much engine oil can result in damage
to the engine or to the catalytic converter.
Have excess engine oil siphoned off.
G6 5 AMG: the oil level can be checked using
the on-board computer only. On all other models, the dipstic
kmust be
used to chec kthe engine oil level.
When checking the oil level:
R park the vehicle on a level surface.
R the engine should be switched off for
approximately five minutes if the engine is
at normal operating temperature.
X Make sure that the key is in position 2in
the ignition lock.
X Press the &or* button on the steer-
ing wheel to select the following message: The measurement takes a few seconds. You
will see one of the following messages in the
multifunction display:
R Engine oil level OK R
Add 1.0 l to reach maximum oil level
R
Add 1.5 litres to reach maximum oil level
R
Add 2.0 l to reach maximum oil level
X
Top up the oil if necessary.
If the engine is at normal operating tempera-
ture and the Engine oil Reduce oil level message appears, the engine oil level
is too high.
X Have excess oil siphoned off.
If the Switch ignition on to check engine oil level message appears:
X Turn the key to position 2in the ignition
lock (Y page 143).
If the Observe waiting time message
appears: 292
Engine compartmentMaintenance and care
Page 336 of 357
X
Stow the jack and the vehicle tools in the
vehicle again.
X Check the tyre pressure of the newly fitted
wheel and adjus titifnecessary.
You will find a table of tyre pressures on the
inside of your vehicle's fuel filler flap. Wheel and tyre combinations
General notes
! For safety reasons, Mercedes-Benzr ec-
ommends that you only use tyres, wheels
and accessories which have been approved
by Mercedes-Benzs pecifically for your
vehicle. These tyres have been specially
adapted for use with the driving safety sys-
tems, such as ABS or ESP ®
.
Only use tyres, wheels or accessories tes-
ted and approved by Mercedes-Benz .Cer-
tain characteristics, e.g. handling, vehicle
noise emissions or fuel consumption, may
otherwise be adversely affected. In addi-
tion, when driving with aload, tyre dimen-
sion variations could cause the tyres to
come into contact with the bodywork and
axle components.T his could result in dam-
age to the tyres or the vehicle.
Mercedes-Ben zaccepts no liability for
damage resulting from the use of tyres,
wheels or accessories othe rthan those tes-
ted and approved.
Further information about wheels, tyres
and approved combinations can be
obtained from any Mercedes-Benz Service
Centre.
! Large wheels: the lower the section width
for a certain wheel size, the lower the ride
comfort is on poor road surfaces. Roll com-
fort and suspension comfort are reduced
and the risk of damage to the wheels and
tyres as a result of driving over obstacles
increases.
i You will find a table of tyre pressures on
the inside of your vehicle's fuel filler flap. For further information on tyre pressure,
see (Y
page 325). Check tyre pressures
regularly and only when the tyres are cold.
i Notes on the vehicle equipment –always
fit the vehicle:
R with tyres of the same size on a given axle
(left/right)
R fit the same type of tyres on your vehicle
at a given time (summer tyres, winter
tyres, all-weather tyres, All Terrain tyres)
The tyre and wheel combinations listed in the
tables below apply to the following models: V1 G 500
V2 G 350 BlueTEC
V3 G 63 AMG
G 65 AMG
i
Not all wheel/tyre combinations can be
mounted at the factory in all countries. Tyres
G3 50 BlueTEC Summer tyres
Tyres Light-alloy
wheels
265/60 R18 109 H
Tyre manufacturer
recommended by
Mercedes-Benz:
Bridgestone. 7.5
Jx18 H2 ET 63 i
You can obtai ninformation abou ttyres
and tyre dimensions that are no tlisted here
at any Mercedes-Benz Service Centre. Wheel and tyre combinations
333Wheels and tyres Z
Page 345 of 357

and, if applicable, the auxiliary heating before
refuelling.
G
WARNING
Fuels are poisonous and hazardous to health.
There is a danger of injury.
Do no tswallow fuel or let it come into contact
with skin, eyes or clothing. Do not inhale fuel
vapours. Keep fuels out of the reach of chil-
dren.
If you or others come into contact with fuel,
observe the following:
R Wash the fuel off any affected areas of skin
with water and soap immediately.
R If you get fuel in your eyes, rinse them thor-
oughly with clean water immediately. Seek
immediate medical attention.
R If fuel is swallowed, seek immediate medi-
cal attention. Do not induce vomiting.
R Change any clothing that has come into
contac twith fuel immediately.
Tank capacity Total capacity
All models
Approx-
imately 96.0 l Of which reserve fuel
All models
Approx-
imately 14.0 l Petrol (EN 228)
Fuel grade
!
Do not use diesel to refuel vehicles with a
petrol engine. Even asmall quantity of die-
sel will damage the fuel injection system.
! Only refuel using unleaded petrol with at
least 95 RON/85 MON that conforms to European standard EN 228 or E DIN
51626-1 or an equivalent specification.
Fuel with this specification may contain up
to 10 % ethanol.
! Do not use the following:
R E85 (petrol with 85 % ethanol)
R E100 (100 %ethanol)
R M15 (petrol with 15 % methanol)
R M85 (petrol with 85 % methanol)
R M100 (100 % methanol)
R Petrol with metallic additives
R Diesel
Do not mix these fuels with petrol, and do
not use any additives. This can otherwise
lead to engine damage. This does not
include cleaning additives for the removal
and prevention of residue build-up. Only
cleaning additives recommended by
Mercedes-Benzs hould be added to petrol,
see "Additives". You can obtain further
information from any Mercedes-Benz
Service Centre.
! Use a filter when adding fuel from a fuel
can. The fuel lines and/or the diesel injec-
tion system could otherwise be blocked by
particles from the fuel can.
Usually you will find information about the
fuel grade on the pump. If you cannot find the
label on the petrol pump, ask the filling sta-
tion staff.
i E10 fuel contains up to 10% bioethanol.
Your vehicle is suitable for use with E10
fuel. You can refuel your vehicle using E10
fuel.
i As a temporary measure, if the recom-
mended fuel is not available, you may also
use unleaded petrol with an octane rating
of 91 RON/82.5 MON. This may reduce
engine performance and increase fuel con-
sumption. Avoid driving at full throttle.
Information on refuelling (Y page 156).342
Service products and capacitiesTechnical data
Page 348 of 357

AdBlue
®
General notes AdBlue
®
is a non-flammable, non-toxic, col-
ourless, odourless and water-soluble fluid.
High outside temperatures If you open the AdBlue
®
tank cap, small
amounts of ammonia vapour may be
released.
Ammonia vapours have a pungen todour and
are particularly irritating to:
R skin
R mucous membranes
R eyes
You may experience a burning sensation in
your eyes, nose and throat, as well as cough-
ing and watering of the eyes.
Do not inhale any ammonia vapours that may
be released. Fill the AdBlue ®
tank only in well-
ventilated areas.
Low outside temperatures AdBlue
®
freezes at a temperature of approx-
imately -11 †. The vehicle is equipped with
an AdBlue ®
preheating system at the factory.
Winter operation can therefore be guaran-
teed even at temperatures below -11 †.
Additives !
Only use AdBlue ®
in accordance with ISO
22241. Do not use additives with AdBlue ®
and do not dilute AdBlue ®
with water. This
may destroy the BlueTEC exhaust gas after-
treatment system.
Purity !
Impurities in AdBlue ®
(e.g. due to other
service products, cleaning agents or dust)
lead to:
R increased emission values
R damage to the catalytic converter R
engine damage
R malfunctions in the BlueTEC ®
exhaust
gas aftertreatment system
Assuring the purity of AdBlue ®
is particularly
important with respec ttoavoiding malfunc-
tions in the BlueTEC exhaust gas aftertreat-
ment system.
If AdBlue ®
is pumped out of the AdBlue ®
tank,
e.g. during repair work, do not use this fluid
to refill the tank. The purity of the fluid can no
longer be guaranteed.
Total capacity of the AdBlue ®
tank Model Total capacity
G3
50 BlueTEC 15 l
Engine oil
General notes The quality of the engine oil is decisive for the
function and service life of an engine. After
extensive tests, Mercedes-Benz approves
engine oils that correspond to the current
technical standard.
Therefore, only Mercedes-Benz approved
engine oils may be used in Mercedes-Benz
engines.
Further information on tested and approved
engine oils can be obtained from any
Mercedes-Benz Service Centre. Mercedes-
Ben
zrecommends that you have the oil
change carried out at a qualified specialist
workshop. Mercedes-Benza pproval is indica-
ted on the oil container by the inscription "MB
Approval" and the corresponding designa-
tion, e.g. MB Approval 229.51.
You can call up an overview of approved
engine oils on the Internet at
http://bevo.mercedes-benz.com by enter-
ing the designation, e.g. 229.5.
The table shows which engine oils have been
approved for your vehicle. Service products and capacities
345Technical data Z