2012 MERCEDES-BENZ G-CLASS SUV seat memory
[x] Cancel search: seat memoryPage 12 of 357

ECO start/stop function
Deactivating/activatin g................. 146
General information .......................145
Electronic Stability Program
see ESP ®
(Electroni cStability Program)
Electronic Traction System
see 4ETS (Electronic Traction System)
Emergenc yclosing
Sof ttop ............................................ 82
Emergency key element
Function/notes ................................ 70
General notes .................................. 70
Removing ......................................... 70
Emergency locking
Vehicle ............................................. 75
Emergency unlocking
Vehicle ............................................. 74
Engine
Display message ............................ 237
ECO start/stop function ................145
Engine number ............................... 341
Jump-starting ................................. 313
Running irregularl y......................... 148
Starting problems ..........................148
Starting the engine with the key ....144
Stopping ........................................ 163
Warning lamp (engine diagnostics) 259
Engine electronics
Notes ............................................. 339
Problem (fault) ............................... 148
Engine oil
Additives ........................................ 346
Checking the oil level ..................... 291
Display message ............................ 239
Filling capacity ............................... 346
Notes about oil grades ................... 345
Temperature (on-board computer) .225
Topping up ..................................... 293
Viscosity ........................................ 346
Environmental protection
Note ................................................ .20
Returning an end-of-life vehicle .......20
ESP ®
(Electronic Stability Pro-
gram) AMG menu (on-board computer) ...226
Deactivating/activating ...................63
Display message ............................ 229Function/notes ................................ 62
Important safety guidelines
.............62
Trailer stabilisatio n.......................... 63
Warning lamp ................................. 256
Exhaus ttail pipe (cleaning instruc-
tions) .................................................. 299
Exterior lighting see Lights
Exterior mirrors
Adjusting ......................................... 99
Anti-dazzle mode (automatic) ........100
Folding in/ou t(automatically) .......100
Folding in/ou t(electrically) .............99
Folding in whe nlocking (on-board
computer) ...................................... 225
Out of position (troubleshooting) ...100
Parking position ............................. 101
Resetting ....................................... 100
Storing settings (memory function) 102 F
Faul tmessage
see Display messages
Filler cap
see Fuel filler flap
Fire extinguisher ............................... 305
First-aid kit ......................................... 305
Fitting awheel
Removing awheel .......................... 332
Fitting wheels
Fitting awheel ............................... 332
Raising the vehicle .........................330
Securing the vehicle against roll-
ing away ........................................ 330
Flat tyre
Preparing the vehicle .....................309
Floormat ............................................ .286
Foglamps Switching on/off ........................... 106
Folding the seat backrest (rear)
forwards/back .................................. 269
Frequencies Garage door opene r....................... 283
Mobile phone ................................. 339
Two-way radio ................................ 339
Fron tfoglam p(display message) ....236 Index
9
Page 13 of 357

Front-passenger seat
Display message ............................ 249
Fuel
Additives ........................................ 343
Consumption statistics ..................215
Displaying the current consump-
tion ................................................ 215
Displaying the range ......................215
Fuel gauge ..................................... 211
Grade (petrol) ................................ 342
Important safety notes ..................341
Notes for AMG vehicles .................343
Premium-grade unleaded petrol ..... 342
Problem (malfunction) ...................159
Quality (diesel )............................... 343
Refuelling ...................................... .156
Tank content/reserve fuel .............342
Fuel/water separator
Service .......................................... .295
Fuel filler flap
Emergency release ........................158
Opening/closing ............................ 157
Fuel filte r(white display message) .240
Fuel level Calling up the range (on-board
computer) ...................................... 215
Gauge ............................................ 211
Fuel reserve
see Fuel
Fuel tank
Capacity ........................................ 342
Problem (malfunction) ...................159
Fuse allocation chart ........................318
Fuse box Battery case ................................... 320
Dashboard ..................................... 319
Front-passenger footwell ...............319
Transmission tunnel ....................... 319
Fuse extractor ................................... 318
Fuses Allocation chart ............................. 318
Before changing ............................. 318
Dashboard fuse box .......................319
Fuse allocation chart .....................318
Fuse box in the front-passenger
footwell .......................................... 319
Fuse box in the transmission tun-
nel ................................................. 319Important safety notes
..................318
In the battery case .........................320 G
Garage door opener Clearing the memory .....................283
Frequencies ................................... 283
Important safety notes ..................280
Opening/closing the garage door ..282
Programming the remote control ...280
Gear indicator (on-board computer) 225
Gearshift program SETUP (on-board computer) ..........226
Genuine Mercedes-Benz parts .........338
Genuine wood trim and trim strips
(cleaning instructions) ......................300
Glove compartment ..........................267
Gradient-climbing capability (max-
imum) ................................................. 173 H
Hazard warning lamps ......................109
Headlamp Cleaning system (function) ............108
Cleaning system (notes) ................347
Headlamps
Cleaning ......................................... 298
Misting up ...................................... 110
Topping up the cleaning system ....294
see Automatic headlamp mode
Head restraints
Adjusting ......................................... 92
Adjusting (rear) ................................ 93
Fitting/removing (rear) ....................93
Luxury .............................................. 92
Resetting (front) ............................... 93
Heating
see Climate control
High-pressure cleaners ....................296
Hill start assist .................................. 145
HOLD function Function/notes ............................. 19610
Index
Page 18 of 357

Bel
ttensioner .................................. 47
Cleaning ......................................... 301
Display message ............................ 232
Fastening ......................................... 44
Fastening, front ............................... 44
Fastening in the rear, centre ............45
Important safety guidelines .............43
Rea rseat belt status indicator .........47
Releasing ......................................... 46
Warning lamp ................................. 252
Warning lamp (function) ................... 47
Seat heating
Malfunction indicator lamp ..............96
Seats
Adjusting (electrically). ....................92
Adjusting the 4-way lumba rsup-
por t.................................................. 94
Adjusting the head restraint ............92
Cleaning the cover .........................300
Correct driver's seat position ........... 90
Important safety notes ....................91
Overview .......................................... 91
Storing settings (memory function) 102
Switching sea theating on/off .........95
Switching the sea tventilation on/
off .................................................... 96
Seat ventilation
Malfunction indicator lamp ..............97
Securing aload .................................. 270
Sensors (cleaning instructions) .......298
Service menu (on-board computer) .220
Service products
AdBlue ®
special additive s.............. 345
Brake fluid ..................................... 346
Coolant (engine) ............................ 347
Engine oil ....................................... 345
Fuel ................................................ 341
Important safety notes ..................341
Notes ............................................. 341
Washer fluid .................................. .347
Settings
Calling up a stored setting .............102
Factory (on-board computer) .........225
On-board computer .......................221
Setting the air distribution ...............131
SETUP (on-board computer) .............226
Shift ranges ....................................... 153Short journeys (diesel particle fil-
ter)
...................................................... 164
Side lamps Switching on/off ........................... 107
Side windows
Convenience opening ......................78
Important safety notes ....................77
Opening/closing .............................. 77
Overview .......................................... 77
Troubleshooting ............................... 78
Ski rack .............................................. 275
Sliding sunroof Important safety information ...........79
Opening/closing .............................. 79
Operating manually ..........................79
Problem (malfunction) .....................80
Snow chains ...................................... 324
Socket Front-passenger footwell ...............278
Luggage compartment ...................278
Rea rcompartmen t......................... 278
Soft top
Closing ............................................ .82
Closing manually in an emergenc y... 82
Important safety notes ....................81
Opening ........................................... 81
Troubleshooting ............................... 87
Spare fuses ........................................ 318
Spare wheel Fitting ............................................ 329
Notes/data .................................... 333
Spare wheel bracket at the rear ....307
Stainless-steel spare wheel cover ..308
Specialist workshop ............................ 22
Speed, controlling see Cruise control
Speedometer
Digita l............................................ 216
In the Instrument cluster ...............211
Segments ...................................... 212
Selecting the unit of measurement 221
see Instrument cluster
SPEEDTRONIC
Display message ............................ 244
Permanent ..................................... 182
Selecting ........................................ 179
Variabl e......................................... 178 Index
15
Page 38 of 357

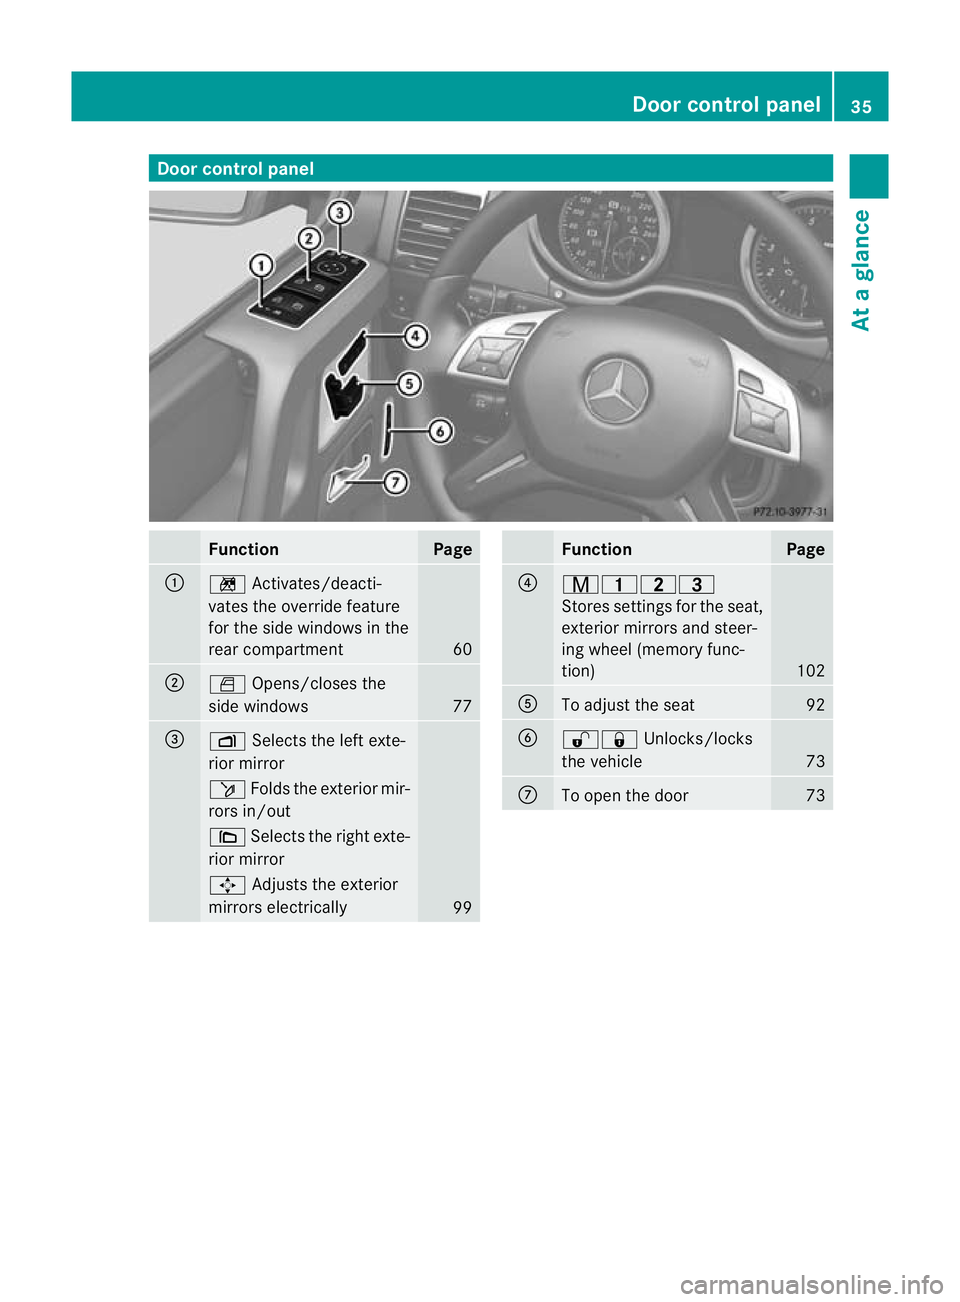
Door control panel
Function Page
:
n
Activates/deacti-
vates the override feature
fo rt he side windows in the
rear compartment 60
;
W
Opens/closes the
side windows 77
=
Z
Selects the left exte-
rior mirror ö
Folds the exterior mir-
rors in/out \
Selects the right exte-
rior mirror 7
Adjusts the exterior
mirrors electrically 99 Function Page
?
r45=
Stores settings for the seat,
exterior mirrors and steer-
ing wheel (memory func-
tion)
102
A
To adjust the seat 92
B
%&
Unlocks/locks
the vehicle 73
C
To open the door 73Doorc
ontrol panel
35At a glance
Page 93 of 357

Useful information
i This Owner's Manual describes all mod-
els, series and optional equipment for your
vehicle that were available at the time of
going to press. Country-specific differen-
ces are possible. Note that your vehicle
may not be fitted with all features descri-
bed. This is also the case for systems and
functions relevant to safety.
i Read the information on qualified special-
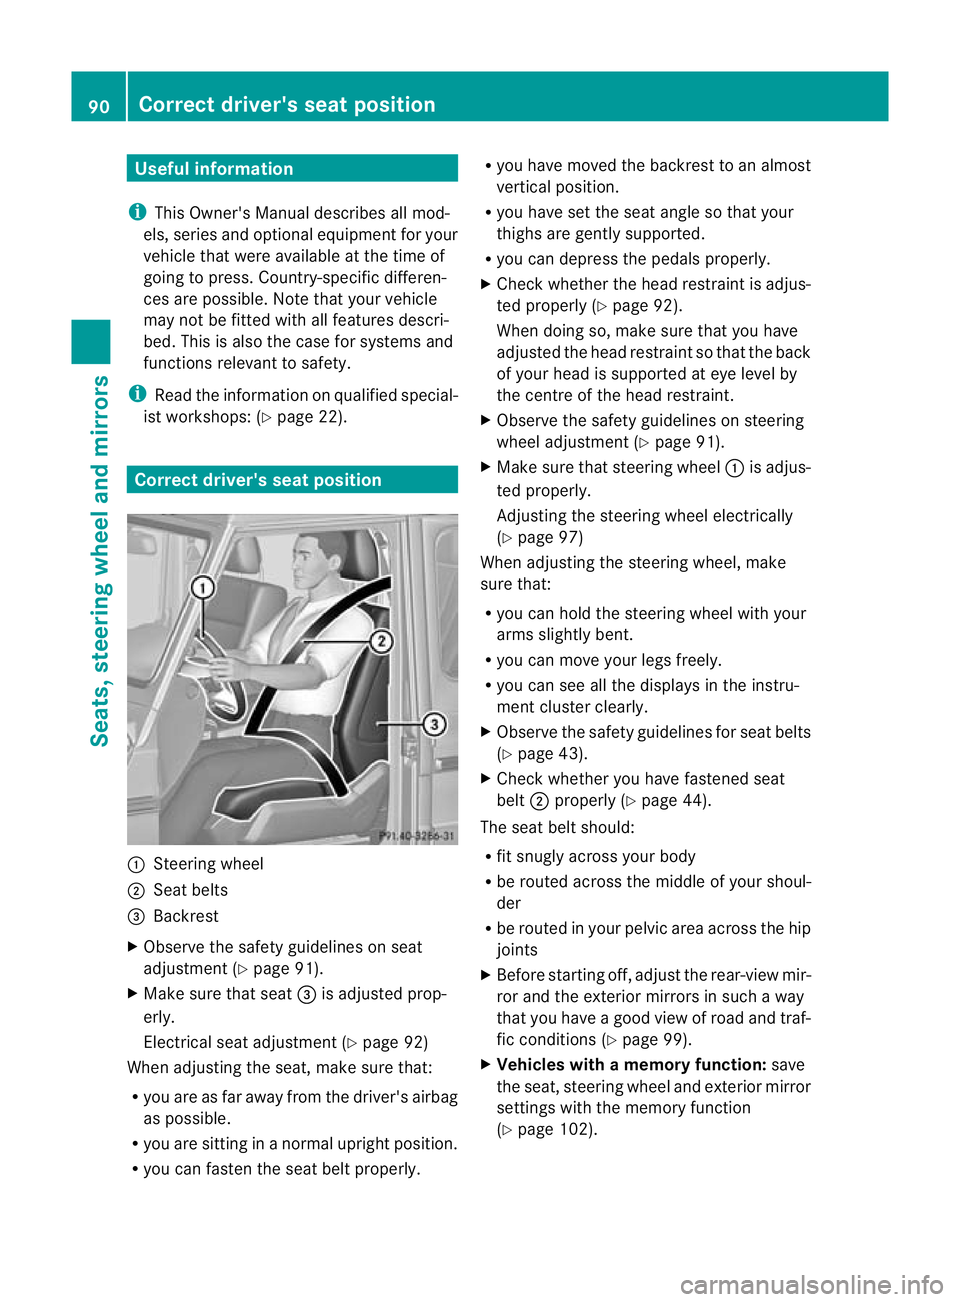
ist workshops: (Y page 22). Correct driver's seat position
:
Steering wheel
; Seat belts
= Backrest
X Observe the safety guidelines on seat
adjustment (Y page 91).
X Make sure that seat =is adjusted prop-
erly.
Electrical seat adjustment (Y page 92)
When adjusting the seat, make sure that:
R you are as far away from the driver's airbag
as possible.
R you are sitting in a normal upright position.
R you can faste nthe seat belt properly. R
you have moved the backrest to an almost
vertical position.
R you have set the seat angle so that your
thighs are gently supported.
R you can depress the pedals properly.
X Check whether the head restraint is adjus-
ted properly (Y page 92).
When doing so, make sure that you have
adjusted the head restraint so that the back
of your head is supported at eye level by
the centre of the head restraint.
X Observe the safety guidelines on steering
wheel adjustment (Y page 91).
X Make sure that steering wheel :is adjus-
ted properly.
Adjusting the steering wheel electrically
(Y page 97)
When adjusting the steering wheel, make
sure that:
R you can hold the steering wheel with your
arms slightly bent.
R you can move your legs freely.
R you can see all the displays in the instru-
ment cluster clearly.
X Observe the safety guidelines for seat belts
(Y page 43).
X Check whether you have fastened seat
belt ;properly (Y page 44).
The seat belt should:
R fit snugly across your body
R be routed across the middle of your shoul-
der
R be routed in your pelvic area across the hip
joints
X Before starting off, adjust the rear-view mir-
ror and the exterior mirrors in such a way
that you have a good view of road and traf-
fic conditions (Y page 99).
X Vehicles with a memory function: save
the seat, steering wheel and exterior mirror
settings with the memory function
(Y page 102). 90
Correct driver's seat positionSeats, steering wheel and mirrors
Page 95 of 357

the seat back. There is a risk tha
tthe seats
and/or the objects could be damaged.
! When the rear bench seat is folded for-
wards, the front seats cannot be moved to
their rearmost position. You could other-
wise damage the seats and the rear bench
seat.
! Make sure that the sun visor is folded up
before adjusting the backrest and head
restraint height. The head restraint and sun
visor could otherwise collide when the head
restraint is fully extended.
i If the front door is open, the seats can be
adjusted for up 30 minutes after the igni-
tion has been switched off.
i The rear-compartment head restraints
can be removed (Y page 93).
For more information, contact a qualified
specialist workshop.
i You can find further information about
enlarging the luggage compartment( fold-
ing the rear bench sea tforwards) on
(Y page 270). Adjusting the seats electrically
! Make sure that the cupholder on the
centre console is folded down before you
move the front-passenger seat forwards. :
Head restraint height
; Seat cushion angle
= Seat height ?
Seat fore-and-aft adjustment
A Backrest angle
i You can store the seat settings using the
memory function (Y page 102). Adjusting the head restraints
Important safety notes G
WARNING
Occupants should only travel sitting on seats
that have the head restraints fitted. This
reduces the risk of injury to the occupant in
the event of an accident.
Adjusting the front seat head restraint
height :
Head restraint height
; Seat cushion angle
= Seat height
? Seat fore-and-aft adjustment
A Backrest angle
X Slide head restraint adjustmen tbutton :
up or down in the direction of the arrow.
Adjusting the luxury head restraints G
WARNING
When folding bac kthe head restraint side bol-
sters, do not put your hands between the side
bolster and the cushion holder. There is a
danger of becoming trapped. 92
SeatsSeats, steering wheel and mirrors
Page 98 of 357

The following adjustments are made:
R
the seat cushion and head restraint move
down.
R the seat moves forwards or backwards,
depending on the starting position.
R backrest :tilts forwards.
R on the driver's side, the steering wheel
moves upwards and towards the dash-
board.
X Fold backrest :forwards in the direction
of the arrow.
Folding the seat back X
Push backrest :back until the seat
engages.
The seat cushion, head restraint, backrest
and steering wheel (driver's side) move
back to their original positions.
For safety reasons, the seat only moves to
its original position if this is in frontoft he
EASY-ENTRY position.
i Store the seat position using the memory
function (Y page 102).
i If your seat position is behind the EASY-
ENTRY position, you can return to this posi-
tion by pressing one of the memory but-
tons. Foot anti-entrapment feature Interrupting the EASY-ENTRY feature To interrupt the EASY-ENTRY feature you can
do the following:
X
Press one of the seat adjustment buttons
(Y page 92).
X Press the memory function adjustment but-
ton (Y page 102).
X Move the steering wheel adjustment lever
(Y page 97). Switching the seat heating on/off
General notes G
WARNING
Repeatedly setting the seat heating to level
3 may result in excessive seat temperatures.
The health of passengers that have limited
temperature sensitivity or a limited ability to
react to excessively high temperatures may
be affected or they may even suffer burn-like
injuries. Therefore, do not use seat heating
level 3repeatedly.
The red indicator lamps in the button indicate
the heating level you have selected.
X Make sure that the key is in position 1or
2 in the ignition lock.
i If the battery voltage is too low, the seat
heating may switch off.
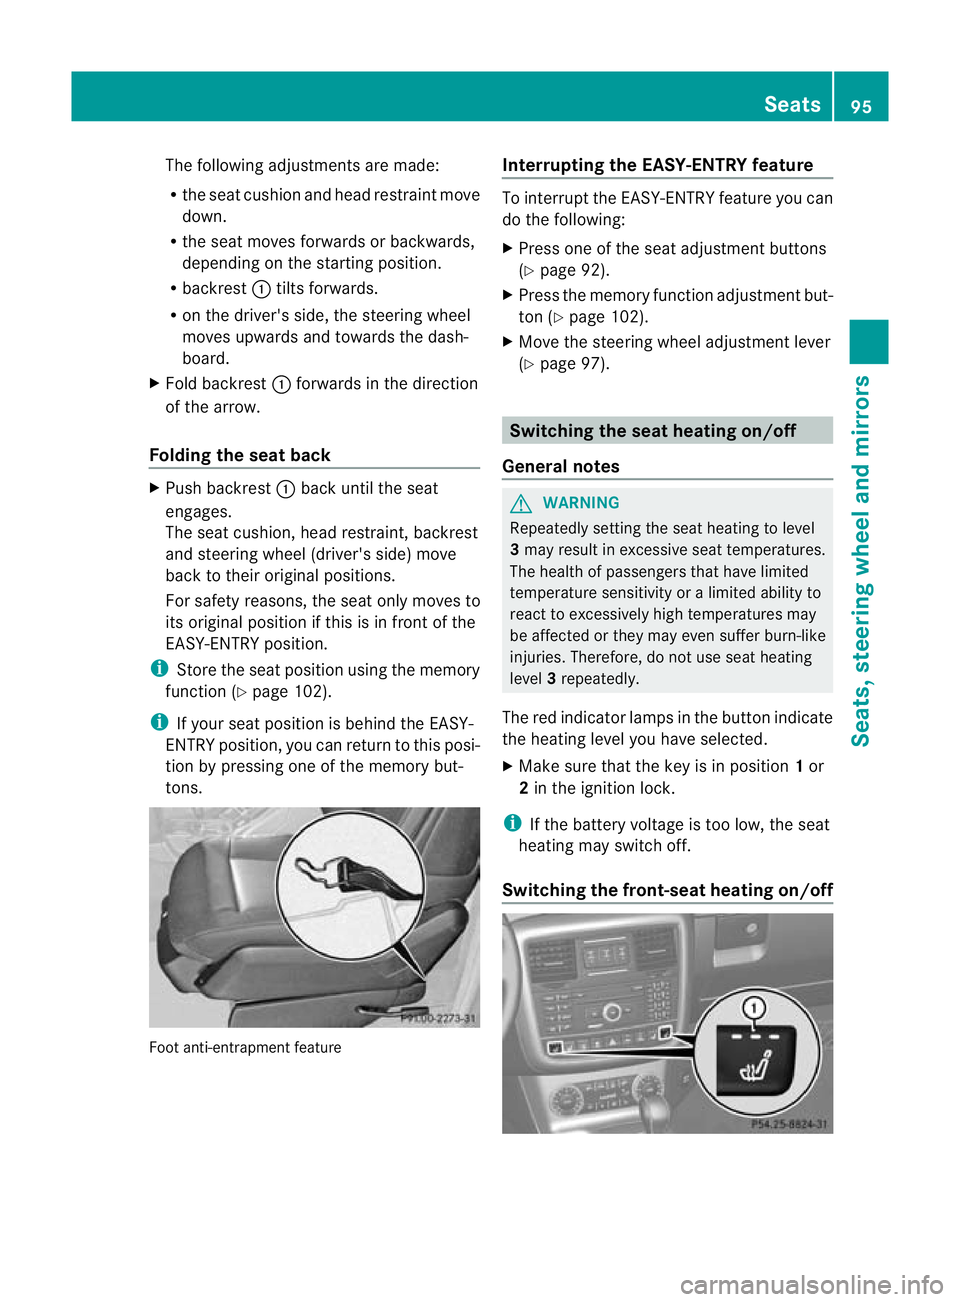
Switching the front-seat heating on/off Seats
95Seats, steering wheel and mirrors Z
Page 101 of 357

X
To activate: make sure tha tthe key is in
position 1or 2in the ignition lock.
X Turn the catch in the direction of
arrow :.
Indicator lamp =lights up.
X To deactivate: make sure that the key is
in position 1or 2in the ignition lock.
X Turn the catch in the direction of
arrow ;.
Indicator lamp =goes out.
i The steering wheel heating does not
switch off automatically.
Problems with the steering wheel heat-
ing :
To switch on the steering-wheel heating
; To switch off the steering-wheel heating
= Indicator lamp
If steering wheel heating indicator lamp =is
flashing, the steering wheel heating has
switched off automatically .The vehicle's
electrical system voltage is too low because
too many electrical consumers are switched
on.
X Switch off electrical consumers that you do
not need, such as the rear window heating
or interior lighting.
Once the battery is sufficiently charged, the
steering wheel heating will switch back on
automatically. Steering wheel EASY-ENTRY/EXIT fea-
ture
Important safety notes G
WARNING
Make sure that nobody can become trapped
when you activate the EASY-ENTRY/EXIT fea-
ture.
If there is a risk of someone becoming trap-
ped, stop the adjustment procedure. To halt
the procedure:
R press the steering column adjustment but-
ton.
R briefly press one of the memory function
position buttons.
The steering column stops moving immedi-
ately.
Do not keep the memory function position
button pressed down, otherwise the memory
function will start and the steering wheel and
seat will begin to move.
Never leave children unsupervised in the vehi-
cle. They could open the driver's door and
thereby unintentionally activate the EASY-
ENTRY feature and become trapped.
! Do not activate the EASY-ENTRY/EXIT
feature, if the seat backrest is reclined too
far backwards. This can damage the front
or rear seats. You must first move the back-
rest to a vertical position.
The EASY-ENTRY/EXIT feature makes getting
in and out of your vehicle easier.
You can activate and deactivate the EASY-
ENTRY/EXIT feature in the on-board com-
puter (Y page 224). 98
Steering wheelSeats, steering wheel and mirrors