2012 MERCEDES-BENZ G-CLASS SUV lock
[x] Cancel search: lockPage 174 of 357
Checklist after driving off-road
Driving ove
rrough terrain places greater
demands on your vehicle than driving on nor-
mal roads. After driving off-road, check the
vehicle. This allows you to detect damage
promptly and reduce the risk of an accident
to yourself and other road users.
X Shift the transfer case to HIGH
RANGE(Y page 202).
X Disengage the differential locks
(Y page 204).
X Clean the headlamps and rear lights and
check for damage.
X Clean the front and rear licence plates.
X Clean the wheels and tyres with a water jet
and remove any foreign objects.
X Clean the wheels, tyres, wheel arches and
the vehicle underside with a water jet;
check for any foreign objects and damage.
X Check whether twigs or other parts of
plants have become trapped. These
increase the risk of fire and can damage
fuel pipes, brake hoses or the rubber bel-
lows of the axle joints and propeller shafts.
X After the trip, examine without fail the
entire undercarriage, wheels, tyres, brakes,
bodywork structure, steering, chassis and
exhaust system for damage.
X After driving for extended periods across
sand, mud, gravel, water or in similarly dirty
conditions, have the brake discs, wheels,
brake pads/linings and axle joints checked
and cleaned.
X If you notice strong vibrations after off-road
driving, check for foreign objects in the
wheels and drive train and, if necessary,
remove them. Foreign objects can disturb
the balance and cause vibrations. Driving on sand Observe the following rules when driving on
sand:
R
Shift the transfer case to LOW
RANGE(Y page 202).
R Avoid high engine speeds.
R Limit the shift range of the automatic trans-
mission according to the off-road condi-
tions.
R Drive quickly to overcome the rolling resist-
ance. Otherwise, the vehicle could dig itself
into the sand.
R Drive in the tracks of other vehicles if pos-
sible. Make sure that the ruts are not too
deep, that the sand is firm enough and that
your vehicle has sufficient ground clear-
ance.
Tyre ruts and gravel roads !
Check that the ruts are not too deep and
that your vehicle has sufficient clearance.
Otherwise, your vehicle could be damaged
or bottom out and get stuck.
Observe the following rules when driving
along ruts in off-road terrain or on roads with
loose gravel:
R Shift the transfer case to LOW
RANGE(Y page 202).
R Avoid high engine speeds.
R Observe the safety notes (Y page 169) and
the general notes (Y page 169) on off-road
driving.
R Restrict the shift range of the automatic
transmission to 1(Ypage 153).
R Drive slowly.
R Where ruts are too deep, drive with the
wheels on one side on the middle section
of turf if possible.
Driving over obstacles !
Obstacles could damage the floor of the
vehicle or components of the chassis. Ask
passengers for guidance when driving over Driving tips
171Driving and parking Z
Page 175 of 357
large obstacles. Any damage to the vehicle
always increases the risk of an accident.
! Drive with particular care when driving
over an obstacle while driving up or down
a steep slope.
The vehicle could otherwise tilt and slide
sideways or tip over. Observe the following rules when driving over
tree stumps, large stones and other obsta-
cles:
R
Observe the safety notes (Y page 169)and
the general notes (Y page 169) on off-road
driving.
R Shift the transfer case to LOW
RANGE( Ypage 202).
R Avoid high engine speeds.
R Restrict the shift range to 1(Ypage 153).
R Make sure tha tyou have enough ground
clearance before driving across an obsta-
cle.
R Drive very slowly.
R Try to drive straight over the centre of
obstacles: front wheel first, then rear
wheel. Travelling uphill
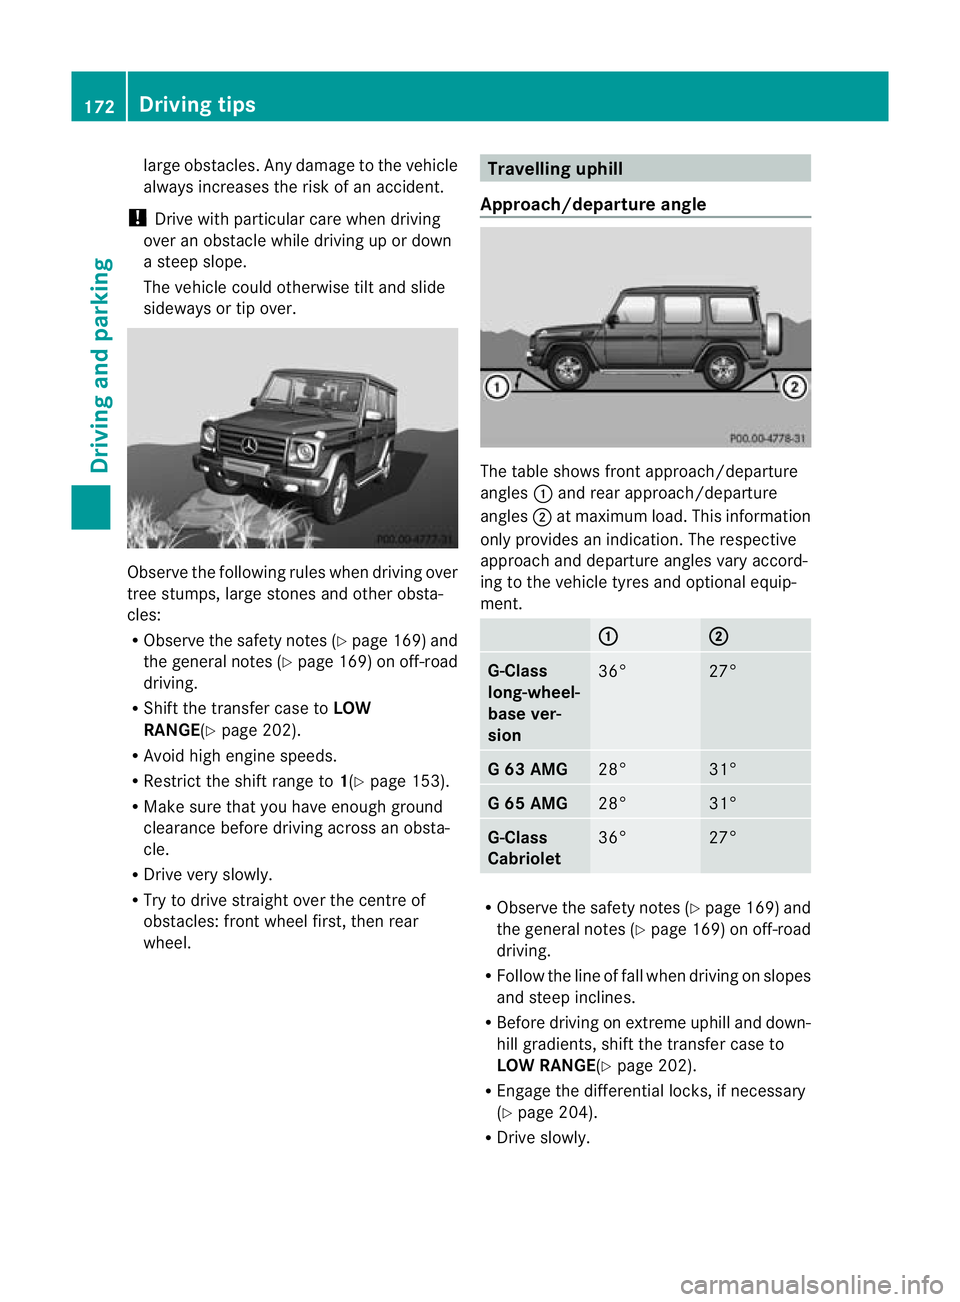
Approach/departure angle The table shows front approach/departure
angles
:and rear approach/departure
angles ;at maximum load. This information
only provides an indication. The respective
approach and departure angles vary accord-
ing to the vehicle tyres and optional equip-
ment. : ;
G-Class
long-wheel-
base ver-
sion
36° 27°
G 63 AMG
28° 31°
G 65 AMG
28° 31°
G-Class
Cabriolet
36° 27°
R
Observe the safety notes (Y page 169) and
the general notes (Y page 169) on off-road
driving.
R Follow the line of fall when driving on slopes
and steep inclines.
R Before driving on extreme uphill and down-
hill gradients, shift the transfer case to
LOW RANGE(Y page 202).
R Engage the differential locks, if necessary
(Y page 204).
R Drive slowly. 172
Driving tipsDriving and parking
Page 181 of 357
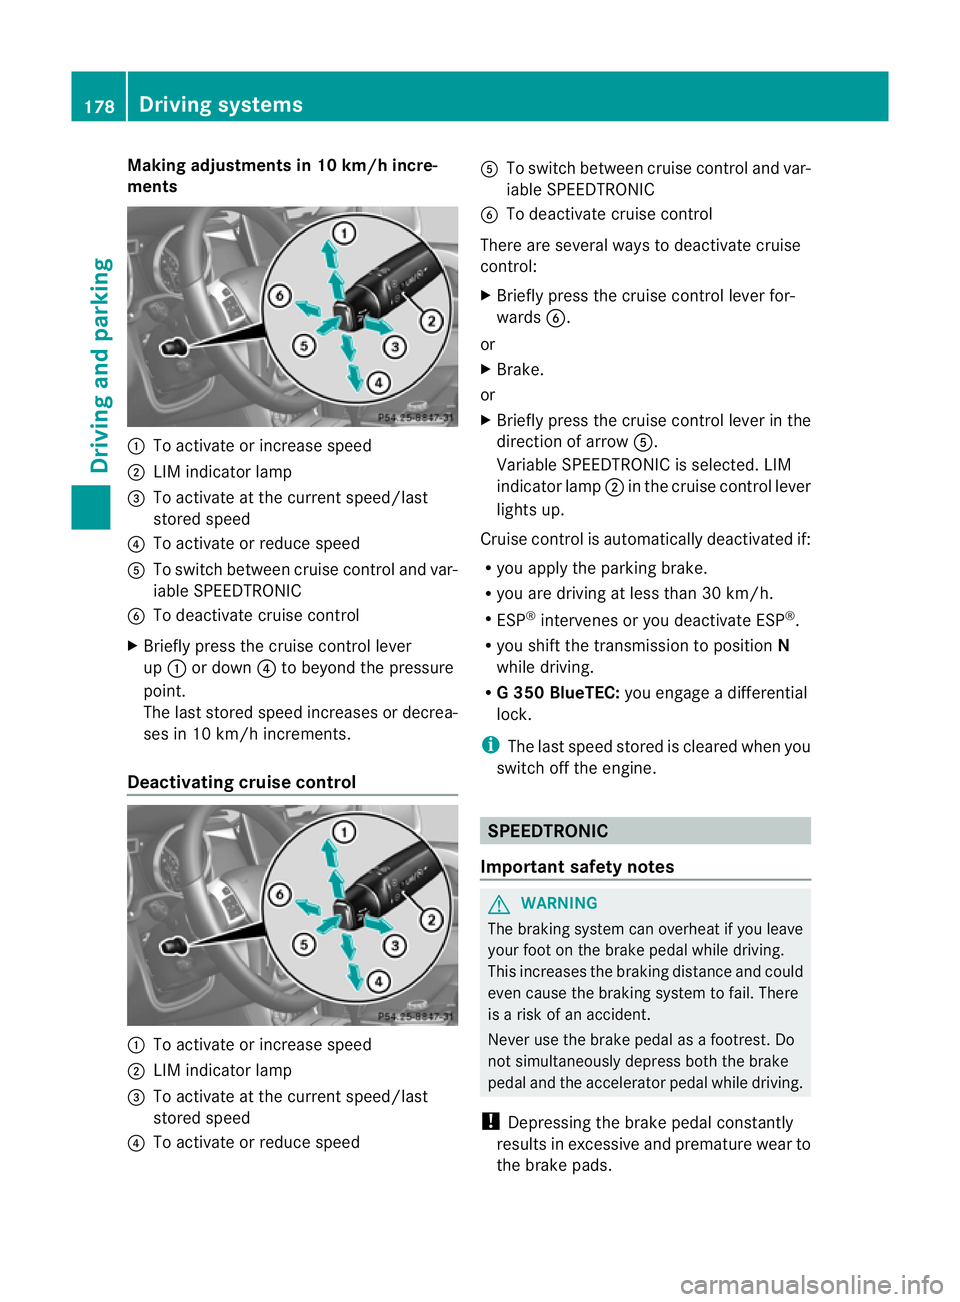
Making adjustments in 10 km/h incre-
ments
:
To activate or increase speed
; LIM indicator lamp
= To activate at the current speed/last
stored speed
? To activate or reduce speed
A To switch between cruise control and var-
iable SPEEDTRONIC
B To deactivate cruise control
X Briefly press the cruise control lever
up : or down ?to beyond the pressure
point.
The lasts tored speed increases or decrea-
ses in 10 km/h increments.
Deactivating cruise control :
To activate or increase speed
; LIM indicator lamp
= To activate at the current speed/last
stored speed
? To activate or reduce speed A
To switch between cruise control and var-
iable SPEEDTRONIC
B To deactivate cruise control
There are several ways to deactivate cruise
control:
X Briefly press the cruise control lever for-
wards B.
or
X Brake.
or
X Briefly press the cruise control lever in the
directio nofarrowA.
Variable SPEEDTRONIC is selected. LIM
indicator lamp ;in the cruise control lever
lights up.
Cruise control is automatically deactivated if:
R you apply the parking brake.
R you are driving at less than 30 km/h.
R ESP ®
intervenes or you deactivate ESP ®
.
R you shift the transmission to position N
while driving.
R G3 50 BlueTEC: you engage a differential
lock.
i The last speed stored is cleared when you
switch off the engine. SPEEDTRONIC
Important safety notes G
WARNING
The braking system can overheat if you leave
your foot on the brake pedal while driving.
This increases the braking distance and could
even cause the braking system to fail. There
is a risk of an accident.
Never use the brake pedal as a footrest .Do
not simultaneously depress both the brake
pedal and the accelerato rpedal while driving.
! Depressing the brake pedal constantly
results in excessive and premature wear to
the brake pads. 178
Driving systemsDriving and parking
Page 187 of 357

cruise control lever in the direction of arrow
B.
LIM indicator lamp =on the cruise control
lever indicates which function you have selec-
ted:
R LIM indicator lamp = off:
DISTRONIC
PLUS is selected.
R LIM indicator lamp = on:
variable
SPEEDTRONIC is selected.
Activating DISTRONIC PLUS Activation conditions
To activate DISTRONIC PLUS, the following
conditions mus
tbe fulfilled:
R the engine must be running. It may take up
to two minutes of driving before DIS-
TRONIC PLUS is ready for use.
R the parking brake must be released.
R the differential lock must be deactivated.
R ESP ®
must be switched on, but not inter-
vening.
R the transmission must be in position D.
R the driver's door must be closed when you
shift from Pto Dor your seat belt must be
fastened.
R the front-passenger door and the rear
doors must be closed.
R the vehicle must not be skidding.
R the DISTRONIC PLUS function must be
selected (Y page 183).
R the transfer case must be in the HIGH
RANGE transmission position.
R the vehicle must not be on an uphill or
downhill gradient of more than 22-25%.
R the radar sensor must be free from dirt
(Y page 298). Activating while driving When driving at speeds below 30 km/h, you
can activate DISTRONIC PLUS if the vehicle
in fron
thas been detected and is shown in the
multifunction display. If the vehicle in fron tis
no longe rdetected and displayed, DIS-
TRONIC PLUS switches off and you will hear
a tone.
X Briefly pull the cruise control lever towards
you ?, or press it up :or down A.
DISTRONIC PLUS is selected.
X Press the cruise control lever up :or
down Arepeatedly until the desired speed
is set.
X Remove your foot from the accelerator
pedal.
Your vehicle adapts its speed to that of the
vehicle in front, but only up to the desired
stored speed.
i If you do not fully release the accelerator
pedal, the DISTRONIC PLUS inactive message appears in the multifunction dis-
play. The set distance to a slower-moving
vehicle in fron
twill the nnot be maintained.
You will be driving at the speed you deter-
mine by the position of the accelerator
pedal. 184
Driving systemsDriving and parking
Page 195 of 357
The brightness of the indicator/warning
lamps is adjusted automatically according to
the ambient light.
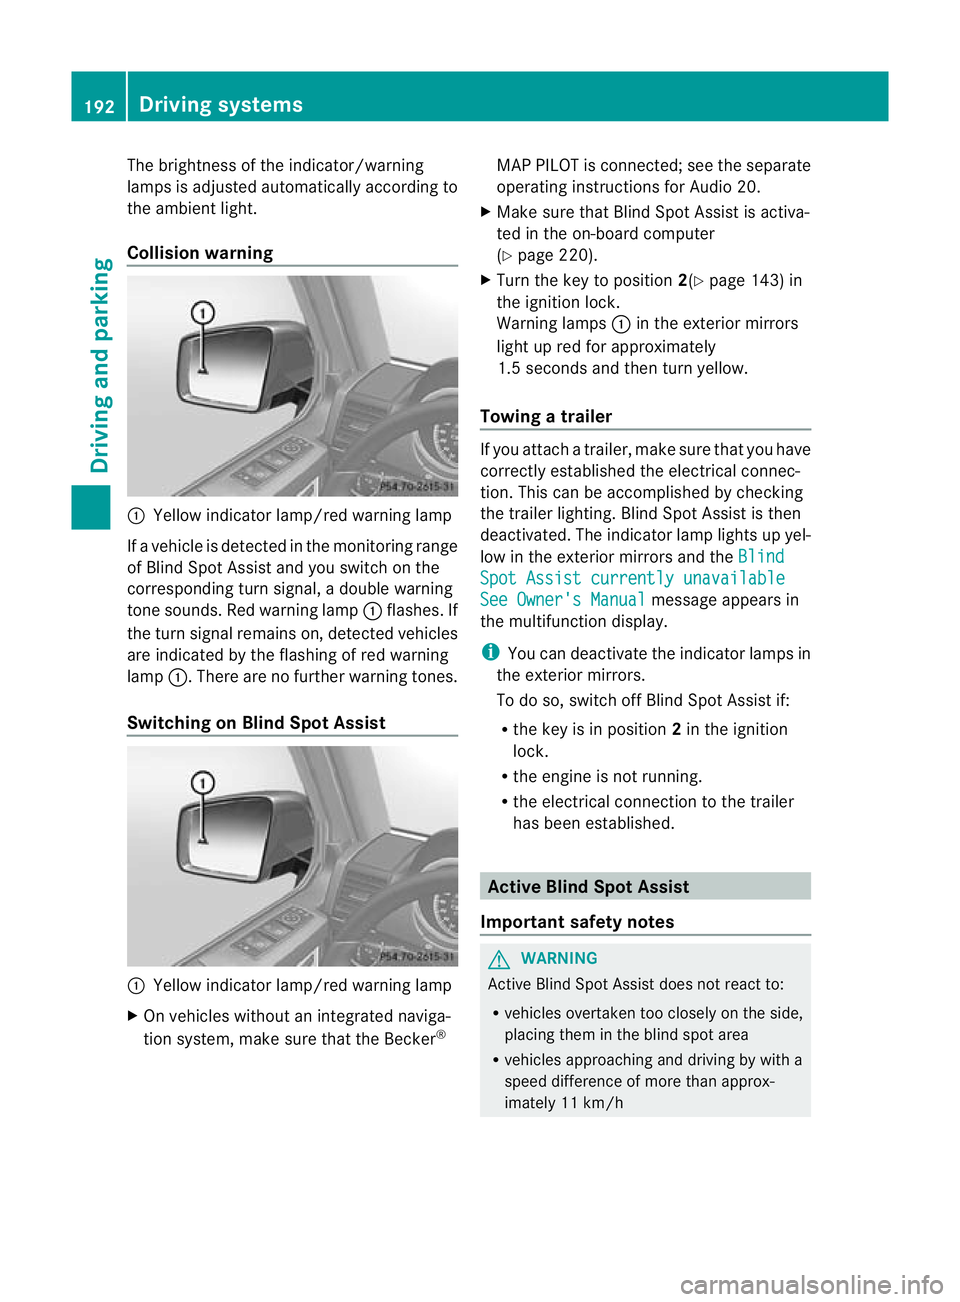
Collision warning
:
Yellow indicator lamp/red warning lamp
If a vehicle is detected in the monitoring range
of Blind Spot Assist and you switch on the
corresponding turn signal, a double warning
tone sounds. Red warning lamp :flashes. If
the turn signal remains on, detected vehicles
are indicated by the flashing of red warning
lamp :.There are no further warning tones.
Switching on Blind Spot Assist :
Yellow indicator lamp/red warning lamp
X On vehicles without an integrated naviga-
tion system, make sure that the Becker ®MAP PILOT is connected; see the separate
operating instructions for Audio 20.
X Make sure that Blind Spot Assist is activa-
ted in the on-board computer
(Y page 220).
X Turn the key to position 2(Ypage 143) in
the ignition lock.
Warning lamps :in the exterior mirrors
light up red for approximately
1.5 seconds and then turn yellow.
Towing atrailer If you attach a trailer, make sure tha
tyou have
correctly established the electrical connec-
tion. This can be accomplished by checking
the trailer lighting. Blind Spot Assist is then
deactivated. The indicator lamp lights up yel-
low in the exterior mirrors and the Blind Spot Assist currently unavailable
See Owner's Manual message appears in
the multifunction display.
i You can deactivate the indicator lamps in
the exterior mirrors.
To do so, switch off Blind Spot Assist if:
R the key is in position 2in the ignition
lock.
R the engine is not running.
R the electrical connection to the trailer
has been established. Active Blind Spot Assist
Important safety notes G
WARNING
Active Blind Spot Assist does not react to:
R vehicles overtaken too closely on the side,
placing them in the blind spot area
R vehicles approaching and driving by with a
speed difference of more than approx-
imately 11 km/h 192
Driving systemsDriving and parking
Page 199 of 357
X
Make sure that active Blind Spot Assist
(Y page 220) is activated in the on-board
computer.
X Turn the key to position 2in the ignition
lock.
Warning lamps :in the exterior mirrors
light up red for approximately
1.5 seconds and then turn yellow.
Towing atrailer If you attach a trailer, make sure tha
tyou have
correctly established the electrical connec-
tion. This can be accomplished by checking
the trailer lighting. Active Blind Spot Assist is
then deactivated. The indicator lamp lights up
yellow in the exterior mirrors and the ActiveBlind Spot Assist currently unavail‐
able See Owner's Manual message
appears in the multifunction display. HOLD function
General notes The HOLD function can assist the driver in the
following situations:
R
when pulling away, especially on steep
slopes
R when manoeuvring on steep slopes
R when waiting in traffic
The vehicle is kept stationary without the
driver having to depress the brake pedal.
The braking effect is cancelled and the HOLD
function is deactivated when you depress the
accelerator pedal to pull away.
i Do not use the HOLD function when driv-
ing off-road, on steep uphill or downhill gra-
dients or on slippery or loose surfaces. The
HOLD function cannot hold the vehicle on
such surfaces. Activation conditions You can activate the HOLD function if:
R
the vehicle is stationary.
R the engine is running or it has been
switched off by the ECO start/stop func-
tion (AMG vehicles).
R the engine is running.
R the driver's door is closed or your seat belt
is fastened.
R the transmission is in position D,Ror N.
R DISTRONIC PLUS is deactivated.
Activating the HOLD function The vehicle's brakes are applied when the
HOLD function is activated. For this reason,
deactivate the HOLD function while in the car
wash or while towing.
X
Make sure that the activation conditions
are met.
X Depress the brake pedal.
X Quickly depress the brake pedal further
until ë appears in the multifunction dis-
play.
The HOLD function is activated. You can
release the brake pedal.
i If depressing the brake pedal the first
time does not activate the HOLD function,
wait briefly and then try again.
Deactivating the HOLD function G
WARNING
When leaving the vehicle, it can still roll away
despite being braked by the HOLD function if:
R there is a malfunction in the system or in
the voltage supply
R the HOLD function is deactivated by the
accelerator pedal being depressed, e.g. by
a vehicle occupant
R the electrical system in the engine com-
partment, the battery or the fuses are tam-
pered with
R the battery is disconnected 196
Driving systemsDriving and parking
Page 202 of 357

Warning displays
Warning display for the front area
:
Segments on the left-hand side of the
vehicle
; Segments on the right-hand side of the
vehicle
= Segments showing operational readiness
The warning displays show the distance
between the sensors and the obstacle. The
warning display for the front area is located
on the dashboard above the centre airv ents.
The warning display for the rear area is loca-
ted on the roof lining in the rear compart-
ment.
The warning display for each side of the vehi-
cle is divided into five yellow and two red seg-
ments. PARKTRONIC is operational if yellow
segments showing operational readiness =
light up.
The selected transmission position and the
direction in which the vehicle is rolling deter-
mine which warning display is active when the
engine is running. Transmission
position Warning display
D
Front area activated
R,
Nor the vehicle
is rolling back-
wards Rear and front areas
activated
P
No areas activated One or more segments light up as the vehicle
approaches an obstacle, depending on the
vehicle's distance from the obstacle.
From the:
R
sixth segmen tonwards, you will hea ran
intermittent warning ton efor approx-
imately two seconds.
R seventh segment onwards, you will hear a
warning tone for approximately two sec-
onds. This indicates that you have now
reached the minimum distance.
Deactivating/activating PARKTRONIC :
Indicator lamp
; To deactivate/activate PARKTRONIC
If indicator lamp :lights up, PARKTRONIC is
deactivated.
i PARKTRONIC is automatically activated
when you turn the key to position 2in the
ignition lock.
Towing atrailer PARKTRONIC is deactivated for the rea
rarea
when you establish an electrical connection
between yourv ehicle and a trailer. Driving systems
199Driving and parking Z
Page 204 of 357
Activating/deactivating the reversing
camera
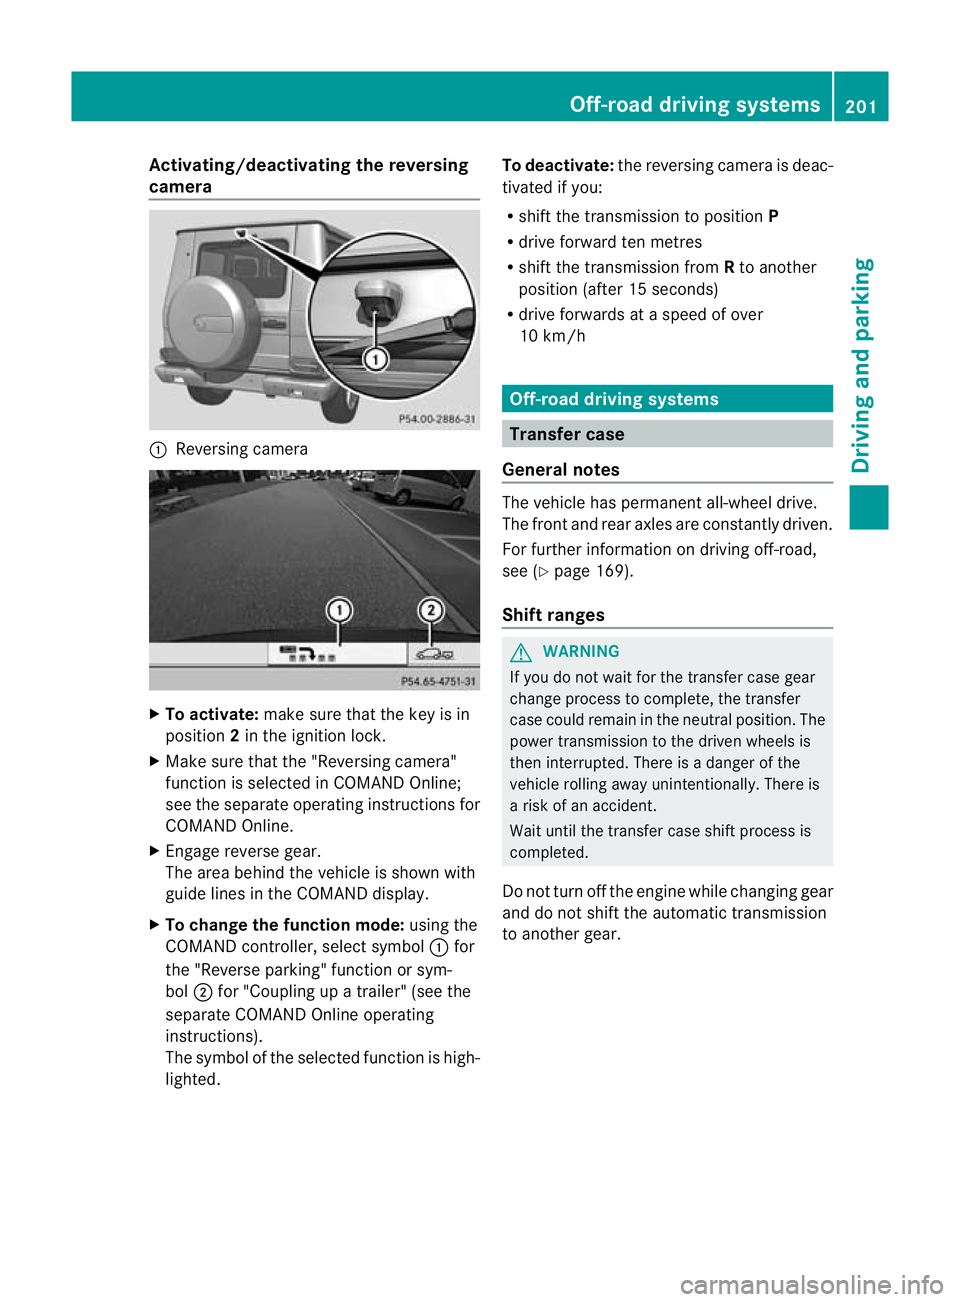
:
Reversing camera X
To activate: make sure that the key is in
position 2in the ignition lock.
X Make sure that the "Reversing camera"
function is selected in COMAND Online;
see the separate operating instructions for
COMAND Online.
X Engage reverse gear.
The area behind the vehicle is shown with
guide lines in the COMAND display.
X To change the function mode: using the
COMAND controller, select symbol :for
the "Reverse parking" function or sym-
bol ;for "Coupling up a trailer" (see the
separate COMAND Online operating
instructions).
The symbol of the selected function is high-
lighted. To deactivate:
the reversing camera is deac-
tivated if you:
R shif tthe transmission to position P
R drive forward ten metres
R shift the transmission from Rto another
position (after 15 seconds)
R drive forwards at a speed of over
10 km/h Off-road driving systems
Transfer case
General notes The vehicle has permanent all-wheel drive.
The front and rear axles are constantly driven.
For further information on driving off-road,
see (Y
page 169).
Shift ranges G
WARNING
If you do not wait for the transfer case gear
change process to complete, the transfer
case could remain in the neutral position. The
power transmission to the driven wheels is
then interrupted. There is a danger of the
vehicle rolling away unintentionally. There is
a risk of an accident.
Wait until the transfer case shift process is
completed.
Do not turn off the engine while changing gear
and do not shift the automatic transmission
to another gear. Off-road driving systems
201Driving and parking Z