Page 116 of 357

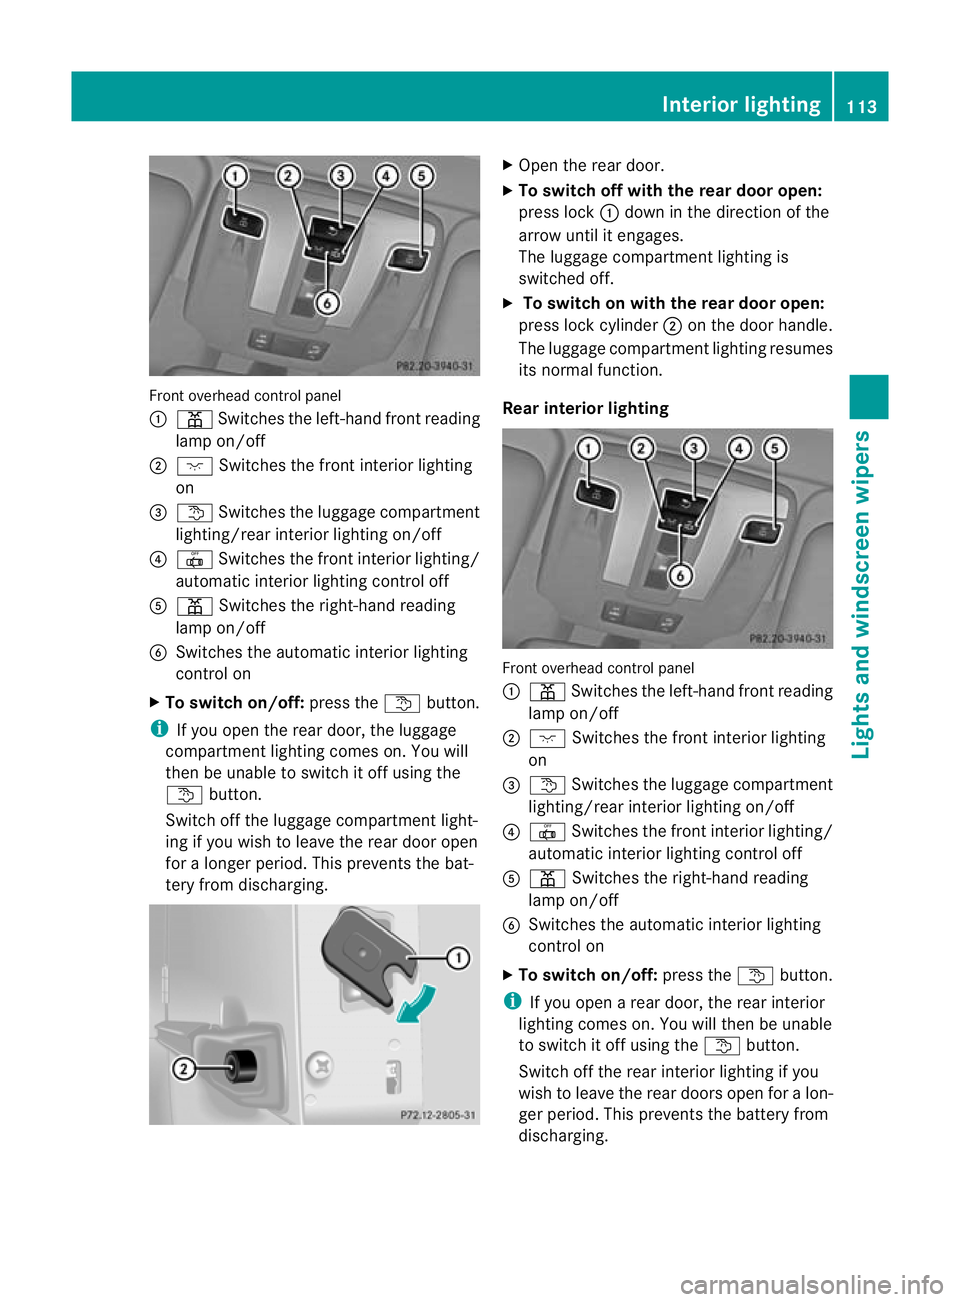
Front overhead control panel
:
p Switches the left-hand front reading
lamp on/off
; c Switches the front interior lighting
on
= t Switches the luggage compartment
lighting/rea rinterior lighting on/off
? | Switches the front interio rlighting/
automatic interior lighting control off
A p Switches the right-hand reading
lamp on/off
B Switches the automatic interior lighting
control on
X To switch on/off: press thetbutton.
i If you open the rear door, the luggage
compartmen tlighting comes on. You will
the nbe unable to switch it off using the
t button.
Switch off the luggage compartment light-
ing if you wish to leave the rear door open
for a longer period. This prevents the bat-
tery from discharging. X
Open the rear door.
X To switch off with the rear door open:
press lock :down in the direction of the
arrow until it engages.
The luggage compartment lighting is
switched off.
X To switch on with the rear door open:
press lock cylinder ;on the door handle.
The luggage compartment lighting resumes
its normal function.
Rear interior lighting Front overhead control panel
:
p Switches the left-hand fron treading
lamp on/off
; c Switches the front interior lighting
on
= t Switches the luggage compartment
lighting/rear interior lighting on/off
? | Switches the fron tinterior lighting/
automatic interio rlighting control off
A p Switches the right-hand reading
lamp on/off
B Switches the automatic interior lighting
control on
X To switch on/off: press thetbutton.
i If you open a rear door, the rear interior
lighting comes on. You will the nbe unable
to switch it off using the tbutton.
Switch off the rear interior lighting if you
wish to leave the rear doors open for a lon-
ger period. This prevents the battery from
discharging. Interior lighting
113Lights and windscreen wipers Z
Page 119 of 357
Replacing the fron
tbulbs
Side lamps/parking lamps X
Switch off the lights.
X Loose nscrews :but do not remove.
X Remove panel ;upwards in the direction
of the arrow. X
Unscrew screws =.
i Only remove screws =. Do not turn
adjustment screws ?. If an adjustment
screw ?has bee nturned, the headlamp
adjustmen tmust be checked at a qualified
workshop. X
Remove headlamp A.
X Lightly press bulb holder B; at the same
time, tur nitanti-clockwise and pull it out. X
Take bulb Coutofb ulb holder B.
X Inser tthe new bulb into bulb holder B.
X Insert bulb holder Binto the lamp and turn
it clockwise.
X Insert headlamp A.
X Replace and tighten screws =.
X Position cover ;.
X Replace and tighten screws :.116
Replacing bulbsLights and windscreen wipers
Page 120 of 357
Fron
tfoglamps/cornering lamps with
foglamp function X
Switch off the lights.
X Unscrew screws :.
X Remove cover ;. X
Unscrew screws =.
i Only remove screws =. Do not turn
adjustment screw ?. If adjustment
screw ?has been turned, the front fog-
lamp adjustment must be checked at a
qualified workshop.
X Remove lamp A. X
Hold lamp A.
X Lightly press bulb holder B, turn it anti-
clockwise to the stop and pull it out. X
Take bulb Cout of bulb holder B.
X Inser tthe new bulb into bulb holder B.
X Insert bulb holder Binto lamp Aand turn
it clockwise to the stop.
X Insert lamp A.
X Replace and tighten screws =.
X Position cover ;.
X Replace and tighten screws :.
Turn signals !
Do not fasten the screws too tightly. You
could otherwise damage the lens. Replacing bulbs
117Lights and windscreen wipers Z
Page 121 of 357
X
Switch off the lights.
X Unscrew screws :.
X Remove lens ;. X
Turn bulb =anti-clockwise, applying slight
pressure, and remove it from the bulb
holder.
X Insert the new bulb into the bulb holde rand
tur nitc lockwise until it engages.
X Fit lens ;.
X Replace and tighten screws :.Replacing the rear bulbs
Tail lamps !
When fitting the lens, make sure that the
seal is positioned correctly.
! Do not fasten the screws too tightly. You
could otherwise damage the lens. X
Switch off the lights.
X Unscrew screws :.
X Remove lens ;. =
Turn signals
? Brake/tail lamp
A Tail lamp/parking lamp
X Turn the corresponding bulb anti-clock-
wise, applying slight pressure, and remove
it fro mthe bulb holder.
X Insert the new bulb into the bulb holder and
turn it clockwise until it engages.
X Fit lens ;.
X Replace and tighten screws :.
Reversing lamp/rear foglamp !
Do not fasten the screws too tightly. You
could otherwise damage the lens. 118
Replacing bulbsLights and windscreen wipers
Page 122 of 357

Example: rea
rfoglamp
X Switch off the lights.
X Unscrew screws ;.
X Remove lens :. X
Turn bulb =anti-clockwise, applying slight
pressure, and remove it from the bulb
holder.
X Insert the new bulb into the bulb holder and
turn it clockwise until it engages.
X Fit lens :.
X Replace and tighten screws ;.Windscreen wipers
Switching the windscreen wipers on/
off G
WARNING
The windscreen will not longer be wiped prop-
erly if the wiper blades are worn. This could
prevent you from observing the traffic condi-
tions, thereby causing an accident .Replace the wiper blades twice a year, ideally in spring
and autumn.
! Do not operate the windscreen wipers
when the windscreen/rear window is dry,
as this could damage the wiper blades.
Moreover, dust that has collected on the
windscreen/rear window can scratch the
glass if wiping takes place when the wind-
screen/rear window is dry.
If it is necessary to operate the windscreen
wipers/rear window wiper in dry weather
conditions, always use washer fluid.
! If the windscreen wipers leave smears on
the windscreen/rear window after the vehi-
cle has been washed in an automatic car
wash, this may be due to wax or other res-
idue. Clean the windscreen/rear window
with washer fluid after an automatic car
wash.
! Intermittent wiping with rain sensor: due
to optical influences and the windscreen
becoming dirty in dry weather conditions,
the windscreen wipers may be activated
inadvertently. This could damage the wind-
screen wiper blades or scratch the wind-
screen.
For this reason, you should always switch
off the windscreen wipers in dry weather. Combination switch
1
$ Windscreen wipers off
2 Ä Intermittentw ipe, low (rain sensor
set to low sensitivity)
3 Å Intermitten twipe, high (rain sensor
set to high sensitivity) Windscreen wipers
119Lights and windscreen wipers Z
Page 123 of 357

4
° Continuous wipe, slow
5 ¯ Continuous wipe, fast
B í Single wipe
C î To wipe with washe rfluid
X Turn the key to position 1or 2in the ignition
lock.
X Turn the combination switch to the corre-
sponding position.
Intermittent wiping is interrupted if you stop
and open a front door. This protects people
getting into and out of the vehicle fro mbeing
sprayed with water.
In the ÄorÅ position, the appropriate
wiping frequency is set automatically accord-
ing to the intensity of the rain. In the Å
position, the rain sensor is more sensitive
than in the Äposition, causing the wind-
screen wipers to wipe more frequently.
i When the windscreen wipers are
switched on and you stop the vehicle, the
windscreen wipers wipe more slowly. Switching the rear window wiper on/
off
Combination switch
:
è Switch
2 b To wipe with washer fluid
3 ITo switch on intermittent wiping
4 0To switch off intermittent wiping
5 b To wipe with washer fluid X
Turn the key to position 1or 2in the ignition
lock.
X Turn switch :on the combination switch
to the corresponding position.
When the rear window wiper is switched on,
the symbol appears in the instrument clus-
ter.
i The rear window wiper comes on auto-
matically if you shift the selector lever to
R while the windscreen wipers are on. Replacing the wiper blades
Important safety notes G
WARNING
The wiper arms could start moving and cause
an injury if you leave the windscreen wipers
switched on.
Remove the key from the ignition lock before
replacing the wiper blades.
! To avoid damaging the windscreen wiper
blades, make sure that you touch only the
wiper arm of the windscreen wiper.
! Never open the bonnet if a windscreen
wiper arm has been folded away from the
windscreen.
Never fold a windscreen wiper arm without
a wiper blade back onto the windscreen/
rear window.
Hold the windscreen wiper arm firmly when
you change the wiper blade. If you release
the windscreen wiper arm without a wiper
blade and it falls onto the windscreen, the
windscreen may be damaged by the force
of the impact.
Mercedes-Benzr ecommends that you have
the wiper blades changed at aqualified
specialist workshop. 120
Windscreen wipersLights and windscreen wipers
Page 124 of 357

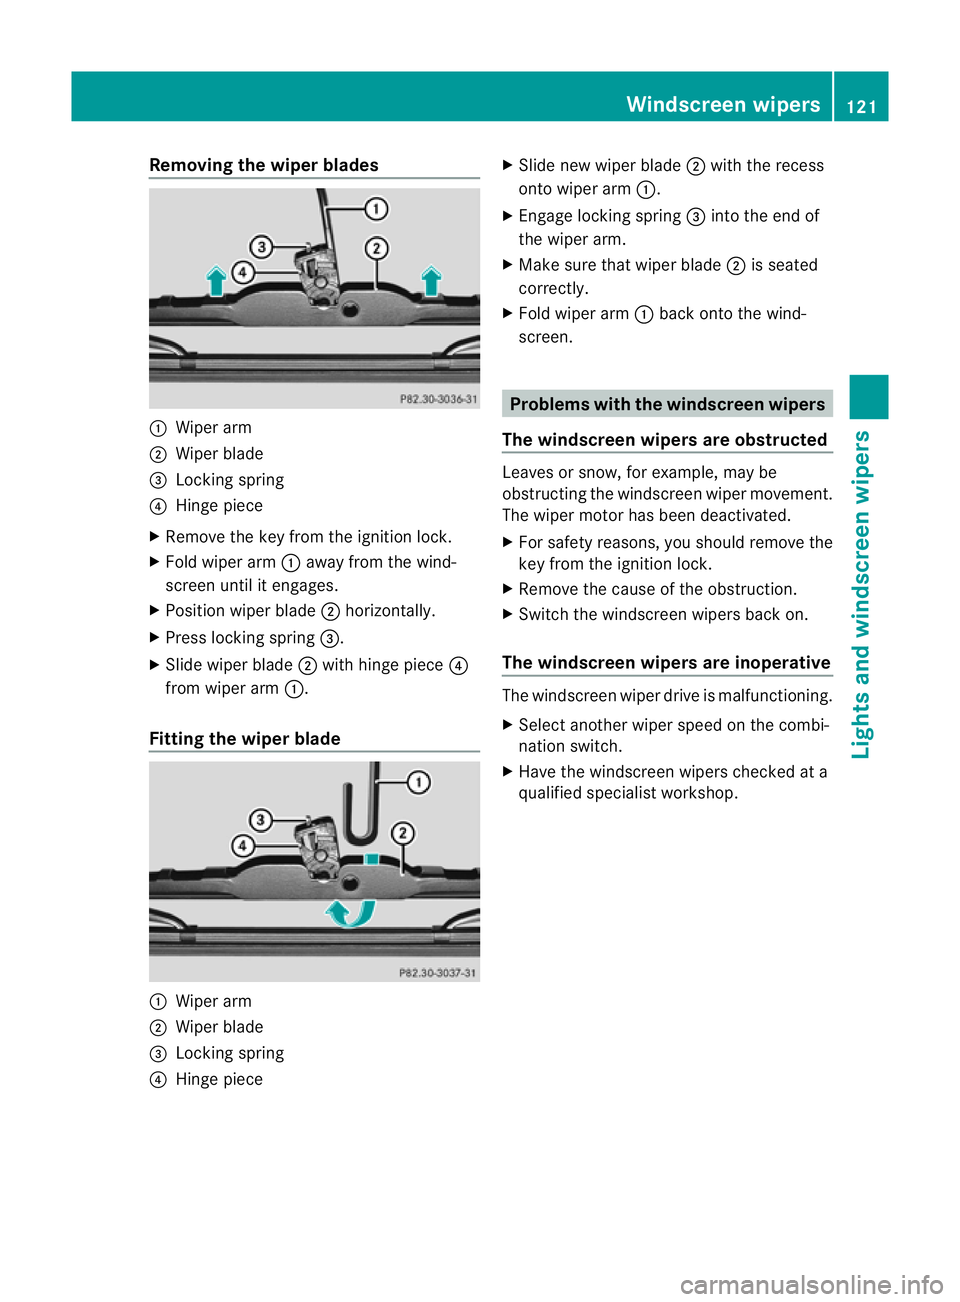
Removing the wiper blades
:
Wiper arm
; Wiper blade
= Locking spring
? Hinge piece
X Remove the key from the ignition lock.
X Fold wiper arm :away from the wind-
screen until it engages.
X Position wiper blade ;horizontally.
X Press locking spring =.
X Slide wiper blade ;with hinge piece ?
from wiper arm :.
Fitting the wiper blade :
Wiper arm
; Wiper blade
= Locking spring
? Hinge piece X
Slide new wiper blade ;with the recess
onto wiper arm :.
X Engage locking spring =into the end of
the wiper arm.
X Make sure that wiper blade ;is seated
correctly.
X Fold wiper arm :back onto the wind-
screen. Problems with the windscree
nwipers
The windscreen wipers are obstructed Leaves or snow, for example, may be
obstructing the windscreen wiper movement.
The wiper motor has been deactivated.
X
For safety reasons, you should remove the
key from the ignition lock.
X Remove the cause of the obstruction.
X Switch the windscreen wipers back on.
The windscreen wipers are inoperative The windscreen wiper drive is malfunctioning.
X
Selec tanothe rwiper speed on the combi-
nation switch.
X Have the windscreen wipers checked at a
qualified specialist workshop. Windscreen wipers
121Lights and windscreen wipers Z
Page 130 of 357

X
Turn the key to position 2(Ypage 143) in the ignition lock.
X Press the Ãbutton.
The indicator lamp in the Ãbutton lights up. Airflow and air distribution are set to auto-
matic mode.
or
X Press the ^button.
The indicator lamp in the ^button goes out. The previous settings are reactivated.
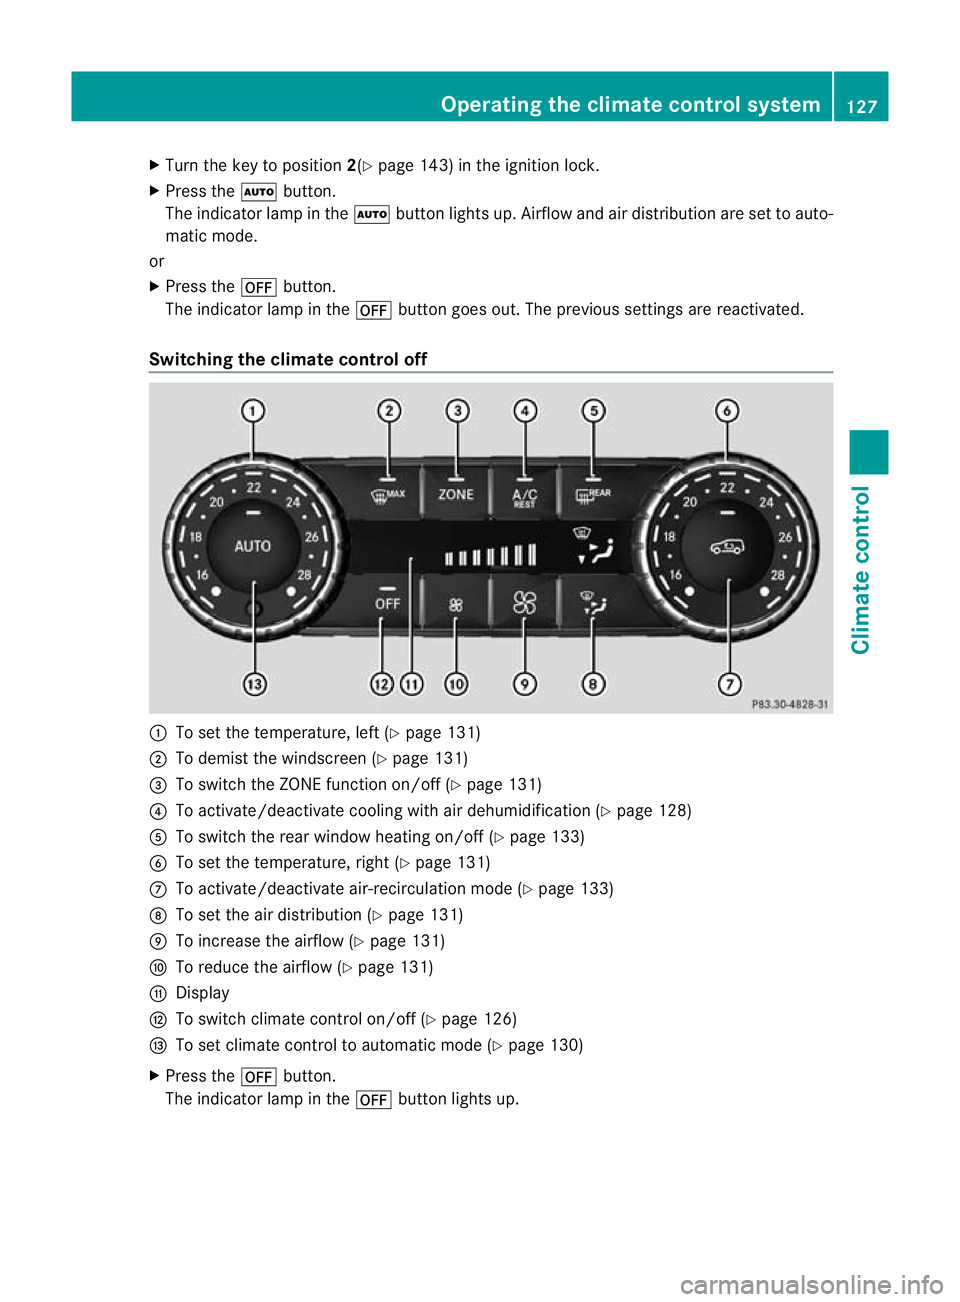
Switching the climate control off :
To set the temperature, left (Y page 131)
; To demist the windscreen (Y page 131)
= To switch the ZONE function on/off (Y page 131)
? To activate/deactivate cooling with air dehumidification (Y page 128)
A To switch the rear window heating on/of f(Ypage 133)
B To set the temperature, right (Y page 131)
C To activate/deactivate air-recirculation mode (Y page 133)
D To set the air distribution (Y page 131)
E To increase the airflow (Y page 131)
F To reduce the airflow (Y page 131)
G Display
H To switch climate control on/off (Y page 126)
I To set climate control to automatic mode (Y page 130)
X Press the ^button.
The indicator lamp in the ^button lights up. Operating the climate control system
127Climate control Z