2012 MERCEDES-BENZ E-CLASS ESTATE roof
[x] Cancel search: roofPage 51 of 457
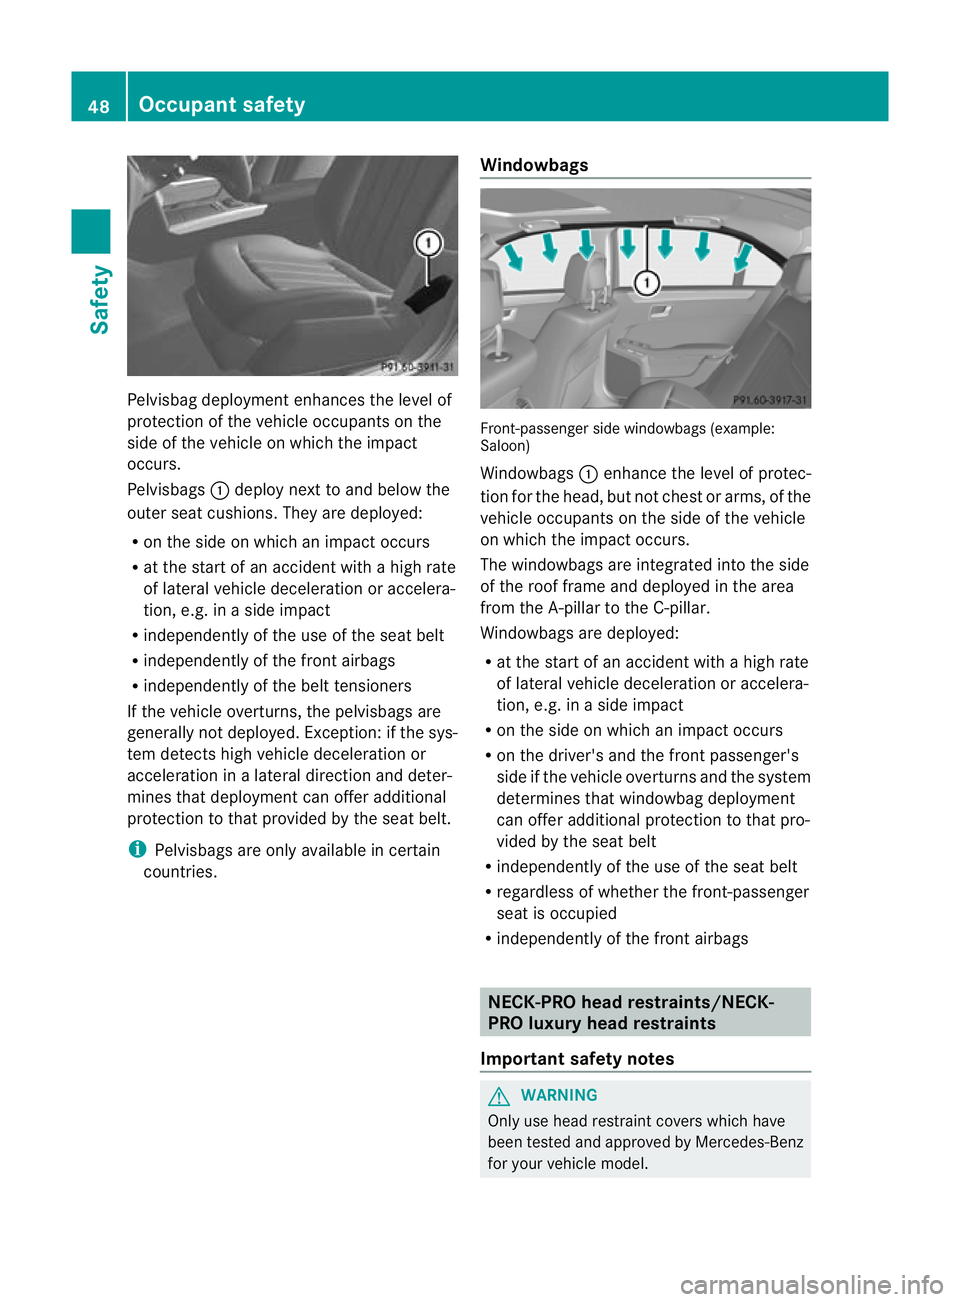
Pelvisbag deployment enhances the level of
protection of the vehicle occupants on the
side of the vehicle on which the impact
occurs.
Pelvisbags
:deploy next to and below the
outer seat cushions. They are deployed:
R on the side on which an impact occurs
R at the start of an accident with a high rate
of lateral vehicle deceleration or accelera-
tion, e.g. in a side impact
R independently of the use of the seat belt
R independently of the fronta irbags
R independently of the belt tensioners
If the vehicle overturns, the pelvisbags are
generally not deployed. Exception: if the sys-
tem detects high vehicle deceleration or
acceleration in a lateral direction and deter-
mines that deploymen tcan offer additional
protection to that provide dby the seat belt.
i Pelvisbags are only available in certain
countries. Windowbags Front-passenger side windowbags (example:
Saloon)
Windowbags
:enhance the level of protec-
tion fo rthe head, but not chest or arms, of the
vehicle occupants on the side of the vehicle
on which the impact occurs.
The windowbags are integrated into the side
of the roof frame and deployed in the area
from the A-pillar to the C-pillar.
Windowbags are deployed:
R at the start of an accident with a high rate
of lateral vehicle deceleration or accelera-
tion, e.g. in a side impact
R on the side on which an impact occurs
R on the driver's and the front passenger's
side if the vehicle overturns and the system
determines that windowbag deployment
can offer additional protection to that pro-
vided by the seat belt
R independently of the use of the seat belt
R regardless of whether the front-passenger
seat is occupied
R independently of the front airbags NECK-PRO head restraints/NECK-
PRO luxury head restraints
Important safety notes G
WARNING
Only use head restraint covers which have
been tested and approved by Mercedes-Benz
for your vehicle model. 48
Occupant safetySafety
Page 53 of 457
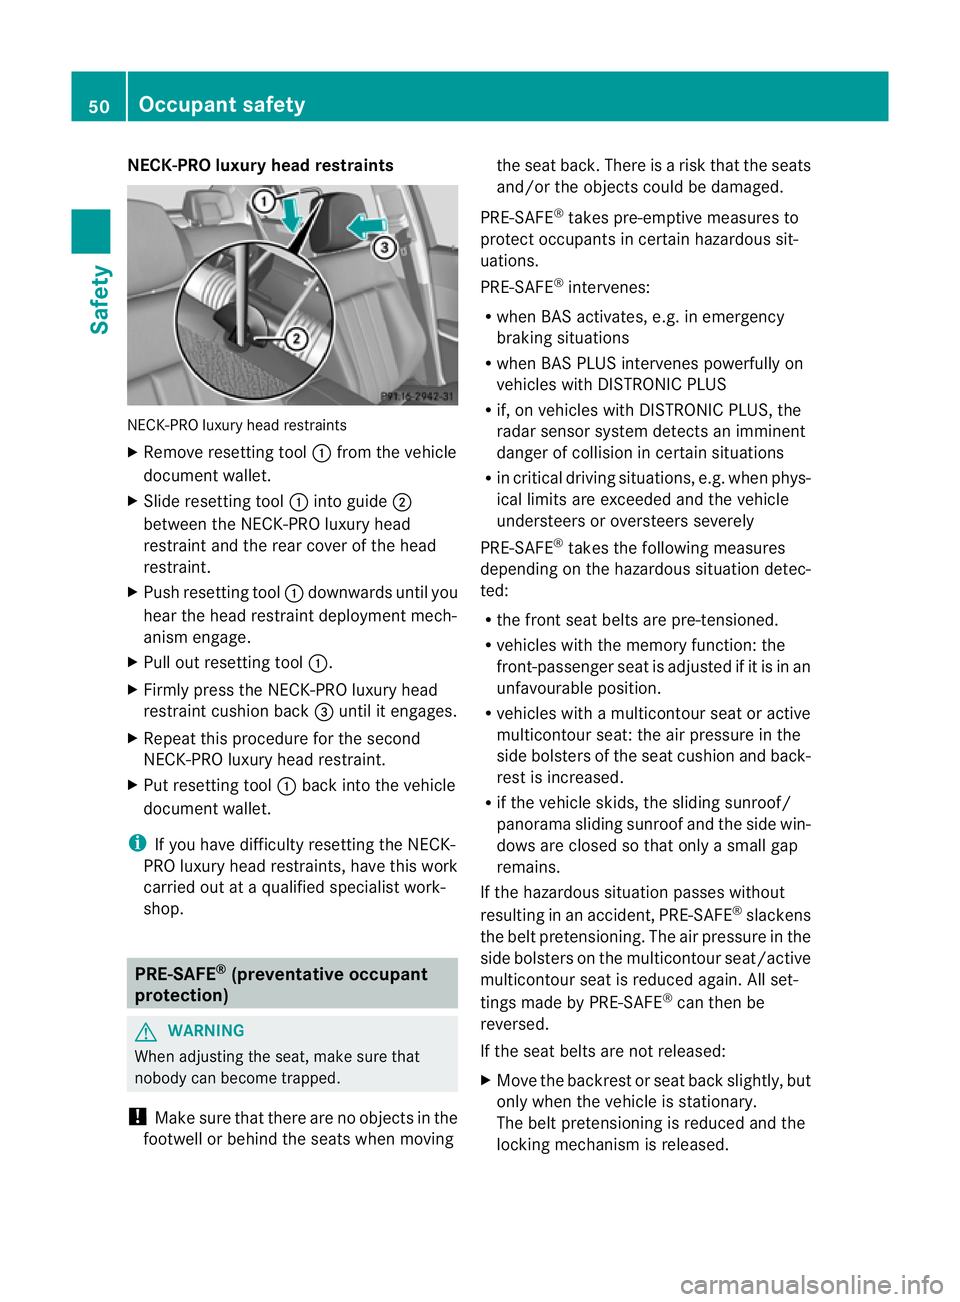
NECK-PRO luxury head restraints
NECK-PRO luxury head restraints
X Remove resetting tool :from the vehicle
document wallet.
X Slide resetting tool :into guide ;
between the NECK-PRO luxury head
restraint and the rear cover of the head
restraint.
X Push resetting tool :downwards until you
hear the head restraint deployment mech-
anism engage.
X Pull ou tresetting tool :.
X Firmly press the NECK-PRO luxury head
restraint cushion back =until it engages.
X Repeat this procedure for the second
NECK-PRO luxury head restraint.
X Put resetting tool :back into the vehicle
documen twallet.
i If you have difficulty resetting the NECK-
PRO luxury head restraints, have this work
carried out at a qualified specialist work-
shop. PRE-SAFE
®
(preventative occupant
protection) G
WARNING
When adjusting the seat, make sure that
nobody can become trapped.
! Make sure that there are no objects in the
footwell or behind the seats when moving the seat back
.There is a risk that the seats
and/or the objects could be damaged.
PRE-SAFE ®
takes pre-emptive measures to
protect occupants in certain hazardous sit-
uations.
PRE-SAFE ®
intervenes:
R when BAS activates, e.g. in emergency
braking situations
R when BAS PLUS intervenes powerfully on
vehicles with DISTRONIC PLUS
R if, on vehicles with DISTRONIC PLUS, the
radar sensor system detectsani mminent
dange rofcollision in certain situations
R in critical driving situations, e.g. when phys-
ical limits are exceeded and the vehicle
understeers or oversteers severely
PRE-SAFE ®
takes the following measures
depending on the hazardous situation detec-
ted:
R the front seat belts are pre-tensioned.
R vehicles with the memory function: the
front-passenger seat is adjusted if it is in an
unfavourable position.
R vehicles with a multicontour seat or active
multicontour seat: the air pressure in the
side bolsters of the seat cushion and back-
rest is increased.
R if the vehicle skids, the sliding sunroof/
panorama sliding sunroof and the side win-
dows are closed so that only a small gap
remains.
If the hazardous situation passes without
resulting in an accident, PRE-SAFE ®
slackens
the belt pretensioning. The air pressure in the
side bolsters on the multicontour seat/active
multicontour seat is reduced again. All set-
tings made by PRE-SAFE ®
can then be
reversed.
If the seat belts are not released:
X Move the backrest or seat back slightly, but
only when the vehicle is stationary.
The belt pretensioning is reduced and the
locking mechanism is released. 50
Occupant safetySafety
Page 72 of 457
Approval number
(E1 ...)
03 301133
04 301133
Order number
A000 970 11 00
Automatic child
seat recognition
Yes
Child-proo
flocks
Important safety notes G
WARNING
Activate the child-proof locks for the rear
doors and the override switch for the rear
windows when children are travelling in the
vehicle .Otherwise, the children could open
doors or side windows while the vehicle is in
motion and injure themselves or others. G
WARNING
Do not leave children unsupervised in the
vehicle, eve nifthey are secured in a child
restraint system. They could injure them-
selves on parts of the vehicle. They could also
be seriously or even fatally injured by pro-
longed exposure to extreme heat or cold.
Do not expose the child restraint system to
direct sunlight. Parts of the child restraint sys-
tem could heat up and the child could burn
herself/himself on them.
If a child opens a door, the child or other per-
sons could be injured as a result. They could
get out and injure themselves or be injured by
a passing vehicle.
Also observe the notes on HOLD. Relevant
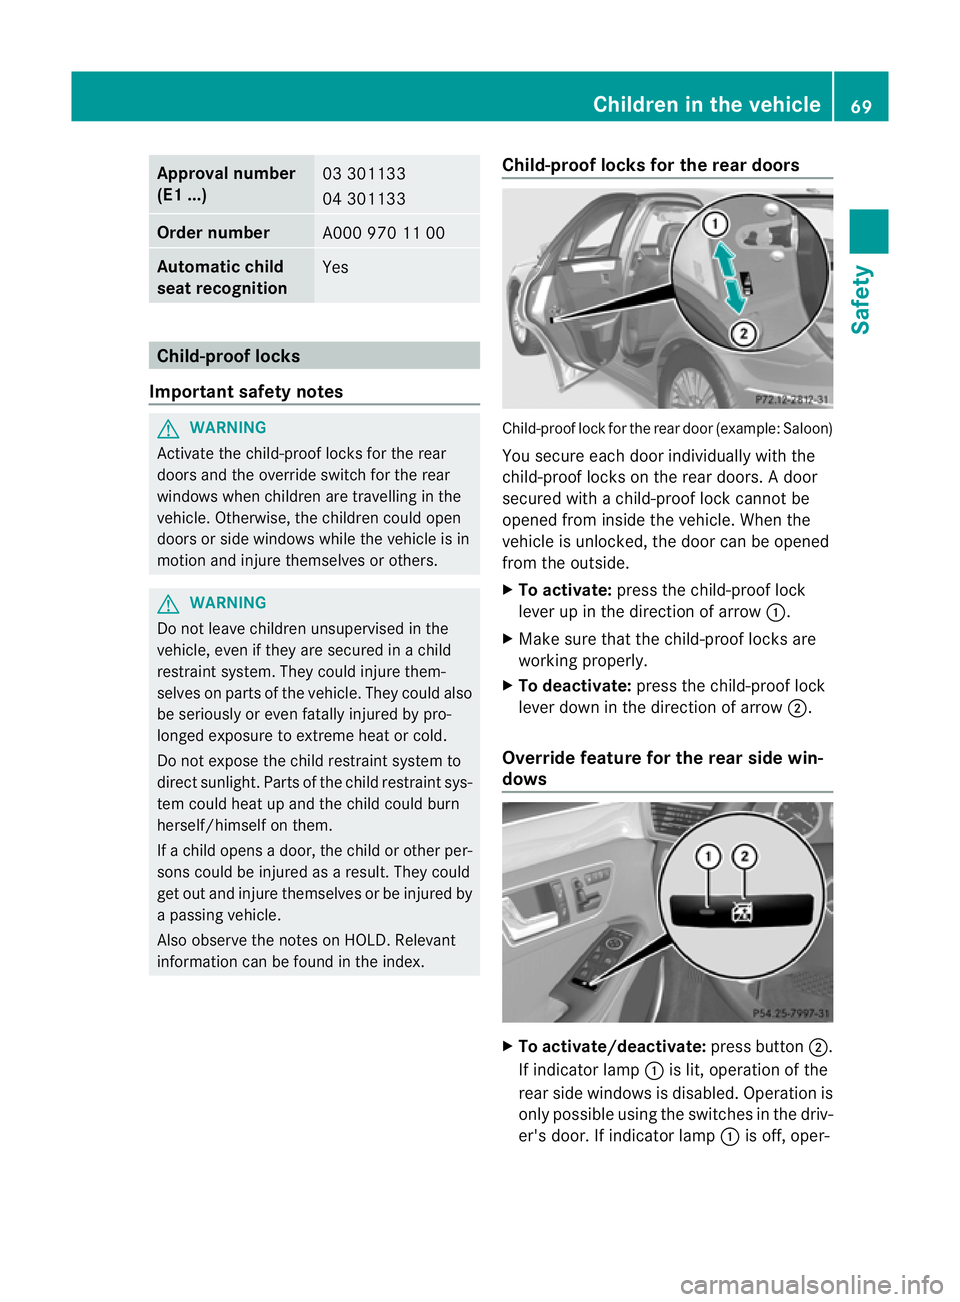
information can be found in the index. Child-proof locks for the rear doors Child-proof lock for the rear door (example: Saloon)
You secure each door individually with the
child-proof locks on the rear doors.
Adoor
secured with a child-proof lock cannot be
opened from inside the vehicle. When the
vehicle is unlocked, the door can be opened
from the outside.
X To activate: press the child-proof lock
lever up in the direction of arrow :.
X Make sure that the child-proof locks are
working properly.
X To deactivate: press the child-proof lock
lever down in the direction of arrow ;.
Override feature for the rear side win-
dows X
To activate/deactivate: press button;.
If indicator lamp :is lit, operation of the
rear side windows is disabled. Operation is
only possible using the switches in the driv-
er's door. If indicator lamp :is off, oper- Children in the vehicle
69Safety Z
Page 83 of 457
Activating
X
Make sure that:
R
the side windows are closed.
R the sliding sunroof/panorama sliding
sunroo fis closed.
R there are no objects, e.g. mascots, hang-
ing on the rear-view mirror or on the grab
handles on the roof trim.
This will prevent false alarms.
X Make sure that:
R
the doors are closed.
R the sliding sunroof/panorama sliding
sunroof is closed.
R the boot lid/tailgate is closed.
Only then is the interior motion sensor
primed.
X Lock the vehicle with the key or KEYLESS-
GO.
The interior motion sensor is primed after
approximately 30 seconds.
To deactivate X
Unlock the vehicle with the key or KEY-
LESS-GO.
The interior motion sensor is switched off
automatically.
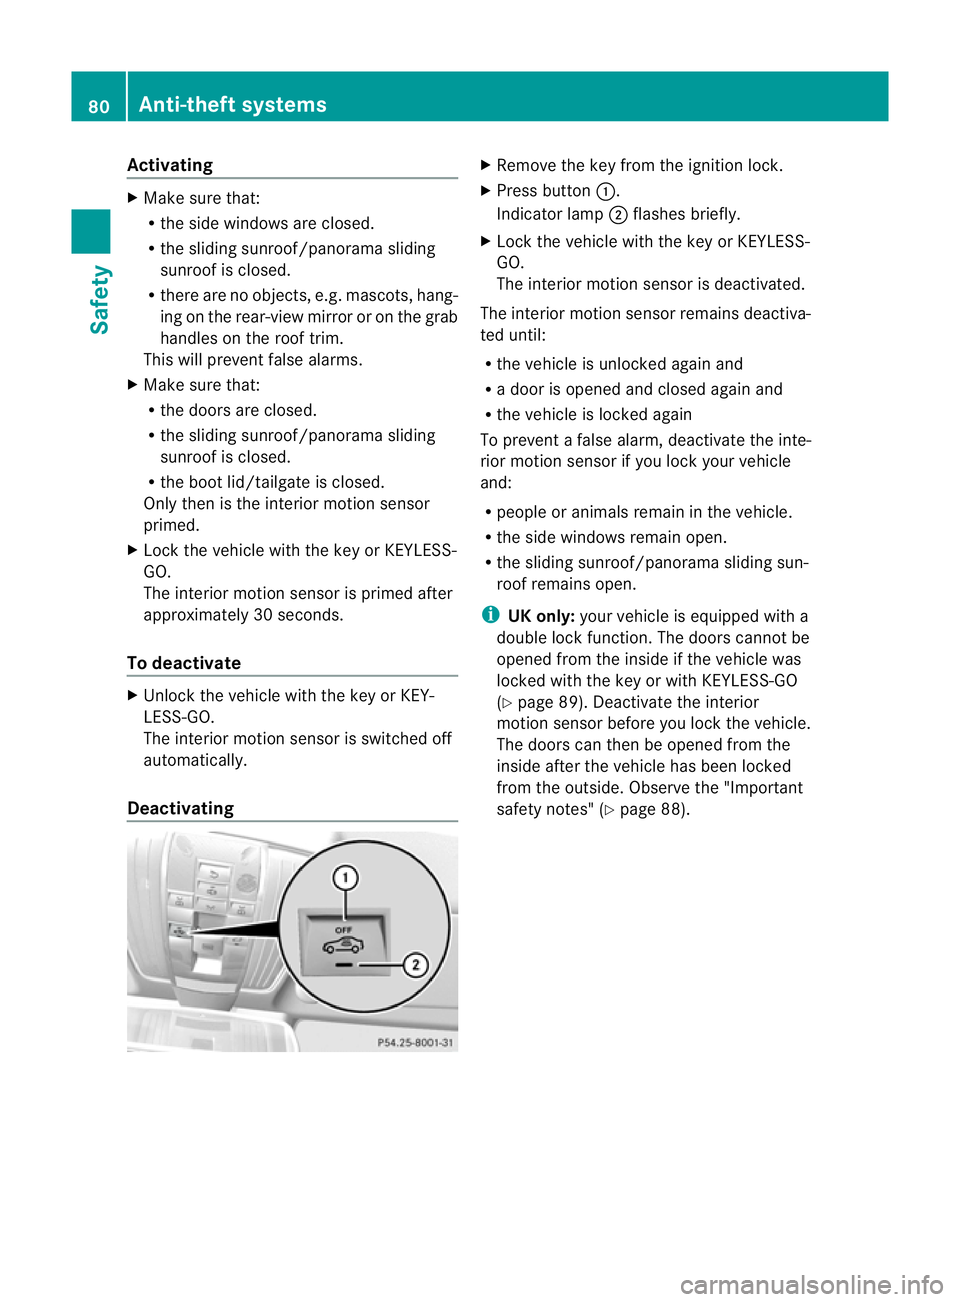
Deactivating X
Remove the key from the ignition lock.
X Press button :.
Indicator lamp ;flashes briefly.
X Lock the vehicle with the key or KEYLESS-
GO.
The interior motion sensor is deactivated.
The interior motion sensor remains deactiva-
ted until:
R the vehicle is unlocked againa nd
R a door is opened and closed agai nand
R the vehicle is locked again
To prevent a false alarm, deactivate the inte-
rio rm otion sensor if you lock your vehicle
and:
R people or animals remain in the vehicle.
R the side windows remain open.
R the sliding sunroof/panorama sliding sun-
roof remains open.
i UK only: your vehicle is equipped with a
double lock function. The doors cannot be
opened from the inside if the vehicle was
locked with the key or with KEYLESS-GO
(Y page 89). Deactivate the interior
motion sensor before you lock the vehicle.
The doors can then be opened from the
inside after the vehicle has been locked
from the outside. Observe the "Important
safety notes" (Y page 88).80
Anti-theft systemsSafety
Page 84 of 457
Useful information
..............................82
Key ....................................................... 82
Doors .................................................... 88
Boot/luggage compartment ..............91
Side windows ...................................... 95
Sliding sunroof .................................... 99 81Opening and closing
Page 92 of 457
They could thereby endanger themselves and
others. Never leave children unsupervised in
the vehicle. Always take the key with you
when leaving the vehicle, even if you are only
leaving it for a short time. Unlocking and opening the doors
from the inside
For all countries except the United King-
dom: you can open a door from inside the
vehicle even if it has been locked. If the vehi-
cle has previously been locked with the key
or with KEYLESS-GO, opening a door from the
inside will trigger the anti-theft alarm system.
Switch off the alarm (Y page 78).
United Kingdom only: if the vehicle has
been locked with the key or with KEYLESS-
GO, the double lock function is activated as
standard. It is then not possible to open the
doors from inside the vehicle. Deactivate the
interior motion sensor (Y page 79) before you
lock the vehicle. The doors can then be
opened from the inside after the vehicle has
been locked from the outside. The anti-theft
alarm system is triggered if the door is
opened from the inside. Switch off the alarm
(Y page 78).
You can only open the rear doors from inside
the vehicle if they are not secured by the
child-proof locks (Y page 69).X
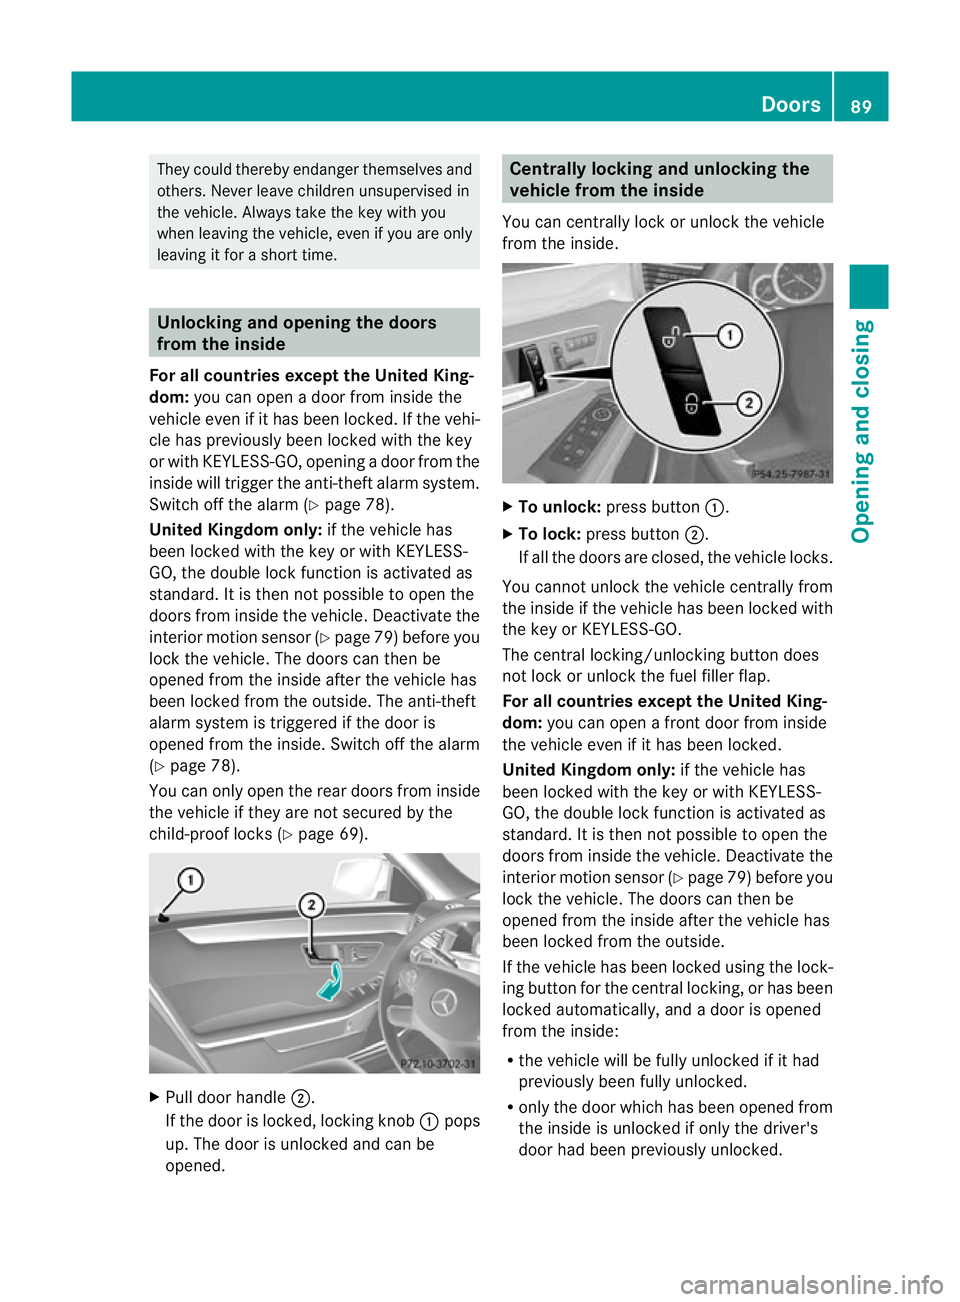
Pull door handle ;.
If the door is locked, locking knob :pops
up. The door is unlocked and can be
opened. Centrally locking and unlocking the
vehicle from the inside
You can centrally lock or unlock the vehicle
from the inside. X
To unlock: press button :.
X To lock: press button ;.
If all the doors are closed, the vehicle locks.
You cannot unlock the vehicle centrally from
the inside if the vehicle has been locked with
the key or KEYLESS-GO.
The central locking/unlocking button does
not lock or unlock the fuel filler flap.
For all countries except the United King-
dom: you can open a front door from inside
the vehicle even if it has been locked.
United Kingdom only: if the vehicle has
been locked with the key or with KEYLESS-
GO, the double lock function is activated as
standard. It is then not possible to open the
doors from inside the vehicle. Deactivate the
interior motion sensor (Y page 79) before you
lock the vehicle. The doors can then be
opened from the inside after the vehicle has
been locked from the outside.
If the vehicle has been locked using the lock-
ing button for the central locking, or has been
locked automatically, and adoor is opened
from the inside:
R the vehicle will be fully unlocked if it had
previously been fully unlocked.
R only the door which has been opened from
the inside is unlocked if only the driver's
door had been previously unlocked. Doors
89Opening and closing Z
Page 99 of 457
G
WARNING
Childre nmay injure themselves if they open
or close the side windows.
Never leave childre nunsupervised in the vehi-
cle .Always take the key with you when leaving
the vehicle, even if you are only leaving it for
a short time. G
WARNING
Do not leave children unsupervised in the
vehicle, even if they are secured in a child
restraint system. The children could:
R be seriously or even fatally injured on parts
of the vehicle
R be seriously or even fatally injured by pro-
longed exposure to extremely high or
extremely low temperatures
If children open a door, they could:
R seriously or even fatally injure other people
R get out of the vehicle and injure them-
selves, or be seriously or even fatally
injured by a passing vehicle
Activate the child-proof locks/override fea-
ture if children are travelling in the vehicle.
They could otherwise open doors or side win-
dows while the vehicle is in motion and
thereby injure themselves or others. Opening and closing the side win-
dows
The switches for all side windows are located
on the driver's door. There is also a switch on
each door for the corresponding side window.
The switches on the driver's door take prec-
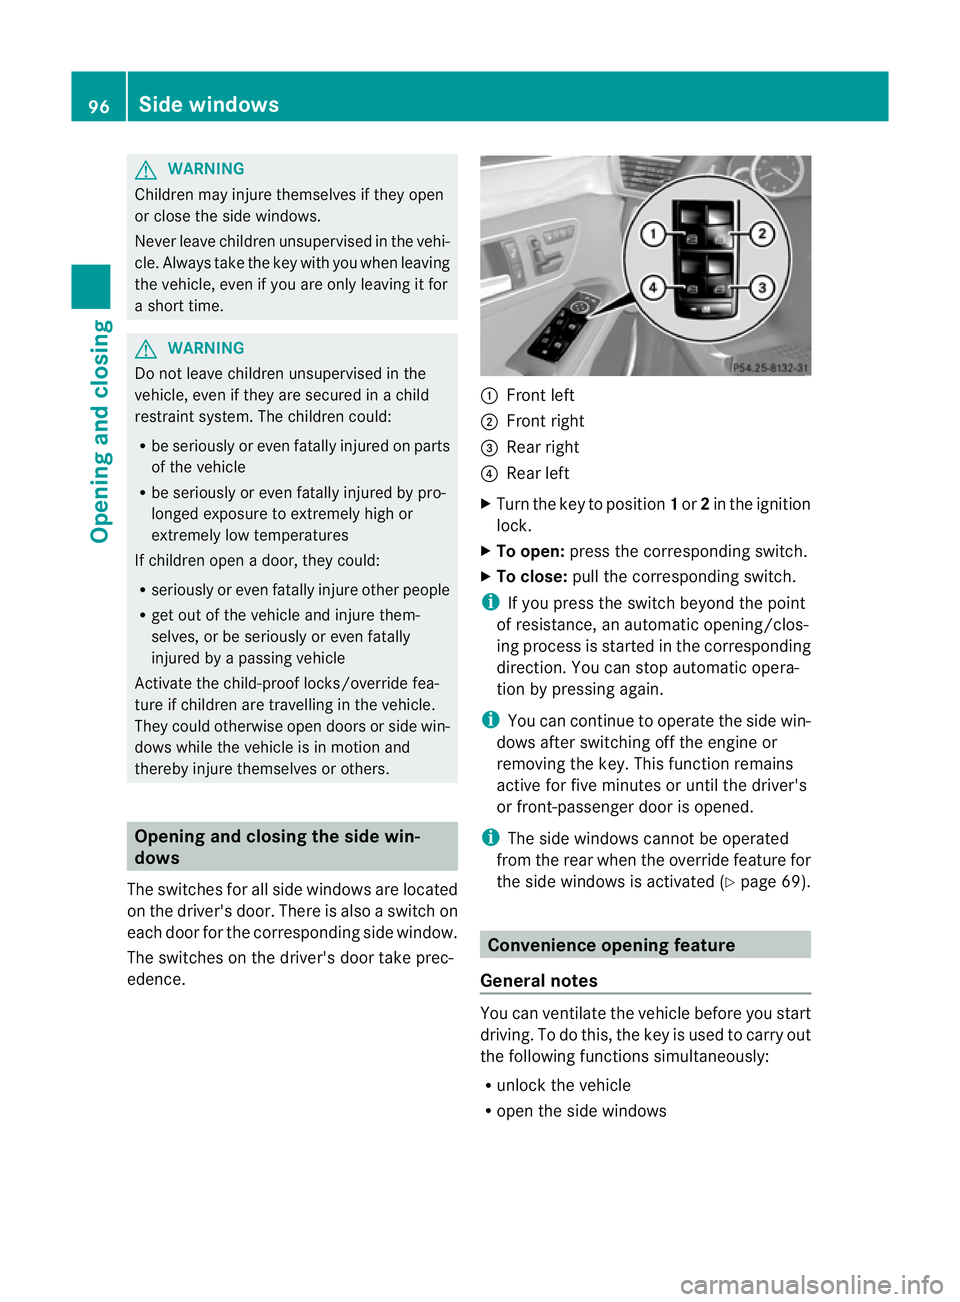
edence. :
Front left
; Front right
= Rear right
? Rear left
X Turn the key to position 1or 2in the ignition
lock.
X To open: press the corresponding switch.
X To close: pull the corresponding switch.
i If you press the switch beyond the point
of resistance, an automatic opening/clos-
ing process is started in the corresponding
direction .You can stop automatic opera-
tion by pressing again.
i You can continue to operate the side win-
dows after switching off the engine or
removing the key. This function remains
active for five minutes or until the driver's
or front-passenger door is opened.
i The side windows cannot be operated
from the rear when the override feature for
the side windows is activated (Y page 69). Convenience opening feature
General notes You can ventilate the vehicle before you start
driving. To do this, the key is used to carry out
the following functions simultaneously:
R unlock the vehicle
R open the side windows 96
Side windowsOpening and closing
Page 100 of 457
R
open the sliding sunroof or the panorama
sliding sunroof and the roller sunblinds
R switch on the seat ventilation for the driv-
er's seat
i The convenience opening feature can
only be operated using the key. The key
must be close to the driver's door handle.
Convenience opening feature X
Point the tip of the key at the driver's door
handle.
X Press and hold the %button until the
side windows and the sliding sunroof or the
panorama sliding sunroof are in the desired
position.
If the roller sunblinds of the panorama slid-
ing sunroof are closed, the roller sunblinds
are opened first.
X Press and hold the %button again until
the panorama sliding sunroof is in the
desired position.
X To interrupt convenience opening:
release the %button. Convenience closing feature
Important safety notes G
WARNING
When using the convenience closing feature,
make sure that nobody can become trapped.
Proceed as follows if there is a risk of entrap-
ment:
With the key:
R release the &button.
R press and hold the %button until the
side windows and the sliding sunroof or the
panorama sliding sunroof open again.
With KEYLESS-GO:
R release the sensor surface on the door han-
dle.
R pull the door handle immediately and hold
it. The side windows and the sliding sunroof
or the panorama sliding sunroof open.
When you lock the vehicle, you can simulta-
neously:
R close the side windows
R close the sliding sunroof or the panorama
sliding sunroof
On vehicles with a panorama sliding sunroof,
you can then close the roller sunblinds.
Using the key The key must be close to the driver's door
handle.
X
Point the tip of the key at the driver's door
handle.
X Press and hold the &button until the
side windows and the sliding sunroof or the
panorama sliding sunroof are fully closed.
X Make sure that all the side windows and the
sliding sunroof or panorama sliding sunroof
are closed.
On vehicles with a panorama sliding sunroof:
X Press and hold the &button again until
the roller sunblinds of the panorama sliding
sunroof close.
X To interrupt convenience closing:
release the &button.
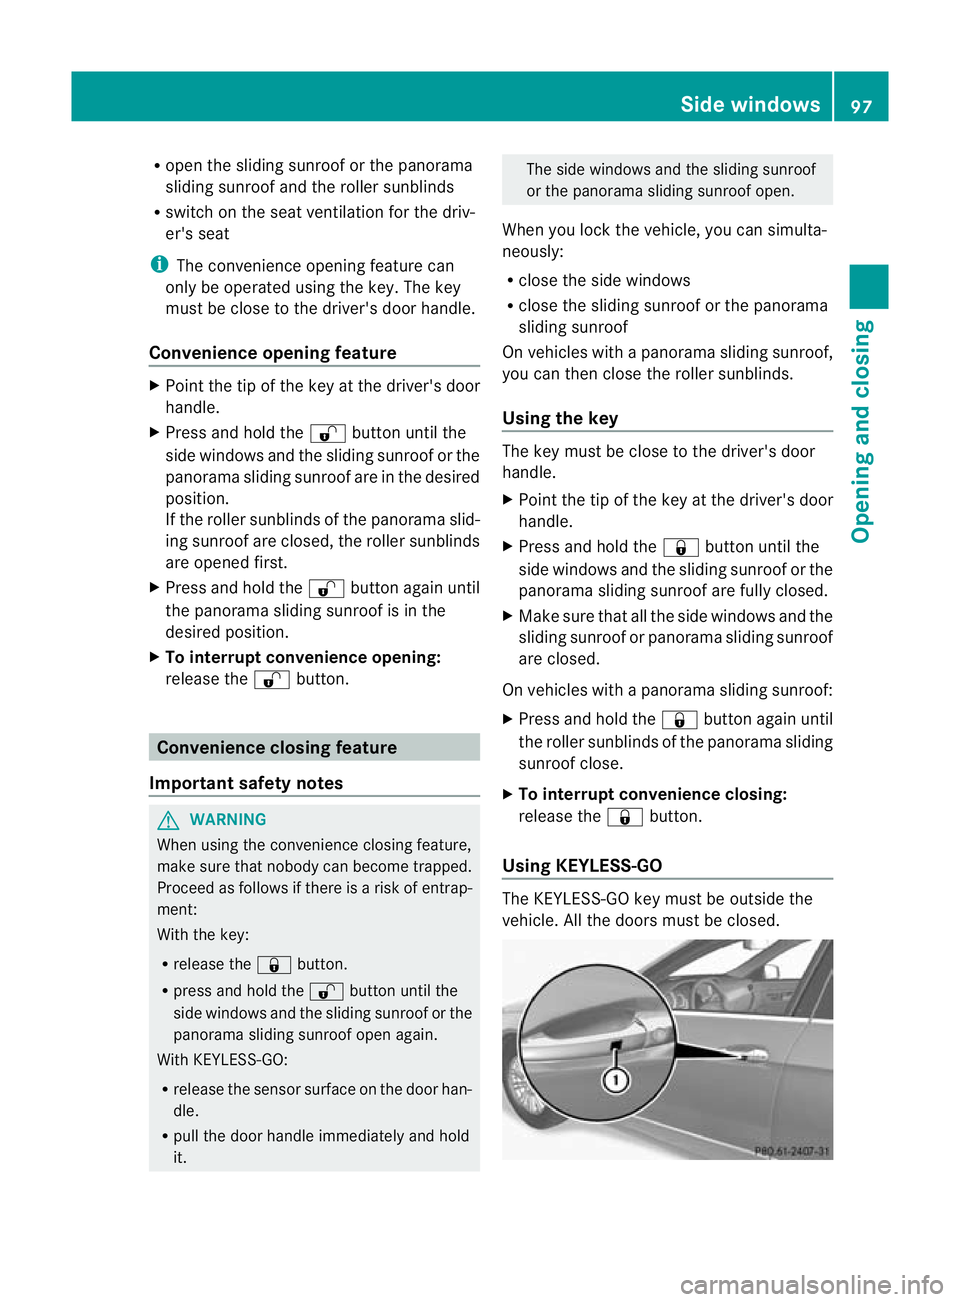
Using KEYLESS-GO The KEYLESS-GO key must be outside the
vehicle. All the doors must be closed. Side windows
97Opening and closing Z