2012 MERCEDES-BENZ CLS SHOOTING BRAKE window
[x] Cancel search: windowPage 140 of 405
Rear window heating
Switching on/off G
WARNING
Clea rall windows of ice or snow before setting
off .O therwise, impaired visibility could
endanger you and others.
The rea rwindow heating has ahigh current
draw. You should therefore switch it off as
soon as the window is clear .Itotherwise
switches off automatically after several
minutes.
If the battery voltage is too low, the rea rwin-
dow heating may switch off.
X Turn the key to position 2in the ignition
lock.
X Press the ¤button.
The indicator lamp in the ¤button lights
up or goes out.
Problems with the rea rwindow heating The rear window heating has switched off
prematurely or cannot be activated.
X Switch off any consumers that are not
required, e.g. reading lamps or interior
lighting.
When the battery is sufficiently charged,
the rear window heating is activated again
automatically. Activating/deactivating air-recircula-
tion mode G
WARNING
Only switch over to air-recirculatio nmode
briefly at low outside temperatures. Other-
wise, the windows could mist up, thus impair-
ing visibility and endangering yourself and
others. This may prevent you from observing
the traffic conditions, thereby causing an
accident. You can deactivate the flow of fresh air if
unpleasant odours are entering the vehicle
from outside. The air already inside the vehi-
cle will then be recirculated.
The operation of air-recirculation mode is the
same for all control panels.
X
Turn the key to position 2in the ignition
lock.
X To activate: press thegbutton.
The indicator lamp in the gbutton lights
up.
i In the event of high pollution levels 1
or at
high outside temperatures, air-recircula-
tion mode is automatically activated. When
air-recirculation mode is activated auto-
matically, the indicator lamp above the
g button does not light up.
Outside air is added after approximately
30 minutes.
X To deactivate: press thegbutton.
The indicator lamp in the gbutton goes
out.
i Air-recirculation mode deactivates auto-
matically:
R after approximately five minutes at out-
side temperatures below approximately
5 †
R after approximately five minutes if cool-
ing with air dehumidification is deactiva-
ted
R after approximately 30 minutes at out-
side temperatures above approximately
5† with the "cooling with air dehumidi-
fication" function switche don. Convenience opening/closing using
the air-recirculation button
G
WARNING
Make sure tha tnobody can become trapped
between the side window and the door frame
as the side windows are opened and closed.
Make sure that all object sand body parts are
1 THERMOTRONIC automatic climate control only. Operating the climate control system
137Climate control
Z
Page 141 of 405
clear of the side windows whe
nthey are being
opened or closed. You or the objects could be
drawn in or become trapped between the side
window and the door frame as the window
moves. If there is arisk of entrapment, oper-
ate the Wswitch to move the side window
in the opposite direction.
Make sure that nobody can become trapped
as the sliding sunroof/panorama sliding sun-
roof is opened and closed. If there is a risk of
entrapment, operate the 3switch to move
the sliding sunroof/panorama sliding sunroof
in the opposite direction.
X Convenience closing feature: press and
hold the gbutton until the side win-
dows and the sliding sunroof/panorama
sliding sunroof are closed.
The indicator lamp in the gbutton lights
up. Air-recirculation mode is activated.
X Convenience opening feature: press and
hold the gbutton until the side win-
dows and the sliding sunroof/panorama
sliding sunroof are opened. The side win-
dows and the sliding sunroof/panorama
sliding sunroof move back to their original
position.
The indicator lamp in the gbutton goes
out. Air-recirculation mode is deactivated.
i If you open the side windows or the sliding
sunroof/panorama sliding sunroof man-
ually after closing the mwith the conveni-
ence closing feature, they will remain in this
position when opened using the conveni-
ence opening feature. Activating/deactivating the residual
heat function
The residual heat function is only available
with THERMOTRONIC automatic climate con-
trol.
It is possible to make use of the residual heat
of the engine to continue heating the station-
ary vehicle for up to 30 minutes after the
engine has been switched off .The heating time depends on the temperature that has
been set for the vehicle interior.
X
To activate: press theÌbutton.
The indicator lamp in the Ìbutton lights
up.
i The blower will run at a low speed regard-
less of the airflow setting.
i If you activate the residual heat function
at high temperatures, only the ventilation
will be activated. The blower runs at
medium speed.
X To deactivate: press theÌbutton.
The indicator lamp in the Ìbutton goes
out.
Residual heat is deactivated automatically:
R after approximately 30 minutes
R when the ignition is switched on
R if the battery voltage drops
R when the auxiliary heating is activated Auxiliary heating
Important safety notes G
WARNING
Exhaust fumes are produced when the auxili-
ary heating is in operation. Inhaling these
exhaust fumes can be poisonous. You should
therefore switch off the auxiliary heating in
confined spaces without an extraction sys-
tem, e.g. a garage. G
WARNING
When operating the auxiliary heating parts of
the vehicle can get very hot. Make sure that
the exhaust system does not under any cir-
cumstances come into contact with easily
ignitable material such as dry grass or fuels.
The material could otherwise ignite and set
the vehicle alight. Choose your parking spot
accordingly.
Operating the auxiliary heating is thus pro-
hibited at filling stations or when your vehicle 138
Operating the climate control systemClimate control
Page 146 of 405
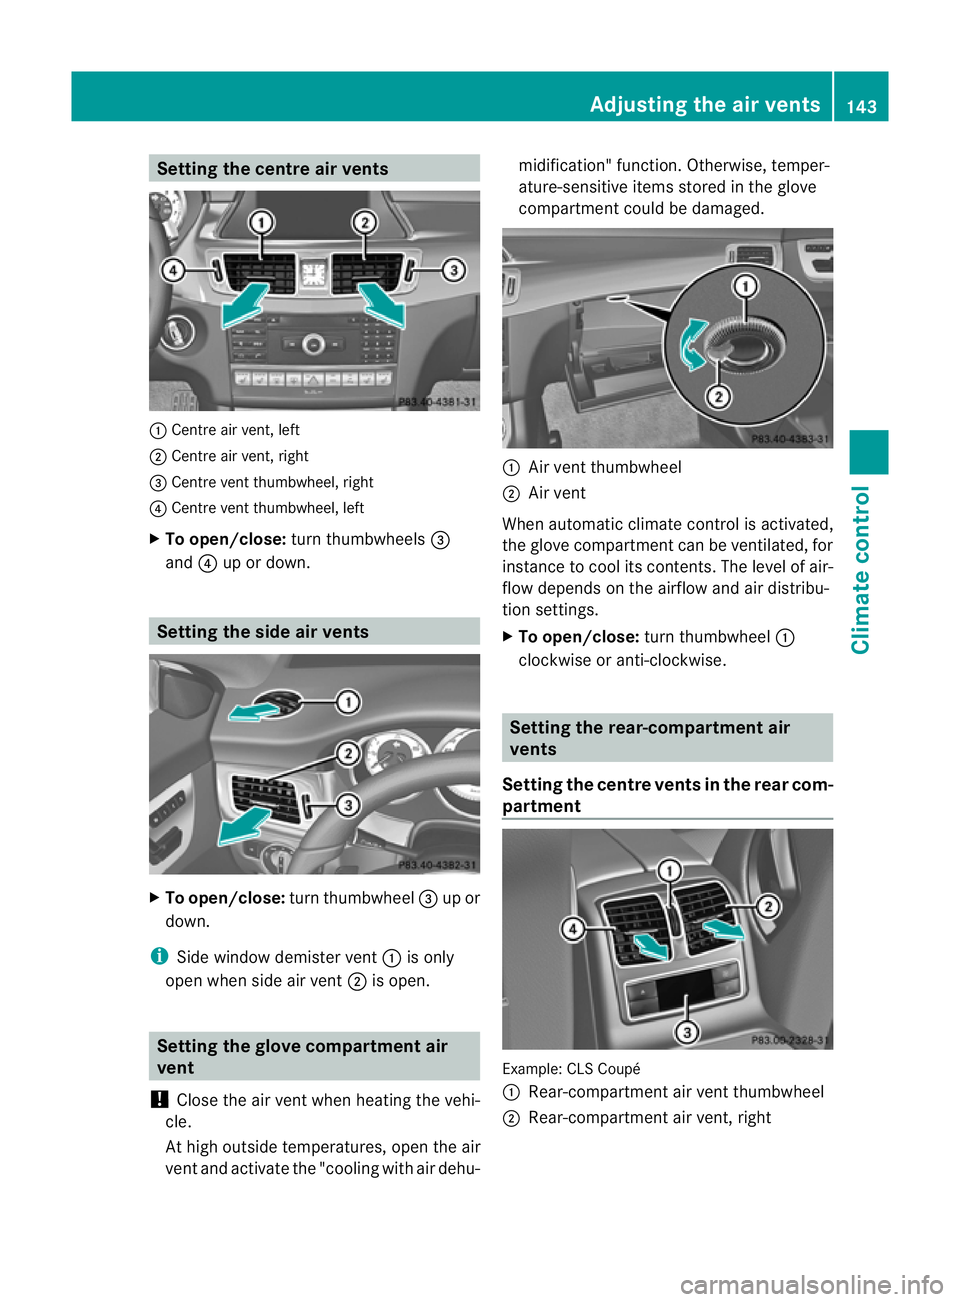
Setting the centre air vents
:
Centre air vent, left
; Centre air vent, right
= Centre vent thumbwheel, right
? Centre vent thumbwheel, left
X To open/close: turn thumbwheels =
and ?up or down. Setting the side air vents
X
To open/close: turn thumbwheel =up or
down.
i Side window demister vent :is only
open when side air vent ;is open. Setting the glove compartment air
vent
! Close the air vent when heating the vehi-
cle.
At high outside temperatures, open the air
vent and activate the "cooling with air dehu- midification" function. Otherwise, temper-
ature-sensitive items stored in the glove
compartmen
tcould be damaged. :
Air vent thumbwheel
; Air vent
When automatic climate control is activated,
the glove compartment can be ventilated, for
instance to cool its contents.T he level of air-
flow depends on the airflow and air distribu-
tion settings.
X To open/close: turn thumbwheel :
clockwise or anti-clockwise. Setting the rear-compartment air
vents
Setting the centre vents in the rear com-
partment Example: CLS Coupé
:
Rear-compartment air vent thumbwheel
; Rear-compartment air vent, right Adjusting the air vents
143Climate control Z
Page 173 of 405
The wear of individual components of the
brake system, such as the brake pads/linings
or brake discs, depends on the individual driv-
ing style and operating conditions.
For this reason, it is impossible to state a
mileage (service life) that will be valid under
all circumstances. An aggressive driving style
will lead to high wear. You can obtain further
information about this from your Mercedes-
Benz Service Centre.
New brake pads/brake pads and discs that
have been replaced only achieve optimum
braking effect after several hundred kilome-
tres of driving. Compensate for the reduced
braking effect by applying greater force to the
brake pedal. Always be aware of this and
adapt your driving and braking accordingly
during the running-in period.
Excessive heavy braking results in corre-
spondingly high brake wear. Observe the
# brake pad wear warning lamp in the
instrument cluster and note any brake status
messages in the multifunction display .Ifyou
regularly drive at high speeds, it is particularly
important to have the brake system checked
and maintained regularly. Driving on wet roads
Aquaplaning If water has accumulated to a certain depth
on the road surface, there is a danger of aqua-
planing occurring, even if:
R
you are driving at low speeds.
R the tyres have adequate tread depth.
For this reason, do not drive in tyre ruts and
brake carefully.
Driving on flooded roads !
Bear in mind that vehicles travelling in
front or in the opposite direction create
waves. This may cause the maximum per-
missible water depth to be exceeded. These notes must be observed under all
circumstances. You could otherwise dam-
age the engine, the electronics or the trans-
mission.
If you have to drive on stretches of road on
which water has collected, please bear in
mind that:
R the maximum permissible still water depth
is 25 cm.
R you should drive no faster than at walking
pace. Winter driving
Important safety notes G
WARNING
If you shift down on a slippery road surface in
an attempt to increase the engine's braking
effect, the drive wheels could lose their grip.
This increases the risk of skidding and having
an accident.
Do not shift down for additional engine brak-
ing on a slippery road surface. G
DANGER
If the exhaust pipe is blocked or adequate
ventilation is not possible, poisonous gases
such as carbon monoxide (CO) may enter the
vehicle. This is the case, e.g. if the vehicle
becomes trapped in snow. There is a risk of
fatal injury.
If you leave the engine or the auxiliary heating
running, make sure the exhaust pipe and area
around the vehicle are clear of snow. To
ensure an adequate supply of fresh air, open
a window on the side of the vehicle that is not
facing into the wind.
Have your vehicle winterproofed at a qualified
specialist workshop at the onset of winter.
Observe the notes in the "Winter operation"
section (Y page 356). 170
Driving tipsDriving and parking
Page 258 of 405
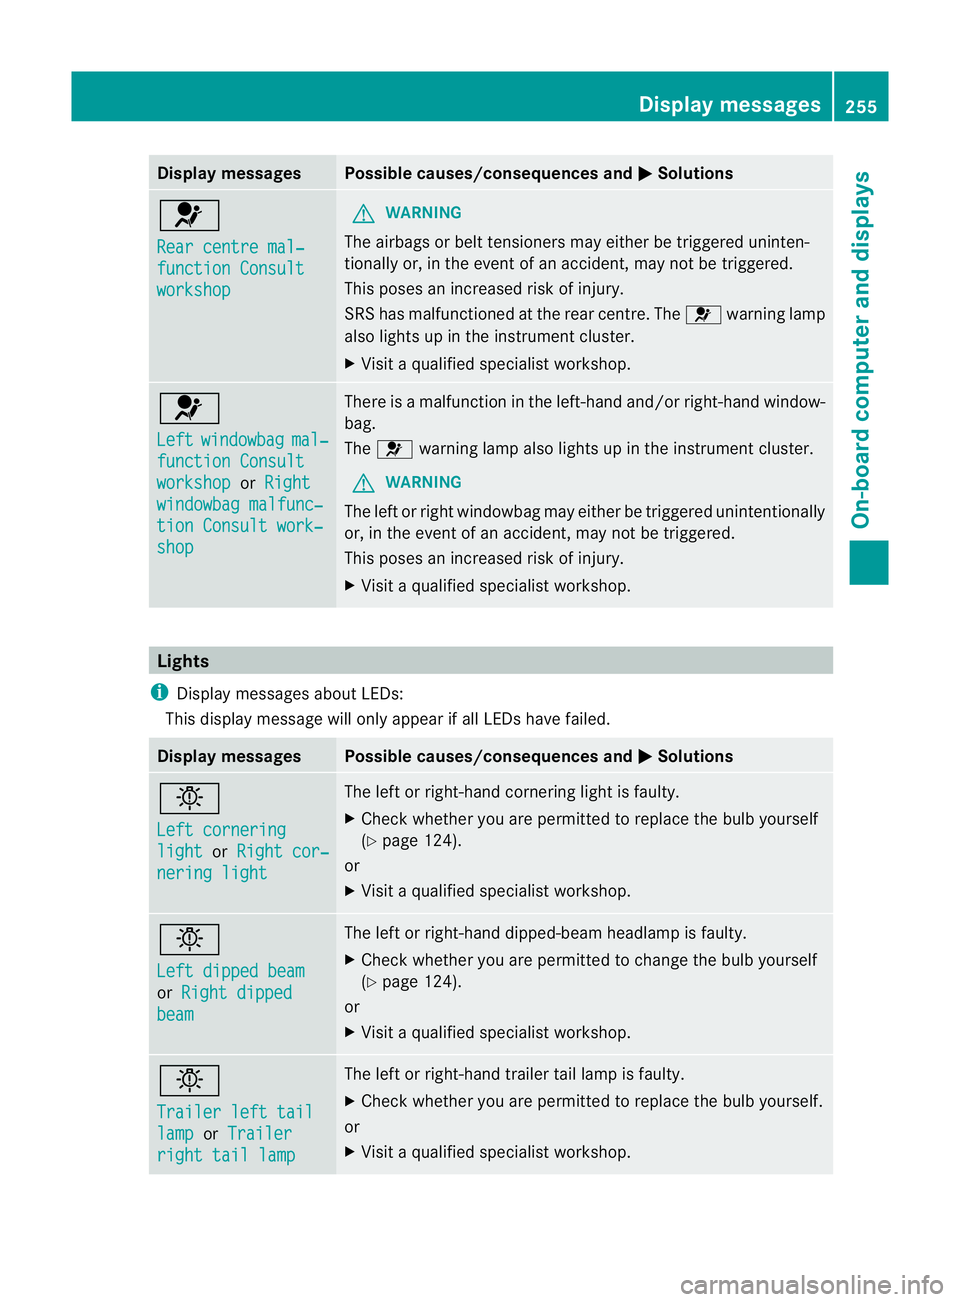
Display messages Possible causes/consequences and
M Solutions
6
Rear centre mal‐
function Consult
workshop G
WARNING
The airbags or belt tensioners may either be triggered uninten-
tionally or, in the event of an accident, may no tbe triggered.
This poses an increased risk of injury.
SRS has malfunctioned at the rear centre. The 6warning lamp
also lights up in the instrument cluster.
X Visit a qualified specialist workshop. 6
Left
windowbag mal‐
function Consult
workshop or
Right windowbag malfunc‐
tion Consult work‐
shop There is a malfunction in the left-hand and/or right-hand window-
bag.
The
6 warning lamp also lights up in the instrument cluster.
G WARNING
The left or right windowbag may either be triggered unintentionally
or, in the event of an accident, may not be triggered.
This poses an increased risk of injury.
X Visit a qualified specialist workshop. Lights
i Display messages about LEDs:
This display message will only appear if all LEDs have failed. Display messages Possible causes/consequences and
M Solutions
b
Left cornering
light or
Right cor‐ nering light The left or right-hand cornering light is faulty.
X
Check whether you are permitted to replace the bulb yourself
(Y page 124).
or
X Visit a qualified specialist workshop. b
Left dipped beam
or
Right dipped beam The left or right-hand dipped-beam headlamp is faulty.
X
Check whether you are permitted to change the bulb yourself
(Y page 124).
or
X Visit a qualified specialist workshop. b
Trailer left tail
lamp or
Trailer right tail lamp The left or right-hand trailer tail lamp is faulty.
X
Check whether you are permitted to replace the bulb yourself.
or
X Visit a qualified specialist workshop. Display messages
255On-board computer and displays Z
Page 300 of 405
If you use the coat hooks, only hang light
clothing on them. Make sure that nobody can
become trapped.
:
Coath ook Luggage compartment cover (CLS
Shooting Brake)
Important safety notes G
WARNING
The luggage compartment cover is not a
restraint system. Secure the load under the
luggage compartment cover by suitable
means. Make sure that the luggage compart-
ment cover is engaged securely. If luggage is
not sufficiently secured, it can be thrown over
the backrest into the passenger compart-
ment, for instance during heavy braking, sud-
den changes of direction or in the event of an
accident .You could cause an accident or
cause injury to yourself and others.
! When loading the vehicle, make sure that
you do not stack the load in the luggage
compartment higher than the lower edge of
the side windows. Do not place heavy
objects on top of the luggage compartment
cover.
The luggage compartment cover is located
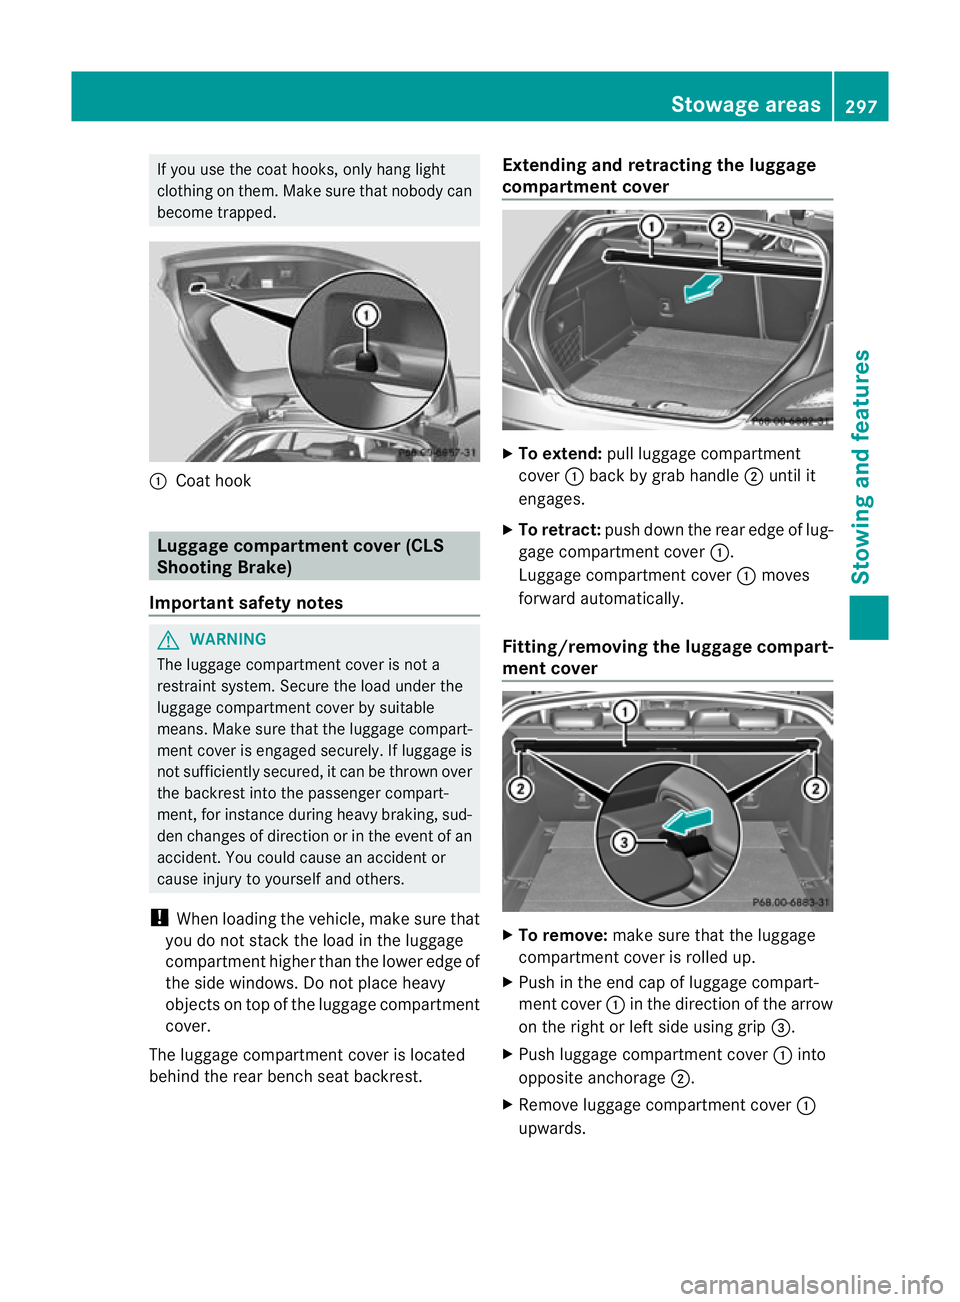
behind the rear bench seat backrest. Extending and retracting the luggage
compartment cover
X
To extend: pull luggage compartment
cover :back by grab handle ;until it
engages.
X To retract: push down the rear edge of lug-
gage compartment cover :.
Luggage compartment cover :moves
forward automatically.
Fitting/removing the luggage compart-
ment cover X
To remove: make sure that the luggage
compartment cover is rolled up.
X Push in the end cap of luggage compart-
ment cover :in the direction of the arrow
on the right or left side using grip =.
X Push luggage compartment cover :into
opposite anchorage ;.
X Remove luggage compartment cover :
upwards. Stowage areas
297Stowing and features Z
Page 308 of 405
holder rest on the vehicle floor. The bottle
holder could otherwise be damaged. X
Press the outer edge of button :and slide
in the direction of the arrow until the bottle
fits into the opening.
X Insert the bottle into the bottle holder.
The bottle holder is suitable for bottles with a
capacity from 0.7 l to 1.5 l.
The bottle holder does not secure bottles; it
merely prevents them from tipping over. Sun visors
Overview G
WARNING
Keep the vanity mirrors in the sun visors cov-
ered while driving. You could otherwise be
dazzled, which may impair your view of traffic
conditions and as a result could cause an
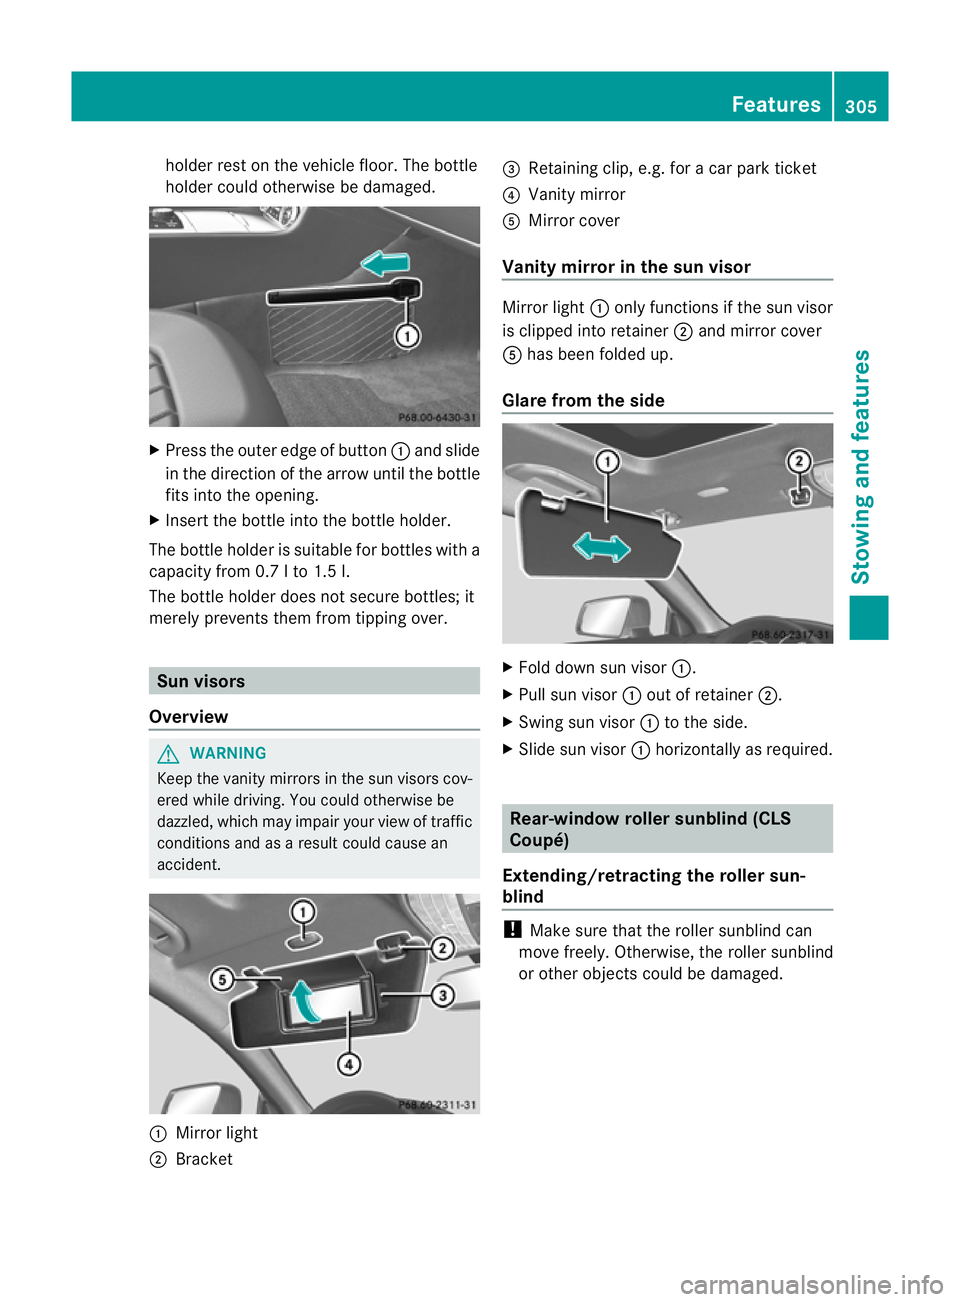
accident. :
Mirror light
; Bracket =
Retaining clip, e.g. for a car park ticket
? Vanity mirror
A Mirror cover
Vanity mirror in the sun visor Mirror light
:only functions if the sun visor
is clipped into retainer ;and mirror cover
A has been folded up.
Glare from the side X
Fold down sun visor :.
X Pull sun visor :out of retainer ;.
X Swing sun visor :to the side.
X Slide sun visor :horizontally as required. Rear-window roller sunblind (CLS
Coupé)
Extending/retracting the roller sun-
blind !
Make sure that the roller sunblind can
move freely. Otherwise, the roller sunblind
or other objects could be damaged. Features
305Stowing and features Z
Page 320 of 405
Asia
Country Radio type approval num-
ber
Frequency range (MHz)
AE (United
Arab Emi-
rates) 1623/5/10-2/26/76
MHz: 433
JO (Jordan) TRC/LPD/2005/23
MHz: 27, 30, 40
,433, 868 KW (Kuwait) 5 October 2005
MHz: 27, 30, 40, 418, 433,
868
LB (Leba-
non) 2920/O&M/2006 / 3 July
05
MHz: 27, 40, 433, 868
SA (Saudi
Arabia) 11_02_05/5024-5-6
MHz: 418, 433
SY (Syria) 279/4/14 / 05 March 06
TR (Turkey) National Certification 23
July 07
MHz: 433
Australia
Country Radio type approval num-
ber
Frequency range (MHz)
AU (Aus-
tralia) 28 June
MHz: 27, 30, 40, 433, 868
NZ (New
Zealand) 20 March 06
MHz: 27, 30, 40, 433
Floormat on the driver's side
G
WARNING
Make sure that there is sufficient clearance
around the pedals whe nfloormats are used,
and that the floormats are properly secured. The floormats must be correctly secured at all
times using the securing knob and retainers.
Before you drive off, chec
kthe floormats and
secure them if necessary. Afloormat which is
not properly secured can slip and thereby
interfere with the movemen tofthe pedals.
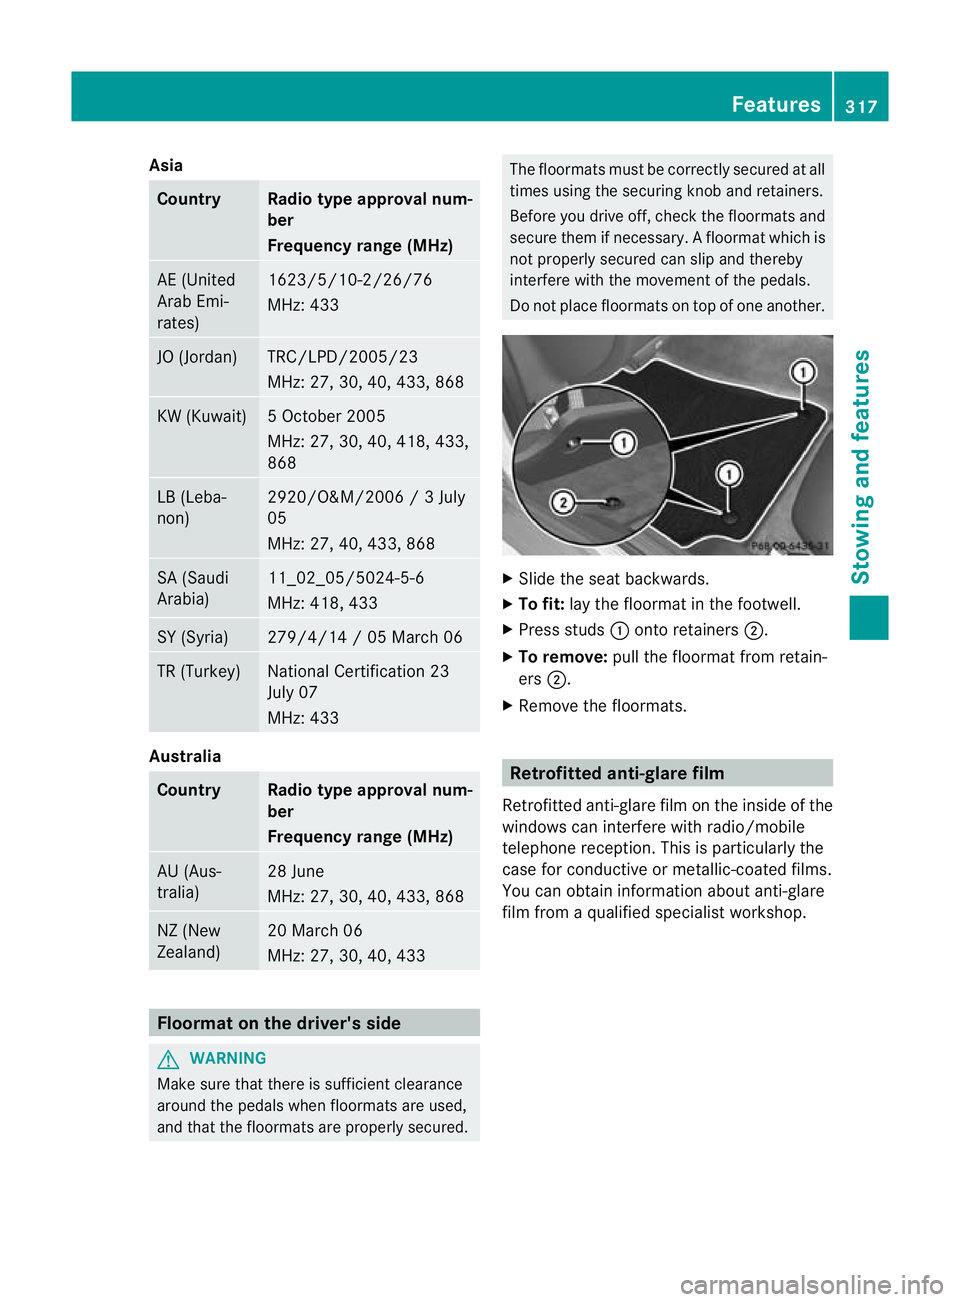
Do not place floormats on top of one another. X
Slide the seat backwards.
X To fit: lay the floormat in the footwell.
X Press studs :onto retainers ;.
X To remove: pull the floormat from retain-
ers ;.
X Remove the floormats. Retrofitted anti-glare film
Retrofitted anti-glare film on the inside of the
windows can interfere with radio/mobile
telephone reception. This is particularly the
case for conductive or metallic-coated films.
You can obtain information about anti-glare
film from a qualified specialist workshop. Features
317Stowing and features Z