2012 MERCEDES-BENZ CLS SHOOTING BRAKE ESP
[x] Cancel search: ESPPage 126 of 405
The interior lighting automatically switches
on if you:
R unlock the vehicle
R open a door
R remove the key from the ignition lock
The interior lighting is activated for a short
time when the key is removed from the igni-
tion lock. You can activate this delayed
switch-off using the on-board computer
(Y page 242).
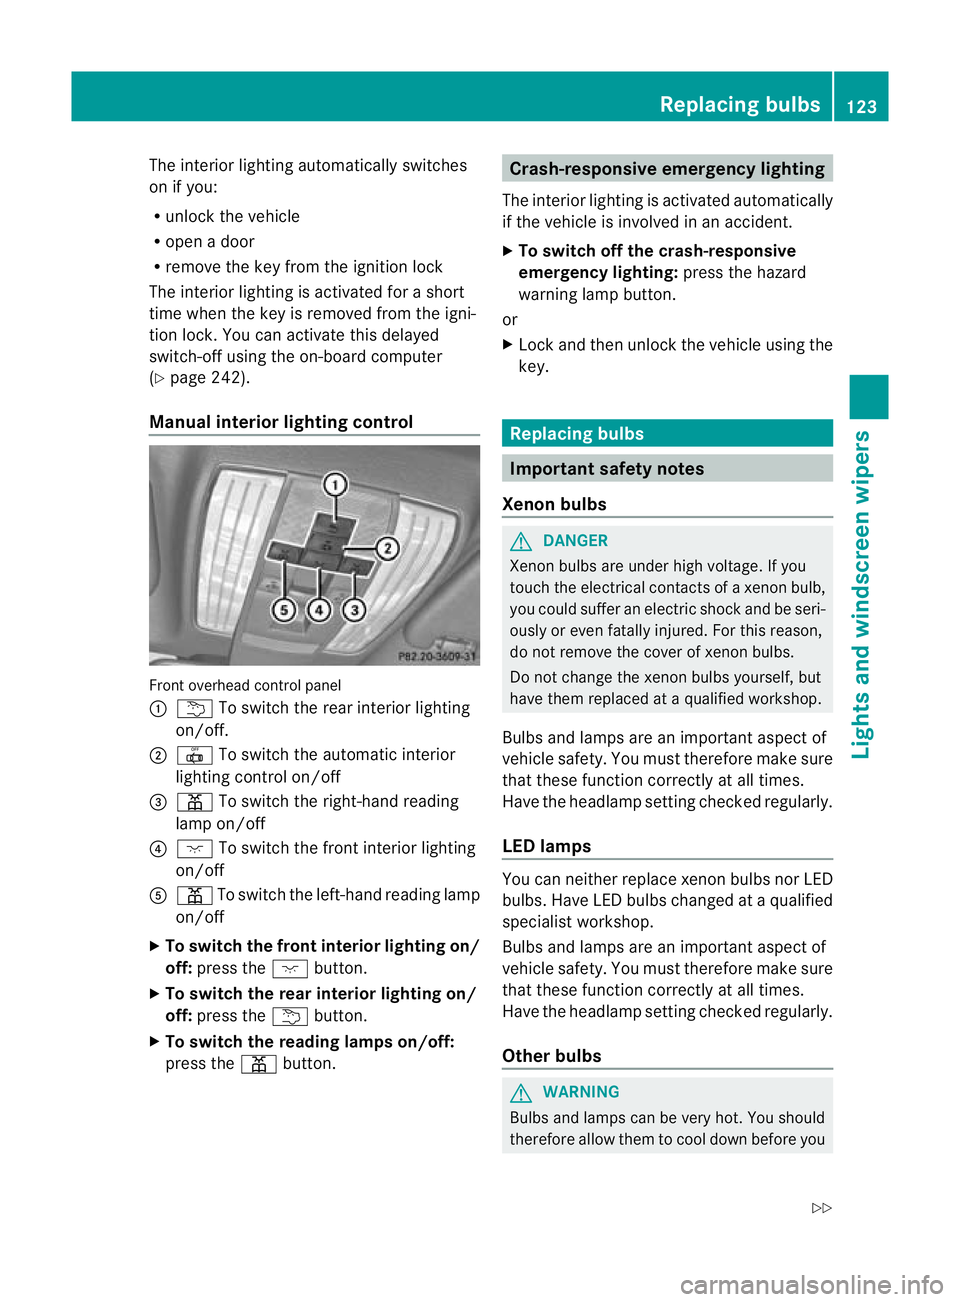
Manual interior lighting control Front overhead control panel
:
u To switch the rear interior lighting
on/off.
; | To switch the automatic interior
lighting control on/off
= p To switch the right-hand reading
lamp on/off
? c To switch the front interior lighting
on/off
A p To switch the left-hand reading lamp
on/off
X To switch the front interior lighting on/
off: press the cbutton.
X To switch the rear interior lighting on/
off: press the ubutton.
X To switch the reading lamps on/off:
press the pbutton. Crash-responsive emergency lighting
The interior lighting is activated automatically
if the vehicle is involved in an accident.
X To switch off the crash-responsive
emergency lighting: press the hazard
warning lamp button.
or
X Lock and then unlock the vehicle using the
key. Replacing bulbs
Important safety notes
Xenon bulbs G
DANGER
Xenon bulbs are under high voltage. If you
touch the electrical contacts of a xenon bulb,
you could suffer an electric shock and be seri-
ously or even fatally injured. For this reason,
do not remove the cover of xenon bulbs.
Do not change the xenon bulbs yourself, but
have them replaced at a qualified workshop.
Bulbs and lamps are an importan taspect of
vehicle safety. You must therefore make sure
that these function correctly at all times.
Have the headlamp setting checked regularly.
LED lamps You can neither replace xenon bulbs nor LED
bulbs. Have LED bulbs changed at a qualified
specialist workshop.
Bulbs and lamps are an important aspect of
vehicle safety. You must therefore make sure
that these function correctly at all times.
Have the headlamp setting checked regularly.
Other bulbs
G
WARNING
Bulbs and lamps can be very hot. You should
therefore allow them to cool down before you Replacing bulbs
123Lights and windscreen wipers
Z
Page 129 of 405
Switching the rear window wiper on/
off
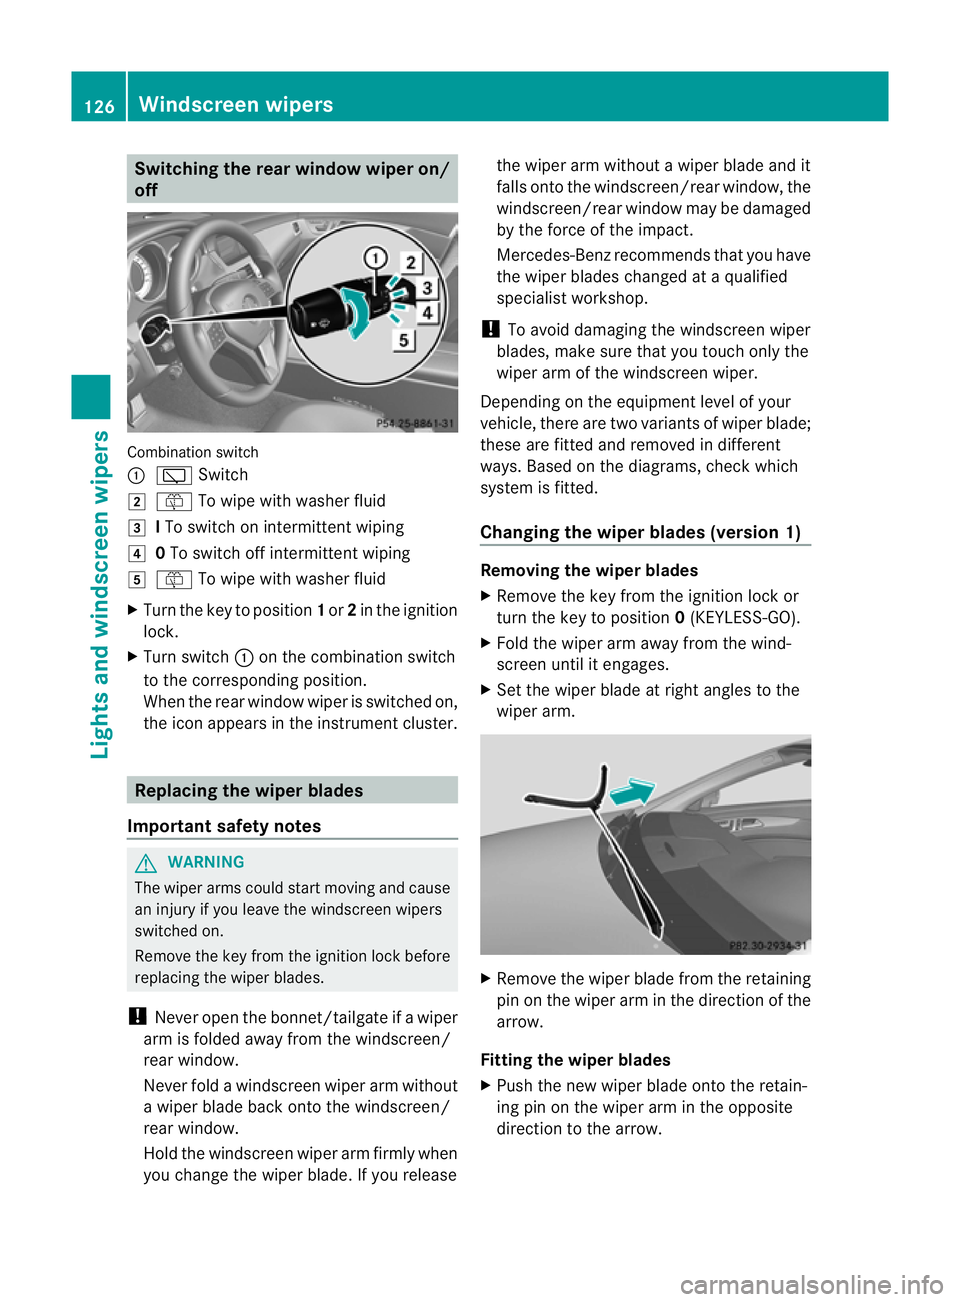
Combination switch
:
è Switch
2 ô To wipe with washer fluid
3 ITo switch on intermittent wiping
4 0To switch off intermittent wiping
5 ô To wipe with washer fluid
X Turn the key to position 1or 2in the ignition
lock.
X Turn switch :on the combination switch
to the corresponding position.
When the rear window wiper is switched on,
the icon appears in the instrumen tcluster. Replacing the wiper blades
Important safety notes G
WARNING
The wiper arms could star tmoving and cause
an injury if you leave the windscreen wipers
switched on.
Remove the key from the ignition lock before
replacing the wiper blades.
! Never open the bonnet/tailgate if a wiper
arm is folded away from the windscreen/
rear window.
Never fold a windscreen wiper arm without
a wiper blade back onto the windscreen/
rear window.
Hold the windscreen wiper arm firmly when
you change the wiper blade. If you release the wiper arm without a wiper blade and it
falls onto the windscreen/rear window, the
windscreen/rear window may be damaged
by the force of the impact.
Mercedes-Benz recommends that you have
the wiper blades changed at
aqualified
specialist workshop.
! To avoid damaging the windscree nwiper
blades, make sure that you touch only the
wiper arm of the windscreen wiper.
Depending on the equipmen tlevel of your
vehicle, there are two variants of wiper blade;
these are fitted and removed in different
ways. Based on the diagrams, chec kwhich
system is fitted.
Changing the wiper blades (version 1) Removing the wiper blades
X
Remove the key from the ignition lock or
turn the key to position 0(KEYLESS-GO).
X Fold the wiper arm away from the wind-
screen until it engages.
X Set the wiper blade at right angles to the
wiper arm. X
Remove the wiper blade from the retaining
pin on the wiper arm in the direction of the
arrow.
Fitting the wiper blades
X Push the new wiper blade onto the retain-
ing pin on the wiper arm in the opposite
direction to the arrow. 126
Windscreen wipersLights and windscreen wipers
Page 144 of 405
Setting the departure time
X
Press the ,or. button repeatedly
until the time to be changed appears in the
display.
X Press the uand^ buttons simulta-
neously.
The Îsymbol in the remote control dis-
play flashes.
X Press the ,or. button to set the
desired departure time.
i The longer you press the ,or.
button, the faster the time changes.
X Press the uand^ buttons simulta-
neously.
The new departure time is stored.
Activating the set departure time
X Press the ,or. button repeatedly
until the desired departure time appears in
the display.
X Press the ubutton.
The Ísymbol and the departure time
appearint he display.
Deactivating a set departure time
X Press the ,or. button.
The status of the auxiliary heating is shown
in the display.
X Press the .button.
The first departure time stored appears in
the display.
X Press the ^button.
The display message OFF appears in the
display.
Replacing the remote control battery G
WARNING
Batteries contain poisonous substances.
Swallowing/ingesting batteries can result in
serious personal injury or death.
Always keep batteries away from children. If
a battery is swallowed, seek immediate med-
ical attention. H
Environmental note Batteries contain pollutants.
It is illegal to dispose of them
with the household rubbish.
They must be collected sep-
arately and disposed of in an
environmentally responsible
recycling system.
Dispose of batteries in an
environmentally responsible
manner. Take discharged
batteries to a qualified spe-
cialist workshop or to a col-
lection point for used batter-
ies.
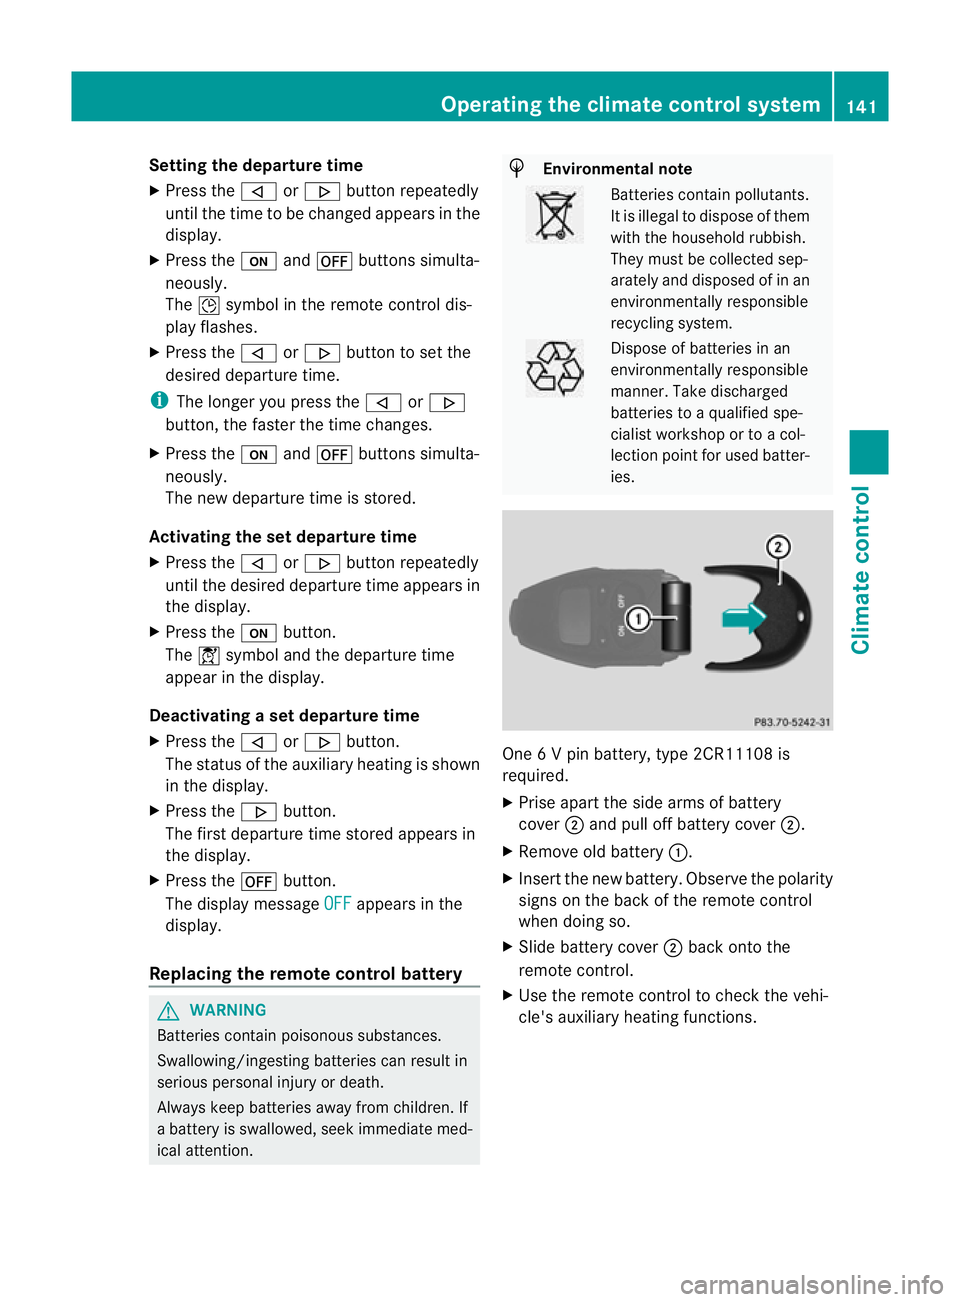
One 6 V pin battery, type 2CR11108 is
required.
X
Prise apart the side arms of battery
cover ;and pull off battery cover ;.
X Remove old battery :.
X Insert the new battery. Observe the polarity
signs on the back of the remote control
when doing so.
X Slide battery cover ;back onto the
remote control.
X Use the remote control to check the vehi-
cle's auxiliary heating functions. Operating the climate control system
141Climate control Z
Page 150 of 405
There is a risk of an accident.
Wear suitable footwear to ensure correct
usage of the pedals.
G
WARNING
If you switch off the ignition while driving,
safety-relevan tfunctions are only available
with limitations, or no tatall. This could affect,
for example, the power steering and the brake
boosting effect .You will require considerably
more effort to steer and brake. There is a risk
of an accident.
Do not switch off the ignition while driving. G
WARNING
If the parking brake has not been fully
released when driving, the parking brake can:
R overheat and cause a fire
R lose its hold function.
There is a risk of fire and an accident .Release
the parking brake fully before driving off.
! Warm up the engine quickly. Do not use
the engine's full performance until it has
reached operating temperature.
Only set the automatic transmission to the
respective drive positions when the vehicle
is stationary.
Where possible, avoid spinning the drive
wheels when pulling away on slippery
roads. Otherwise, you could damage the
drive train.
! AMG vehicles: at low engine oil temper-
atures (below +20 †), the maximum
engine speed is restricted in order to pro-
tect the engine. To protect the engine and
maintain smooth engine operation, avoid
driving at full throttle when the engine is
cold. Key positions
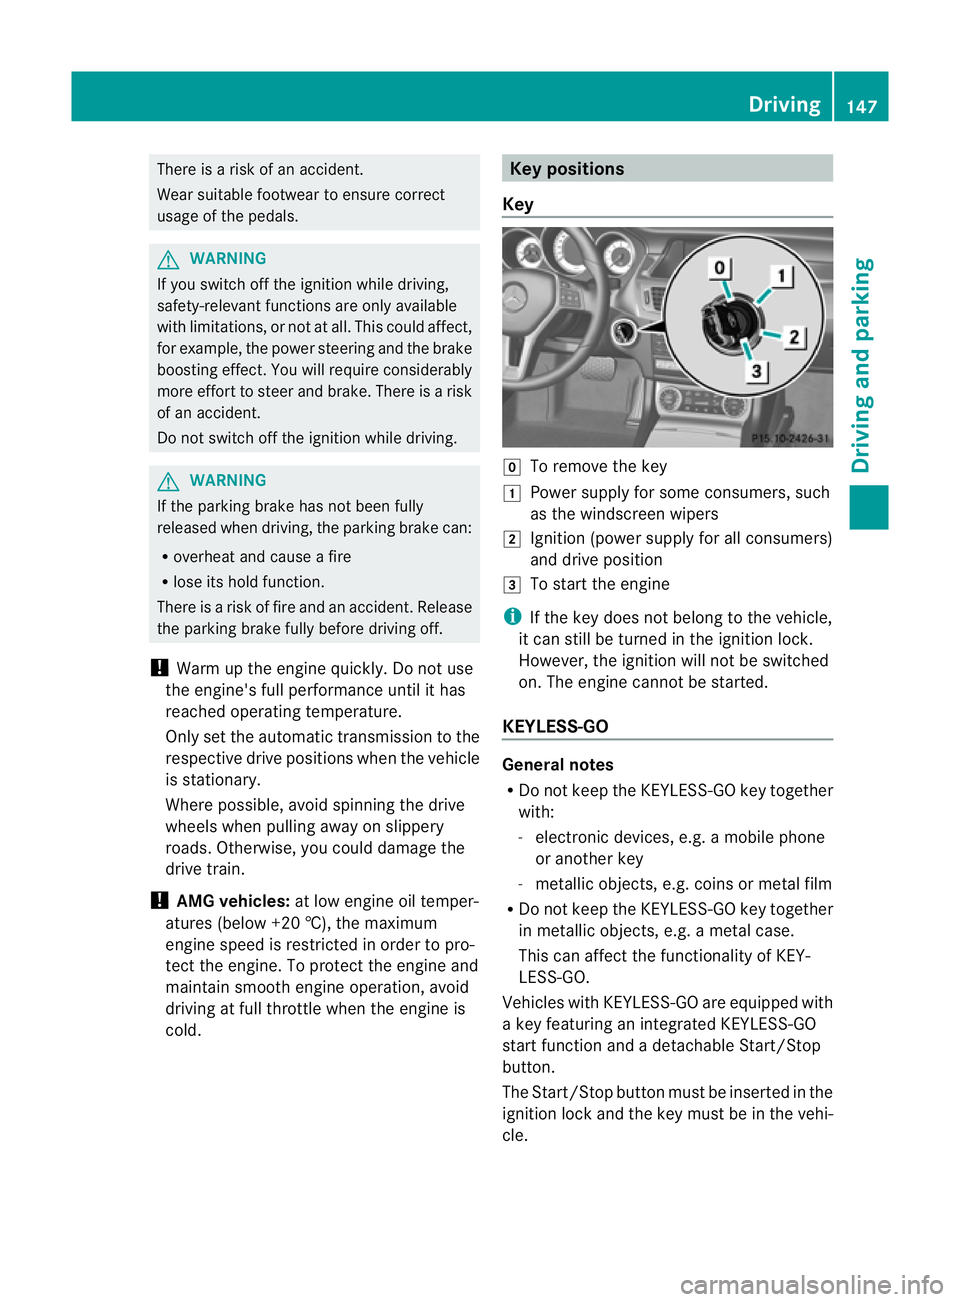
Key g
To remove the key
1 Power supply for some consumers, such
as the windscreen wipers
2 Ignition (power supply for all consumers)
and drive position
3 To start the engine
i If the key does not belong to the vehicle,
it can still be turned in the ignition lock.
However, the ignition will not be switched
on. The engine cannot be started.
KEYLESS-GO General notes
R
Do not keep the KEYLESS-GO key together
with:
- electronic devices, e.g. a mobile phone
or another key
- metallic objects, e.g. coins or metal film
R Do not keep the KEYLESS-GO key together
in metallic objects, e.g. a metal case.
This can affect the functionality of KEY-
LESS-GO.
Vehicles with KEYLESS-GO are equipped with
a key featuring an integrated KEYLESS-GO
start function and a detachable Start/Stop
button.
The Start/Stop button must be inserted in the
ignition lock and the key must be in the vehi-
cle. Driving
147Driving and parking Z
Page 151 of 405
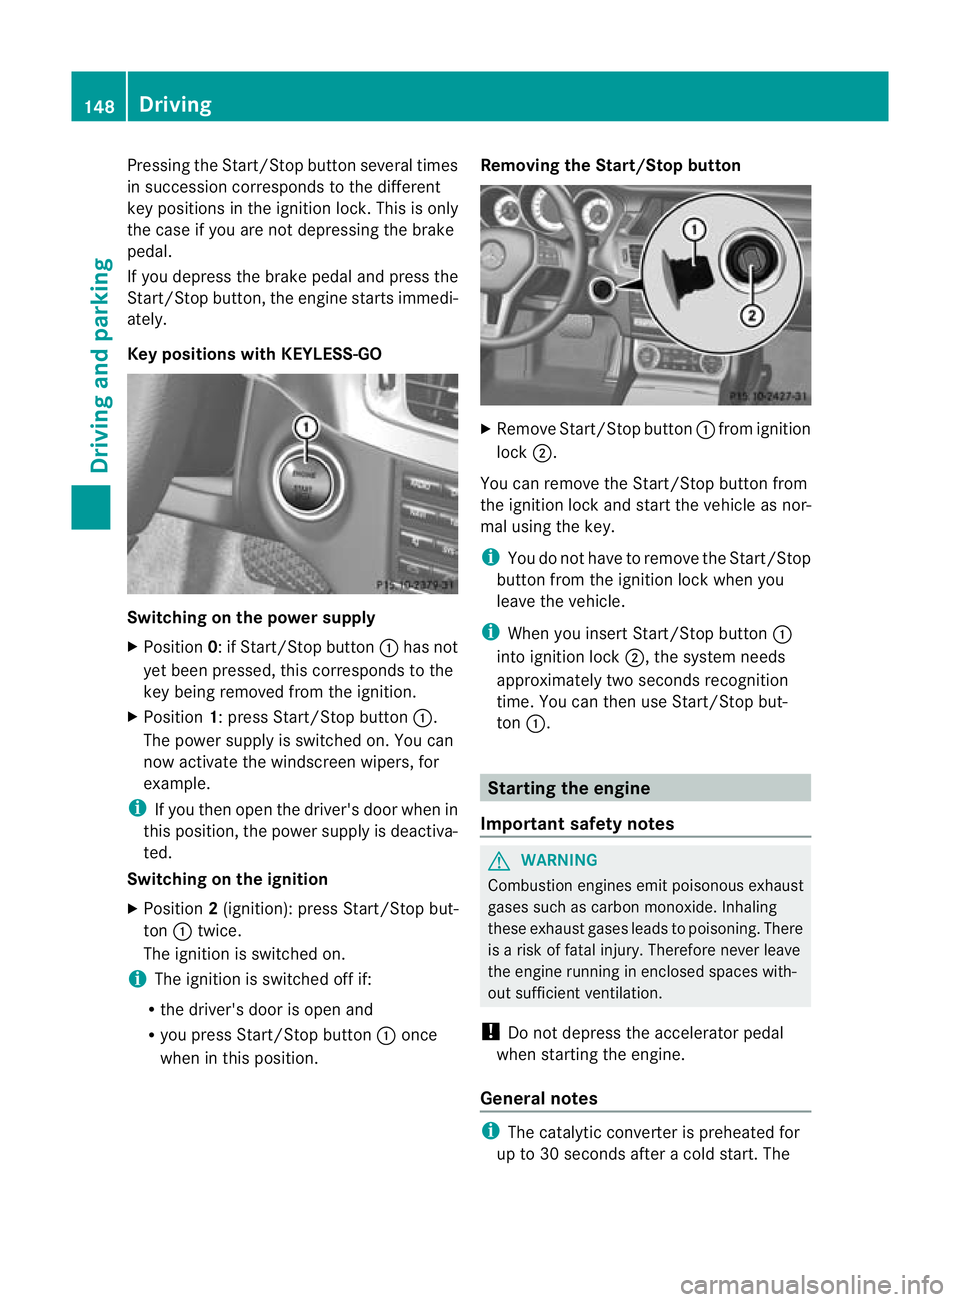
Pressing the Start/Stop button several times
in succession corresponds to the different
key positions in the ignition lock. This is only
the case if you are not depressing the brake
pedal.
If you depress the brake pedal and press the
Start/Stop button, the engine starts immedi-
ately.
Key positions with KEYLESS-GO
Switching on the power supply
X
Position 0: if Start/Stop button :has not
yet been pressed, this corresponds to the
key being removed from the ignition.
X Position 1: press Start/Stop button :.
The power supply is switched on. You can
now activate the windscreen wipers, for
example.
i If you then open the driver's door when in
this position, the power supply is deactiva-
ted.
Switching on the ignition
X Position 2(ignition): press Start/Stop but-
ton :twice.
The ignition is switched on.
i The ignition is switched off if:
R the driver's door is open and
R you press Start/Stop button :once
when in this position. Removing the Start/Stop button
X
Remove Start/Stop button :from ignition
lock ;.
You can remove the Start/Stop button from
the ignition lock and start the vehicle as nor-
mal using the key.
i You do not have to remove the Start/Stop
button from the ignition lock when you
leave the vehicle.
i When you insert Start/Stop button :
into ignition lock ;, the system needs
approximately two seconds recognition
time. You can then use Start/Stop but-
ton :. Starting the engine
Important safety notes G
WARNING
Combustion engines emit poisonous exhaust
gases such as carbon monoxide. Inhaling
these exhaust gases leads to poisoning. There
is a risk of fatal injury. Therefore never leave
the engine running in enclosed spaces with-
out sufficient ventilation.
! Do not depress the accelerator pedal
when starting the engine.
General notes i
The catalytic converter is preheated for
up to 30 seconds after a cold start. The 148
DrivingDriving and parking
Page 153 of 405
i
Upshifts take place at higher engine
speeds after a cold start. This helps the
catalytic converter to reach its operating
temperature more quickly.
Hill start assist G
WARNING
After a short time, hill start assist will no lon-
ger brake your vehicle and it could roll away.
There is a risk of an accident and injury.
Therefore, quickly move your foot from the
brake pedal to the accelerator pedal.N ever
leave the vehicle when it is held by hill start
assist.
Hill start assist helps you when pulling away
forwards or in reverse on an uphill gradient.
It holds the vehicle for a short time after you
have removed your foot from the brake pedal.
This gives you enough time to move your foot
from the brake pedal to the accelerator pedal
and depress it before the vehicle begins to
roll.
X Take your foot off the brake pedal.
The vehicle is then held for about a second.
X Pull away.
Hill start assist will not function if:
R you are pulling away on a level road or a
downhill gradient.
R the transmission is in position N.
R the parking brake is applied.
R ESP ®
is malfunctioning. ECO start/stop function
Important safety notes G
WARNING
If the engine is switched off automatically and
you exit the vehicle, the engine is restarted
automatically. The vehicle may begin moving.
There is a risk of accident and injury. If you wish to exit the vehicle, always turn off
the ignition and secure the vehicle against
rolling away.
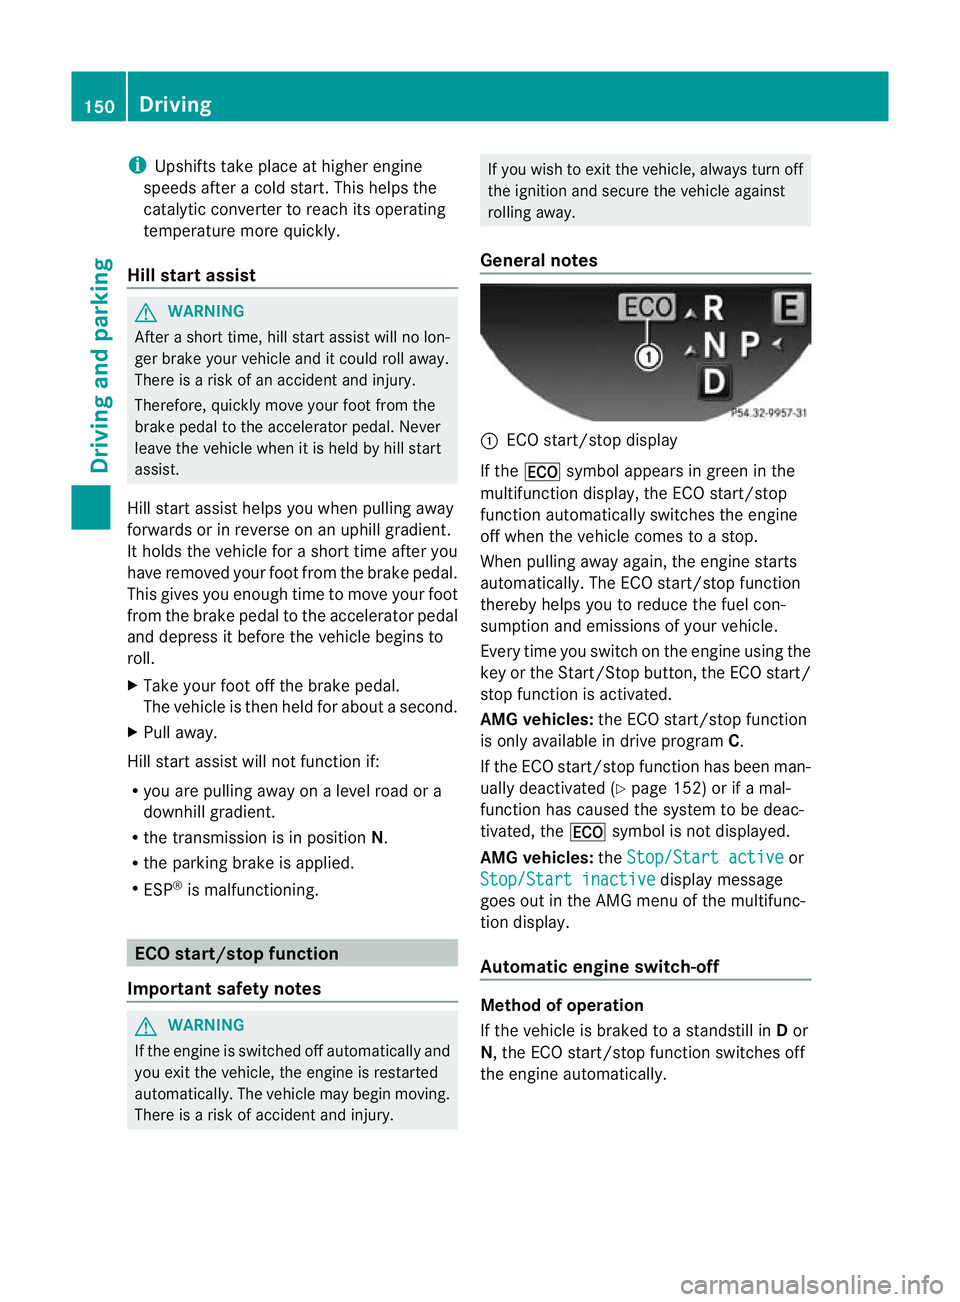
General notes :
ECO start/stop display
If the ¤ symbol appears in green in the
multifunction display, the ECO start/stop
function automatically switches the engine
off when the vehicle comes to a stop.
When pulling away again, the engine starts
automatically. The ECO start/stop function
thereby helps you to reduce the fuel con-
sumption and emissions of your vehicle.
Every time you switch on the engine using the
key or the Start/Stop button, the ECO start/
stop function is activated.
AMG vehicles: the ECO start/stop function
is only available in drive program C.
If the ECO start/stop function has been man-
ually deactivated (Y page 152) or if a mal-
function has caused the system to be deac-
tivated, the ¤symbol is not displayed.
AMG vehicles: theStop/Start active or
Stop/Start inactive display message
goes out in the AMG menu of the multifunc-
tion display.
Automatic engine switch-off Method of operation
If the vehicle is braked to a standstill in
Dor
N, the ECO start/stop function switches off
the engine automatically. 150
DrivingDriving and parking
Page 156 of 405
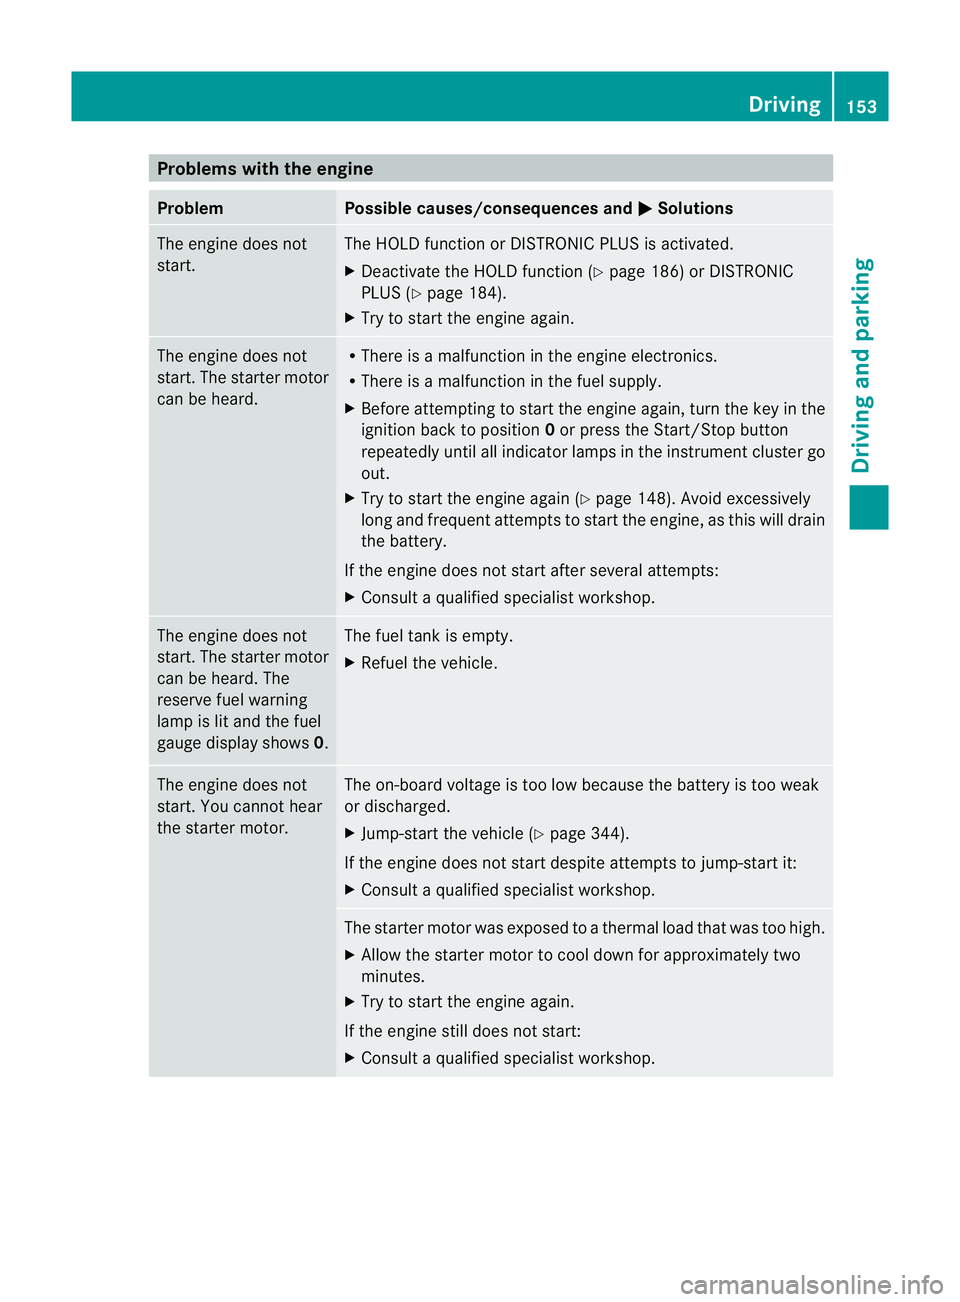
Problems with the engine
Problem Possible causes/consequences and
M Solutions
The engine does not
start. The HOLD function or DISTRONIC PLUS is activated.
X
Deactivate the HOLD function (Y page 186) or DISTRONIC
PLUS (Y page 184).
X Try to start the engine again. The engine does not
start. The starter motor
can be heard. R
There is a malfunction in the engine electronics.
R There is a malfunction in the fuel supply.
X Before attempting to start the engine again, turn the key in the
ignition back to position 0or press the Start/Stop button
repeatedly until all indicator lamps in the instrumen tcluster go
out.
X Try to start the engine again (Y page 148). Avoid excessively
long and frequent attempts to start the engine, as this will drain
the battery.
If the engine does not start after several attempts:
X Consult a qualified specialist workshop. The engine does not
start
.The starter motor
can be heard. The
reserve fuel warning
lamp is lit and the fuel
gauge display shows 0. The fuel tank is empty.
X
Refuel the vehicle. The engine does not
start. You cannot hear
the starter motor. The on-board voltage is too low because the battery is too weak
or discharged.
X
Jump-start the vehicle (Y page 344).
If the engine does not start despite attempts to jump-start it:
X Consult a qualified specialist workshop. The starter motor was exposed to a thermal load that was too high.
X Allow the starter motor to cool down for approximately two
minutes.
X Try to start the engine again.
If the engine still does not start:
X Consult a qualified specialist workshop. Driving
153Driving and parking Z
Page 159 of 405
i
The automatic transmission shifts into
park position Pautomatically:
R if you open the driver's door while the
vehicle is stationary in transmission posi-
tion Dor R
R if you open the door while travelling at
very low speeds in transmission position
D or R
i Depressing the brake and pushing the
DIRECT SELECT lever up or down disen-
gages the parking lock. The transmission is
in Nneutral.
In order to shift from park position P
directly into Ror D:
R depress the brake pedal and
R push the DIRECT SELECT lever up or
down past the first point of resistance
Engaging reverse gear R !
Only shift the automatic transmission to
R when the vehicle is stationary.
X Push the DIRECT SELECT lever up past the
first point of resistance.
Shifting to neutral (N) X
Push the DIRECT SELECT lever up or down
to the first point of resistance.
Engaging drive position D X
Push the DIRECT SELECT lever down past
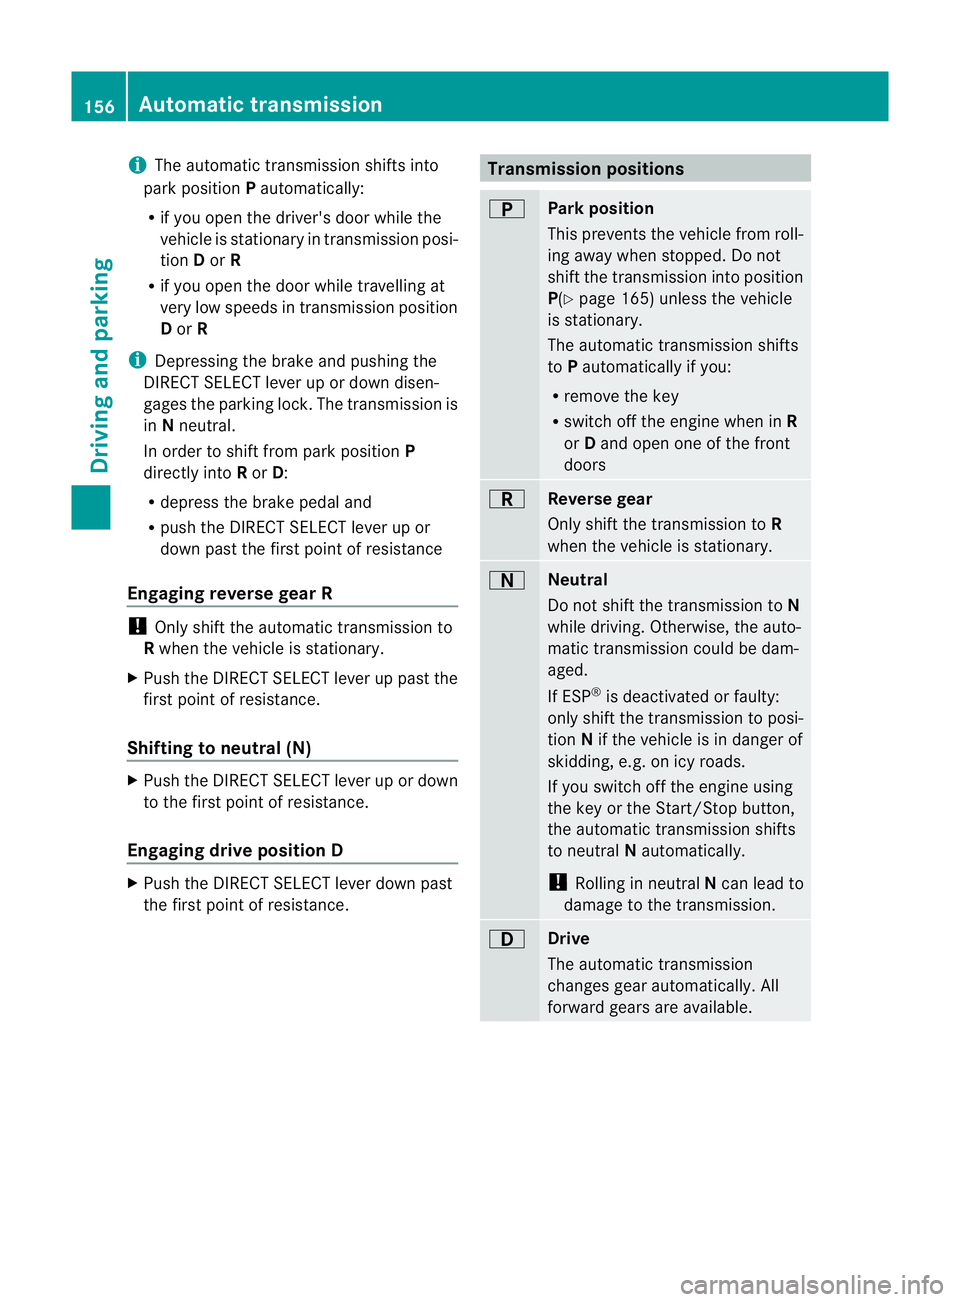
the first point of resistance. Transmission positions
B
Park position
This prevents the vehicle from roll-
ing away when stopped. Do not
shift the transmission into position
P(Y
page 165) unless the vehicle
is stationary.
The automatic transmission shifts
to Pautomatically if you:
R remove the key
R switch off the engine when in R
or Dand open one of the front
doors C
Reverse gear
Only shift the transmission to
R
when the vehicle is stationary. A
Neutral
Do not shift the transmission to
N
while driving. Otherwise, the auto-
matic transmission could be dam-
aged.
If ESP ®
is deactivated or faulty:
only shift the transmission to posi-
tion Nif the vehicle is in danger of
skidding, e.g. on icy roads.
If you switch off the engine using
the key or the Start/Stop button,
the automatic transmission shifts
to neutral Nautomatically.
! Rolling in neutral Ncan lead to
damage to the transmission. 7
Drive
The automatic transmission
changes gear automatically. All
forward gears are available.156
Automatic transmissionDriving and parking